
Various Authors
Ecodefense: A Field Guide to Monkeywrenching
Introduction to the Third Edition
Chapter 1: Strategic Monkeywrenching
Chapter 2: The Future of Monkeywrenching
Advanced Tree Spiking Techniques
Federal Anti-Spiking Legislation
Tree Pinning: The Art of Silent Spiking
An Advanced Tree Pinning Technique
Foiling the Detectors: Non-Metallic Tree Spikes
Hard Rock vs. Heavy Metal: Quartz Tree Pins
Plastic and Wood Pulp: The Monkeywrencher’s Dream?
Non-Destructive Stopping of Logging
Monkeywrenching Seismic Operations
Plugging Waste Discharge Pipes
Ranching Equipment and Machinery
Cautionary Notes About Monkeywrenching Grazing
Expedient Method of Cutting Stakes
Chapter 5: Vehicles and Heavy Equipment
Disabling Motor Vehicles of All Kinds
Preparing A Machine For Burning
Vehicle Modifications for the Serious Monkeywrencher
Where to Find Traps and Trap Lines
The Ecodefense Deluxe Noose Pole
Animal Enterprise Protection Act
Chapter 7: Miscellaneous Deviltry
Disadvantages of Mountain Bikes
Correcting Forest Service Signs
Field Notes — General Camouflage
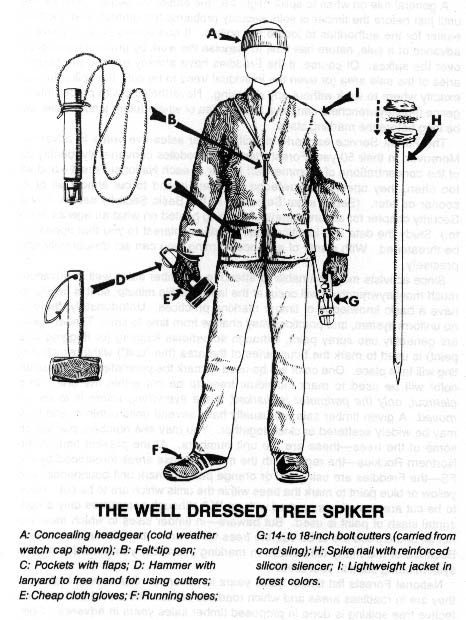
A Fanny Pack For Monkeywrenchers
Radios and Communications Equipment
Protection From Night Vision Surveillance
FBI Updates Eavesdropping Methods
Advanced Investigation Methods
Advanced Fingerprinting Techniques
State-Of-The-Art Video Surveillance
Defense Against Undercover Activities
Background Check on Suspected Infiltrators
BLM Procedure for Ecotage Letters
Epilogue: Marine Monkeywrenching
International Engine Room Colorcode
This book is dedicated to:
Edward Abbey 1927–1989
John Zaelit (Mr. Goodwrench) 1954–1986
Bill Turk (The Mad Engineer) 1953–1992
Wilderness needs no defense, only more defenders
Introduction to the Third Edition
Ecodefense is a historical artifact. It be argued that it is the most controversial environmental book ever published; more importantly, though, it is a key exhibit in the legal history of freedom of the press in the United States. The First Amendment to the United States Constitution was ratified in 1791. It reads in part, “Congress shall make no law ... abridging the freedom of speech, or of the press.” That enshrined freedom of the press and speech sets the United States of America apart from all other nations. No other country so jealously defends the right of its citizens to speak and publish controversial ideas.
Several years ago when Australia banned the importation and sale of Ecodefense, it was not possible for the United States to follow suit — because of the First Amendment. Instead, the United States government spent several million dollars, employed a small army of FBI agents, and entrapped a number of citizens in 1987–89 in an effort to suppress publication and distribution of Ecodefense. That attack on free speech and the freedom of the press glares like a pustulating boil in American history just as do the Alien and Sedition Acts, the Palmer Raids, and McCarthyism.
We at Abbzug Press believe that the Bill of Rights is like a set of muscles — if they aren’t exercised, they atrophy. Therefore, it is our patriotic duty to defend the First Amendment to the United States Constitution and publish a new Third Edition of Ecodefense: A Field Guide to Monkeywrenching.
Efforts to suppress Ecodefense and to entrap its co-editor, Dave Foreman, have been well covered elsewhere and we will not go into them here. Nor will we here attempt to justify the practice or necessity of monkeywrenching. Edward Abbey’s Forward! and the first two chapters of this edition do that. Monkeywrenching is also justified in Ed Abbey’s novels The Monkey Wrench Gang and Hayduke Lives!, Howie Wolke’s Wilderness on the Rocks, Christopher Manes’s Green Rage, and, in greater detail, Dave Foreman’s Confessions of an Eco-Warrior.
We will here, however, rebut two myths about Ecodefense. First, it is widely believed that Ecodefense (or Abbey’s Monkey Wrench Gang) launched the practice of monkeywrenching. In fact, ecological sabotage was widespread before Ecodefense was first published in 1985 and even before The Monkey Wrench Gang was published in 1975.
The second myth is that Dave Foreman wrote Ecodefense. The first edition of Ecodefense was a compilation of articles and letters sent to the Earth First! Journal by dozens of individuals. This Third Edition has over two dozen major contributors and at least one hundred other contributors. In this edition, we have given aliases to credit all articles and significant field notes where the author did not offer her own alias. In the previous editions, Dave Foreman and Bill Haywood compiled, edited, and arranged the contributions. We have retained their names as editors for the Third Edition since it is largely based on the previous editions.
There are changes in the Third Edition, however. Some material deemed to be irrelevant or counterproductive has been dropped. Incorrect information has also been dropped. Much new information has been incorporated. Most of it was contributed between 1987 and 1989. A professional editor was retained to rewrite, copy edit, arrange, and otherwise clean up all of the text. Some previous material has been rearranged.
Edward Abbey and two other contributors, John Zaelit and Bill Turk, have died since the First Edition of Ecodefense. This Third Edition is dedicated to their memories and to the fierce green fire that burned in their eyes. They were heroes, defenders of their native land.
We thank the other defenders of the land who contributed to Ecodefense, though they must remain anonymous. It is their book.
When we began work on the Third Edition we asked Dave Foreman for any thoughts he might offer to today’s reader of Ecodefense. He responded:
Is your act a strategic one, or is it merely an inarticulate yell, conveying only rage, alienation, and despair? Monkeywrenchers must constantly ask themselves:
-
Who is my audience?
-
What is my message?
-
Will this deter destruction?
-
Are there legal means not yet used?
Of course this Third Edition of Ecodefense, like those before it, is meant only to entertain. No one should take it seriously.
— Matthew Lyon for Abbzug Press
Forward!
by Edward Abbey
If a stranger batters your door down with an axe, threatens your family and yourself with deadly weapons, and proceeds to loot your home of whatever he wants, he is committing what is universally recognized — by law and morality — as a crime. In such a situation the householder has both the right and the obligation to defend himself, his family, and his property by whatever means are necessary. This right and this obligation is universally recognized, justified and even praised by all civilized human communities. Self-defense against attack is one of the basic laws not only of human society but of life itself, not only of human life but of all life.
The American wilderness, what little remains, is now undergoing exactly such an assault. Dave Foreman has summarized the character and scale of the assault in the first chapter of this excellent and essential book. With bulldozer, earth mover, chainsaw and dynamite the international timber, mining and beef industries are invading our public lands — property of all Americans — bashing their way into our forests, mountains and rangelands and looting them for everything they can get away with. This for the sake of short-term profits in the corporate sector and multi-million dollar annual salaries for the three-piece-suited gangsters (M.B.A., Harvard, Yale, University of Tokyo, et alia) who control and manage these bandit enterprises. Cheered on, naturally, by Time, Newsweek and the Wall Street Journal, actively encouraged by those jellyfish Government agencies which are supposed to protect the public lands, and as always aided and abetted in every way possible by the quisling politicians of our Western states (such as Babbitt, DeConcini, Goldwater, Hatch, Garn, Symms, Hansen, Wallop, Domenici — to name but a few) who would sell the graves of their own mothers if there’s a quick buck in the deal, over or under the table, what do they care.
Representative democracy in the United States has broken down. Our legislators do not represent those who elected them but rather the minority who finance their political campaigns and who control the organs of communication — the Tee Vee, the newspapers, the billboards, the radio — that have made politics a game for the rich only. Representative government in the USA represents money not people and therefore has forfeited our allegiance and moral support. We owe it nothing but the taxation it extorts from us under threats of seizure of property, or prison, or in some cases already, when resisted, a sudden and violent death by gunfire.
Such is the nature and structure of the industrial megamachine (in Lewis Mumford’s term) which is now attacking the American wilderness. That wilderness is our ancestral home, the primordial homeland of all living creatures including the human, and the present final dwelling place of such noble beings as the grizzly bear, the mountain lion, the eagle and the condor, the moose and the elk and the pronghorn antelope, the redwood tree, the yellowpine, the bristlecone pine, even the aspen, and yes, why not say it?, the streams, waterfalls, rivers, the very bedrock itself of our hills, canyons, deserts, mountains.
For many of us, perhaps for most of us, the wilderness is as much our home, or a lot more so, than the wretched little stucco boxes, plywood apartments, and wallboard condominiums in which we are mostly confined by the insatiable demands of an overcrowded and ever-expanding industrial culture. And if the wilderness is our true home, and if it is threatened with invasion, pillage and destruction — as it certainly is — then we have the right to defend that home, as we would our private rooms, by whatever means are necessary. (An Englishman’s home is his castle; an American’s home is his favorite fishing stream, his favorite mountain range, his favorite desert canyon, his favorite swamp or patch of woods or God-created lake.)
The majority of the American people have demonstrated on every possible occasion that they support the ideal of wilderness preservation; even our politicians are forced by popular opinion to pretend to support the idea; as they have learned, a vote against wilderness is a vote against their own re-election. We are justified in defending our homes — our private home and public home — not only by common law and common morality but also by common belief. We are the majority; they — the greedy and powerful — are the minority.
How best defend our wilderness home? Well, that is a matter of strategy, tactics and technique, which is what this little book is about. Dave Foreman explains the principles of ecological defense in the complete, compact and conclusive pages of his short introduction. I can think of nothing I could add nor of anything I would subtract; he says exactly what needs to be said, no more and no less.
I am happy to endorse the publication of Ecodefense. Never was such a book so needed, by so many, for such good reason, as here and now. Tomorrow might well be too late. This is a book that will fit handily in any saddlebag, in any creel, in any backpack, in any river runner’s ammo can — and in any picnicker’s picnic basket. No good American should ever go into the woods again without this book and, for example, a hammer and a few pounds of 60-penny nails. Spike a few trees now and then whenever you enter an area condemned to chainsaw massacre by Louisiana Pacific and its affiliated subsidiary the U.S. Forest Service. You won’t hurt the trees; they’ll be grateful for the protection; and you may save the forest. My Aunt Emma back in West Virginia has been enjoying this pleasant exercise for years. She swears by it. It’s good for the trees, it’s good for the woods, it’s good for the earth, and it’s good for the human soul. Spread the word-and carry on!
Edward Abbey
July 1984
Oracle, Arizona
Chapter 1: Strategic Monkeywrenching
By Dave Foreman
In early summer of 1977, the United States Forest Service began an 18 month-long inventory and evaluation of the remaining roadless and undeveloped areas on the National Forests and Grasslands of the United States. During this second Roadless Area Review and Evaluation (RARE II), the Forest Service identified 2,686 roadless areas of 5,000 acres or more totaling 66 million acres out of the 187 million acres of National Forest lands. Approximately 15 million acres of roadless areas were not included in RARE II because of sloppy inventory procedures or because they had already gone through land use planning after the first RARE program in the early ’70s. All in all, there were some 80 million acres on the National Forests in 1977 retaining a significant degree of natural diversity and wildness (a total area equivalent in size to the state of New Mexico or a square 350 x 350 miles).
About the same time as the Forest Service began RARE II, the Bureau of Land Management (BLM) initiated a wilderness inventory as required by the Federal Land Planning and Management Act of 1976 (FLPMA) on the 189 million acres of federal land that they manage in the lower 48 states. In their initial Inventory, BLM identified 60 million acres of roadless areas of 5,000 acres or more (a total area approximately the size of Oregon or a square 300 x 300 miles).
Along with the National Parks and Monuments, National Wildlife Refuges, existing Wilderness Areas, and some state lands, these Forest Service and BLM roadless areas represent the remaining natural wealth of the United States (though much of the roadless acreage inventoried in the 1970s has been butchered). They are the remnant of natural diversity after the industrial conquest of the most beautiful, diverse, and productive of all the continents of the Earth: North America. Turtle Island.
Only 150 years ago, the Great Plains were a vast, waving sea of grass stretching from the Chihuahuan Desert of Mexico to the boreal forest of Canada, from the oak-hickory forests of the Ozarks to the Rocky Mountains. Bison blanketed the plains — it has been estimated that 60 million of the huge, shaggy beasts moved across the grassy ocean in seasonal migrations. Throngs of Pronghorn and Elk also filled this Pleistocene landscape. Packs of Gray Wolves and numerous Grizzly Bears followed the tremendous herds.
In 1830, John James Audubon sat on the banks of the Ohio River for three days as a single flock of Passenger Pigeons darkened the sky from horizon to horizon. He estimated that there were several billion birds in that flock. It has been said that a squirrel could travel from the Atlantic seaboard to the Mississippi River without touching the ground so dense was the deciduous forest of the East.
At the time of the Lewis and Clark Expedition, an estimated 100,000 Grizzlies roamed the western half of what is now the United States. The howl of the wolf was ubiquitous. The California Condor sailed the sky from the Pacific Coast to the Great Plains. Salmon and sturgeon populated the rivers. Ocelots, Jaguars, and Jaguarundis prowled the Texas brush and Southwestern mountains and mesas. Bighorn Sheep ranged the mountains of the Rockies, the Great Basin, the Southwest, and the Pacific Coast. Ivory-billed Woodpeckers and Carolina Parakeets filled the steamy forests of the Deep South. The land was alive.
East of the Mississippi, giant Tulip Poplars, American Chestnuts, oaks, hickories, and other trees formed the most diverse temperate deciduous forest in the world. In New England, White Pines grew to heights rivaling the Brobdingnagian conifers of the far West. On the Pacific Coast, redwood, hemlock, Douglas-fir, spruce, cedar, fir, and pine formed the grandest forest on Earth.
In the space of a few generations we have laid waste to paradise. The Tall-grass Prairie has been transformed into a corn factory where wildlife means the exotic pheasant. The Shortgrass Prairie is a grid of carefully fenced cow pastures and wheatfields. The Passenger Pigeon is no more; the last one died in the Cincinnati Zoo in 1914. The endless forests of the East are tame woodlots. With few exceptions, the only virgin deciduous forest there is in tiny museum pieces of hundreds of acres. Fewer than one thousand Grizzlies remain. The last three condors left in the wild were captured and imprisoned in the Los Angeles Zoo. (An expensive reintroduction effort has since been started.) Except in northern Minnesota and northwestern Montana, wolves are known as scattered individuals drifting across the Canadian and Mexican borders. Four percent of the peerless Redwood Forest remains and the ancient forests of Oregon are all but gone. The tropical cats have been shot and poisoned from our Southwestern borderlands. The subtropical Eden of Florida has been transmogrified into hotels and citrus orchards. Domestic cattle have grazed bare and radically altered the composition of the grassland communities of the West, displacing Elk, Moose, Bighorn Sheep, and Pronghorn and leading to the virtual extermination of Grizzly Bear, Gray Wolf, Cougar, and other “varmints.” Dams choke most of the continent’s rivers and streams.
Nonetheless, wildness and natural diversity remain. There are a few scattered grasslands ungrazed, stretches of free-flowing river, thousand-year-old forests, Eastern woodlands growing back to forest and reclaiming past roads, Grizzlies and wolves and lions and Wolverines and Bighorn and Moose roaming the backcountry; hundreds of square miles that have never known the imprint of a tire, the bite of a drill, the rip of a ‘dozer, the cut of a saw, the smell of gasoline.
These are the places that hold North America together, that contain the genetic information of life, that represent sanity in a whirlwind of madness.
In January of 1979, the Forest Service announced the results of RARE II: Of 80 million acres of undeveloped lands on the National Forests, only 15 million acres were recommended for protection against logging, road building, and other developments. In the big-tree state of Oregon, for example, only 370,000 acres were proposed for Wilderness protection out of 4.5 million acres of roadless, uncut forest lands. Of the areas nationally slated for protection, most were too high, too dry, too cold, too steep to offer much in the way of “resources” to the loggers, miners, and graziers. Most roadless old-growth forest was allocated to the sawmill. Important Grizzly habitat in the Northern Rockies was tossed to the oil industry and the loggers. Off-road-vehicle dervishes and the landed gentry of the livestock industry won out in the Southwest and Great Basin.
During the early 1980s, the Forest Service developed its DARN (Development Activities in Roadless Non-selected) list, outlining specific projects in particular roadless areas. DARN’s implications are staggering. The list is evidence that the leadership of the United States Forest Service consciously and deliberately sat down and asked themselves, “How can we keep from being plagued by conservationists and their damned wilderness proposals? How can we insure that we’ll never have to do another RARE?” Their solution was simple: Get rid of the roadless areas. In its earliest form, DARN projected nine thousand miles of road, one and a half million acres of timber cuts, 7 million acres of oil and gas leases in National Forest RARE II areas before 1987. More recent figures from the Forest Service are far more disturbing: The agency plans over half a million miles of new road, and up to 100,000 miles of this will be in roadless areas! In most cases, the damaged acreage will be far greater than the acreage stated, because the roads are designed to split undeveloped areas in half, and timber sales are engineered to take place in the center of roadless areas, thereby devastating the biological integrity of the larger area. The great roadless areas so critical to the maintenance of natural diversity will soon be gone. Species dependent on old growth and large wild areas will be shoved to the brink of extinction.
The BLM Wilderness Review has been a similar process of attrition. It is unlikely that more than 9 million acres will be designated as Wilderness out of the 60 million with which the review began. Again, it is the more scenic but biologically less rich areas that will be proposed for protection.
By 1990, Congress had passed legislation designating minimal National Forest Wilderness acreages for most states (generally only slightly larger than the pitiful RARE II recommendations and concentrating on “rocks and ice” instead of crucial forested lands). In the next few years, similar picayune legislation for National Forest Wilderness in the remaining states (Montana and Idaho) and for BLM Wilderness will probably be enacted. The other roadless areas will be eliminated from consideration. National Forest Management Plans emphasizing industrial logging, grazing, mineral and energy development, road building, and motorized recreation will be implemented. Conventional means of protecting these millions of acres of wild country will largely dissipate. Judicial and administrative appeals for their protection will be closed off. Congress will turn a deaf ear to requests for additional Wildernesses so soon after disposing of the thorny issue. Political lobbying by conservation groups to protect endangered wildlands will cease to be effective. And in half a decade, the saw, ‘dozer, and drill will devastate most of what is unprotected. The battle for wilderness will be over. Perhaps 3 percent of the United States will be more or less protected and it will be open season on the rest. Unless ....
Many of the projects that will destroy roadless areas are economically marginal. For example, some Forest Service employees say that the construction costs for a low figure of 35,000 miles of roads in currently roadless areas will exceed $3 billion, while the timber to which they will provide access is worth less than $500 million. It is costly for the Forest Service, the BLM, timber companies, oil companies, mining companies, and others to scratch out the “resources” in these last wild areas. It is expensive to maintain the necessary infrastructure of roads for the exploitation of wildlands. The cost of repairs, the hassle, the delay, and the downtime may just be too much for the bureaucrats and exploiters to accept if a widely-dispersed, unorganized, strategic movement of resistance spreads across the land.
It is time for women and men, individually and in small groups, to act heroically in defense of the wild, to put a monkeywrench into the gears of the machine that is destroying natural diversity. Though illegal, this strategic monkeywrenching can be safe, easy, fun, and — most important — effective in stopping timber cutting, road building, overgrazing, oil and gas exploration, mining, dam building, powerline construction, off-road-vehicle use, trapping, ski area development, and other forms of destruction of the wilderness, as well as cancerous suburban sprawl.
But it must be strategic, it must be thoughtful, it must be deliberate in order to succeed. Such a campaign of resistance would adhere to the following principles:
Monkeywrenching is nonviolent
Monkeywrenching is nonviolent resistance to the destruction of natural diversity and wilderness. It is never directed against human beings or other forms of life. It is aimed at inanimate machines and tools that are destroying life. Care is always taken to minimize any possible threat to people, including the monkeywrenchers themselves.
Monkeywrenching is not organized
There should be no central direction or organization to monkeywrenching. Any type of network would invite infiltration, agents provocateurs, and repression. It is truly individual action. Because of this, communication among monkeywrenchers is difficult and dangerous. Anonymous discussion through this book and its future editions seems to be the safest avenue of communication to refine techniques, security procedures, and strategy.
Monkeywrenching is individual
Monkeywrenching is done by individuals or very small groups of people who have known each other for years. Trust and a good working relationship are essential in such groups. The more people involved, the greater the dangers of infiltration or a loose mouth. Monkeywrenchers avoid working with people they haven’t known for a long time, those who can’t keep their mouths closed, and those with grandiose or violent ideas (they may be police agents or dangerous crackpots).
Monkeywrenching is targeted
Ecodefenders pick their targets. Mindless, erratic vandalism is counterproductive as well as unethical. Monkeywrenchers know that they do not stop a specific logging sale by destroying any piece of logging equipment, they come across. They make sure it belongs to the real culprit. They ask themselves what is the most vulnerable point of a wilderness-destroying project, and strike there. Senseless vandalism leads to loss of popular sympathy.
Monkeywrenching is timely
There are proper times and places for monkeywrenching. There are also times when monkeywrenching may be counterproductive. Monkeywrenchers generally should not act when there is a nonviolent civil disobedience action — e.g., a blockade-taking place against the opposed project. Monkeywrenching may cloud the issue of direct action, and the blockaders could be blamed for the ecotage and be put in danger from the work crew or police. Blockades and monkeywrenching usually do not mix. Monkeywrenching may also not be appropriate when delicate political negotiations are taking place for the protection of a certain area. There are, of course, exceptions to this rule. The Earth warrior always asks, Will monkeywrenching help or hinder the protection of this place?
Monkeywrenching is dispersed
Monkeywrenching is a widespread movement across the United States. Government agencies and wilderness despoilers from Maine to Hawaii know that their destruction of natural diversity may be resisted. Nationwide monkeywrenching will hasten overall industrial retreat from wild areas.
Monkeywrenching is diverse
All kinds of people, in all kinds of situations, can be monkeywrenchers. Some pick a large area of wild country, declare it wilderness in their own minds, and resist any intrusion into it. Others specialize against logging or ORVs in a variety of areas. Certain monkeywrenchers may target a specific project, such as a giant powerline, a road under construction, or an oil operation. Some operate in their backyards, while others lie low at home and plan their ecotage a thousand miles away. Some are loners, and others operate in small groups. Even Republicans monkeywrench.
Monkeywrenching is fun
Although it is serious and potentially dangerous, monkeywrenching is also fun. There is a rush of excitement, a sense of accomplishment, and unparalleled camaraderie from creeping about in the night resisting those “alien forces from Houston, Tokyo, Washington, DC, and the Pentagon.” As Ed Abbey said, “Enjoy, shipmates, enjoy.”
Monkeywrenching is not revolutionary
Monkeywrenchers do not aim to overthrow any social, political, or economic system. Monkeywrenching is merely nonviolent self-defense of the wild. It is aimed at keeping industrial civilization out of natural areas and causing industry’s retreat from areas that should be wild. It is not major industrial sabotage. Explosives, firearms, and other dangerous tools are usually avoided; they invite greater scrutiny from law enforcement agencies, repression, and loss of public support.
Monkeywrenching is simple
The simplest possible tool is used. The safest tactic is employed. Elaborate commando operations are generally avoided. The most effective means for stopping the destruction of the wild are often the simplest. There are times when more detailed and complicated operations are necessary. But the monkeywrencher asks, What is the simplest way to do this?
Monkeywrenching is deliberate and ethical
Monkeywrenchers are very conscious of the gravity of what they do. They are deliberate about taking such a serious step. They are thoughtful, not cavalier. Monkeywrenchers — although nonviolent — are warriors. They are exposing themselves to possible arrest or injury. It is not a casual or flippant affair. They keep a pure heart and mind about it. They remember that they are engaged in the most moral of all actions: protecting life, defending Earth.
* * *
A movement based on the above principles could protect millions of acres of wilderness more stringently than could any congressional act, could insure the propagation of the Grizzly and other threatened life forms better than could an army of game wardens, and could lead to the retreat of industrial civilization from large areas of forest, mountain, desert, prairie, seashore, swamp, tundra, and woodland that are better suited to the maintenance of native diversity than to the production of raw materials for over consumptive technological human society.
If logging firms know that a timber sale is spiked, they won’t bid on the timber. If a Forest Supervisor knows that a road will be continually destroyed, he won’t try to build it. If seismographers know that they will be constantly harassed in an area, they won’t go there. If ORVers know that they’ll get flat tires miles from nowhere, they won’t drive in such areas.
John Muir said that if it ever came to a war between the races, he would side with the bears. That day has arrived.
Postscript (1993)
Events in the years since the above was originally written (1985) and revised (1990) have underscored its message:
-
Wilderness legislation proposed since 1990, like the infamous 1992 Montana bill, has focused on “rocks and ice,” ignoring critical habitat;
-
The Supreme Court has severely restricted “standing” for conservationists to sue the federal government;
-
The Forest Service has tried to deep-six its appeals process because forest defenders use it to slow timber sales and road building in roadless areas;
-
Resource extraction industries are gearing up for a major attack on the Endangered Species Act;
-
Powerful members of Congress, at the encouragement of the timber industry and with the acquiescence of some conservation groups, have slipped through legislative “riders” preventing legal challenges to timber sales in roadless areas ...
The list goes on and on.
While public outcry from grass-roots conservationists has turned some of these assaults on due process around, the last wildlands on the public lands are under attack as never before. The final mopping-up action of industrial society against the ecological richness of North America (and the world) is now occurring. Yet ... our hands are tied only if we allow them to be tied.
Chapter 2: The Future of Monkeywrenching
By T.O. Hellenbach
In an era of international tensions over bombings, shootings, and acts of mass destruction, the word “terrorism” is a guaranteed headline-grabber and a simplistic brand for anyone’s political opposition. As early as 1986, Democratic Representative Pat Williams of Montana used this number one media buzzword to condemn Earth First!, announcing his refusal to consider any EF! wilderness proposals while tree spiking continued.
His sense of moral outrage was shared by another public official, Thomas Hutchinson, governor of Massachusetts colony. The indignant governor refused to negotiate with radical colonists whom he associated with numerous attacks on public and private property. Rebels had attacked his home and trashed the offices of the vice-admiralty courts and the Comptroller of Customs, smashing windows and burning records. For turning a deaf ear, Hutchinson received a harbor full of tea in what came to be known as the “Boston Tea Party.” No isolated incident, the destruction of what, in today’s economy, would be over a hundred thousand dollars worth of private property was followed three months later by another successful nighttime raid on a tea ship at dock. Elsewhere in the area, citizens put the monkeywrench to the construction of British fortifications by sinking barges loaded with bricks, tipping over supply wagons, and burning hay intended for use as soldier’s bedding.
The Tories of yesteryear lacked only the word “terrorism” with which to brand the women and men who created the United States of America. One of those founding radicals, Thomas Jefferson, warned that “strict observance of the written law is doubtless one of the highest duties of a good citizen, but it is not the highest.” He further wrote, “To lose our country by a scrupulous adherence to written law would be to lose the law itself.”
Last century, the institution of slavery was only brought down by prolonged and determined protest that, at its core, was lawless and destructive of property. Slaves used work slowdowns and feigned illness to hurt cotton production. Costly supervision was necessary to prevent deliberate trampling of crops and breaking of tools. At night, cotton fields, barns, and gins were burned. Runaway slaves formed guerrilla bands with poor whites and dispossessed Indians, staging swift raids against plantations.
Even the work of white abolitionists, encouraging runaways and funneling them to safety through the “underground railroad,” was destructive of the private economic concerns of those who saw the slave as just another exploitable resource. As with the former British colonial government, the sluggish minds of men in government failed to acknowledge the changing times, and another war was needed to resolve the issues.
To the west, the invasion of sacred lands was rarely welcomed by the native tribes of America. Survey markers and telegraph poles were favorite, and vulnerable, targets of sabotage. Indians attacked the railroad by unbolting the rails, or constructing barriers of stacked ties secured to the rails with freshly cut telegraph wire.
Even the peaceful Hopi were not spared the meddling of industrial society. In 1891 came a plan to move them out of their clustered mesa-top villages and onto single-family plots of private land. After survey markers were destroyed, government troops were dispatched to arrest the leaders responsible. Faced with a roadblock of warriors armed with bows and arrows, the cavalry officer in charge lured out a Hopi delegation to talk terms. The Indians were seized and marched forward as a human shield. Soldiers occupied the village, and native religious leaders made the first of many trips into imprisonment.
Elsewhere in the West, the introduction of barbed wire in the 1880s saw cat-tlemen attempt to dominate the formerly public grasslands. Fence cutting wars resulted, with small ranchers and farmers forming secret societies with names like the “Owls,” the “Javelinas,” and the “Blue Devils.” Their spies passed information about new fencing at nighttime meetings protected by the use of secret passwords. Sometimes a damaged fence was posted with signs warning against rebuilding. Estimates of fence cutting damage in Texas alone ranged from 20 to 30 million dollars. Typical of government response, it became a more serious crime to cut an illegal fence than to build one.
Similarly, in New Mexico, small groups of raiders from Hispanic communities calling themselves “Gorras Blancas” (“whitecaps”) cut fence to resist the takeover of their communal land grants by large Anglo cattle corporations.
Even wild animals resisted the destruction of their homelands under the hooves of invading livestock. Many of the so-called “renegade” Gray Wolves, who undertook seemingly wanton attacks on cattle and sheep, were the last surviving members of their packs and had seen their fellow pack members trapped and killed. Arizona’s “Aguila Wolf” (“aguila” is Spanish for “eagle”) killed up to 65 sheep in one night. Near Meeker, Colorado, “Rags the Digger” would ruin trap lines by digging up traps without tripping them. Many of these avenging wolves were trap victims themselves, bearing names like “Crip,” “Two Toes,” “Three Toes,” “Peg Leg,” and “Old Lefty.”
Whole communities would marshal their resources to kill the last of the wolves. “Three Toes of Harding County” eluded over 150 men in 13 years of attacking livestock in South Dakota. As recently as 1920, a trapper worked for eight months to kill the famous “Custer Wolf.” East of Trinidad, Colorado, ran a renegade wolf called “Old Three Toes,” the last of 32 wolves killed in Butler Pasture. This lonely wolf befriended a rancher’s collie, who was penned into a chicken run to keep him away from the wolf. One night they found freedom together by digging from opposite sides of the fence. The collie never returned home, and was killed weeks later by a poison bait. Old Three Toes and her litter of Gray Wolf-collie whelps were discovered shortly thereafter and all were killed.
Throughout most of the land, the Gray Wolf has vanished, barbed wire rules, the natives have lost their sacred soil, and we are largely slaves to the industrial culture born in the coal-fired furnaces of Europe. Resistance, both lawful and lawless, has come and gone, won and lost, and remains more “American” than apple pie. And somewhere, beyond the edge of the ever-spreading pavement, are tales of solitary wolves and Grizzlies, “traditionals” who shun the missionaries, wildlands that know only freedom, and small bands of monkeywrenchers, wild-eyed and unbending. Is there a future for any of them? Or more to the point, can acts of sabotage really influence events? History has proven that resistance can be effective, so let’s briefly examine how this is possible.
Most businesses, both large and small, operate to produce a relatively small margin of profit, frequently a single digit percentage of overall gross sales. This small margin of profit is vulnerable to outside tampering, such as a successful consumer boycott which reduces sales. A determined campaign of monkeywrenching affects the other end, by increasing operating costs to the point that they cut into profits. The random act of sabotage accomplishes little, but when cautiously repeated, striking weak points again and again, monkeywrenching can force an exploitative corporation to expand their security efforts and incur related expenses. Repairs of damages, such as abrasives in lubricating oil, result in several costs, including downtime. Since many businesses run on tight budgets or borrowed money, loss of production, even on a temporary basis, becomes costly. Interest payments on borrowed funds increase, payrolls for idled workers must be met, and buyers of finished products become impatient with missed deadlines. Reputation, as much as other factors, influences credit; so imagine the chilling effect on banks, finance companies, equipment manufacturers (who often extend credit to buyers), and insurance companies (who finance anything these days) when they realize that a few operators, working in critical wildlands, are more susceptible to delays in repayment.
Production scheduling is so critical to financial planning that most businesses have various contingencies to minimize the impact of mechanical failure, inclement weather, and other factors. They may anticipate losing an average of two weeks to weather when logging in a certain season. Or they may have plans to rent extra equipment in the event of serious breakdowns. Repeated hits by ecoteurs exhaust the contingencies and cut into the eventual profit.
Some ecotage damage is repaired by funds from insurance companies. If the damage is recurrent, the insurer will increase the deductible, thereby forcing the operator into higher out-of-pocket expenses. Insurers will also often increase premiums, insist on higher security expenditures, and may even cancel coverage. Of course, the operator’s standing with his insurance company is of critical importance to his lenders.
Increases in security costs include pay for guards, guard dog services, security fencing and lighting, and mundane security measures, like driving all heavy equipment to a single secure location (resulting in higher operating costs and lost work time). Heavy equipment is especially vulnerable to sabotage, with downtime often costing more than $50 an hour. Security expenditures can be increased by including urban targets like warehouses, mills, and offices for ecotage.
In addition, if smaller supporting businesses fear the impact of monkey-wrenching against a business to which they sub-contract, they may hesitate to do business, or increase their charges to compensate themselves for also becoming targets.
Ultimately, the entire industry and its financial backers must be made aware that operations in de facto wilderness areas face higher risks and higher costs. Press coverage of monkeywrenching can drive this point home and alert the public in a manner that hurts the corporate image. The charge that monkey-wrenching alienates public opinion stems from an incomplete understanding of propaganda and history. Scientific studies of propaganda and the press show that the vast majority of the public remembers the news only in vaguest outline. Details rapidly fade from memory. Basic concepts like “opposition to logging” are all that are retained. History informs us that direct action engenders as much support as opposition. The American Revolution saw as many colonists enter the Tory ranks as enlisted in the Continental Army. During World War II, as many Frenchmen joined Nazi forces as participated in the famous French Underground. The majority of the public floats noncommittally between the conflicting forces.
Finally, the actions of monkeywrenchers invariably enhance the status and bargaining position of more “reasonable” opponents. Industry considers main-line environmentalists to be radical until they get a taste of real radical activism. Suddenly the soft-sell of the Sierra Club and other white-shirt-and-tie eco-bureaucrats becomes much more attractive and worthy of serious negotiation. These moderate environmentalists must condemn monkeywrenching so as to preserve their own image, but they should take full advantage of the credence it lends to their approach.
As for other types of activism, picketing and sit-ins quickly lose their news-worthiness. Boycotts can’t touch primary industries because these resource extraction industries do not sell directly in a consumer market. Even letter-writing campaigns and lobbyists are losing ground as the high cost of television advertising places election financing in the hands of well-heeled industrial and labor union PACs (Political Action Committees set up to undermine campaign “reform” laws).
In these desperate times, it is difficult to be both close to Earth and optimistic about her future. The hope that remains is found in the minds of those who care, and the hearts of those few who dare to act.
Chapter 3: Developments
Clearcuts springing up in every nook and cranny of the National Forests; high-voltage power lines marching arrogantly across desert valleys and Midwest farms; seismograph crews scarring roadless areas with their bulldozers, thumper trucks, and explosives; survey stakes and their Day-Glo orange flagging warning of who-knows-what awful scheme; and the ubiquitous signs of overgrazing on public lands are the hallmarks of the industrial siege on the wild and open space areas of America. As Ed Abbey said, it looks like an invasion, an invasion from Mars.
As good patriots, lovers of our native land, it is our duty to resist invasion and to defend our planet. The following chapter describes some of the tools for that defense. A hammer and nails to save the forests, a pair of gloves to pull up survey stakes, a socket wrench for power towers ... and so on.
The assault on wild nature is on marginal financial ground. By making it cost even more, a few monkeywrenchers can stop the destruction in many places and slow it in others. As evidence of how effective even a few actions can be, look at the hue and cry being raised by the timber industry, their flunkies in the Forest Service, and their hired politicians over a small number of tree-spiking operations. If they multiply their efforts, wilderness defenders can save significant blocks of wild country.
Tree Spiking
Tree spiking can be an extremely effective method of deterring timber sales, and seems to be growing more and more popular. Mill operators are quite wary of accepting timber that may be contaminated with hidden metal objects, — saws are expensive, and a “spiked” log can literally bring operations to a screeching halt, at least until a new blade can be put into service. The Forest Service and timber industry are very nervous about spiking — when they or the media raise the subject of monkeywrenching, this is the form most commonly discussed. Agency and industry officials are loath, however, to raise the subject. Indeed, the Forest Service (FS) often fails to publicize incidents of spiking, on the theory that the less the practice is publicized, the less likely it is to spread. When the Freddies (FS officials) do publicly acknowledge that a spiking has occurred, they often make a considerable effort to find the perpetrators, even to the point of offering substantial cash rewards. (No modern-day tree spiker has been caught, however.)
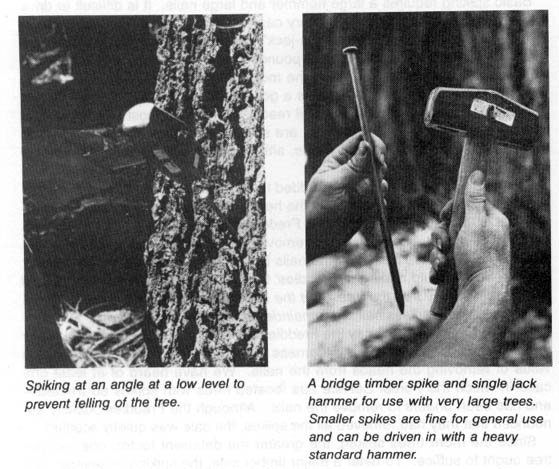
There are two basic philosophies of tree-spiking. Some people like to spike the base of each tree, so that the sawyer, in felling the tree, will almost certainly encounter one of the spikes with the chain saw. This would at the very least require the sawyer to stop and sharpen the saw, and might require the replacement of the chain. If this happens with enough trees, the amount of “down time” caused to the sawyers would pose a serious hindrance to operations. In this type of spiking, the spiker drives several nails (or non-metallic spikes, about which more later) at a downward angle into the first two or three feet above ground of each tree. The nails are spaced so that a sawyer, in felling the tree, is likely to hit at least one of them.
There is an objection to this type of spiking — the possibility, however remote, that the sawyer might be injured, either by the kickback of the saw striking the nail, or by the chain, should it break when striking the spike. A friend of ours who worked for many years as a logger in Colorado says that in numerous incidents of striking metal objects with his saw — including one time when the impact was great enough to cause him to swallow his chaw of tobacco — he never once had a broken chain or was otherwise hurt. Yet the possibility is there. Because of this possibility, we do not recommend this type of spiking.
The second philosophy of tree spiking is to place the spikes in the trees well above the area where the fellers will operate — as many feet up the trunk as one can conveniently work. The object of the spiking in this case is to destroy the blades in the sawmill. Since in large mills the blades are either operated from a control booth some distance from the actual cutting, or are protected by a Plexiglas shield, this method is unlikely to cause anyone physical injury even should a blade shatter upon striking a spike, which is unlikely. It is true that in small, “backyard” sawmills the operator might be standing close to the blade, but we assume that anyone contemplating spiking would never consider doing it on other than large timber sales where the trees are destined for a corporate, rather than a small, family-operated mill. Locally owned and operated sawmills are seldom a major threat to wilderness. The major threats come from the big, multinational corporations whose “cut-and-run” philosophy devastates the land and leaves the local economy in shambles when all the big trees are cut and the main office decides to pull out and move to greener pastures.
I anticipate an objection at this point. “Wait a minute,” someone says, “if the purpose of spiking trees is to save them from being cut, then what good does it do if the tree wrecks a blade in the mill? It’s too late to save the tree, isn’t it?” The answer is that the value of spiking is as a long-term deterrent. If enough trees in roadless areas are spiked, eventually the corporate thugs in the timber company boardrooms, along with their corrupt lackeys who wear the uniform of the Forest Service, will realize that timber sales in our few remaining wild areas will be prohibitively expensive. And since profits are the goal, they will begin to think twice before violating the wilderness.
In many cases, people have spiked timber in a threatened area, and then have sent (anonymous!) warning to the authorities. If this is done before the timber has actually been sold, the effect on competitive bidding can be considerable. (The Forest Service plans timber sales years in advance, but actual sale of the timber to a logging company is one of the last steps in the process.) In fact the sale may be quietly dropped. In cases where the timber has already been sold prior to spiking, the Freddies (upon receiving a warning) have sent crews into the woods to locate and remove the spikes — at substantial expense in overtime to the agency. If this happens often enough, it can not fail to reduce the total number of timber sales substantially, particularly in this era of federal budget deficits.
We will describe here several methods of spiking trees, go into the “when” and the “where” of spiking, and deal with the sensitive matter of when and how to announce a spiking. First, though, we stress some basic security considerations.
Spiking trees is potentially dangerous. The Forest Service has increased its law-enforcement budget considerably in the last few years, and one reason has been the increased incidence of monkeywrenching. Another reason for increased law enforcement has been the stepped-up campaign by the Feds to eliminate marijuana growing from the public lands, but it should be obvious that a cop in the woods looking for dope will arrest any monkeywrenchers he or she might encounter by chance as well.
The Freddies (and other Federal land-use agencies as well) are becoming increasingly sophisticated in law enforcement, and it is foolish to underestimate them. According to a 1986 column by Jack Anderson, these agencies employ such tactics as surveillance (of suspicious persons), and mail interception (presumably again involving those who have for some reason attracted their suspicions). They may have agents in the woods in plain clothes, posing as hikers, campers, or fishers; and it is even possible that agents might be in the woods at night on stakeouts, equipped with night-vision devices.
If a monkeywrencher is contemplating spiking trees in a remote roadless area long in advance of a timber sale, the chances of encountering cops are relatively slim. Conversely, if a highly controversial timber sale is involved, especially one in which monkeywrenching already has been committed or at least threatened, the danger to the monkeywrencher is very real. For this reason alone it is preferable to spike trees preventively, rather than as a last-ditch effort to save a seemingly doomed grove.
Most veteran tree spikers agree that tree spiking should never be done alone. In addition to the person or persons who are doing the actual spiking, at least one person should have the sole duty of acting as lookout. Some experienced tree spikers recommend three lookouts for both spiking and silent pinning. At the first sign of any other people in the vicinity, spiking should cease and the team should quietly withdraw. The team should use the drop-off and pick-up method of access, and should follow all recommended precautions as to clothing, footwear, and tools (see the Security chapter).
Some experienced tree spikers, however, argue that it is best to always monkeywrench alone, even with tree spiking, so that you never have to worry about the reliability of your partner. They argue that careful reconnaissance of the area to be spiked, a planned and scouted escape route, and frequent stopping to listen make solitary tree spiking safe.
Spiking is much easier done in daylight than in the dark. A team can work much faster in full light, and in darkness it is all too easy to be sloppy and fail to cover up the signs of your activities. If a team is spiking in a remote roadless area and takes full security precautions, they can operate securely in daytime. In daylight one is more likely to encounter other humans in the woods, but almost any activity in the woods at night, if detected, will be deemed suspicious and investigated.
Assuming that spikers are working in a remote roadless area, and are not working during the hunting season (a dangerous time to be out in the woods, since on much of the public lands the highest period of use occurs at this time), the greatest danger will be from casual encounters with Forest Service field personnel — timber markers, survey crews, and the like — who might be working in or near your area. Try to know where these crews are working at all times. If you have a source within the agency, fine, but you can more safely get this information from continued observation and from knowing your area well. Crews tend to work in the same area for weeks at a time, and often live in temporary field quarters (trailers or even tents) rather than commute every day from the District Ranger Station or Supervisor’s Office. Another type of people you might encounter in the woods, especially if you are working in the area of a timber sale which has already been announced for public bidding, are representatives of logging companies who might be checking out the timber before deciding their bids. Needless to say, you do not want to fall into the hands of these people.
When to Spike Trees
A general rule on when to spike might be, “the earlier the better.” If one waits until just before the timber is sold, security problems are greater, and it will be easier for the authorities to locate the spikes. If one spikes several years in advance of a sale, nature has time to disguise the work by growing completely over the spikes. Of course, if the Freddies have already marked the boundaries of the sale area (or even the individual trees to be cut), the spiker knows exactly where to work without any guessing. Nevertheless, with proper intelligence monkeywrenchers can have a good idea of where future timber sales will be long before the marking stage.
The Forest Service earmarks specific timber sales five years in advance. Moreover, in their 50-year Forest Plans, the Freddies conveniently identify all of the concentrations of “commercial” timber in each National Forest — and all too often, they openly acknowledge that they intend to cut almost all of it, sooner or later. (See “Target Selection” in the Basic Security section in the Security chapter for secure means of keeping posted on what an agency is up to.) Study the data and identify areas of critical interest to you that appear to be threatened. With plenty of advance warning, you can act deliberately and precisely.
Since activists may be unable to attend to all timber sales well in advance, much monkeywrenching will occur at the last possible minute; so it is helpful to have a basic knowledge of timber marking practices. Unfortunately, there is no uniform system, and practices may change from time to time. Timber markers generally use spray paint, although sometimes flagging (or flagging and paint) is used to mark the boundaries of the area (the “unit”) within which cutting will take place. One color will be used to mark the perimeter, while another color will be used to mark individual trees to be cut within the unit. In a clearcut, only the perimeter is marked, since everything within is to be removed. A given timber sale will usually have several units within it, and they may be widely scattered or close together. You may see numbers painted on some of the trees — these are the unit numbers. At the present time in the Northern Rockies — the region with the most roadless areas threatened by the FS — the Freddies are using red or orange paint to mark unit boundaries, and yellow or blue paint to mark the trees within the units which are to be cut. Trees to be cut are sometimes marked with an “X,” although sometimes only a horizontal slash of paint is used. But beware — in timber sales in which most but not all of the trees are to be cut, the trees which are to be left may be painted. Because of the many differences in marking practices, you should know the system being used in your area.
National Forests list timber sales years in advance. Some even indicate if they are in roadless areas and which roadless areas. The safest and most effective tree spiking is done in proposed timber sales years in advance. Spiking ideally should occur before any road building or even surveying is under way. Such advance spiking should be announced to prospective timber buyers and the Forest Service, but not the media. The presence of spiked trees in timber sale areas will reduce the commercial value of such sales and turn off potential bidders. The cost of identifying and removing spikes may make the sale so expensive that even the Forest Service — which habitually sells timber at a loss to US taxpayers — will drop it.
Spiking trees many years ahead of their scheduled sale has several advantages. Little money has been invested in surveying, road building, preparing environmental assessments, and the like; so the authorities have less incentive to go ahead with a timber sale. It’s more difficult for the Freddies to locate spiked trees years after spiking, and without easy road access they are less likely to search for spikes. Timber buyers have not committed resources to the area and it may be easier for them to simply not bid on a risky, possibly expensive proposition. Also the monkeywrencher’s chances of being encountered are slim. The advantage of advising only the agency and prospective timber buyers and not the general media, is that there will be no public loss of face if the sale is quietly dropped or left without a bid because of the spiking. In some cases, spiked timber has been sold and cut at a considerable financial loss to both the Forest Service and the logging company so that they do not to appear to be intimidated by a widely publicized tree spiking.
Basic Spiking Techniques
Basic spiking requires a large hammer and large nails. It is difficult to drive large nails into a tree with an ordinary carpenter’s hammer. The best type of hammer to use is one of the “single-jack” variety (a one-handed sledgehammer) with a head weighing 2-1/2 or 3 pounds. Nails should be large, but not extremely large; the larger the nails, the more time and energy are required to drive them. A 60 penny (60d) nail is a good size. This is about 6-1/4 inches long and is the largest “common” nail readily available in most building supply stores. Larger nails (called spikes) are sold by their size in inches. Spikes should not be needed in most cases, although they are useful for extremely large trees.
Another tool should probably be added to the basic spiking kit: a small pair of bolt cutters, powerful enough to cut the heads off the nails. The reason to add this tool is that in several cases, the Freddies have sent crews into the woods to locate (with metal detectors) and remove (with crowbars) as many spikes as possible. Cutting the heads off the nails (after driving them nearly all the way into the tree) should make the Freddies’ task all the more fun. Drive the nail almost all the way into the tree. Cut the head off with the bolt cutters. Then, drive the now headless nail the remainder of the way into the tree. Remember, the more time and money the Freddies expend removing spikes, the fewer trees will be cut and the more wilderness saved. We cannot overestimate the value of removing the heads from the nails. We have heard of at least one case in which the Forest Service has located trees with spikes so treated — and has been unable to remove the nails. Although the Freddies publicly announced that they had removed all the spikes, the sale was quietly scuttled.
Since the more trees spiked, the greater the deterrent factor, one nail per tree ought to suffice. To deter a major timber sale, the spiking of several hundred trees might be a worthy goal, but even a few dozen spiked trees will be of some deterrent value. It might be noted that on Meares Island in British Columbia, opponents of logging, working systematically and in teams, have spiked literally thousands of trees to great effect. But spiking does not have to be on this scale to be effective.
Trees should be spiked at various heights above the ground. While it is acceptable to drive some of the nails in at the height of a standing person — the most convenient place — an effort ought to be made to place them higher. There are a couple of reasons for this. First, nails placed above head height will be more difficult for investigators to spot, and second, if all the nails are driven in at the same height, the searchers’ task will be easier. There are a number of ways to place nails high. Climbing spikes (metal spurs which attach to boots, used in conjunction with a waist belt) work well. Climbing spikes are fairly expensive when purchased from forestry supply houses, but it may be possible to locate an old pair (they are used by smoke jumpers and others in forestry work) or to improvise a pair. Or, a spiker can fabricate a light, portable ladder which can be carried from tree to tree. Another method would be for the spiker to stand on a partner’s shoulders while driving the nails. Climbing tree stands, used by archery hunters, are easily carried, quiet, and allow you to climb a tree fairly quickly. The good ones will not harm the tree or leave marks. (Practice first! Inexperienced users have been injured when their tree stands collapsed under them.) In regions that get considerable snowfall, a good solution would be to spike in the winter, using skis or snowshoes when several feet of snow cover the ground.
Some effort should be made to cover the signs of the work in a spiking operation. Again, the ideal spiking would take place several years before a timber sale, giving nature a chance to hide the evidence by growing over the nails.
However, in many cases a spiker will not be able to do the job far enough in advance for bark to grow over the nails. In such cases, after driving the nail in flush, the head of the nail should be covered so as to camouflage all signs of the work. A piece of bark fixed with glue, liquid wood, or cement over the nail is best, but pitch might be used, or in a pinch, paint the color of the bark. A brown felt marker can also be used to disguise the shiny head of the nail after it is driven into the tree.
— Bill Haywood
Field Notes
-
For large old-growth trees, “bridge timber spikes” (about one foot long) can be particularly effective. These spikes cost about 70 cents each and require a stout arm to drive. A heavy hammer (small sledge) that can be gripped with both hands may be the best tool. Building supply stores sometimes have these large spikes in bins with the rest of the nails.
-
A hand-operated bit and brace can be used to drill holes into trees for insertion of “super spikes.” After drilling the hole, a section of sharpened rebar can be driven into the tree. Be sure to cover the hole with bark (liquid wood or some other adhesive can be used to secure the bark). This method of spiking is very labor-intensive, but it shouldn’t take many such spikes to deter cutting.
-
Field experience in using 60d spikes in pine, fir, and spruce shows that they can be de-headed prior to driving them. This eliminates the necessity of carrying bolt cutters in the field. Always bring a punch to drive the de-headed nails below the surface of the tree. This makes removal nearly impossible.
-
To avoid leaving telltale nail heads around a spiking site, glue a plastic magnet on the top jaw of your bolt cutters. This way, the heads can be collected when cutting off the heads of nails in trees.
-
The distinctive marks left by your particular bolt cutters will be destroyed by pounding in the spikes. The marks on the jaws of the bolt cutters can be removed by simply filing the jaws. Such distinctive marks could constitute evidence if you were charged with the crime.
-
When using bolt cutters to de-head spikes, always wear goggles or other eye protection. The heads of the nails can really fly.
-
Most large (8” to 12”) spikes are either 5/16 or 3/8-inch in diameter. Choose bolt cutters with a slightly larger capacity than your spikes, i.e., one-half-inch or larger. (Spike metal falls into the “soft” or “medium” category on the “capacity chart,” which is a small metal tag affixed to each set of bolt cutters.) Cutters with greater capacity cut easier and faster and last longer.
-
The type of tree may dictate the size of your spikes and whether or not you de-head them before driving. Pines and cedars are relatively soft, allowing even de-headed 60d nails to be driven in without bending (a de-headed 60d nail would likely bend in harder wood). Douglas-fir is a bit harder; spikes smaller than 5/16-inch diameter should not be de-headed prior to driving. Old-growth hemlock is extremely hard. Experiment with the various tree species in your area.
-
Some field reports indicate that with large spikes (60d or larger) it is possible to employ the following method: (1) Drive the spike half-way into the tree. (2) Cut off the portion of the spike protruding from the tree, using bolt cutters or a hacksaw. (3) Using the loose portion of the nail as if it were a center punch, drive the imbedded part of the nail as far into the tree as it will go. (4) Remove your “center punch,” caulk the hole, and disguise it.
-
Avoid imported (Korean, Taiwanese, etc.) spikes; buy US or Canadian brands. Cheap imports may be softer and bend easier when driving.
-
In spiking a large timber sale, concentrate on the part of the sale closest to the main road as this will tend to dissuade the contractor from cutting the rest of the sale. (The Forest Service has allowed some logging firms to cancel the timber sale contract after encountering spiked trees.)
-
For extra effect, combine large and small nails. Use only one large spike per tree, but pound in several smaller nails as well. This is a good job for a partner who cannot drive in large spikes, and it further protects the tree. The metal detector can’t tell the difference between large and small spikes.
-
A military surplus green canvas ammo bag is perfect for transporting spikes in the woods.
-
You can use a fanny pack to carry your spikes. The weight is easier to carry on the hips than on the back. During the actual spiking, put the fanny pack in front to use like a carpenter’s apron.
-
For a major spiking operation, you may wish to stash a box of spikes in the woods in the summer (when access is easier), and then ski in during the winter and do the spiking. Be sure to hide the spikes where you can find them even if they are buried under several feet of snow.
-
Do not lubricate spikes for easy driving. Most lubricants are petroleum derivatives, all of which are poisonous to trees. Vegetable oils are nearly as toxic. They have the added disadvantage of attracting decomposers (bugs and fungi) as they go rancid. The bottom line is that nothing belongs in a tree except wood.
-
Some concerned folks have recommended that spikes be sterilized in rubbing alcohol or hydrogen peroxide. But medical advisers argue that rubbing alcohol or hydrogen peroxide would be more harmful to the tree than anything on relatively clean spikes.
-
In addition to the security reasons for wearing gloves, they will protect your hands. A hard day of pounding spikes can blister the hands of the toughest. Besides being painful, blisters might be considered evidence against someone suspected of spiking.
-
Some experienced tree spikers suggest that notification of spiking is best done by issuing a blanket warning after marking a few trees for demonstration purposes (with a spray painted white “S”), and spiking every tree in the poten-tial logging area.
-
Tree spiking is noisy. Some spikers suggest drilling a hole to accommodate the spike — thus reducing the amount of noisy hammering. The problem with this is that it severely limits the number of trees that can be spiked in a given amount of time.
Here in the Northwest, security is a major concern. What I’ve found to work well is spiking in the rain. (You get soaked, but you don’t leave tracks!) Rain drastically reduces the noise produced by hammering. Rain also seems to keep the Freddies indoors.
I also write my communiqués in the winter, after the snows have come. It annoys the hell out of the loggers when they know they can’t look for your work until late spring.
One last suggestion: Since metal detectors are the rage of late, I also pound in scores of small standard-type nails. They may not stop a saw blade but they will frustrate the piss out of the guy or gal with the detector. It also helps to camouflage where I put the real spikes.
— Banana Slug
An amusing sidelight on tree spiking is that the Inyo National Forest has spiked snags with 14 to 16 penny nails to “armor” them against wood cutters. The Forest Service is protecting the snags for wildlife habitat.
Advanced Tree Spiking Techniques
Helix (spiral) nails are the ultimate in metal spikes — these are the type of nails that were used in large quantities on Meares Island. The spiral makes the nail extremely difficult to remove, and removal is virtually impossible when the head of the nail is clipped off. These nails come in three sizes suitable for tree spiking: 8”, 10”, and 12” long. While the 8” size is adequate for most jobs, the 10” and 12” sizes can be driven even when the head has been removed in advance — a great advantage. Driving these spikes is not easy. You will need to be in shape. You may want to use a heavier hammer. A flat-faced, 3 pound sledge with a long handle (18”) is ideal for driving large helix spikes.
You may have to look around to find helix spikes; not all building supply stores carry them. They are expensive, but much less so if bought by the box. Call around (use a pay phone) to check on availability and price (prices may vary widely). If you need an excuse for buying them, say you are building a bridge to a piece of remote property owned by your uncle. Use the same pre-cautions to protect your identity in buying helix nails that you would use with any unusual item — never buy such nails in your own community (unless it is a large city), never go back to the same store twice, and never leave such things lying around your house or car.
Good quality, US-made 20”-24” bolt cutters (cost about $80) are adequate for 60d spikes or helix spikes 8” and smaller. You can easily carry this size bolt cutters in the woods to de-head your spikes after you drive them most of the way into the tree. You can then drive them in the rest of the way without their heads.
For 10” and larger helix spikes, 30”-36” bolt cutters are necessary. De-head these spikes at home (large bolt-cutters are cumbersome and heavy to carry in the woods). These larger spikes can be easily driven in without their heads. You may prefer to rent one of these larger bolt cutters for a day or two and de-head an entire box of spikes at home. If you do rent one (to save the cost of purchase), do not leave your ID as security. Instead, leave a cash deposit ($150 generally required) which will be refunded when you return the bolt cutters.
— Jeanne Carr
Field Notes
-
Various exotic methods have been suggested for putting spikes into trees, ranging from crossbows to muzzle-loaders to shotguns to spear guns. None of these seem to be worth the trouble, according to serious tree spikers who have tried them. Stick to the basics. Similarly, suggestions have been made that shooting bullets into trees would have the same effect as spiking. We discourage this for several reasons: the hydrostatic shock to the surrounding tissue in the tree from a bullet; the possibility of poisoning the tree if copper-jacketed ammo is used; the unlikelihood of bullets in trees being effective saw-dulling agents; the increased legal risk that comes from using firearms; and the security problem of noise from firearms. Previous suggestions for using nail guns (“power-actuated fastening systems”) are also now rejected due to noise, ineffectiveness, and greater complexity.
-
Resistance to logging should not be restricted to tree spiking. Many of the other techniques described in Ecodefense can be effective against logging. One other tactic is to cut the cable used in skidding logs through steep terrain. At night the cables are slack. Tape the cable before hacksawing and use cable clamps to secure the cut end to a nearby tree.
-
Keep in mind that metal detectors are not very reliable. After the extensive and intensive spiking of old-growth cedar on Meares Island in British Columbia, MacMillan Bloedel timber company had poor success in locating tree spikes.
-
Most experienced tree spikers argue for keeping tree spiking simple: good old-fashioned plain steel 6 inch spiral spikes driven in with a regular hammer and countersunk one inch below the bark with an industrial punch. More elabo-rate techniques involve heavier equipment, greater expense, more time. Simple spiking is easier and faster.
-
“Traditional” spiking, as described above, is relatively simple and quite effective. However, the serious eco-raider might do well to consider some of the alternative methods described by T. O. Hellenbach later in this chapter. These methods require more specialized equipment, and are therefore more costly to the spiker, but they offer distinct advantages, both in security and effectiveness.
Spiking Security
-
Watch for maintenance crews working at night.
-
Resist the temptation to use your spiking nails around the house. Examination of spikes can determine their manufacturer, and it’s best not to have similar nails where you live.
-
In places where spiking is rampant, the authorities may go so far as to “dust” trees with dyes in powder form. These powders are almost invisible to the naked eye, but will show up under an ultraviolet or “black” light. To avoid exposing oneself in such a situation, minimize contact with the tree (you need not hug it!), put your gloves in a plastic bag when you are done (if you’re not disposing of them immediately), and launder your clothes after you get home. You might also purchase an ultraviolet light (available from scientific supply houses, novelty and “head” shops). In this age of budgetary restraints, however, the Freddies are not likely to go to this extreme except in special cases.
-
Be cautious when buying large quantities of nails. Although nails are common items and their possession (in the absence of other evidence) would con-stitute only the barest of circumstantial evidence, it would be wise never to buy them where you are known or might be remembered.
-
Be careful about leaving fingerprints on spikes. After purchasing them, carefully wipe them clean and place them in a cloth bag or wrap them up to be carried in your pack for field use. Wear gloves while spiking trees (see below) and do not touch the spikes unless your hands are gloved.
Federal Anti-Spiking Legislation
The so-called “Anti-Drug Abuse Act of 1988” (Public Law 100–690, 100th Congress) became law in November 1988, amid great media hoopla. This document is well worth perusing despite its 350 pages. In addition to containing a number of provisions which seem to sacrifice some of the most basic civil liberties for the “war on drugs,” PL 100–690 also contains clauses, added as “riders” to the original legislation, that haven’t the remotest connection with fighting drugs.
One of these added provisions is of interest to monkeywrenchers, for it specifically targets tree spikers who operate on the public lands. This subsection is entitled “Hazardous or Injurious Devices on Federal Lands,” and amends existing law (Chapter 91 of Title 18, US Code). Rather than attempt to paraphrase the wording of this section, I’ll quote verbatim from some of the most interesting passages:
Whoever — (1) with the intent to violate the Controlled Substances Act, (2) with the intent to obstruct or harass the harvesting of timber, or (3) with reckless disregard to the risk that another person will be placed in danger of death or bodily injury ... uses a hazardous or injurious device on Federal land, or on an Indian Reservation ... shall be punished under subsection (b).
Subsection (b) spells out the penalties:
(1) If death of an individual results, [the person convicted] shall be fined under this title or imprisoned for any term of years or for life, or both; (2) if serious bodily injury to any individual results, be fined ... or imprisoned for not more than twenty years, or both; (3) if bodily injury to any individual results, be fined ... or imprisoned not more than ten years, or both; (4) if damage exceeding $10, 000 to the property of any individual results, be fined ... or imprisoned for not more than ten years, or both; and (5) in any other case, be fined ... or im-prisoned for not more than one year.
The law goes on to specify that if anyone is convicted under this subsection a second time, the minimum penalty shall be imprisonment for up to ten years, regardless of the magnitude of the offense. The law also spells out the difference between “serious bodily injury” and “bodily injury”; the latter can be as simple as “a cut, abrasion, bruise. ..” There are detailed descriptions of what constitutes a “hazardous or injurious” device. After describing the usual “guns attached to trip wires” and “explosive devices” that we’ve all read about in Reader’s Digest “drug menace” articles, the law gets into some specifics obviously aimed at monkeywrenchers rather than pot growers: singled out are “sharpened stakes,” “nails placed so that the sharpened ends are positioned in an upright manner,” and “tree spiking devices including spikes, nails, or other objects hammered, driven, fastened, or otherwise placed into or on any timber, whether or not severed from the stump.
The well-read monkeywrencher will notice that the “hazardous or injurious devices” described in this law could describe road spiking devices as well as tree spikes.
Some other provisions of this law are also of interest to monkeywrenchers. Both the Bureau of Land Management (BLM) and National Park Service (NPS) are getting funds to beef up their law enforcement presence (to combat drugs, of course) and the Forest Service is to double the number of their new drug cops, from 500 to 1000! These drug cops have already been employed to counter protesting conservationists in the woods (including those practicing non-violent civil disobedience), and they can be expected to continue doing this. Anyone contemplating any variety of monkeywrenching should be aware of this increased law enforcement presence on the public lands. The “Anti-Drug Act” also gives Forest Service law enforcement officers authority to conduct investigations on non-government lands, assuming that those investigations are of crimes that took place on Federal lands. This opens the door to the possibility that Freddie cops might conduct surveillance or investigate suspected monkeywrenchers in or around the activists’ homes or places of employment, or anywhere else for that matter.
The swift passage of anti-spiking legislation is an indication of how effective spiking has become in deterring timber sales. After several years of the Freddies and their friends in the timber industry dismissing spiking as a trivial matter, we have seen in some parts of the country a media blitz during the last couple of years portraying a veritable epidemic of spiking. Since even before the passage of the recent law adequate legislation (albeit not as specific) existed under which anyone caught spiking could have been (and certainly would have been) prosecuted, one might say that the current legislative effort to single out spiking is at least in part propaganda to assure the media and timber industry that the government is acting vigilantly to counter the growing wave of monkeywrenching.
This is not to trivialize the import of the new law. The Forest Service in particular has begun to feel the pressure caused by monkeywrenchers, and they see that if current trends continue, their “business as usual” policy won’t be tenable much longer. They no doubt see the new law as a tool with which to turn back the clock to those happy days of a decade ago when almost no one seriously challenged their policies. In order to turn back that clock, they will try hard to catch wrenchers in the act, and to impose the maximum penalty on them. Unfortunately for the Forest Service, it is too late to go back to the days when there was no organized dissent. Too many people realize that the Forest Service’s lip service to “public input in the forest planning process” and all their pious words about “working within the system” are just that — words. Some of those people are so angry after “working within the system” for years without seeing that system budge, meanwhile watching the plunder of the planet continue unchecked, that they are ready to break the law, even at the risk of their lives and liberty, to try to stop that plunder.
A case in point is this: In October 1987, the State of California passed two laws (Senate Bill 1176 and Assembly Bill 952) aimed at deterring tree spikers, even though a law on the books since the 1870s already made spiking a felony. The first of these laws provides graduated penalties for anyone convicted of tree spiking. For “simple spiking” the penalty is up to three years imprisonment. For a spiking that results in bodily injury to someone, the penalty is up to six years in prison. For a spiking causing “great bodily injury” to someone, the penalty is up to nine years imprisonment. The second law makes it a misdemeanor “to possess a spike with the intent to spike a tree.” The passage of these laws was widely reported in the California press at the time. Yet if newspaper articles are any indication, several spikings occurred in the state during 1988, despite the new legislation.
In part, the California laws were passed due to widespread publicity following the incident earlier in 1987 at the Cloverdale, California, sawmill in which a sawyer was seriously injured when a saw in the mill came into contact with a log containing a metal spike. That spiking was apparently not environmentally motivated, but no matter. Radical environmentalists were widely blamed for causing the injury to the millworker. This underscores something repeatedly stressed in both Ecodefense and in the old Ned Ludd column of the Earth First! Journal in the 1980s, namely, that monkeywrenching should be aimed at machines, not people, and that the purpose of spiking is to save trees. Every time a tree goes to a mill — spiked or not — that tree has been lost. Anyone spiking trees has a moral obligation to notify the “proper authorities” that a particular area contains spiked trees and that it would be hazardous to cut those trees. This should be done with all due concern for the monkeywrencher’s security, but it should be done before those trees are scheduled to be cut.
If the government does succeed in slowing down the wave of spiking (and this is dubious, given the method’s obvious effectiveness) it will succeed only because monkeywrenchers have switched to other tactics, equally damaging to the industrial state but perhaps not as widely anticipated as spiking. Right now, the Forest Service is watching especially for spikers; a major arrest would boost the morale in the corporate boardrooms of LP, MAXXAM, and their ilk. This means that spikers should be extremely vigilant, but it also might provide the opportunity for monkeywrenchers to strike other, more vulnerable targets as well. Going after logging equipment, for instance, causes more immediate financial losses to the industry than spiking. The monkeywrencher should be aware, however, that with all those extra Freddie cops in the woods, seemingly unguarded equipment just might be staked out. Still, there are loads of other possibilities and some of them do not require any incriminating specialized equipment. Systematic plugging of culverts, to cite one example, hasn’t been employed nearly as much as it deserves to be. Done on a large enough scale, it could do millions of dollars damage to the bloated system of logging roads in the National Forests.
We should take heart from the passage of draconian laws; this means we are actually having some effect on the industrial state. We should also be flexible, and able to adapt to changing circumstances. It is almost a cliché that generals are forever fighting wars using the tactics of the previous war. Generals can afford to do this, since it is the common soldier, not the general, who pays the penalty. Monkeywrenchers are in the front ranks, and can’t afford to get careless. Keep on fighting, but be careful!
— Smokey Bear
Field Note
British Columbia recently established tree spiking as a major crime. Penalties are six months and $2,000 for spiking; three years and $10,000 fine if physical injury or property damage occurs for spiking any tree, whether living, dead, standing, fallen, limbed, bucked, or peeled. It is also an offense to aid, abet, or counsel another to spike timber; to carry spikes or other potentially hazardous objects with the intent to spike timber: six months and $2,000. (Of course, no one involved with the publication or distribution of Ecodefense abets, aids, or counsels anyone to spike timber.)
Tree Pinning: The Art of Silent Spiking
Just as spiking is named for the spike-like quality of the fifty and sixty-penny nails used, so “pinning” is named for a lowly steel pin which, buried in the tissue of a living tree, is designed to wreak havoc with the butchering blade of the sawmill. As levels of protective security increase to stem the swelling tide of tree spiking, silent new methods will become necessary for those courageous enough to infiltrate the guarded stands of condemned trees. The loud ring of hammer on spike is replaced by the gentle hum of the cordless electric drill as it creates a small cavity for the insertion of a steel pin.
Equipment
Because the basic equipment for tree pinning is more expensive than that required for spiking, it is wise to “shop by phone” and get the best price possible. Drill prices, for example, can vary as much as $50 from one store to the next.
Drills — Many models and types of cordless electric drills are currently available, but the best, in terms of torque and price, are probably those manufactured by Black & Decker. Their basic model 9020 sells for $25 to $40. Its slow speed and limited battery storage capacity allows for drilling only 15 to 25 holes, depending on the toughness of the wood; but, you can buy three or four of this model for the price you’ll pay for the vastly superior model 1940 ($80 to $100). The model 1940 will drill twice as many holes as the 9020, and will do so more quickly due to its higher RPMs. It also has a detachable power pack that allows you to plug in a fresh set of batteries. The battery packs range in price from $25 to $50, but you may have to check with a considerable number of retailers to find one who stocks them on the shelf. Do not order them from the manufacturer unless you can have them shipped to a trusted friend who lives far away. Also, never return the warranty registration card to the manufacturer since this creates a paper trail which could be of great assistance to Officer Dogooder and his trusty bloodhounds.
Finally, read the instructions that come with your drill and follow them to the letter. This is your best insurance against equipment failure.
Drill Bits — Use only high speed “twist” drill bits of a type normally used to drill through metal. The flutes and grooves in this type of bit (unlike the wood bit) force the sawdust debris out of the hole. On the first try, a twist bit can drill a 4 to 4-1/2 inch deep hole. A second effort in the same hole (after clearing out the sawdust) can double this depth. Usually, however, it is not necessary to drill in more than 4 inches past the bark to accommodate a pin of up to 3 inches.
Apron — A simple cloth apron makes a handy pin holder. It also allows you to wipe your gloves clean (of silicon — more on this later).
Pins — At a welder’s supply, buy one-quarter inch steel welding rod. It comes in thirty-six inch lengths, two rods per pound, at $1 to $1.50 a pound. For the sake of variety on different jobs, occasionally substitute either the threaded or zinc-coated steel rod found in the hardware section of most lumber yards. Keep in mind, however, that zinc plating almost doubles a steel object’s detectability to a metal detector. Do not use zinc-coated rods where this would be a problem.
Use a hacksaw to cut the steel rods into three and four inch lengths. This allows you to fit the pin to different hole depths.
Saftey Glasses — Buy and wear simple plastic safety glasses that do not block your side vision.
Rags — Always have plenty of clean rags available to keep your equipment wiped free of fingerprints.
Caulk — Buy a standard caulk gun and tubes of clear silicon caulk (like GE’s Silicon II). This keeps it quick, clean, and cheap.
Pinning
Pinning is best accomplished by a two-person team using the following five steps:
-
Drill a hole at a slight downward angle in the tree. Your drill bit should be slightly larger in diameter than your steel pins.
-
Use the caulk gun to squeeze clear silicon into the hole.
-
Insert the steel pin. If the hole is more than 4 inches deep, use a 4 inch pin. If the wood in a particular spot is too tough, don’t force it. Use a 3 or even 2 inch pin in a shallower hole. Use another piece of steel rod, from 6 to 12 inches long, to push the pin to the bottom of the hole. Glue the pin in place with the silicon (otherwise a powerful magnet could pull it out).
-
Place another dab of clear silicon at the mouth of the hole. This seals the hole against invasion by bugs or disease.
-
Camouflage the opening with a chip of bark stuck onto the silicon.
Targets
Because of the relative silence of this technique, it can be used in sections of timber slated for immediate felling. You should not limit yourself to standing trees, however. Effective monkeywrenching involves examining every step in the processing of old-growth timber, from mountainside to mill door. Since metal detectors are often used to locate nails, old fence wire, and other scrap metal in logs before milling, observe this process from a safe distance to see if you can infiltrate the work area at night and insert your pins after the metal detection phase. If even greater silence is necessary, switch to a brace and bit (a crank-like hand drill available at all hardware stores). This entails more manual labor, but you don’t need to pin fifty logs. Six to a dozen will do quite well. Make sure you remove any telltale shavings or sawdust that can reveal your activities.
— T.O. Hellenbach
Field Notes
-
Jam a branch in a drilled hole after it is pinned. When the tree is debarked in the mill, it will not appear as suspicious as a plastic-filled hole would, and will merely appear to be a knot.
-
Normal drill bits are too short for old-growth trees. Use long ones.
-
Devise a system for keeping track of your tools in the dark — a fanny pack or a tool belt with holsters.
-
Instead of using a drill larger than the pin, try using one the same size and then driving the pin in. Driving the pin into a drilled hole requires much less force and noise than hammering into undrilled wood and still eliminates the need for caulking if you plug the hole with a wood dowel the same size as the pin and cut it off flush.
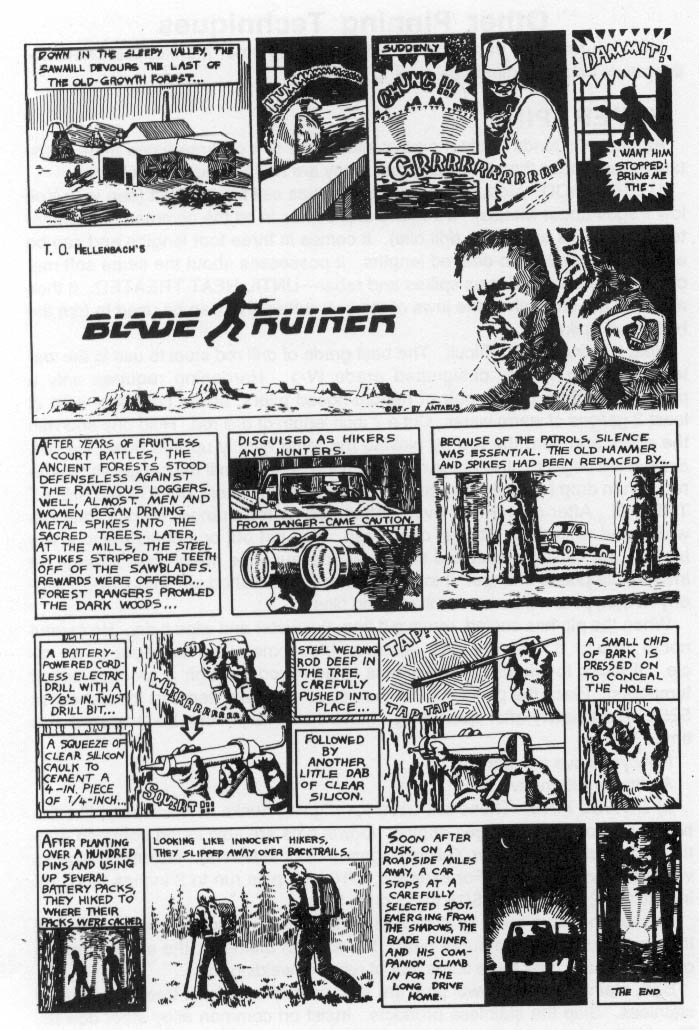
Other Pinning Techniques
Included here are three short articles detailing other monkeywrenchers’ refinements on the original tree pinning technique.
Super Pins
At least two kinds of steel pins available are two or three times more resistant to saw blades than is welding rod. They are Drill Rod and Dowel Pins.
1) Drill Rod. Most major steel companies sell this product (see your Yellow Pages under Metals). It’s round and comes in all the common drill diameters (one of its uses is as drill bits). It comes in three foot lengths and can be easily hacksawed into desired lengths. It possesses about the same soft mechanical characteristics as spikes and rebar — until heat treated. It then acquires the strength of the jaws of the bolt cutters that can be used to trim the heads off spikes!
Heat treating is not difficult. The best grade of drill rod steel to use is the water hardening variety designated grade W-1. Hardening requires only a propane torch, a cheap pair of needle-nosed pliers, and a container with at least 2 gallons of warm water. Cut a 7 inch length of drill rod. Hold one end with the pliers and heat the rod by playing the torch evenly up and down the pin. Soon it will begin to glow black-red. Continue heating until the pin glows cherry-red. Then drop (quench) it in the container of warm water. Don’t overheat the pin. After cherry-red, overheating begets red-orange, orange, orange-white, and white hot. Stop at cherry-red. You get but one chance and if you blow it, you can’t go back and start again because the metal goes through an irreversible phase change. If in doubt, check the finished pin with a file. Properly heated pins will be harder than good files.
When the pin has cooled, remove it from the water and wipe it dry. Be careful not to drop it. It is harder than Japanese trigonometry but as fragile as an icicle. It lacks toughness. Toughness is achieved through a process called tempering. Place the pin in your kitchen oven and bake (temper) for an hour at 525°F immediately after quenching. More than one pin can be tempered at a time.
Now you have a super pin.
A simpler alternative is:
2) Dowel Pins. These are used for aligning hunks of machinery, like the two halves of a Volkswagen engine. Dowel pins are sold in the common fractional diameters (see your Yellow Pages under Fasteners). Maximum lengths vary with the diameter. For example, 3/16 inch pins run to 2 inches long, 1 /4 inch to 2 1/2 inches, and 5/16 to 3 inches long.
These pins have been heat treated so that their interiors are very hard and their outer surfaces are super hard. For a given diameter, the shear strength of dowel pins is over three times that of rebar or welding rod.
Soft, stainless steel dowel pins are sold as well as a heat treated variety of stainless. Skip the stainless products. Insist on common alloy steel dowels. They’re the strongest and the least expensive.
Because drill rod and dowels are much stronger than other steel pins, they are effective tree spikes in smaller diameters. Therefore drilling holes for them requires less effort. Hand drilling holes for these pins can be done with an old-fashioned bit and brace. Twelve and eighteen inch long drill bits are available and “lean-against” braces make drilling easier. And drilling by hand is silent!
Placing pins deep in the tree by drilling farther into it is best. More expensive metal detectors are required to find deeply implanted pins, and the deeper the pin, the more difficult it is to remove it.
When using high strength pins instead of rebar or spikes, it’s the cross-sectional area that matters, not the diameter. Pins 3/16 inch in diameter are sufficient.
— Henry Bessemer
An Advanced Tree Pinning Technique
The government had the foresight to train me in demolitions and sabotage and it still dominates my thinking. After studying the tree problem we have come up with what we think is a sure fire way to neutralize the cutters. This method is an improvement over the already good tree spiking procedure in earlier editions of Ecodefense.
Wholesale tool companies (check the Yellow Pages for a major city) sell cordless electric drills’ with removable nicad battery pacs. These are the heavy industrial models made by Makita and the like, not the cheap little things sold in Wal-Mart. Replacement battery pacs and chargers are available, and this is important. Tool companies also sell “aircraft extension bits,” which are very long drill bits, in lengths up to 18 inches.
Get some lengths of oil hardening tool steel rod (drill rod) of at least 1 /4 inch diameter. This is soft annealed steel that is usually worked into shape then made hard by heat treating. Cut the rod up into three to six inch pieces with a metal cutting band saw (or have it done in a machine shop). Have the short lengths of rod heat treated by a company that does that and tell them to draw the rod lengths back to Rockwell 49–50. This gives them a spring temper which is hard yet flexible.
Drill holes in trees, higher than eye level, with an extension bit 1/32 or 1/16 inch larger in diameter than the steel rod and slanting slightly downwards. The rods can then be inserted into the hole with adhesive and the hole filled with wood putty or ideally a plug of the same wood of which the tree is composed. A piece of bark glued over the hole will totally obscure the defect. The spare recharged battery pacs will allow an operator to drill quite a few holes, and probably work all night. The drills are fairly quiet, but I recommend silencing them with foam covers.
The best plan would be to inoculate as many trees as possible in a random pattern in any one section, concentrating on the areas of current cutting so they will run into a densely pinned area fairly quickly. Just in case sophisticated metal detectors can pick up the metal pins, load ceramic rods in a few holes or even tungsten carbide rods which are expensive but non-magnetic.
After giving the stand its shots, inform the processor’s insurance company of what was done and why. If no insurance company will cover them, they won’t cut.
If you can afford it, carbide rod is best because it is non-magnetic and absolutely no saw will get through it. Remember to buy carbide rod to length, since you can’t cut it without a special diamond wheel (you might check with a lapidary supply house for this kind of diamond wheel).
Of course, observe all security precautions when ordering material — especially by mail.
— Allen Dulles
The Increment Borer
The increment borer is a tool that almost every forester carries and uses on occasion. It is used to bore into the trunk of a tree in order to extract a core. (The core can tell a forester such things as the age and health of the tree.) The tools, made from Swedish steel, are anywhere from 4” to 30” long and come in three bore sizes (4, 5, and 12 mm). The 16 inch length retails for about $100 in the Ben Meadows Catalogue. Other forestry supply outfits also sell them. (Try Forestry Suppliers, Inc., POB 8397, Jackson, MS 39204–0397.)
Unlike spike and hammer, the increment borer is quiet, and bores a 1/4” to 5/16” hole which will take 6” of 1/4” round file. A round, or rat-tail file, makes an excellent pin — one far more resistant to a saw than a spike. Part of the core can be returned to cover the hole. The hole seals itself with pitch in a short time.
The borer and file, unlike a hammer and spikes, would be expected in the forest or on a timber sale area, especially if you are wearing an old Filson cruiser’s jacket and carrying a cruiser’s ax.
Proper use of an increment borer takes a little practice. While it can be rotated, it must never be bent, or it will splinter. Further, it is best to remove it immediately after the core has been extracted. Otherwise, the tree seems to set up on it after a while, making extraction difficult. If, in boring a tree, you inadvertently run into rot in the butt, it may be necessary to pull back with all your weight, while rotating the instrument in order to re-engage the threads in sound wood.
Of course, in case questioned, it pays to bone up on some forestry terms: mean annual increment, rings per inch, low site, high site, standard deviation, etc.
Yes, $100 is a lot of money for an individual to spend, but the reduction in court costs might make it worthwhile.
— Vecchio Silva
Field Note
Borer tools can be ordered from International Reforestation, Eugene, OR. 1-800-321-1037. 8” borers are $83.00 (plus postage); 10” borers are $97.50; 12” borers are $105. (Be extremely security-conscious when ordering by mail!)
A couple of things should be remembered when using borers: 1) To avoid getting it stuck in the tree, never leave the tool in the tree longer than absolutely necessary; 2) When removing the core, never force the spoon in or out if the core appears to be stuck. If you do, you may tweak the spoon out of shape, ruining it. Instead, repeat the release procedure. If the spoon won’t come out with the borer in the tree, back the borer all the way out before removing the core.
Ceramic Spikes
Foiling the Detectors: Non-Metallic Tree Spikes
Tree spiking has forced the development of a number of countermeasures, the most significant being the use of metal detectors to locate metallic spikes embedded in tree trunks. Many sawmills routinely screen all fallen logs at the mill to remove commonplace metallic objects like nails and old barbed wire. There is an increasing likelihood that conventional metal spikes will be detected before reaching their intended target — the costly sawmill blade. Editor’s note: This does not mean that metallic spikes are no longer useful — the reaction to their use thus far indicates that they are having an impact. But non-metallic spikes have obvious advantages.
Ongoing research has produced several non-metallic spikes, or pins, that promise to defeat the metal detector and wreak havoc inside the sawmill. The first of these is a high-fired ceramic pin made of the same type of stoneware used by potters who hand-throw (on a potter’s wheel) cups, bowls, plates, etc. The primary ingredient is stoneware clay, produced in a wide range of formulations by clay companies and ceramic supply outfits. Most such manufacturers and suppliers are located in large metropolitan areas where monkeywrenchers can purchase their clay over the counter for cash — leaving no paper trail, like name and address, for the police investigator. The clay usually comes in twenty-five pound bags, two such bags making up a fifty-pound box. Be sure that the clay type (known as the “clay body”) that you purchase contains no iron oxide, an ingredient commonly added to stoneware clays. If sufficiently concentrated, this iron oxide may be picked up by metal detectors. To find a suitable clay, make your first inquiry by phone, obtaining the name or number of a stoneware clay that contains no iron oxide. At a later date, send the most inconspicuous-looking member of your spiking team in to purchase a bag or box. If necessary, she can be “picking it up for a friend,” or can be a college art student purchasing materials for a project.
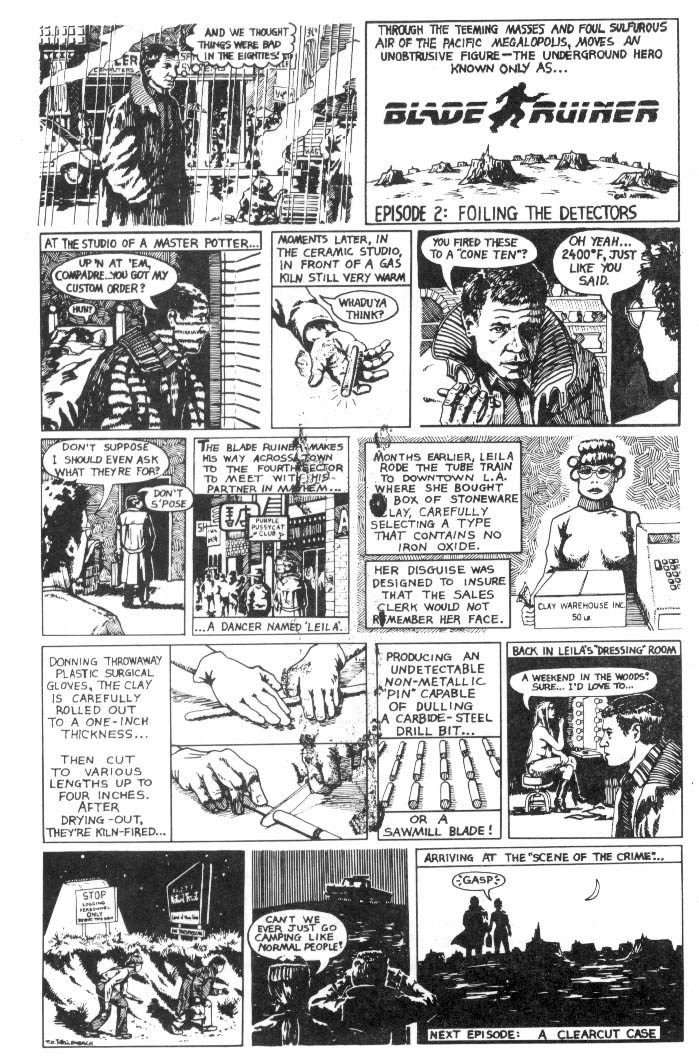
Clay bodies can be stiffened and made even more durable by the addition of “grog,” a gritty, sand-like material usually made of a high-fired refractory material (ground stoneware) or simply a pure quartz sand. Purchase this from a clay supplier, and specify an 80 or coarser screening. Do not buy fine powder grog, or “soft” grog made of weaker lower-fired materials. The grog is blended into the clay body through a process called “wedging”: kneading the material in by hand until it is thoroughly and evenly distributed throughout the clay. Since clay formulas vary from one type to another and from one company to the next, we cannot specify the amount of grog to add to your clay. Just add a little at a time until the clay feels a little coarser and stiffer. If you add too much, the clay will be hard to roll out and will not stick together well. The clay must remain “plastic” to allow you to readily shape it.
When handling the clay directly, always wear plastic gloves. The best types are the disposable examination gloves used by doctors and available at medical supply houses. More expensive, but more readily available, are the plastic gloves sold at all grocery stores in the kitchenware section. These types are more durable and will survive repeated use. Whichever type you use, obtain gloves with a skin-tight fit.
The pins are made simply by rolling the clay out to the desired thickness, and cutting it to the appropriate length. As with the metallic pins described above, you will have to use a drill to make a hole in the tree for inserting the pin. Choose your drill (cordless battery-type or old fashioned brace and bit) and find the largest bit you can readily use, up to one inch in diameter. Experiment on a recently fallen tree to insure that your drill and bit combination allows you to drill a hole up to four or five inches deep. The thicker your ceramic pin is, the more likely it is to either dull or break a sawmill blade. Therefore, if you can drill one-inch diameter holes, roll out the clay to a one-inch thickness. It will shrink some in drying and firing and will fit easily in a one-inch hole. As to pin length, four inches is plenty long; cut some shorter lengths, too, like two and three inches. This way, if your drill encounters a hard spot like a knot in the wood preventing you from drilling to the desired depth, you can use a shorter pin in the shallow hole.
Once your pins are rolled and cut, set them aside for a couple of weeks to thoroughly dry. They must be completely dry or they will break apart in firing. Also, make sure the clay is well-compressed during the rolling-out, as even tiny air pockets left inside the clay will blow up during firing.
Finally, your ceramic pins will be ready for the final stage in preparation — the firing. High temperature firing brings about chemical changes in the clay, causing the particles to bond together through vitrification. The end product is a material so hard it will easily scratch glass. In hardness, it ranks with some types of steel, although it will shatter under a heavy blow (making it unsuitable for spiking with hammers). Still, it is high enough on Mohs’ scale of hardness to cause damage to sawmill blades.
High-temperature firing can be achieved only in a gas-fired kiln. The pins must be fired to “cone 10,” which generally ranges from 2350 to 2400 degrees Fahrenheit. Firing to lower temperatures will not produce the same hardness. Following are some of the sources for gas firing:
Schools — Various college classes, adult education courses, and private instructors maintain gas kilns for student use.
Do-it-yourself — This entails purchasing a gas kiln and making the necessary hookups to a source of bottled LP gas. This all costs several hundred dollars. Take a college course or private course through a competent potter to learn the principles and mechanics of gas firing before undertaking this step yourself.
Private Individuals — Across the nation, there are thousands of professional potters selling their hand-thrown wares through art and craft shows attended by the public. Some of them will be amenable to letting you pay for custom firing in their kilns. This allows you to have the job done professionally. As a way of developing this contact, you might buy several pieces from them at a show, and ask if you can come to their studio later to buy more of their wares. If you appear to be a good customer, the potter might agree to fire a few dozen pins for you. To make sure your contact is a competent professional, check out their product line. They should carry a wide range of practical goods (cups, bowls, planters, etc.) and should stock large numbers of items. Avoid those who don’t seem to have much to choose from. Check the quality of their firing by breaking one of the inexpensive items you bought from them. The broken edge, revealing the inside of the fired clay, should be a medium to dark brown. If it appears very dark, almost blackish, the work is poorly fired (over-vitrification) and is too brittle. Do not let such a potter do your firing. Make sure you check the broken edge, as an external examination will not reveal this type of sloppy firing. Of course, make sure their goods are stoneware fired to a cone 10.
Security is of primary consideration when firing in someone else’s kiln, or when having a custom firing done. Do not use your real name. Never reveal the intended use of the ceramic pins unless the person handling the firing is a member of your spiking team. Do not attempt to recruit for your spiking team the person doing your firing unless it is a trusted friend of many years’ acquaintance, or a trusted relative. If possible have a trusted confidant handle the manufacture and firing of the pins at a location far from the forest where they will be used.
Have ready an air-tight reason for your intended use of the pins. Make up a convincing story, perhaps about how you plan to assemble them into an abstract sculpture. Use your imagination. The possibilities are limitless.
As a further means of obscuring their intended use, fire the pins in twelve inch lengths. These can later be cut-down to suitable lengths using a diamond wire hand saw available for $15 to $25 through a jeweler or lapidary supply house (found in most large cities).
It’s a good idea to have a member of your team take a course in pottery to become familiar with the materials, techniques, and terminology. This can help in manufacturing a convincing cover story for the firing of your peculiar pins.
Competent private instructors, although not as widely available, can be a good source of schooling and kiln access.
Inserting Ceramic Tree Spikes
A hand-powered brace and bit type of drill is both inexpensive and very effective for drilling large diameter holes in trees. It is also laborious and time-consuming, so you should plan to work on only six to a dozen trees per hit. Small numbers are sufficient if using non-metallic pins since the Freddies will be unable to find them; and if the lumber company cuts anyway, the pins will make it to the sawmill to attack the blades.
When a team is working in an area currently being logged, it is necessary to take security precautions that might not be necessary when working in a remote roadless area. Night work may be essential, and this creates additional problems. Absolutely critical is the ability to conceal all signs of your work. To gain this ability, you must practice during daylight hours in a safe and secluded location. Only by polishing your technique beforehand can you be sure you will leave no evidence at the scene. When chips of bark are glued back into place, there must be no telltale seams, cracks, or excess glue. All wood shavings must be carefully swept onto a towel and carried away a short distance for shallow burial. A dark terry cloth towel is recommended since the shavings will stick well to the rough surface.
When working at night, use a flashlight to carefully double-check your work when finished. The best flashlight is the current-issue GI flashlight available at most army surplus stores. It is made of green high-impact plastic, has an angled head (the light shines at a right angle to the body), and takes two “D” cell batteries. Unscrew the base cap and inside you’ll find a red plastic lens that fits under the “0” ring screwed onto the standard lens. This red light is sufficient for close work and will not ruin your night vision. If you insist on using a penlight type of flashlight, close one eye to protect at least half of your night vision. As with all tools, make sure all surfaces inside and out (including batteries) are wiped clean of fingerprints.
Your brace should be lightly oiled to insure silence, and you should carry a spare bit so that you can always work with a sharp bit. Since you have to lean into the brace to get maximum effectiveness, this tool is particularly effective on felled trees that have been limbed and bucked (cut into shorter lengths). These can be found either scattered about the logging site, or near skid trails or “landings” where they are piled for loading onto trucks.
When working in an area currently being logged, remain concealed by working low to the ground, hidden by shadows, or in areas where the terrain prevents viewing from any distance. Take these precautions when working in the dark. As in any spiking operation, it is essential to have an alert lookout well posted to guard the approaches. Working low will protect you from Forest Service enforcers using night vision devices. The lookout and pinner(s) need a signaling system of bird calls or short range radios. Always use a nondescript code on the radio.
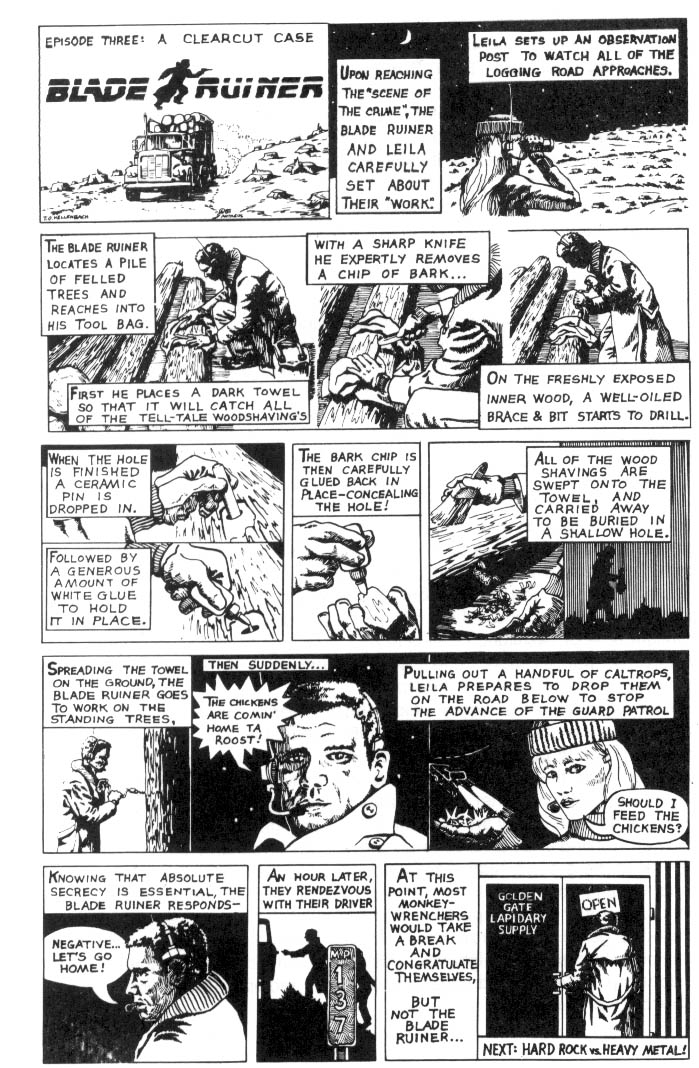
It takes a brave monkeywrencher to work a logging site in the night, but remember that you have the choice of time and place. This advantage, when coupled with basic security precautions, will guarantee your success.
— T. O. Hellenbach
Field Notes
-
A simple way to test ceramic pins for metallic content is to run a magnet over them. If you detect any significant magnetic attraction, the pins probably contain ferrous metals, and maybe susceptible to metal detectors.
-
Instead of going to all the hassle of making your own ceramic pins or cut-ing rock slivers, just buy the ceramic rods that are used in knife sharpeners — “crock sticks.” They’re uniform in diameter and come in useful lengths. They can be broken into shorter lengths if you want. They can sometimes be purchased at flea markets for less than a buck. The uniform diameter allows a closer fit, which means you can drill a smaller hole faster and easier. Crock sticks are iron-free as well.
-
In green timber, white glue may not dry sufficiently quickly. In that case, try epoxy for plugging holes after inserting pins.
-
Ceramic insulators are made out of an extremely hard ceramic and are suitable for non-metallic tree spikes. Although they are being replaced by plastic insulators, they can often be found in old junk piles or in basements or storage sheds — some can still be seen in National Forests where ancient telephone lines led to fire lookouts (before radios). They also may still be available at large electrical supply stores. Use the standard placement and security methods for non-metallic spikes. Industrial ceramics are used for a wide variety of purposes, and with a little imaginative sleuthing, monkeywrenchers can probably find other readily-available forms suitable for spiking.
Rock Spikes
Hard Rock vs. Heavy Metal: Quartz Tree Pins
Certain types of rock could well be the ideal type of anti-sawblade “pin” for planting in condemned trees. As with other types of monkeywrenching, proper materials and technique are essential.
Equipment
Begin by obtaining copies of lapidary. magazines at a quality newsstand. Among these are Gems and Minerals and Lapidary Journal. Scan the ads for lapidary supply houses and supplies in large cities. For security reasons, select a business in a distant city. Make your equipment purchases in cash. Never leave your name or address.
In the magazine ads, look for either manufacturers or retailers of lapidary saws, particularly a type called a “trim” saw, used to cut small stones into precise sizes and shapes. This power tool handles a circular sawblade made of high grade steel core with a cutting edge impregnated with chips of industrial or human-made diamond. The smallest size, a six-inch blade, should be more than adequate. These circular sawblades are far better than band or wire saws for our purposes, as they will handle greater pressures. Make sure your trim saw has a vise for holding the stone during cutting. You will also want to pur-chase the recommended coolant, as it is essential that the sawblade’s bottom edge be immersed in this oil-based protective material. An extra blade or two can save you a return trip should you damage your first one while learning proper cutting technique. Trim saws vary in price from about $160 to $350, with good quality models averaging around $300. Diamond blades range in price from $20 to $45. The more costly types are thin blades for fine cutting with a minimum of material loss (important only for work with precious and semi-precious stones), so the lower priced general-purpose blades are what you want. Dulled or damaged blades can be repaired and re-surfaced by manufacturers, but don’t leave a name and address for investigators to trace to you.
Information on proper use of the trim saw can be found at a large public library in lapidary and jewelry-making books. Read and/or photocopy the information at the library. If you check out a book, you will leave a paper trail betraying your interest in this subject.
Following are some important rules for correct operation of a trim saw:
-
Always put safety first. Wear safety glasses. Be patient while learning to use the saw.
-
Don’t use long extension cords to power the saw as this will cause a loss of power through voltage drop.
-
Maintain proper coolant levels. Otherwise you will quickly destroy an expensive blade.
-
Make sure the surface of the rock you are cutting is at right angles to the blade. Cutting into an angled surface can create side pressures that bring about a wobble and rapidly wear out the blade.
-
Slow down at the end of every cut to keep the rock from breaking and leaving a jagged spur protruding from the cut surface.
Stones can be cut into any elongated shape that will fit into the holes drilled into trees, generally not exceeding one inch in diameter. After cutting, clean the stone “pins” in warm water and dish soap. When finished, store them in a container to prevent accidental handling with bare hands (fingerprints!).
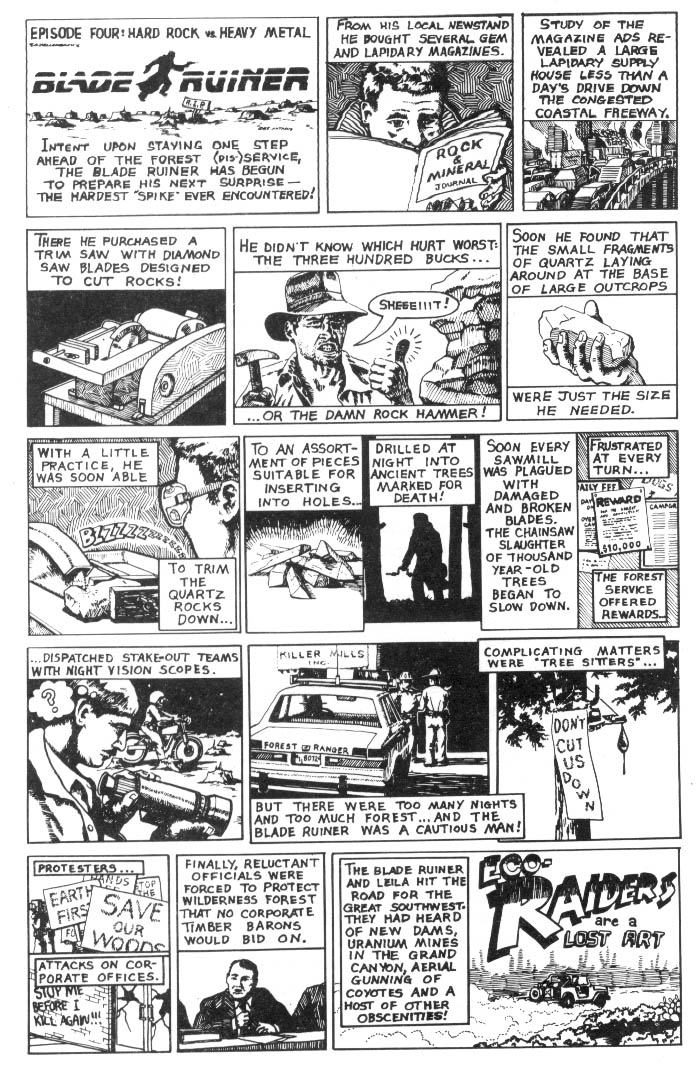
Rock Types
The large majority of rock types are not suitable for modification into “pins” simply because they are not hard enough to damage a sawmill blade. Quartz and related minerals are perhaps best. On the Mohs’ hardness scale (from one to ten), quartz rates a seven, making it harder than steel which ranks from 5.5 to 6.5 Furthermore, virtually anyone with outdoor experience will recognize quartz in the field. Quartz is found throughout most of the US.
Quartz comes in a variety of colors, from clear or milky white, to rose or red-dish, yellowish, and even blue gray in some gold-bearing regions. A good field test for rocks you think are quartz can be carried out with a small piece of glass. If the rock is quartz, it will scratch the glass. If it will not scratch glass, it is simply a quartz look-alike. Start with small quartz rocks until you know what your trim saw can handle. Proper use of the saw will permit a single diamond blade to cut thousands of square inches of quartz.
Lower Cost Alternatives
If the cost of procuring a trim saw is prohibitive, one can scour the area of quartz deposits for fragments or river-worn pieces small enough to insert into a one-inch hole. On the negative side, they may be difficult to load into the drilled hole and less likely to come into contact with a sawblade.
Smaller quartz gravel can be combined with cement to make a round pin of some value. First, roll-up heavy paper and glue it into tubes one-inch in diameter or a little less. Mix three parts gravel with one part cement and one and one-half parts sand. Add water, a little at a time, until the mix is wet but still very stiff. Next, load it into the tube a little at a time and use a dowel to tamp it into place, eliminating air bubbles. Wearing plastic gloves will protect your hands from the lime in the cement. Set your pins in a cool but moist place to cure. Ideal conditions are 70 degrees Fahrenheit and 80 percent relative humidity. Allow them to cure from three to six months for maximum strength. Finally, peel off the paper tube exterior and paint the pins with a coat of exterior latex paint to protect the concrete from deterioration. Make sure the concrete is never exposed to freezing temperatures while curing. Use pieces of quartz gravel as large as is feasible.
Still another low cost pin involves using large quartz gravel or cobbles in a matrix of a good quality resin epoxy available at hardware stores and lumber yards. Form it into pins in the same way you would with the concrete method. This can allow you to use larger quartz rock fragments with a better chance of impacting a blade. The paper can be soaked in water and gently scrubbed off once the epoxy has set-up properly.
Rock and concrete pins require the drilling of large-diameter holes in trees which are best done with a brace-and-bit. Use the techniques described earlier for drilling and disguising the presence of the pins. As with ceramic pins, setting rock and concrete pins is time consuming and you should not expect to set a great many in one working session. However, properly placed and disguised, such non-detectable pins should be a highly effective deterrent. Note: As always, avoid placing the pins in the lower three feet of the tree, where they can cause chain saw kickback, with the possibility of injury to the feller. After all, we’re in it to save trees, not hurt people.
— T. O. Hellenbach
Field Notes
-
You may be able to find granite cores from old mining operations in rock shops. These circular cores from drilling are ideal non-metallic spikes. They can also be found anywhere test drilling is done, particularly around mines, bridges, dams, and energy plants. Since this drilling is done in order to analyze the underlying rock strata, the core samples are often kept for reference. But since more drilling than necessary is usually done, there’s bound to be waste material lying around.
-
Any good geologist can fairly accurately pinpoint where rocks of particular types come from, so it might be a good idea not to collect rocks from your property or even nearby.
-
An effective mold for cement and rock spikes would be the pasteboard tubes inside rolls of toilet paper or paper towels. Another would be a section of PVC pipe. After drying, remove the pasteboard tube or pipe.
-
An indication that lumber barons are taking non-metallic spikes seriously comes from the Missoula Technology and Development Center News in June, 1990. It reported that a fluoroscope had been tested on logs for detecting ceramics and rocks embedded in them.
-
If you find the suggested methods of pinning with ceramic or rock too much work, try a less sophisticated method. Simply drill a hole, stuff it with gravel or cobbles, fill it with caulking, and plug with a wooden dowel. It is much quicker, simpler, and cheaper. While this may not completely ruin a sawblade, it sure as heck won’t do it any good!
-
Drive small rocks into the crevices of the bark. Tree-cutters hate hitting rocks imbedded in trees even more than nails, as rocks do more damage to saws; and rocks cannot be detected by metal detectors.
-
Large-Diameter Bits. Since 1” and 2” diameter holes required for some non-metallic tree “spikes” are generally out of the range possible with cordless electric drills, an old-fashioned hand brace is required. Several types of large-diameter bits are available. Long (12” and upwards) ship auger bits are good, though difficult to locate and quite expensive. Extra-wide auger bits are available at some well-stocked hardware stores and can be used with an extender for deep holes. Unfortunately, these extenders are hard to find for standard tapered-shank bits. Several models of “micro-dial” bits are available for holes up to 3” wide. These cost around $15 and allow the hole width to be adjusted to match the diameters of the pins used. If you can find a tapered-shank bit extender, use it with the standard-length (about 8”) auger bits. If you can’t find a tapered-shank auger bit, find a micro-dial bit with a square shank for a power drill. This may have to be special ordered; Irwin Tool Co. does make them. With this bit, you can use readily available power-drill bit extenders ($3 each, lengths up to 18”). The power-drill bit extenders do require a special set of jaws in the hand brace, but most newer models accommodate both square and ta-pered shanks anyway.
Avoid the temptation to use too long an extender. A total length of 18” (bit plus extender) is maximum; any more length will make your set-up too unwieldy. As always, stick to only the best tools and check second-hand stores first. With a little searching and luck, a set-up as described above can be had for as little as $15! And second-hand shops are the best low cost sources for hard-to-get items like tapered-shank extenders and extra-wide auger bits.
Remember, drilling holes in trees with a bit-and-brace is hard work. You will need to be in shape.
Maximum effectiveness of “super pins” might be achieved by sending a warning letter and a pin sample (so they will believe you!) after the spiking. This in itself may be enough to deter logging in the spiked area; if not, at least the mills will know precisely what is behind the destruction of their expensive blades and won’t make the same mistake again.
— The Phantom Driller
Plastic and Wood Pulp: The Monkeywrencher’s Dream?
Remember that scene from the film The Graduate, in which the corporate executive tells Dustin Hoffman where the future lies? “I have just one word for you. Plastics.” Well, that may also be the word for those seeking new ways to deter the timber industry and their lackeys in the Forest Service.
An article in the October 1987 issue of The Barker, a woodworkers’ journal published in Vancouver, BC, describes the serious problem of contamination of pulpwood by small particles of plastic that find their way into the wood chips destined for paper-making. We have been hearing rumors for years that there is an insidious method for sabotaging the pulp-making process. Finally we have some facts.
It seems that most plastic gets into wood chips inadvertently, through worker carelessness. Items such as plastic bags and wrappers, nylon rope, cups, eating utensils, plastic bottles, pens, and even hard hats have fallen onto conveyors and into vats. In the course of manufacturing, the larger pieces of wood are screened out for “redigestion,” which means that these plastic items keep getting recycled until they are small enough to pass through screens and enter the pulp.
These particles of plastic are insidious because they do their damage after the final product — the paper — has left the mill. Plastic specks in the paper cause problems primarily because the plastic melts when heated. Plastic has clogged paper-coating machines, leaving lines on expensive, coated paper. Paper-makers have also found “windows” in paper, caused where plastic has melted and stuck to rollers during manufacturing. Plastic particles in computer paper have melted and gummed up computer equipment. The problems caused by plastic particles in paper are so serious that whole batches of paper have been rejected by the purchaser when contamination has been discovered. In some cases, paper-makers have paid for damages to purchasers of paper who did not find plastic particles until it was too late to prevent damage to products or equipment.
How much plastic does it take to cause problems? I quote from the article:
It takes only ten pinhead size specks per bale of pulp to ruin the whole shipment and one foot of polypropylene rope will produce approximately one million specks. The particles ... are almost impossible to remove from the pulping process.
This information has applications for monkeywrenchers. As more and more old growth falls to the chain saw, increasing numbers of trees cut on National Forests, and elsewhere, will be small trees destined for wood chips. Of course, unless someone actually works in a mill, or has access to the trucks that haul the chips to a pulp mill (these distinctive-looking trucks are a common sight in some woodland areas), it probably won’t be easy to contaminate the wood after it has been reduced to chips. But this leaves the charming possibility of “contaminating” the trees before they are cut and reduced to chips — “contaminating” them in such a way that they will be undesirable as pulp, or at least undesirable for high-grade paper pulp (some pulp is also made into cardboard boxes, particle board, and the like, and plastic particles may not ruin these products). We don’t know of anyone yet who has field experience using “plastic spikes,” but it seems that it should be fairly simple.
Since polypropylene rope was singled out for notice in the article, perhaps this is as good a plastic “contaminant” as any. Polypropylene rope would also have the advantage of disintegrating rather rapidly — anyone who has used it must know how easily the ends fray.
Holes could be drilled (using a bit and brace) in trees in an area destined for pulpwood cutting. Since small trees are usually destined for pulp-generally trees less than 8” in diameter — the holes won’t have to be as deep as those for traditional spiking. Two or three inches beyond the bark might be sufficient. The hole needs to be slightly larger than your rope diameter. Take a small segment of polypropylene rope and tamp it all the way into the hole. Then fill the remainder of the hole with a caulking material, and camouflage as in any spiking operation. As in any spiking, if the trees can be “inoculated” a few years before they’re scheduled to be cut, all the better, since nature will have time to cover up the work before it’s time to notify the Freddies (or whomever) that the trees have been subjected to preventive medicine.
Activists in British Columbia are also using Styrofoam cups, foam ear plugs, and similar materials to “soft spike” trees slated for pulping. An advantage in this kind of “spiking,” is that no one will whine about the danger presented to millworkers of flying shrapnel from Styrofoam cups or bits of rope.
— Harry Orchard
Non-Destructive Stopping of Logging
Some monkeywrenchers have tried saving trees from being cut by marking them with paint as “leave trees.” This is accomplished by marking a tree with Forest Service orange at four and a half feet and at ground level on two sides. There are now traceable isotopes added to FS leave tree paint, so look-alike orange paint may not be as effective as it once was. If you find a friendly in the FS willing to part with some FS orange, remember that in applying it you will probably get some of it (and the tracer) in your hair, clothes, etc. and this could be evidence against you.
Often a tree will be unmarked by covering the “cut blue” paint with any dark spray paint. This could be an easier way to save a tree marked for cutting. Tracer paint isn’t needed for this.
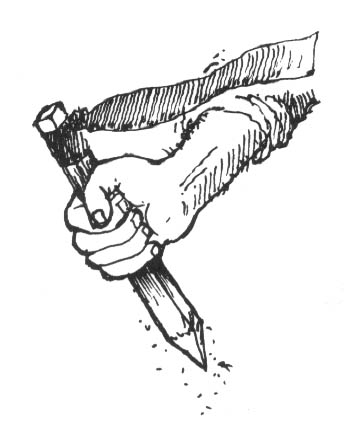
Survey Stakes
“Always pull up survey stakes!” This was Ed Abbey’s advice to all outdoor visitors. It seems a great many people are following his advice. Wherever the machine has been spreading its destruction, be it in the city suburbs or in the remote backcountry, a near-epidemic of stake-pulling has the land rapers — be they Freddie bureaucrats or corporate developers — on the defensive. Interestingly, it is not just wild-eyed eco-radicals who are pulling stakes. Redneck hunters of the old school, the sort who pack in to get their Elk and who well know what impact development would have on their favorite hunting grounds — these folks are doing it, too. We’ve even heard of miners pulling up stakes from Freddie logging roads in Idaho — although we doubt they were motivated by lofty ideals — they just wanted to be left to their destructive activities in peace, undisturbed by rival rapists.
Unfortunately, a great deal of stake-pulling is haphazard. In fact, most stake-pulling is probably unplanned and done on impulse by someone just out for a hike. This is unfortunate on two counts. First, to pull a few survey stakes here and there, while leaving the bulk of them untouched, won’t slow the developers much. The surveyors will come to work, notice the damage done, curse a bit, and replace the missing stakes with a day or two of extra work. Little has been done to halt the machine, beyond making a simple gesture of defiance (not that there aren’t times when a gesture of defiance is better than nothing). Second, casual, spur of the moment stake-pulling is unfortunate because it exposes the monkeywrencher to possible arrest. And pulling up survey stakes is a crime. It is considered destruction of property, and someone taken in the act of removing survey stakes could be charged with a felony. At the very least, she will be charged with a misdemeanor. Howie Wolke in Wyoming received six months in the county jail and a $750 fine combined with $2500 of restitution to Chevron for pulling survey stakes on a proposed oil & gas exploration road in a roadless area — this was after he had plea-bargained a guilty plea to a misdemeanor in exchange for dropping felony charges which could have sent him to the state penitentiary for several years.
Yet stake-pulling, well-planned and systematically done, can be one of the most effective means of monkeywrenching. It requires no esoteric technical know-how and no specialized tools. It can be done with one monkeywrencher and one alert lookout. Moreover, the stake puller need not carry the onus that the tree and road spiker or bulldozer burner carries. And stake-pulling can be effective — very effective. While it is certainly possible to trash the wilderness without the benefit of scientific surveying — the crude roads bulldozed by half-assed small-time miners are the classic example — accurate surveying is essential for even the most mildly sophisticated construction projects. Logging haul roads, for instance, require precise gradients and curves — the faster the trucks can get the logs out, the greater the profit margin for the operators. Even more precise surveying is needed for the construction of buildings (corner locations and elevations are critical), the layout of water and sewer lines, and the like. If the surveyor’s work is obliterated before such a project is completed, their work must be redone before the project can proceed. A day of systematic monkeywrenching can result — and in numerous known cases has resulted — in many weeks of extra work for the survey crews. In those parts of the country where winter stops construction activities, a day or two of well-planned stake removal could easily postpone a project until the next year ... and the next year. Done often enough and well enough, the trashing of the work of the surveyors can increase the costs of environmentally destructive projects to the point that the projects are canceled. After all, profits are the name of the game in the land rape business.
As we have said, surveying may precede a wide variety of development projects, whether it is a shopping mall gobbling up open space on the edge of a city, a new ski resort replacing Grizzly Bear habitat in a mountain meadow, or a new road gutting the heart of a previously roadless area for the loggers and the big oil corporations. The first tangible signs of all of these projects will most likely be the surveyors in their bright orange vests, leaving behind them a trail of confusing wooden stakes and multicolored ribbons.
Roads
The most ubiquitous form of development, at least in previously unviolated areas, is the road. Roads are of necessity a precursor of any large-scale development in the wilderness, whether it is for logging, mining, oil and gas exploration, or simply modern “industrial” tourism.
Roads range from paved, high-speed highways which may involve measurements down to the hundredths of a foot, through unpaved but still relatively sophisticated “all-weather” roads (the major trunk roads on the National Forests are of this variety) down to fairly crude logging “feeder” roads, which are measured, during the surveying phase, merely to the nearest foot. What all these roads have in common is that they require surveying.
For the sake of explanation, we will discuss the surveying of a typical low-grade logging road of the sort constructed on the public lands. Thousands of miles of these roads are built each year, generally at taxpayers’ expense, to the benefit of a few big logging companies and to the detriment of the forest. The basic principles used in this example would apply, with only minor differences, to the surveying of any road.
Our hypothetical road will be built into the “Last Stand Grove” on the Timber Sale National Forest. In the beginning, timber cruisers indicated the presence of “commercial” timber in the Last Stand Grove area. This may have originally happened many years ago, when even the Freddies didn’t think that the trees in Last Stand Grove were economically feasible to cut. But the bureaucracy has a long memory, and finally the day arrives when only remote and marginal stands of trees remain uncut. So the “timber beasts” schedule a sale in Last Stand Grove — no matter that only five million board feet of timber will be sold in return for the construction of ten or twelve miles of new road — since their job is to meet the Forest’s annual projected “cut,” they don’t worry about economics.
Since each National Forest maintains a “Five-Year Timber Plan,” updated annually, the Last Stand Grove Timber Sale is planned five years ahead of the projected date. Sometimes due to fluctuations in the timber industry, the projected date may not be met, but as a rule about a year or two prior to the scheduled date of the sale, depending on available personnel and other work priorities, the actual surveying of the road network into the sale area begins. In the meantime, timber marking crews have probably already been sent into the sale area to mark trees for cutting (although sometimes this is not done until after the survey crews have begun laying out the roads).
Just as the timber cruising, “stand exams,” and marking are done by the Timber Branch of the Forest Service, the design and surveying of the road network fall under the jurisdiction of the Engineering Branch. The engineers study topographical maps and get a rough idea of the most feasible route for a road into the Last Stand Grove. The next step is to send a couple of people out into the woods to see if this route is practical. This crew flags the route as they go, by tying brightly-colored ribbon to the trees, while trying to keep within a certain grade. Sometimes the route roughly charted on the maps proves infeasible in the field due to the topography, and the engineers are forced to take a different approach. But generally they find a workable route. Their biggest difficulty is usually keeping within the required grade. Although short stretches of logging road may exceed 8 or 9 percent, engineers try to keep below 6 percent on most stretches. The steeper the road, the slower the haul traffic.
If you happen across a line of flagging in the woods, you may have encountered a road in the earliest stages of survey. Should you remove the flagging, you have probably cost the developers a couple of days’ work at the most. It would be better to wait until the surveying has progressed further, when monkeywrenching would have a greater effect. Incidentally, “flagging” is what surveyors call the brightly colored plastic tape that they use to mark their work and make it easy to locate. Red and orange are the colors most favored by surveyors, although they may use others. Exploiters besides surveyors may use flagging; timber crews frequently use it to mark sale boundaries, although they usually favor blue, yellow, or striped flagging.
After the engineers have roughly flagged the route of the road, a more proper survey is done. This employs a crew of three to five people. On large road projects, several crews may work simultaneously on different sections of the road. Sometimes the crews live in temporary housing (usually trailers, rarely tent camps) near the work area, but not usually. Often survey crews spend nearly as much time driving over forest roads as they do working in the woods.
The road survey crew performs a two-fold function. The survey crew precisely marks the location of the road on the ground, a route that will later be followed by the construction workers when the road is actually built. At the same time, the crew gathers and records data which will later be used in the actual design of the road. This data will enable the designers to estimate such things as the needed amounts of cut and fill, blasting, culverts or bridges, and the like. This information will be used to estimate construction costs. Nowadays, actual road design is generally done by computer, after all the pertinent data has been collected and processed.
The survey crew follows the line of preliminary flagging, laying out the route. Distances are measured from the beginning of the road, and are measured from point to point along the “centerline” of the route. Each point on the centerline called a “station” is numbered. Each station is marked, usually with a stake (and sometimes also in other ways, which will be described later). On low-grade logging roads, where precision is not essential, measurements are usually done by “chaining”: measuring with an engineer’s tape. These tapes are usually made of reinforced cloth, and are 50 or 100 feet long. For more precise measurements, it was formerly the practice to use a “steel chain,” which is a thin, flexible steel measuring tape up to 200 feet long. However, where sophisticated surveys are needed now it is common to employ various forms of “electronic distance meters,” or EDMs, which use a laser beam to take instantaneous and accurate measurements between the instrument and a “rodman” holding a reflector. Whatever the means used, the object is the same: the measurement of distances between stations along the centerline of the road.
On a low-grade logging road such as the one to the Last Stand Grove, stations may be placed at pre-set intervals of 50 feet or so. Stations are also placed wherever there is a “break” in the terrain. A “break” is a significant change in the terrain — it might be a slight hollow or a major rock outcrop. In complex terrain, stations are more closely spaced. Where the route crosses a stream, for instance, stations might be placed at the top of the banks, at the actual edge of the stream, and in the center of the stream. Stations are also placed at any point where the centerline of the road changes direction.
The survey crew makes a note of anything of significance in the terrain at each station, and also generally runs a “cross-section.” In a cross-section, an imaginary line is plotted at right angles to the centerline of the road. The crew takes a chain out 50 or 100 feet above and below the centerline and records differences in elevation at various distances from the centerline. For low-grade roads this is done by simply recording angles from the centerline with a clinometer or hand level. In more sophisticated surveys a tripod-mounted level is set up over the centerline station to record exact elevation differences along the cross-section. Occasionally, stakes are placed above and below the centerline along the line of each cross-section (“cross-section stakes”).
When the crew “puts in” a station, they place a stake with the numerical designation of that station in the ground. On a low-grade road, the survey stake itself is the only indicator of the station. In more elaborate surveys, where precise distances are required, the station is marked by a nail or a “hub and tack.” A hub is a fat (usually 2” x 2”) stake which is pounded flush into the ground — a small tack is then placed in the top at the precise location of the station. This is of importance to the monkeywrencher, since if you want to do a thorough job of monkeywrenching a survey project, you need to remove everything — every bit you leave will make the job of re-surveying easier — yet you may not notice a hub flush with the ground and almost certainly will not notice something as small as a nail, unless you know to look for such things around survey stakes.
Sometimes, especially in areas with heavy cattle grazing, small colored flags attached to long wires are fastened to the point of a stake or hub before it is driven into the ground. These flags make the stakes easier to locate, but their real purpose is to make the survey animal-proof. Survey stakes are frequently pulled out of the ground or broken off due to the activities of cows or other large herbivores (cows as monkeywrenchers?). Often the stake is totally absent but the flag remains. Monkeywrenchers should be sure to pull up such flags, and look for a hub — it may be covered with a layer of dirt, pine needles, or the like.
Stakes are numbered beginning with the starting point of the road. The numbering system used is fairly standard, and a brief explanation may be of some use to the serious monkeywrencher. Theoretically, the starting station on a road would be “zero,” which would be written as “0000,” since it’s a four digit system measured in feet. A station 50 feet from the starting point would be written as “0050.” It is common, though, to start out at 1000’ (“1000”) to allow for later adjustments in the design. So if “1000” is the beginning station in a road, a station 250 feet farther down the centerline would be written as “1250,” and one 1000 feet from the starting point would be written as “2000.” You can therefore determine by the station numbers where you are in relation to the starting point of a line of survey stakes-if you cross a survey line in the woods at station “6200,” for example, you are likely about a mile from the starting point (assuming the first station was “1000”). Of course, only exploration will tell you how far the stakes go in the opposite direction — unless you have some “inside” information on the project.
In addition to a number, each stake will probably have a letter or series of letters written on it. These may be “PT” or “POT,” which stand for “point on tangent,” or “PC” or “POC,” which stand for “point of curve.” A point on tangent is simply a station along a straight section of the centerline, while the point of curve is a station where the centerline either begins or ends a curve. On low-grade logging roads, the Freddies usually employ a simpler designation: stations on a straight line are designated with a “P,” for “point,” while stations at the beginning or end of a turn are designated “PI,” for “point of intersection.” The importance of this to the monkeywrencher is that “PC” or “PI” stations, where the road will change direction, are more critical than the stations on a straight line. At “PC,” “POC,” and “PI” stations, the survey crews, in addition to their usual cross-section, also record the angle and direction of the turn. For low-grade roads this is done with a hand or staff compass; on more sophisticated roads this is done with a theodolite or its electronic equivalent. Because the “loss” of a PC or PI station can necessitate a lot of replacement work, these stations often have special “reference points,” which are additional means of locating the station should the original hub and/or stake be removed or otherwise effaced.
Reference points (or “RPs,” as they are usually termed) are not inspired by monkeywrenchers, although their use has certainly become more common in areas where the deliberate removal of survey stakes has become a popular pastime. Survey stakes, hubs, and the other markings of survey crews are often obliterated in perfectly “innocent” ways. If a road is not immediately built, for example, the ravages of nature begin to take their toll. Stakes weather fast, flagging fades and eventually disintegrates, and some forest creatures speed the process up by gnawing on the stakes. An additional reason for the use of RPs is that when the construction workers arrive on the scene, they often accidentally knock over stakes before their usefulness is finished.
RPs may be placed several ways. Perhaps the simplest and most common is to set a hub and tack a given distance from the station (remember, it will probably be a “PC,” “POC,” or “PI” station). The hub and tack will be placed to the side of the roadway. In extremely hard ground a nail will probably be used instead of a hub and tack. The distance will vary, but it might be as far as 50’ away, although the distance has a lot to do with visibility. Then a second hub and tack (or nail) will be placed a number of feet beyond the first one, on a tangent (straight line) leading to the station that is being RP’d. Thus, if the original station is obliterated, by lining up the two RPs and measuring the distance it is possible to re-set the station. It is important for the prospective monkey-wrencher to check carefully for RPs when removing survey stakes. If you don’t find any on your first couple of “PC” or “PI” stations, it is probably safe to assume that there aren’t any, but if they are present a thorough job of monkeywrenching requires their removal. Fortunately, RPs are also usually marked by stakes and flagging, so that the surveyors can find them again.
Another way RPs are sometimes done is to place a hub and tack or nail a given distance off the centerline, measure the distance, and take a compass bearing from the RP to the centerline station. This method is not as accurate as the previous method, and is not likely to be employed on sophisticated surveys. On simple surveys in wooded terrain, RPs usually consist of no more than a couple of stakes nailed to widely-separated trees away from the center-line. By simultaneously measuring known distances from those two stakes, the surveyors can relocate the original station. (No bearings are taken.)
Just before actual construction of a road begins, a final survey is done. Any changes in the centerline suggested in the final design are made. More importantly (for the monkeywrencher, at least) additional staking is done. “Slope stakes” are placed above and below the centerline. These stakes indicate such things as the top of the cut and the bottom of the fill. At stream crossings they indicate such things as the position of culverts. Slope stakes usually bear written information regarding the width of the roadway, depth of cut, and so on. Slope stakes are more for the benefit of the inspectors than the bulldozer operators, who rarely read them and knock them out with their ‘dozers as soon as work commences. The best time to monkeywrench a road survey is after the main survey has been completed but before slope staking begins. A monkeywrencher has far more stakes to remove if he or she waits until this final phase, and by then it is frequently too late to stop the road. The slope-staking crews sometimes work only a few days ahead of the ‘dozer crews.
Flagging — Survey crews leave lots of bright-colored flagging to mark their path. While this flagging may be offensive to the aesthetic sense, it certainly makes it easier for a monkeywrencher to locate all the stakes, hubs, and nails. Usually flagging is placed on the stakes themselves (although there is a trend to use pre-painted stakes instead — red or orange are the most common colors). Hubs are not flagged, since they are generally pounded flush into the ground, but nails have a strip of flagging tied around the head before they are driven into the ground. In addition, flagging is usually hung on a branch above the stake (in wooded country). Thus the centerline of the road is usually well-marked with flagging. When slope-staking is done, two additional lines of flagging (one above and one below the centerline) are usually placed. This flagging delineates the zone that will be cleared of trees ahead of the bulldozers. In addition to pulling out all stakes, nails, and hubs, the thorough monkey-wrencher should remove all flagging. The harder it is for the surveyors to relocate the route of a road, the more costly and time-consuming a re-survey will be.
A monkeywrencher removing stakes and flagging from a road project will quickly accumulate more stakes and flagging than can be conveniently carried. A good idea is to carry a pack in which to place stakes and flagging. Periodically, the monkeywrencher should detour some distance away from the route of the road, and dispose of this material in such a way that it is not likely to be easily seen. Burning has been suggested, but this is time-consuming and might jeopardize security, and in any event is not recommended for flagging, which is plastic. A better method is to bury the material. At the very least, stakes should be broken and all stakes and flagging hidden under logs or rocks. Resist the temptation to carry any of the material out with you once you’ve finished monkeywrenching a project. Stakes and flagging would constitute incriminating evidence should you be stopped and searched. (See Field Notes for additional and important security considerations.)
Construction Sites
Any development involving structures is extensively surveyed prior to construction. Not only are the locations of corners, water and sewer lines, and such important, but it is necessary to have precise elevations for foundations and to provide proper drainage for sewer lines. For these reasons the surveying done on construction sites is more precise than that done for most roads.
Monkeywrenching can seriously retard major construction projects.
The basic principles of surveying are the same as for roads, and you will find a profusion of hubs and tacks, nails and stakes around any major construction site. The main thing to keep in mind around a construction site is that reference points, or RPs, are almost certainly used for all major points of significance. This is because as soon as actual construction starts, all of the hubs, nails, and the like marking important locations get ripped out during excavation for the buildings, even though it is absolutely necessary to relocate all of these points. Therefore, well away from the building site you will find numerous RPs. A proper job of monkeywrenching will require removal of all of these, in addition to the hubs, stakes, and such on the actual building site.
On a construction site, the stakes will often carry a description of what they represent, as “water line,” “corner of building,” “edge of sidewalk,” and such. Frequently, longer-than-usual stakes are employed. These are called “laths,” and may be 2’ or 3’ long. Laths are also frequently used in the slope-staking of roads.
Miscellaneous
Offset Stakes — Survey stakes may be offset from the actual location of the station. This may be for several reasons. If the station falls on a rock where a stake cannot be driven, a masonry nail may be driven into the rock to mark the station, and the stake offset several feet. Sometimes the ground is simply too hard to admit a stake (but usually not a nail). On road reconstruction projects, where stations may fall in an existing roadway, stakes or laths are offset to the side of the road. You have probably seen these while driving down a highway about to be improved. If the existing road is unpaved, nails with flagging or shiners on them (a shiner is a small, bright metal disk through which a nail is driven) are driven into the actual station, while the stake bearing the station number is offset to the side of the road. If the existing road is paved, a masonry nail is driven into the pavement at the station, and the station number is spray-painted on the surface of the pavement.
When a stake is offset, the distance of the offset is written at the top of the stake, enclosed in a circle or oval. The writing on the stake faces the direction of the station. If you find such a stake, you can usually find the actual station by roughly measuring the distance written on the stake and searching for a nail. Sometimes a stake may be offset several feet from a hub, particularly in hard ground. A hub can sometimes be successfully driven into ground hard enough to shatter the thinner identifying stakes.
Bench Marks — A “bench mark” is a point of known elevation. The classic example is the USGS markers (usually a brass cap) which one finds frequently on mountain tops or other prominent locations. In many survey projects (including some road projects) it is necessary to know exact elevations. Working from a permanent bench mark, like a USGS bench mark, the surveyors establish the elevation of a number of “temporary bench marks” (“TBMs”) in the project area. Large, stable rocks with small protuberances are favorite subjects for temporary bench marks. The rock will frequently be spray-painted and the elevation of the protuberance written on the rock. Another oft-used method is to drive a large nail most of the way into a tree. The head of the nail is the TBM, and its elevation is usually written on a stake nailed to the tree. The tree will also probably be prominently flagged or spray-painted. While TBMs painted on rocks would be difficult to efface, nails in trees can either be driven all the way in and disguised or removed with a claw hammer.
Sometimes for major construction projects survey crews establish permanent bench marks at the construction site. These usually consist of small copper caps or larger (4”-5” diameter) aluminum ones set in concrete. The cap is attached to a metal rod (sometimes up to 2’ long) which is driven to within a few inches of the ground surface, after which a few inches of concrete are poured around the metal cap. These are called “monuments.” Removing one would probably require a shovel and/or pry bar. Needless to say, removal of a monument is illegal; in fact, it usually says so right on the metal cap.
Photo Panels — You have probably seen these in the woods. They consist of sheets of plastic, a foot or two wide and ten or more feet long, usually arranged in a cross or “X.” The plastic is usually white, although black plastic is sometimes used on a light-colored surface. The purpose of these is to aid in mapping by aerial photography. If you look at the center of the “X,” you will find a hub, nail, or piece of rebar. This marks a point with known coordinates (i.e., it has been set after the surveyors have run a traverse out to it). Several of these panels will be laid out in advance of a photo session. This may sound innocent, but such mapping is frequently done in connection with major construction projects. Unfortunately, photo panels are frequently left to rot in the woods after the job is done; effective monkeywrenching would have to be done during the short interval between the time they are laid out and the time the photos are taken — this sometimes is a matter of days, though it may be several weeks.
— Leather stocking
Field Notes
-
Tools — While little specialized equipment is necessary for the saboteur of survey stakes, a few items are helpful. As mentioned earlier, a pack to carry stakes, flagging, and other trash one might pick up is helpful. Don’t carry out anything that might be incriminating. Bury or otherwise conceal it away from the road or construction site.
A claw hammer is useful for pulling nails out of trees or pavement, and even makes it simpler to remove nails from soft ground. It also can prove useful in removing hubs from hard ground. Give the head of the hub a few good whacks to one side or another. That will probably loosen the hub enough so that it can be pulled out by hand.
-
Security — Removing survey stakes may seem like a relatively innocuous occupation, but the authorities and the corporate minions do not consider it trivial. Always use a lookout. If you see anyone else in the vicinity, stop, get rid of anything incriminating, and get out of the area. Always have an escape route planned. Treat this activity as seriously as you would any other form of monkeywrenching.
If you are working in an area in which there has been considerable monkey-wrenching, the authorities may well be on the lookout for saboteurs. Do not discount the possibility that a survey project may be staked out (no pun intended) or that someone may have followed you into the woods. It has been reported that on some highly-controversial timber sales the Freddies have resorted to putting invisible dyes on survey stakes. The idea apparently is that anyone touching these stakes will get some of the dye on their hands but not be aware of it, and that should they be apprehended, the dye would show up under ultraviolet light. Although it is not likely that this tactic will be widely used, since it will complicate the task of the surveyors and construction workers themselves, prospective monkeywrenchers should be aware of the lengths to which the authorities are prepared to go.
Invisible dyes are really nothing new in law enforcement, and have long been used to mark money. If you suspect that the authorities might be using this technique in your area, take a few simple precautions: Wear cheap cotton gloves while monkeywrenching. Place the stakes, as they are removed, in a plastic trash bag. Avoid touching clothing with either gloves or stakes. Before leaving the area, dispose of gloves, stakes, and trash bag(s), preferably where they will never be found. Be sure that you have left no fingerprints on anything — be especially careful with the trash bags. At the earliest opportunity, wash the clothes you were wearing on your mission.
-
Do not neglect other tactics discussed in this book (road spiking, sand in the oil, etc.) to harass surveyors.
Mining
We have received comments from knowledgeable individuals that the “Mining” section in the second edition of Ecodefense contained inaccurate information. In addition to decrying the misleading information about mining claims and staking, critics argued that destroying mine claim posts accomplished very little at considerable risk. As one experienced monkeywrencher wrote, “If you remove the posts at an early stage, all you will do is warn the claim holder of potential future problems. I personally believe that the vast majority of mining claims aren’t worth the trouble.” We agree, and have deleted the article on mining claims from this third edition. Instead of wasting your time trashing mining claims, there are far more effective ways to hamper the destructiveness of both small and corporate miners. Suggestions are offered in the following Field Notes.
Field Notes
-
Because so many “mines” are on a shaky financial footing, spiking roads to cause flat tires, plugging culverts to wash out newly bulldozed roads, and midnight maintenance on heavy equipment and trucks can cause crippling financial losses to a small or medium-sized operator, and sometimes even cause a major company to abandon a project. (The major asset many “small miners” have is their bulldozer which they use with reckless abandon to scrape up the earth to look for the “mother lode.” These fellows are among the most destructive characters loose on our public lands. If you can cripple their bulldozer with the techniques described elsewhere in Ecodefense, you might put them out of business, or at least run them out of the area you are trying to defend.) Security is of prime importance with any monkeywrenching around a mine site because of the forty-niner mentality still prevalent amongst such “get rich quick” cretins. Do not take unnecessary chances here — you are not simply courting jail, but possible death.
-
If you ever run across an unattended drill rig, take the bits away and bury them. Do likewise with any strange looking fittings you find, especially if they are for compressors or pumps. Some of these things are specialized and aren’t easily replaced. If there are rows of cuttings, scatter these around. If there are cores, break and scatter them.
-
One kind of mining claim marker that should be destroyed is that made of PVC pipe. Many miners are now using four-inch diameter PVC pipe in lengths of about 4 feet as claim markers. They double as death traps. In one case, BLM rangers examined 730 of these posts and found 168 dead birds and lizards. Flycatchers and wrens are particularly vulnerable. Birds enter them for possible nesting sites and can’t get out. Bees and other insects die in them as well. Until uncapped pipes are banned as claim markers, they can be tipped over or smashed.
Powerlines
During the last several years, the sabotage of powerlines has become recognized as a major form of monkeywrenching — due largely to several ill planned and poorly thought-out actions. In fact, sabotage of powerlines is often a poor idea. The reasons arguing against powerline ecotage include:
-
The difficulty of explaining why the powerline is being sabotaged. Who is the audience? What is the message? What are you trying to prevent?
-
The strong likelihood of alienating the public. Dropping a powerline may cut off power to hundreds of thousands, if not millions, of people, and cause them great inconvenience. It is doubtful that they will be sympathetic to either your action or to your goals after experiencing the inconvenience. (In one foolish powerline downing near Santa Cruz, California, in 1990, the many victims had recently been hit with a major earthquake.)
-
Law enforcement agencies make powerline sabotage a higher priority than other forms of monkeywrenching. Judges, prosecutors, and police agencies are likely to react severely to something that has the potential of inconveniencing so many people, and that strikes at the heart of the industrial infrastructure.
-
High-voltage powerlines are extremely dangerous and monkeywrenchers could be easily killed trying to sabotage them.
Unless you are prepared to take on these problems, and there is no better alternative, leave powerlines alone. Powerlines having any connection to nuclear power plants have the above problems in spades. Doing anything to such a line will bring the entire weight of the Department of Justice down on your head. (The successful minor ecotage of a powerline connected to the Palo Verde Nuke Plant in Arizona in 1986 triggered the Justice Department’s infamous operation against Arizona Earth First!, even though there was no connection between the 1986 incident and Earth First!.)
Ecotage directed at remote powerlines servicing only land-destroying operations, like isolated mines, is more justifiable and safe.
However, there have been successful and justifiable ecotage actions against major powerlines. The most successful was in western Minnesota in the mid- to late-1970s, when a group of farmers, the “Bolt Weevils,” continually monkeywrenched a 500 KV powerline under construction. Although that powerline was ultimately built, a dozen other projected powerlines were never built. The following guidelines on monkeywrenching powerlines come from anonymous Bolt Weevil veterans.
Powerlines are highly vulnerable to monkeywrenching from individuals or small groups. The best techniques are: 1) removing bolts from steel towers; 2) if tower bolts are welded to the nuts, cutting steel towers with hacksaws, torches (be careful not to breathe the vapors of galvanized metal — see the “Cutting Torch” section in the Vehicles and Heavy Equipment chapter), or cutting wheels; and 3) shooting out insulators (with a shotgun), and shooting the electrical conductor itself (a high-powered rifle is best) which frays it and reduces its ability to transmit electricity. Chain saws, or crosscut saws where noise is a problem, are appropriate for the large wooden towers. Techniques that connect the conductors directly to each other (cable lifted by balloons or shot by harpoon guns) are also effective, but more dangerous to ecoteurs. Used creatively, these techniques can completely baffle the opposition.
-
Most powerline towers are attached to a concrete base(s) by large bolts and nuts (with or without the addition of guy wires). (See illustration.) Check the size of the nuts, get a socket set for that size nut, a cheater pipe for better torque, and remove the nuts. You may also want to tap out the bolts with a hammer. Wind will do the rest after you are safely away from the area.
-
The more vulnerable towers are those spanning a canyon, at corners, on long spans, going up or down mountains — anywhere there is added stress or powerful wind. The “domino effect” can be achieved by monkeywrenching a series of towers leading up to a corner, or an otherwise stressed tower, and then monkeywrenching the stressed tower. Do not expect to monkeywrench a stressed tower and then allow the wind to finish the job for you after you are safely away from the area — it will probably come down in your presence. Be prepared.
-
If the nuts are welded to the bolts to prevent removal, use a hacksaw to cut through the bolts or even through the supports. This is more difficult, but a night’s work can still prepare a good number of towers for toppling in the next storm.
-
A cutting torch can also be used for cutting through tower supports (see “Cutting Torch” section in the Vehicles and Heavy Equipment chapter). Keep in mind that use of a cutting torch may result in additional arson charges. This happened in the Arizona case.
-
Another effective method, where noise is not much of a problem, is to shoot out the insulators holding the power cables themselves. A twelve-gauge shotgun loaded with double-ought shot is the best tool. Walk under the line until you are directly beneath the insulators on a tower. (See Illustration.) With your back to the wind, take two large steps backwards, aim at the insulators, and commence firing. Be prepared to dodge large chunks of falling glass. Large powerlines are suspended from strings of 20 or more insulators. Breaking 70 to 90 percent of them in one string is usually enough to ground out the conductor. This may take several rounds (the record is two), and will cause bright sparks. A team of three shotgunners, each taking a string of insulators for one conductor or conductor bundle, is best for a typical AC line. The lines themselves seldom are shot through and thus fall, but be alert for this possibility. Keep in mind that the use of firearms will result in additional charges if you are caught.
-
When insulators are shot out, the line quits carrying power and has to be shut down until the point of disruption is found and repaired. A helicopter may have to fly several hundred miles of powerline to find where it has been monkeywrenched. Monkeywrenching at a number of locations on the same night compounds the utility company’s problems.
-
Because of the noise from the use of shotguns, extreme security mea-sures are necessary and several escape routes should be planned. Furthermore, the use of firearms makes this a potentially dangerous activity. Do not leave any empty shotgun shells at the scene, since they can be positively traced to the gun that fired them.
-
Smaller powerlines are vulnerable to having their insulators shot out by a .22 rifle from a car driving along backroads or a hiker. (“Powerline? What powerline? I’m just hunting rabbits.”) This is an effective way to discourage power companies from spraying rights-of-way with toxic herbicides if you let the power company know that the damage is being done because of herbicide spraying (techniques for safe communication of this sort are in the Security chapter) and that it will stop when they stop poisoning the area.
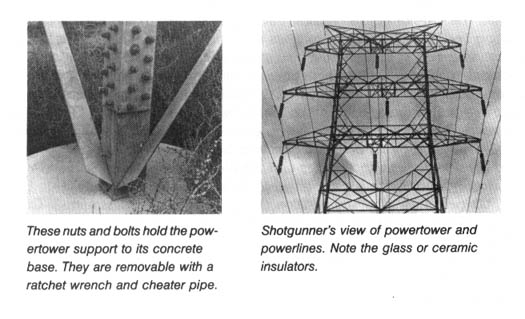
Field Notes
-
One item in Murphy’s Law states, “When loosening bolts, one of them is bound to be a roller (a bolt that will not simply spin off, but must be wrenched off millimeter by millimeter). It will either be the last bolt or the one most difficult to reach.”
So, for the soloist, it is wise to carry a cheap 3” C-clamp, which can bought at any hardware store, and a flat box-end wrench. Put the “fixed” head of the C-frame on the outside of the angle iron (the flat side) of the power tower and the floating head of the screw on the inside (sloped face). This gives you a brace to hold the box wrench so you can use both hands on the ratchet. This set-up will sometimes slip, so be careful to avoid skinned knuckles (wear gloves). An off-set wrench will only roll off the nut, adding to your frustrations. -
Some powerline towers are supported by guy wires. It would be extremely dangerous to cut the guy wires. They under great tension and the resulting snap could easily kill a nearby person. Also, the tower would be quite unstable after the last guy wire is cut — there is no telling where it would fall.
A safer method is to use a 4 foot long bar on the turnbuckle connecting the guy wire to ground and just unscrew the sucker most of the way. Let the wind do the rest — do not unscrew it all the way or you will be in the same danger as from cutting the wire. -
Powerlines are generally patrolled at least once a week at irregular times.
-
Any work near powerlines or other sources of electricity must be done with extreme caution. The high voltage will kill you if you are careless. If you have the opportunity, watch a power company crew doing “Hot Stick” work. If you must work around live wires, use proper equipment.
-
According to a recent report from UPI, utility companies are warning the public that small, metallic balloons, such as those sold for birthday parties and Valentine’s Day, have been implicated in several recent power failures. “In the past couple of years these metallic balloons have come up from nowhere and have escalated into a major source of power outages,” said Harry Arnott, a spokesman for Pacific Gas & Electric, a major California utility.
The Mylar balloons have a 1000th-of-an-inch coating of aluminum, which is an excellent conductor of electricity. When a stray balloon gets caught between two powerlines, it can cause electricity to arc between the lines, melting the lines and sometimes blowing up transformers and causing live wires to fall to the ground.
In 1987 PG & E blamed balloons for 140 power outages, while Southern California Edison reported 229 balloon-caused outages. An outage on Valentine’s Day in 1986 caused by a silvery heart balloon affected 20,000 customers. A balloon-caused outage in Antioch, California, in August 1987 affected 2750 customers and fried wires in microwaves, VCRs, and TV sets. The problem caused by holiday balloons has only been recognized recently, because the balloons usually disintegrate when they hit power lines, leaving no trace.
Warning: these balloons, as well as other plastic items, have been implicated in the deaths of marine animals, such as turtles and whales, who mistakenly ingest them. For that reason, their use in monkeywrenching is strongly discouraged. Even though they are effective weapons against powerlines, their danger to biodiversity is even greater. Do not use them, especially not near the ocean.
Seismographic Lines
How Seismic Survey Crews Work
One of the biggest potential threats to wilderness is energy exploration. According to the Utah Wilderness Association, for example, over 90 percent of BLM land in Utah is covered by oil and gas leases. The holder of the lease has the right to explore for energy wealth with helicopters, trucks, and sometimes earthmoving equipment; roads have been bulldozed for drilling rigs in several Wilderness Study Areas, even though this violates BLM regulations for WSAs. Exploration, drilling, and extraction of fossil fuels continue to be regarded in Washington as priority uses for public lands in the West.
Permits to explore for oil and gas are regularly granted by the BLM and Forest Service with little or no fuss. Environmental damage is supposed to be kept to a minimum, but damage is inevitable; and nobody watches seismic crews to prevent needless tearing up of the land — except at archaeological sites, which must be surveyed and marked by an archaeologist before the seismic work can begin. I heard a story that typifies this kind of situation. A crew was doing a line in Montezuma Canyon in Utah, where they were preceded by a bulldozer to make a road through the rocks. Because the canyon is an archaeologically rich area, full of Basketmaker and later Cliff Dweller sites, an archaeologist marked these sites off limits with blue flagging. Human nature being what it is, the surveyors and the “juggies” raided every blue-flagged area for potsherds and arrowheads!
After the energy company gets its permit, it sends in the surveyors. Working with a “chain,” the line is laid out cross-country or along a road using colored flags at regular intervals of 110, 220, 440 feet, or whatever for the pattern being used. Later (sometimes not until after the line is “shot”) the surveyors sight in the whole line with a theodolite or its electronic equivalent, leaving survey stakes to mark instrument positions. Survey work is easy, although tedious, to undo. As an ecodefender, the biggest problem is finding a seismic line in the first place; unless you have talked to somebody on the crew over a beer, a glimpse of colored flags along the road or trail is the only clue. Walk along the line and pull them all up. Bring a pack because seismic lines often run thirty miles or more, and that’s a lot of flags.
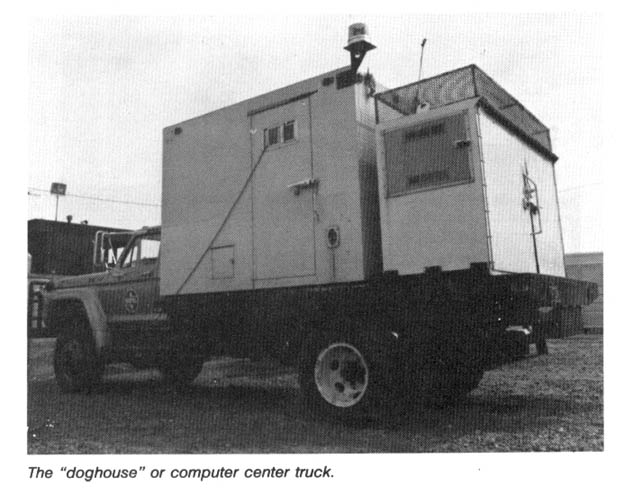
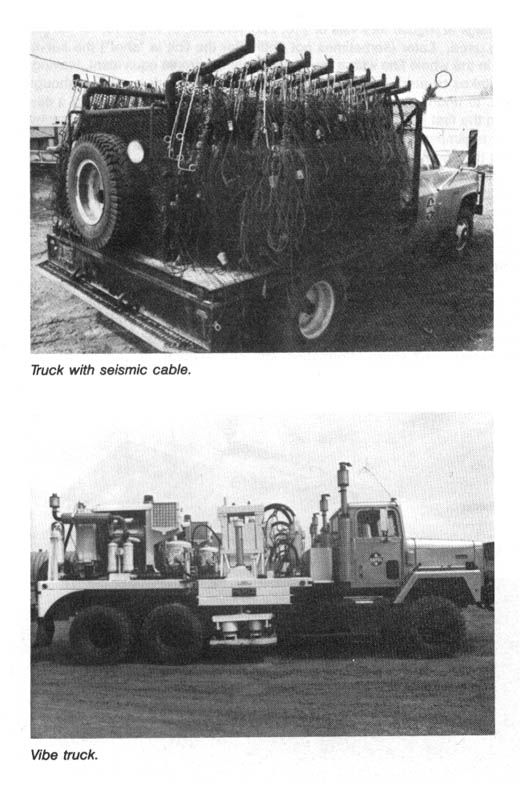
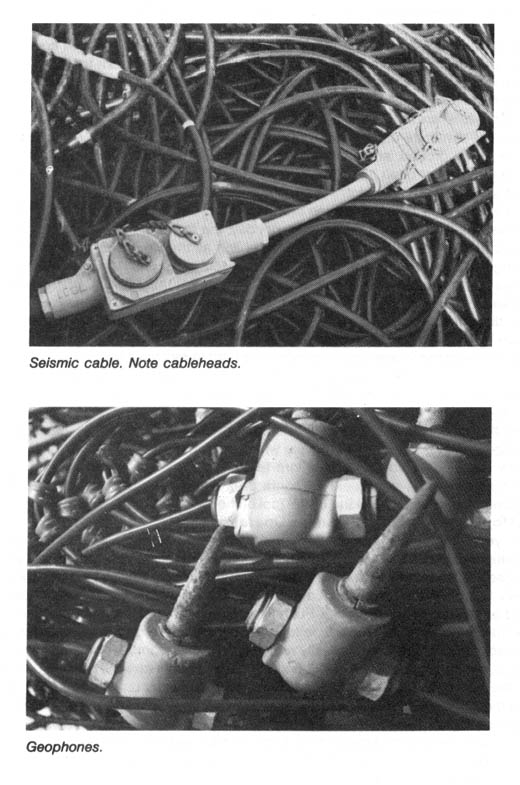
Wild areas commonly have rugged terrain, else they would have been explored and drilled years ago. The advent of “portable” crews has overcome terrain problems for oil companies, however, and created problems for wilderness defenders instead. Portable crews arrive by helicopter and use lightweight cable and geophones, and a portable seismograph or “recorder” unit which puts the data on magnetic tape. To create echoes for the geophones to pick up, dynamite charges are set off in drilled holes or on the surface. These explosive charges do little damage to the landscape, but they play hob with any wild animals that may live in the area. In some areas repeatedly explored (oil companies don’t share information with one another, so redundant work is commissioned) Bighorn Sheep and other animals have moved away.
Shot-hole operations use a truck-mounted drilling rig and leave a lot more physical evidence than a portable crew. There are restrictions on the use of this kind of equipment near human habitations, naturally, but most oil and gas exploration is on backcountry roads and trails. The major threat to wilderness here is roads. Needing a road on which to work, a seismic crew will get a bulldozer and make one.
“Vibroseis” crews are a relatively new development in geophysical work. Instead of dynamite charges, vibrator trucks are used. Each “vibe” lowers a plate to the ground, and shakes it hydraulically. There are usually four vibes on a crew, most often trucks, but tracked vibes are used by some companies that work off the roads a lot.
A typical crew has about three or four miles of cable and geophones on the ground at any one time. During the work day, the recorder truck is plugged into the cable, “reading” off about two miles of line as the vibes shake at intervals along it. The “jug crew” is picking up the geophones and cables behind the vibes and laying it all out again ahead. At night, the vehicles are usually parked in town but the cable is left in place on the line. Often the cable heads are disconnected at intervals or where the line crosses a road, since people have been known to use a pickup truck or whatever to drag cables away. Cable and geophones are very expensive and hard to replace if lost or damaged.
Seismic crews generally have three or four vibes and jug trucks, and the crew can usually operate well enough even if its loses one of these vehicles. However, each crew possesses only one recorder. If it goes down, no work can be done until it is fixed. A recorder is expensive, complex electronic equipment, and too costly to replace with a spare. If the recorder is down, the crew has to shut down. Juggie lore tells of the time one crew was tired of working seven days a week, 12 hours a day, and so created a vacation by putting a ping-pong ball in the diesel fuel of the recorder truck.
Monkeywrenching Seismic Operations
If you come across seismic equipment in the mountains or desert, there are a couple of cheap, easy ways to cause energy companies untold grief and expense. Concentrate on the thick cables paralleling the strings of geophones. Only two cheap, easily obtained items are necessary: A box of straight pins and a few tubes of super glue. Push two or three straight pins completely into as many cables as you have time for, then bend the pins until the heads break off, so they can’t be seen or easily removed. This will short out all wiring in the cable, rendering it useless. Next find the cable heads (where the cable hooks to the next one: 100–300 feet apart). Open the heads by unscrewing or opening the latches — depending on the type of cable. Inside, you will see male and female plugs, 2 each, containing 48 or 96 “pins.” Cover these with super glue, as well as the joining edges of the cable heads, and put them back together. Most crews only have a few replacement cables, so if you can “fix” 10–20 heads you will shut them down.
If you come across the “doghouse” (computer center of the crew), you probably won’t be able to get inside to do any real damage, unless you’re carrying bolt cutters or a hacksaw. These things run off generators sitting right next to them, though, and the usual monkeywrench tricks will work there.
In themselves, seismic survey crews do less damage to the land than strip mines, power plants, and dams. However, our remaining de facto wilderness areas (which are not protected by legislation) lie open to road making for seismic operations, and when the results from such a survey are positive we get drilling rigs. This type of work should be restricted to land already dominated by the works of civilization. In wildlands, seismic crews are the vanguard of the “rape, ruin, and run boys” and should be stopped.
— Everett Ruess
Field Note
Update: Most seismic crews now record many more signals than before, and use “telemetry” systems. They reportedly no longer use cables that plug into one another, which could be glued together by monkeywrenchers as in the past. In the new systems, you will find boxes about eight inches high plugged into the cable at intervals that could be anything from 100 to 1000 feet. The most common brand names are Geosource, GUS, Input/Output, or Sercel. These boxes are worth about $3000 to $8000 apiece, depending on the model. If about one-third of the boxes were dragged off by goddamn wolves or bison and hidden in bushes or holes, this would stop the crew, unless they carry a lot more spares than usual. The cables themselves are not worth so much except one telemetry system uses fiber-optic cables, which are hard to repair if chewed by feral donkeys. Or giant rats.
It is common today to record several parallel lines at once, so if you stumble across one recording line, more may be nearby. Each line cable might lead into the recording truck, which often removed from the site at night. If you encounter a cable running transversely to the recording cable, this may lead to other lines. Where the transverse cable meets the recording lines, the boxes may look different than the others. These are special boxes, few in number, and a meteorite strike on these would really hold up the crew.
A seismic crew working in mountainous terrain will probably use a radio repeater. Scanning the peaks with binoculars, you might find an antenna. If you like climbing, an expedition might reveal whether this antenna could be improved by an FBI agent provocateur with a gas torch or big rock.
A trade journal called World Geophysical News gives the approximate locations of working crews. Unfortunately, this will set you back $200 a year, and many contemporary surveys are so short they will be finished by the time you read about them. If you arrived on the grid of a freshly completed survey, about all you could do is rip out permanent markers, or swap the numbers of them. Or perhaps you could look for evidence of any damage that breaches the environmental regulations the crew was supposed to observe.
Finally, be careful. Many crews employ a warm body to watch the recording cables at night, when working near any human settlements. Also take note that Greenpeace is being sued for stopping a seismography boat off the coast of Australia.
— Robert LeRoy Parker
Plugging Waste Discharge Pipes
Despite the general focus of this book on wilderness defense and the general public perception that monkeywrenching is restricted to wild lands in the West, ecotage has a long and honorable tradition fighting polluting industries as well. One of the most evolved forms of monkeywrenching is plugging polluters’ discharge pipes. The following is from an expert in such matters.
The basic trick is to plug wastewater discharge pipes from various industries. Chemical, metal-working, electrical generating, mining, sewerage, and oil refining and drilling plants all discharge large amounts of wastewater. Wastewater flow rates can exceed several million gallons per day from a single source.
A single pipe can turn a vital river into a festering toxic sewer. Imagine the reaction at the plant when the foul stuff oozes back into the executive parking lot instead of into an unsuspecting river.
Choosing Targets
This is the easy part. Look in the local yellow pages for one of the facilities mentioned above. Or, walk or canoe along the local riverbank. Mark prospective targets on a map. Use a tape measure to determine the inside pipe diameter. Note the type of pipe (concrete, steel, or clay).
Sewer pipes are distinguished by gray-colored water discharges, algae growing in the pipe, rancid smells, and black ooze in sediment near the pipe. These pipes range in size from 12 to 96 inches.
Landfills leak toxic contaminants. The leacheate is often pumped into a local water body. Look for orange iron stains from the leacheate. Thin oily films will form on puddles of the leacheate. Unlike oil slicks, the films are solid, resembling the effect you get when you sprinkle talcum powder on still water.
Rainwater runoff and drainage pipes are extremely common. These pipes are at the end of natural or artificial drainage courses. They are most often 18 or 12 inches in diameter. They usually run clear, except for the first few minutes after a cloudburst begins. Then all the crap on the roads (oil and heavy metals) gets washed into the water. Many folks find storm drains a convenient place for their toxic garbage. This is a favorite trick of big auto repair shops. Plugging a rainwater runoff pipe can have a delayed but dramatic effect on a local industry or shopping mall.
Cooling water pipes are universally warm, foamy, big, and tough to plug. Generally, intakes for cooling water pipes for chemical plants should not be plugged because such a sudden blockage could result in dangerous conditions inside the plant.
Industrial waste outflows are the most noxious of all pipes. The most toxic waters from an industry run anywhere from completely clear and clean-looking to completely black. The water can turn blue litmus paper red or vice versa. If a pipe doesn’t fit one of the first four categories, and is located near a chemical, oil, metal, high tech, mining, or other plant, it’s probably a toxic discharge.
Plugging A Pipe
Small pipes 18 inches and less in diameter. The first step is to temporarily block the flow in the pipe to make your job easier. Many pipes have little or no flow during dry weather. If there is a flow, stop it up temporarily with one or more sand bags. Stuff the sand bag up the pipe as far as you can. This will give you the time you need to work.
Fill a second sand bag with a water-cement-gravel mixture and push it in up to the first sand bag. At this point you should have blocked flow from the pipe. Add a little cement around the bag to lock it in place. Cement in a few bigger rocks for good measure. (See Figure 2.)
Sometimes a bucket filled with cement and gravel will just fit into a pipe. This is especially true for 12” pipes. Add extra cement around the edges inside the pipe to ensure good anchoring. Similar objects filled with cement are available for smaller pipes (vehicle exhaust pipes, for example). Plumber supply stores have commercial pipe plugs for 2 to 8 inch pipes.
Medium pipes 2 to 5 feet in diameter. For sewer manholes, simply lift the cover and fill the manhole with sandbags. Twenty-five 60 pound bags will fill the largest ones. Far fewer bags can be used if you only stuff them up the exit pipe. The weight of the water will force a complete blockage as the manhole fills up. (See Figure 3.)
Sandbags may also be used as a temporary block while the pipe exit is blocked with bricks and cement. Cement and gravel filled bags will do if extra cement is put between the bags. This is a big operation and will require a vehicle and one to two hours work for two people.
Big pipes 5 feet and bigger in diameter. These pipes can be bricked and dammed if they are occasionally dry. There may be no or low flow times of day or year. Nail guns (watch out for firearms laws) may be used to attach strips of sheet metal onto bulkheads even if there is some flow. Or you can hammer in regular nails or special nails designed for concrete.
Look upstream for valves, gates, weirs, and intakes which may be easier to plug or gum up.
If the pipe is too big, consider homemade signs that say things like “This way to DuPont’s toxic discharge pipe.”
When you are done: Clean up all equipment. Dispose of empty containers (no fingerprints!). Camouflage your plugged pipe if possible. A pipe that’s hard to find is a pipe that’s hard to fix. Don’t return to view your handiwork. Rest assured that a well-executed pipe plug will shut down even a large operation. City-sized chemical facilities have been shut down by pipe plugs in the past.
(Examples are Dow, Midland, Michigan, 1986; Ciba Geigy, Toms River, New Jersey, 1986; Monsanto, Boston, Massachusetts, 1985.)
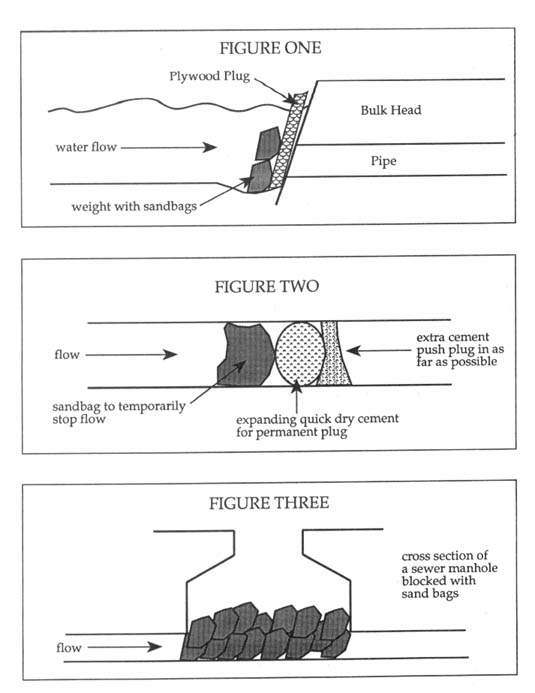
Helpful Hints
-
Large utility company cooling water outfalls may discharge 500,000,000 gallons per day, but these megaplants also have much smaller yet equally vital wastewater flows — typically 1–10 MGD flows. An ecodefender can easily stop these flows. Valves and flood gates may also be vulnerable.
-
Start small. What you learn on small pipes will help you with the big ones.
-
Good quality, waterproof, quick-drying cement is worth its weight in gold. Anchoring cement has all these properties and it expands as it sets, too. Marine patching cement is even better, but you’ll need practice to use it well.
-
When using cement, mix it with lots of gravel and stones. They provide cheap bulk and make the plug much tougher. If you want to ruin a company’s day for sure, add some rebar and chicken wire to your cement plugs.
-
Plugging an intake or a bulkhead at the point where a channel flow goes underground is very effective. The flowing water will help push your plug deeper into the pipe. (See Figure 1.)
-
These techniques are equally effective in urban, rural, and wild places.
Safety
-
Remember that if the company wants to get rid of the crap, it must be dangerous to your health. Always use waterproof gloves and eye protection. Wear old rain gear that you can affordably discard after each job. The following parts of your body should be protected on a job:
-
Eyes — wear goggles
-
Skin — wear gloves and maybe a rain jacket
-
Lungs — gas masks are usually unnecessary, but it is prudent to work quickly in order to reduce your risk
-
Feet — wear rubber boots.
-
Mouth — wear a bandanna over your mouth to prevent liquid droplets from splashing into your mouth, especially when working around sewage.
-
-
Be careful dealing with sewage discharges. They may contain harmful (to people) bacteria.
-
Sudden blockages of chemical plant cooling water intakes may result in dangerous conditions inside the plant. Block outfalls, not cooling water in-takes
-
Your plug may be stronger than some older concrete pipes. Plugging may cause bulkheads to collapse. Don’t stick around.
-
Anchor cement is caustic and may burn your cuticles and sting in cuts. Always wash after using it.
Security
Watch out for video cameras. Parallel chainlink fences spaced five feet or less apart may indicate that motion detectors are in use. Small microwave antennas may be motion detectors.
Discharge pipes are so common and lowly they are ignored by most security personnel. Unless guards are tipped off beforehand, pipes are often sitting ducks for the ecodefender.
Beware of leaving footprints in mud which is common around pipes.
For a fictional treatment of this kind of monkeywrenching, see Zodiac: The Eco-Thriller by Neal Stephenson (Atlantic Monthly Press Books, 1988).
— Armand Hammer
Field Notes
-
Flush a mixture of dry plaster and sawdust in a nylon stocking down toilets in order to block the sewer systems of objectionable developments in wild areas, such as ski resorts and National Park hotels.
-
Ocean front sewer pipes often have metal “tide gate” flaps to prevent sea-water from flooding the pipe during high tide. Lock it shut. Some tide gates already have wing nut locking mechanisms. Use them.
-
Waste pond and waste ditch overflows are easily blocked because the water pressure is working in your favor. Fill (a) sandbag(s) with mixed wet anchor cement and gravel, and stuff it in the upper end.
-
At many dumps and industrial sites you will find monitoring well caps. They are used to detect pollution underground. Do not touch them or you may endanger a site cleanup.
Hydro Plant Flood Gates
The flood gates of many hydro plants are controlled by radio messages often sent from hundreds of miles away and transmitted by microwave stations. When opened, the river level below can rise ten feet or more in a minute or two and, of course, the river keeps rising so long as the gates are open or until the source of the water is exhausted. The source generally contains thousands of acre feet of water — sometimes enough to overflow or wash out a dam down-stream.
Modern technology generally renders the need for humans at the plants obsolete. Consequently if one of the transmitters were destroyed it seems logical to assume that a considerable amount of impounded water would be liberated before remedial action could be taken.
The transmitters are generally unguarded and amount to nothing much more than a large billboard (the type Doc Sarvis was well acquainted with).
Splashingly yours
— Floyd Flood
Grazing
The livestock industry has probably done more basic ecological damage to the western United States than has any other single agent. The Gray Wolf and Grizzly Bear have been exterminated throughout most of the West for stock-men (and Grizzlies are still being killed around Yellowstone National Park and the Rocky Mountain Front for sheep ranchers). Ranchers are the main threat to Gray Wolves naturally repopulating the Northern Rockies from Canada and the principal opposition to their reintroduction elsewhere in the West. The Mountain Lion, Bobcat, Black Bear, and Coyote have been relentlessly shot, trapped, and poisoned for and by ranchers such that lion and Bobcat populations are shadows of their former numbers. Elk, Bighorn, Pronghorn, and Bison have had their numbers tragically reduced through the impacts of livestock grazing. Streams and riparian vegetation have been degraded almost to the point of no return throughout much of the West. The grazing of cattle and sheep has drastically altered natural vegetative communities and has led to the introduction of non-native grasses palatable only to domestic livestock. Sheet and gully erosion from livestock grazing have swept away most of the topsoil in the West. In non-timbered areas, most “developments” on public lands — roads, fences, juniper chainings, windmills, pipelines, stock tanks, and the like — are for the benefit of only a few welfare ranchers. Vast areas of the Great Basin and Southwest could be designated as Wilderness were it not for the livestock industry. And throughout the West, public lands ranchers are the most vocal and militant lobby against environmental protection and Wilderness designation.
Nonetheless, conservationists have been slow to face the challenge from the livestock industry. So afraid have we been of their loud talk and pointy toed boots, that environmental groups have acquiesced in allowing ranchers motorized access in Wilderness Areas to “manage” their cows and sheep. Monkeywrenchers and others have shied away from fighting the ranchers because of the Marlboro Man mystique.
Great care must be taken in selecting targets for ecotage against livestock grazing. Despite the negative aspects of the livestock industry, many ranchers are decent folks. They are trapped in a hopeless situation and are trying to do the best they can. In Montana and Wyoming, particularly, there are ranchers who support Wilderness, fight timber sales, oppose predator control, and have a deep and abiding respect for the land. Some of the best conservationists in the Northern Rockies are ranchers. Unfortunately, they are the exception. But the monkeywrencher must make absolutely certain that the intended target of grazing ecotage fully deserves it. Thoughtful ecotage strategists argue that suitable targets may include:
-
Vocal leaders of the phony “Wise Use” movement and other anti-public lands schemes;
-
Vocal opponents of Wilderness designation and other environmental protection measures;
-
Notorious killers of Grizzlies, Gray Wolves, Mountain Lions, Bobcats, Coyotes, prairie dogs, eagles, and other “varmints”;
-
Poor land managers and egregious overgraziers;
-
Overgraziers who operate in particularly sensitive areas (Wilderness Areas, National Parks and Monuments, National Wildlife Refuges, etc.).
Selective monkeywrenching against the worst ranchers will not only help eliminate the negative impacts of grazing from sensitive areas but will encourage all ranchers to do a better job.
Security must be highly stressed for any anti-grazing activity. Although the actual number of welfare ranchers in the West is small, they generally control the politics of rural areas, most counties, and many states. Legal penalties are severe and date from the old days of the cattle/sheep wars and widespread rustling. A monkeywrencher caught in the act by stockmen may well wish he or she had never been born. Be careful. Damn careful!
Overgrazing is vulnerable to monkeywrenching for two reasons: 1) much of the worst overgrazing occurs in places remote, rugged, and seldom visited; and 2) some of the most damaging livestock operations are on a precarious financial basis where enough losses from ecotage can eliminate the grazing problem.
Operations by monkeywrenchers against overgrazing include the following:
-
Moving salt blocks;
-
Damaging water developments;
-
Cutting fences;
-
Spiking roads;
-
Destroying ranching equipment and machinery.
Road spiking and other techniques discussed elsewhere in this book have applications against overgraziers. Today’s welfare rancher is soft and prefers a pickup truck to a horse. Take away his wheels and you take away his access to the range. Be creative.
Salt Blocks
Salt blocks are used to disperse livestock grazing. In arid areas, salt blocks are supposed to be placed several miles away from riparian areas and water sources in order to prevent the livestock from congregating and doing excessive damage in watered areas. Often, though, a hiker may discover salt blocks placed in canyon bottoms or near streams. Such placement of salt blocks leads to concentrated cattle use which severely damages the stream banks, the vegetation, and the aquatic ecosystem. (After cattle have been fenced out of dry, barren, former streams in Nevada, the streams have begun to flow year-round again; cottonwoods, willows, and other vegetation have sprung up; and fish have returned.) In earlier editions of Ecodefense, it was suggested that salt blocks in riparian areas be carried away and dropped miles from water. Doing this, however, simply moves the grazing damage elsewhere. Salt blocks should be made totally inaccessible to livestock. Here are some suggestions, all of which have been tested:
-
If it is feasible, and safe to do so, put blocks in your vehicle and carry them off to some place where cattle can’t get to them.
-
Stick them up in a tree where cattle can’t reach them.
-
Throw them into thick, sturdy brush or inaccessible rocky areas, over cliffs, into holes, under cattleguards, in road culverts, or anywhere cattle can’t find them.
-
Bury them deeply.
-
Put them on the other side of fences. The cattle will either knock down the fence to get to the salt block, or not get to it.
-
Throw them into a stock tank.
-
Place them in a campground, picnic area, or resort area, so the public can experience the wonders of bovines up close.
Water Developments
In arid areas of the West, grazing is water-based. The amount of grazing possible in an area is determined by the availability of water. If there is no natural, dependable water for miles in any direction, the area cannot be grazed. To remedy this problem, pipelines are constructed from water sources to drinking troughs for cattle. Windmills may also be drilled. Such developments are vulnerable to ecotage.
Pipelines — These are of a variety of types, ranging from simple ones consisting of the ubiquitous black flexible PVC pipe, to more elaborate systems using steel or aluminum pipe. Sometimes rigid PVC pipe is used as well, though this highly breakable pipe is uncommon in “range improvements.” Pipelines may lead from springs, wells, or small dams to distant stock tanks. In some areas pipelines several miles long have been constructed (frequently at taxpayers’ expense) to enable cows to graze in areas that could not other-wise support livestock. Sometimes these pipelines are buried, but usually large segments of them are above ground, especially in rocky country, thus vulnerable to monkeywrenching. The black PVC pipe can be cut with a pocketknife, although carrying a small hatchet will make the job easier. Cutting a pipeline once may render it temporarily useless, but far better is to walk along it cutting it repeatedly. Rigid PVC pipe can easily be shattered with a large rock. Aluminum pipe can be punctured with a hammer and large nail, although a hammer and cold chisel would probably work better. The latter may also suffice for small steel pipelines; if not, it may be necessary to disassemble the pipe with a couple of pipe wrenches.
Unfortunately, PVC pipe is cheap and easy to replace. Even a dozen breaks in a line can be quickly found because of the leaking water, and repaired in a few hours at relatively low cost.
Here’s an improved, field-tested method for dealing with such water lines. This method can only be used when the pipe is not carrying water, such as when the cattle have been moved to another range. That’s the safest time, anyway.
First, drill a small (1/8”) hole in the pipe. Next, inject one of the urethane foam caulking compounds (like “Polycel”), commonly sold in hardware stores. This compound comes in an aerosol can with a very small nozzle. The com-pound expands to several times its original volume and forms a hard, tight plug in the pipe, completely blocking the pipe. The entire operation takes about two minutes. One plug will do the job, but it is best to do it at least twice at widely separated spots in the pipeline.
The only external evidence of the damage is the 1/8” hole plugged with the foam. Even if the rancher knew what to look for, finding this would require an inch-by-inch inspection of the pipe. To be safe, drill the hole in an inconspicuous location such as where the pipe is buried.
Remember the following tips:
-
Even when the pump is off, water will remain in the low-lying portions of the pipe. It may be best to go uphill and plug a dry section, but the procedure will work in water-filled pipes. (At least it works in a water-filled pipe up to 1.5” in diameter, the largest so far tried.)
-
The procedure will not work if water is flowing, because the foam is washed away before it sets. If you drill into such a pipe, don’t just walk away. That little fountain coming from a drilled hole may give unnecessary clues to the rancher. Make your work look like an accident or simple vandalism by smashing that section of the pipe with rock or hammer.
-
Read the directions on the aerosol can. The can must be inverted to work — if it isn’t, you’ll just inject gas. Keep foam off clothing, skin, tools, etc. It’s very sticky and will not dissolve in common solvents.
Fast and inconspicuous for you — slow and expensive for the Marlboro Man!
Stock tanks and water troughs — Previous editions of Ecodefense suggested puncturing stock tanks with a hammer and large nail. Punctures, though, are relatively easy to patch. It is better to gash thin-walled metal tanks with an ax or hatchet. Thick-walled tanks can be gashed with a cold chisel and large hammer. Make as long and ragged a gash as possible. Gashing right above the base is most effective and hardest to patch. Concrete water troughs can be thoroughly smashed with a sledgehammer or with large rocks. You may think that shooting metal tanks full of holes during hunting season is a good idea. This is not recommended. Ballistics tests may trace your spent bullets to your gun. There is also a serious danger in ricochets; even a high-powered rifle won’t penetrate thick-walled tanks.
Sometimes small drinking troughs will be fed from a large stock tank by means of a float valve, like the one in your toilet (See illustration.) Find the float valve. It is usually between the tank and the drinking trough, and covered by a removable hatch. Wire the float valve in the “up” position. When the water level in the drinking trough drops, the float will remain up and no more water will flow into the trough. Or, rip out the float mechanism and dispose of it.
Many metal tanks and concrete troughs are fed by pumps. These pumps can be damaged in a variety of ways, such as pouring abrasives in the oil.
Windmills — The towers for most windmills are now made of steel members which are assembled on the spot using simple nuts and bolts. With enough time and the proper tools (a couple of crescent wrenches or maybe a socket set) a monkeywrencher could completely disassemble a tower. However, there are less-laborious ways of putting windmills out of business.
Windmills generally have a mechanism (it may look like a small crank attached to a chain or cable) to stop the vanes from turning, and thus stop the sucker rods’ up-and-down motion (this motion is what pumps the water out of the well). The sucker rods are usually made from several sections of steel pipe, or solid steel rods, threaded together.
An effective way to render a windmill inoperative is as follows:
-
Stop the motion of the windmill.
-
Using a couple of pipe wrenches, disassemble the sucker rods at a joint.
-
Draw the sucker rod out of the well casing until you come to another joint. The weight of the rod will depend on the depth of the well, but unless the well is deep, one or two people should be able do this.
-
Using the wrenches, remove the next section(s) of rod.
-
Let the remaining sucker rod fall down into the well casing, where it will be difficult to retrieve. Note: it might be possible to cut the sucker rods with a hacksaw, if they are not too thick. This would probably be simpler.
Some monkeywrenchers shoot holes in the oil reservoirs on windmills to burn up the gears. They aim for the metal cover on the gearbox; oil dribbles out. If the vane is folded and the windmill is unable to turn, they pull up on the lever to open it up and hope for a good breeze. Because of additional criminal penalties attached to crimes where firearms are used, and pollution by the oil, monkeywrenchers should be very reluctant to try this.
A windmill may also be pulled over by cutting support cable (if any), loosening nuts at the base, and pulling it over with a come-along, winch, horse, or vehicle. Be careful of the falling tower!
Cutting Fence
Fences are what tamed the West for the livestock barons. They impede the movement of Elk, Pronghorn, deer, and other wildlife, as well as that of hikers. They destroy the open-space feeling of the land and give it a cow-pasture, private property look. Fences are the key management tool in making the range available to livestock grazing. Simply cutting fence will cause great disruption to our landed gentry. Fences are expensive. Some experts estimate that 100 people cutting fence on a regular basis around the West could put public land ranchers out of business. Fence cutting is easy and relatively safe.
The best tool for fence cutting is a “fence tool.” It looks like a weird, over-grown pair of pliers and a good pair can be purchased for about $20 at most hardware stores. It can be used for hammering, twisting wire, pulling staples, and cutting wire. Most fences are constructed of barbed wire or net wire. A fencing tool will cut either with ease.
You should not just go out and cavalierly start cutting fence. Some fences protect the land. You do not want to cut a fence and allow cattle from over-grazed areas to enter an ungrazed area or one in relatively good condition. Never cut a fence separating an ungrazed National Park or National Wildlife Refuge from grazed National Forest, BLM, state, or private land. Do not cut fences in riparian areas (public lands agencies are actually trying, in some areas — against great rancher opposition in some cases, but with rancher support in others — to get cattle out of some sensitive riparian areas). It is dangerous to cut fence along highways. People die every year in the West from hitting cows in “open range” areas with their cars. Leave highway fences up. Think about the likely results before you cut. Some clever monkeywrenchers, however, cut fence to allow cattle to wander through campgrounds, picnic areas, and other recreation areas in order to outrage more people about the grazing of livestock on public land.
Cutting an old, rusty, run-down fence is often not worth the effort, as the fence is probably obsolete or due to be rebuilt soon anyway. Give priority to new, expensive-looking fences.
When you have selected suitable fencing to cut, pick your time carefully. Avoid hunting season. There are more people out in the field then (hunters and game wardens, of course, and ranchers to make sure that cows aren’t shot). If possible, pick a season when the cattle or sheep have been moved to another pasture. A quarter moon night is good. So is bad weather. (Beware of lightning — barbed wire fences can attract it.) Some experienced fence cutters believe it is best to monkeywrench during daylight because it looks less suspicious, and because one can do a much quicker and more thorough job, with less risk of injury. When cutting fence, it is important to look like a cowboy; most folks other than ranchers have no idea what happens on a ranch and will simply think you’re doing ranch work.
Walk along your carefully chosen fence in one direction, cutting as you go. Do not double back. You might find someone looking for you. Check behind yourself frequently. You are, after all, leaving a perfect trail. Binoculars are useful for watching your back trail. Beforehand you should select several possible escape routes. Look carefully ahead of you as well as behind you, as you cut. Once in a while stop suddenly, be dead silent, and listen carefully. When you leave your fencing work, do not leave a trail that someone can follow back to your home, camp, or vehicle. Do not loiter. Do your work and leave.
You can cut a mile or more of fence in an hour once you get moving. Snip each strand of wire between posts but do not damage the posts. They will be needed for reconstruction of the fence later and will prevent other trees from being cut for fence posts. Give special attention to corner posts since they are integral to supporting the entire line of fence. All wire should be cut on support and corner posts, gates, cattle guards, and the like. Instead of cutting between each post, you also can randomly cut wire along a greater length of fence and probably still necessitate the complete restringing of the fence. Some experienced fence cutters cut strands only between every second or third post, but also vary their pattern. They believe this will cost more time and money in repair.
Caution: Barbed wire is usually strung under tension, so be careful when cutting it. When cutting, stand well to the side of the wire and cut strands next to the post. Do not hold on to the wire as previous editions of Ecodefense suggested. Fortunately, many public-lands ranchers are too lazy to keep their fences in good repair, so the wire is apt to be loose.
An experienced barbed wire fence repair person suggests that to do the most expensive damage to a fence, one should cut out one-foot sections between posts. Throw the cut section away from the fence where it can’t be easily found. To repair this kind of cutting requires three people and many pieces of wire. If enough one-foot sections are taken out, it will require the complete restringing of the fence.
Replacing cut fence is costly for the rancher. Two-point barbed wire costs about $80 for a quarter-mile spool. Cutting a mile of four-strand fence necessitates the replacement of $1280 of wire. Of course, the fence must be so cut up that it is not feasible to repair it by splicing cut ends back together.
Fence cutting is hard on your hands: Wear gloves to protect your hands and to avoid leaving fingerprints.
Ranching Equipment and Machinery
Most big ranches are heavily mechanized, with a variety of vehicles and equipment used in their daily operations. These include bulldozers, backhoes, tractors, heavy trucks (both for hauling equipment and cattle), and horse trailers. These vehicles are often parked around the ranch house, but when they are being used for particular projects (building a stock tank, say) they are apt to be left out in the boonies for a few days and nights. The usual techniques for disabling vehicles and heavy equipment can be applied to ranch equipment.
Miscellaneous
Public lands ranchers, no doubt aware of the indefensible nature of many of their practices, are hypersensitive about public criticism. For this reason any means of bringing their depredations to the attention of the public will have a twofold benefit — it will both educate the public and give the ranchers high blood pressure.
Recently in the Southwest the press reported an outbreak of sign alteration. Someone was using a stencil to modify those ubiquitous highway signs that warn the motorist of open range — the ones that show a big cow on a yellow background. (See section on “Stencils” in the Propaganda chapter.) They were adding to the signs messages like “Stop overgrazing,” and “Get cows off the public lands.” Needless to say, the ranching community was outraged. $500 rewards were offered for the perpetrators and serious penalties were threatened should they be apprehended.
If you live in a rural area and decide to try to rectify the abuses of overgrazing through monkeywrenching, it would probably be best to keep a low profile on other conservation issues and to avoid publicly criticizing the livestock industry. Indeed, it may be wise not to engage in anti-grazing monkeywrenching in your home area at all.
— High Plains Drifter
Field Notes
-
There has recently been a trend in some parts of the West for ranchers to install submersible electric pumps in wells, even in wells in remote areas without electric lines. Evidently the ranchers are using portable electric generators to run the pumps — a pump is run long enough to fill a large stock tank; then the generator is removed. It may be difficult to remove the submersible pump from the well casing without special equipment (although if this can be done, it certainly would be effective). However, such wells do have vulnerable electrical wiring and circuit boxes on the surface. The circuit boxes can be smashed with a sledge or large rock; the wiring can be repeatedly cut with a fencing tool or bolt cutters.
-
Smash apart feed and water troughs and salt block holders.
-
Cut, smash, and pull apart corrals. Corrals are expensive to repair or replace, and are necessary for ranching operations. Do the same to pens, chutes, loading ramps, stock scales, and other structures. They can also be burned. (Keep in mind that such use of fire constitutes arson and carries additional penalties.)
-
Some ecotage actions against livestock grazing are discouraged for various reasons. Poisoning cattle with oleander clippings should be avoided because some species of grazing wildlife may also be vulnerable. The press recently reported that a champion racing Buffalo died after eating hay that had oleander leaves and stalks accidentally mixed in, for example. We do not know if Elk, Pronghorn, Bighorn Sheep, or other wild critters would be poisoned by oleander clippings put out for cattle on public lands. In another case, 35 cattle in northern Utah died after eating clippings of English yew, an ornamental widely planted around homes in that region. Again, we do not know if this plant is toxic to wildlife as well.
Some people have proposed simply shooting cattle. This is dangerous, would likely be counterproductive, and would carry severe penalties if the shooter were caught. More important, the lead bullet will remain in the cow carcass. A critter that scavenges the meat may ingest that bullet and die of lead poisoning. California Condors have died after ingesting lead bullets in carcasses. If you must shoot, use only steel bullets.
Finally, we discourage the importation of diseases or disease-bearing parasites into the Western open range. A recent newspaper article reported on the 60 cowboys employed by the Department of Agriculture to patrol the Rio Grande from its mouth to Amistad Dam to keep out Mexican cattle. The Mexican cows are infested with ticks that carry a disease organism causing so-called Texas fever or cattle fever. The article reported that if the cattle fever tick became established in the United States, it could cause $5 billion worth of damage a year to the cattle industry. Besides the possible biological dangers, trying to smuggle these ticks across the border to the public lands grazing states would be personally dangerous and would be counterproductive. -
A few thoughts on public lands grazing strategy: Every BLM grazing district has several large ranches on the edge of bankruptcy, despite recent high beef prices. These ranches can be determined by speaking discretely with the BLM, real estate agencies, or by examining county tax delinquency records. These ranches almost certainly are destroying riparian areas, wildlife winter range, and/or recreational resources. The public should be made aware of the destruction and the ranch should be mentioned by name and linked with the deteriorated condition. Try letters to the editor, TV reports, or tours for newspaper reporters.
The object is to make potential buyers aware of the actual value of the ranch. This will have the effect of lowering the value of the ranch to reflect its real worth and should reduce inflated bank borrowing power. A few large ranches revalued to actual worth will have a chilling effect on the local market. Enough local market exposures will have an effect throughout the West.
Cautionary Notes About Monkeywrenching Grazing
Random sabotage of range “improvements” may do more harm than good. Study the target area before taking action against:
-
Windmills and Water Tanks. These water developments concentrate cattle in their vicinity and may actually prevent livestock from abusing more remote areas. Severe overgrazing, bare dirt, and trampling usually indicate the presence of water facilities. Only the most remote water developments should even be considered as potential targets, and only if alternative sources of natural water are available to wildlife.
-
Fences. Casual fence-cutting will make you a best friend of the “trespass” grazier, the worst abuser of public lands. These greedy stockmen will cut fences and leave gates open to allow their stock to “innocently” wander onto lands where they are not legally permitted. If you know a stretch of fence that routinely entangles and kills wildlife, observe the following procedures: To protect deer, cut the second wire from the top. Deer are killed when their hind leg doesn’t clear the top wire and becomes twisted between the top two strands. A twelve to eighteen inch spacing between the top wires prevents this problem. If antelope are trapped (a winter problem) cut the bottom wire to allow the animals to crawl under.
-
Overgrazing. There is plenty of worthwhile overgrazed land around, so limit your hits to these most abused areas. Educate yourself in the rudiments of range management so you can learn to recognize the symptoms. Know about the succession from grass to brush to trees. Learn to recognize snake-weed, greasewood, and other plants that are indicators of overgrazing. Train yourself to recognize the early signs of soil erosion as well as the more severe arroyo-cutting. Also, know which grasses and shrubs the livestock consume so you can tell at a glance if they’re gnawing them down to nothing.
Because ranchers in some areas have become suspicious of animal rights saboteurs hitting their range improvements, make sure you’re equipped with leather boots, canned meat (if you’re a vegetarian, you can always give it to a panhandler later), and some Outdoor Life magazines in case some suspicious cowpokes insist on poking around your camp or car.
— T. O. Hellenbach
Chapter 4: Roads and Tire
Napoleon’s army may have traveled on its stomach, but the army of wilderness destruction travels by road and vehicle. Indeed, one of the most commonly used criteria for “wilderness” is “roadlessness.” Roads are used for logging, for mineral exploration and development, for oil & gas activity, for grazing “management,” for powerline construction, for dam building, for ski area, recreational, and subdivision development. Trappers, poachers, slob hunters, archaeological site vandals, prospectors, seismographic crews, and other vanguards of the industrial spoliation of the wild use four-wheel-drive vehicles on dirt roads, on jeep trails, and cross-country. Then there are the mindless masturbators on their 4 x 4s, ATVs, ORVs, dune buggies, muscle wagons, dirt bikes, tricycles, and Nature knows what else — ripping up the land, leaving their tracks as their imbecilic calling cards, running down wildlife, and disrupting non-motorized recreation.
The road network on public lands, however, cannot be effectively guarded against a serious campaign to close it. The money is not available to both build and constantly repair roads in rough, remote country. And vehicles — whether on the roads or off — are highly vulnerable to having their tires flattened if they enter areas where they don’t belong.
With the simple tools and techniques discussed in this chapter, an Earth defender can essentially declare her own wilderness boundary and safeguard an area from vehicle-borne destruction. Are two roadless areas separated by a dirt road? Close it. Are “cherry-stem” roads invading a block of wild country from all sides? Shut them off at the periphery. Is the Forest Service building a logging road into prime wildlife habitat? Wreck it. Are miners, seismographers, surveyors, trappers, or poachers threatening your area? Take their transportation away. Are bozos on their tricycles or dune buggies trashing a wild canyon, roadless beach, or desert valley? Flatten their tires and make ‘em walk out.
The most vulnerable portion of the industrial infrastructure is the transportation network. The ecodefender can safely, securely, cheaply, and effectively disrupt it — and save wild country.
Most monkeywrenchers have focused on disabling heavy equipment, cutting down billboards, and — more recently — spiking trees. All of these are worthwhile, but road spiking and destroying roads have not received the attention due them. With the United States Forest Service continuing a gargantuan road-building program in currently roadless areas, monkeywrenchers need to make a major effort to close these roads. This chapter tells you how to do just that. An additional attraction of road spiking or road destruction is that it is much more difficult for the villains to protect hundreds of miles of road from sabotage than it is for them to guard a few pieces of heavy equipment or active logging sites. You are in much less danger of apprehension doing this kind of monkeywrenching out in the wildwood than you are crawling around equipment yards. Nonetheless, do not neglect basic security precautions.
Road Spiking
A modern version of the Vietnamese “punji stake” offers a simple means of closing an unsurfaced road. An angle-cut metal rod driven into the road’s wheel rut will puncture tires while not harming people. The 1/2 inch diameter rod, protruding only about three inches, is too blunt to penetrate a shoe sole under a person’s weight, but sharp enough to puncture the tire of a heavy vehicle. With this technique you can cure an ORV problem or make a logging or mining operation unprofitable. By harassing a survey or exploration crew with these you might persuade a corporation not to proceed with a mining or drilling operation. The possible applications are extensive since almost any exploitive enterprise requires roads.
You can buy the materials to close a road for pocket change, and can emplace the stakes alone in a very brief time. By not involving anyone else, you can insure that nobody can betray you. That peace of mind is sometimes worth more than the encouraging companionship. Since the stakes can be driven quickly and easily, there is little chance of being seen, let alone identified, if you exercise even minimal caution.
Obtaining the Materials
Any piece of hard metal that can be sharpened and driven into the ground will work. For convenience and economy, we recommend 1/2 inch diameter steel rod used for concrete reinforcement, usually called “number four rebar” in the construction trades.
If you buy rebar pre-cut to length, you will order “one foot number-four dowels,” and you will have to sharpen one end.
If you decide to cut the stakes from longer rods, you can hacksaw stakes such that the ends are sharp enough. Cut the rods off at a sharp angle (at least 45 degrees) every couple of feet, then cut these pieces in half with a straight-across cut. Thus each stake is about one foot long, with one sharp end and one blunt end. Stakes longer than a foot are hard to drive deep enough in rocky ground; much shorter and they are not stable. Longer ones may be useful in very soft ground.
If you buy the longer rod and cut it, keep in mind that rebar is usually bought by contractors in quantity and delivered to a construction site. So, do not call attention to yourself by repeatedly buying small quantities of rebar and hack-saw blades in the same building supply store in an area where “road spiking” is taking the profits out of some local rip-off. Rebar is common, ordinary stuff, though, and nobody will take any interest in why you want it so long as you don’t need a salesperson’s help in figuring out what (and how much) to order. Order a length that you can easily transport. Buy the best hacksaw blades, since cheap ones break easily and will only make a few cuts before dulling. Buy the longest blades you can find in order to get a decent stroke (most hacksaws accept blades of various lengths). This will make cutting much easier.
Expedient Method of Cutting Stakes
Secure one end of the rod (by clamping, jamming, etc.) and lay the free end across a crotched (or notched) piece of wood under the cut to be made, about one foot from the end. Lay the blade alongside one of the retention ridges which run across the rebar at a 45 degree angle. Make several light strokes until the blade cuts into the bar enough to prevent sideways slipping. With a little practice you can cut more than a dozen road spikes an hour in this manner. If you cut up a rod or two in your spare time during the week, you will have plenty by the weekend.
Building a Jig
For ease and convenience, you may want to build a jig to hold the rod steady and to guide the sawblade. Any kind of “miter box” that doesn’t reduce the length of the stroke much is okay. A simple method is to place two cement blocks on end and place the length of rebar to be cut in the grooves on the ends. Saw the rebar between the cement blocks.
Using an Acetylene Torch
A torch is the fastest and easiest method of turning out large numbers of stakes. Learning how to cut (as opposed to welding or joining) with a torch is easy. Someone can show you in half an hour how to hook up and adjust the equipment well enough to burn off rods. Learn how to handle the gases and equipment safely, and to adjust the flame. (See the separate article on the Cutting Torch in the Vehicles and Heavy Equipment chapter.)
Emplacing the Stakes
Make the “cap” illustrated here so that you can drive the stakes into the ground without blunting the sharp end. Buy two 3/8 to 1/4 inch galvanized pipe “reducers,” one 3/8 by 5 inch galvanized pipe nipple, and one 1/4 inch nipple of any length (the shorter the better), and assemble as follows: Screw the five inch long pipe into the large ends of both reducers; screw the smaller pipe into the small end of one of the reducers; then cut it off flush.
Place the reducer with the flush-cut nipple over the sharp end of the road spike and hammer the other end of the reducer to drive the stake into the ground. If you simply put a piece of 1/4 inch pipe over the sharp end of the stake and hammered on it to drive in the rebar, one pipe end would deform very quickly from hammering and the stake would wedge up in the other end. The reducers hold their shape and make this a long lasting tool. Driving the first stake creates a seat (in the end that fits over the stake) into which succeeding road spikes should be fitted.
Where to Place Road Spikes
For effectiveness and safety, give thought to where you place road spikes. Avoid areas where a blow-out or flat from the stake might put the driver of the vehicle in danger. Roads or “jeep trails” with a sheer, long drop-off on one side are obvious danger zones. Choose, instead, a flat area or low point in the vehicle path. Determine whether you should spike a long vehicle route at the beginning or in a remote location in the middle. Will a flat miles from nowhere endanger a typically overweight, soft ORVer?
Although road spikes are difficult to see from a vehicle (particularly a charging muscle wagon), picking a spot where they will be extra difficult to see will increase their effectiveness. Choose a spot where vegetation to the side, shadows, a dip in the route, a curve, or other natural camouflaging will obscure the three inches of dark rod protruding from the ground. Also, pick a site where there is an excellent chance of the road spike making contact with a tire. At some points along a vehicle route, there may be several feet of variance for the tires. Several road spikes may be needed across the route there to flatten a tire. Instead, select a spot where ruts or natural constrictions keep the tire tread confined and where one spike is sure to make contact with knobby rubber. Crossings of streams and dry washes are also choice locations. Look at the terrain and previous vehicle tracks to determine where each of your spikes will wreak maximum (but not dangerous) havoc on vehicle tires that should not be there.
Consider the direction most vehicles will be traveling and incline the road spikes accordingly. It may be necessary on some routes to direct your spikes in both directions.
Even with proper planning of spike emplacement, your road spikes may stand out. Put a tumbleweed, litter, or small branches over visible spikes to hide them.
— Dan‘l Boone

Field Notes
-
Check a dead-end jeep trail before you spike it. It is best to flatten some-one’s tires when they are goingin, not coming out.
-
Often a trustworthy partner is useful for security. While one person drives the spikes in the road, the other can watch or listen for vehicles or hikers. Prudently used, radios can add to security. See the section on Tools in the Security chapter for a discussion on radios.
-
Placing a rag over the head of the spike driver when hammering in stakes may help to deaden the noise of hammering.
-
Rebar is cheap. A twenty-foot length at one suburban building supply store was only $3.50. Rebar also saws easily and quickly with a good hacksaw blade — don’t be intimidated by the task until you try it.
-
Disguise your spikes with small branches. This may be especially effective on logging roads. Soon, drivers will be afraid to drive over any fragment of dead tree.
-
3/8 inch rebar can also be used for road spikes. It is cheaper (79 cents for a ten foot length), saws easier, and is lighter to transport in your pack. Except for really macho tires, it should do an adequate job.
-
3/8 inch diameter rebar cut in two or three foot lengths has been found effective for flattening the tires of dune buggies and the like on beaches and in sand dune areas.
-
Free rebar can oftentimes be had by scouting around old construction sites where short pieces have been discarded.
-
On almost every construction job where rebar is used, many small pieces will be left over. If you walk up and ask whoever is putting in the steel if you can have the leftover rebar for a home project, they generally will be happy to give it to you.
-
A quick and easy way to cut rebar for road spikes is to rent a heavy pair of bolt cutters (handles at least 3’ long). Place one handle on the ground and stand on the grip. You want the whole cutter lying on the ground except for the one handle used to work the jaws. While keeping the cutters flat, raise the jaws as wide (high) as you can. Place the rebar in as close to the hinge pin as possible, then put your full weight on the handle. The jaws will eat right through, crimping the bar into a razor-sharp edge. Be careful; you can lose blood to these sharp little suckers. You may not be able to cut the rebar at more than a 20 degree angle, but field experience has proven that to be sharp enough. This method works well for anyone over 175 pounds; a smaller person might want to use a hydraulic cutter. In two hours, you can have enough stakes to spike a lot of jeep trail.
-
The so-called “Anti-Drug Abuse Act of 1988” which made tree spiking a federal felony, also made road spiking (including nailboards) a similar crime. This testifies to the effectiveness of road spiking and to the concern industry and ORVers have about its increasing use. See the section on Federal Anti-Spiking Legislation in the Developments chapter.
An Alternative Spike Driver
Rebar road spikes can be driven into soft (muddy) ground without dulling the business end and without using a spike driver. Tightly clamp a large pair of visegrips to the spike and tap on the visegrips with a hammer to sink the spike into the ground. In harder ground, visegrips and a simple spike driver can be used. Use a three-inch section of 3/8 inch pipe with a 3/8” by 1/4” reducer or a 3/8” end cap (block-off cap) screwed on the end. Tightly clamp the visegrips 3 1/2 inches from the pointed end of the rebar road spike. Slide the spike driver over the rebar so it rests on the visegrips but does not touch the sharp end of the rebar (half an inch gap should be present). By hammering on the end of the spike driver, the rebar spike will be driven into the ground through the visegrips which you grip. (See illustration.)
— St. Francis
Advanced Road Spiking
Here are some ideas to increase the effectiveness of rebar road spikes. First of all, we found that the easiest way to procure raw materials is to visit the local landfill. Many landfills have unattended scrap metal recycling piles which contain scrap pieces of rebar. The sizes that work best are #3 (3/8”) and #4 (1/2”). Many pieces will be bent, but these are useful for creative placements.
We have directed much energy toward stopping 3-wheeled ATCs, dirt bikes, and the 4-wheeled (“Quad Runner”) ATVs. These abominations present problems different from those presented by 4 x 4 trucks and jeeps. For them, ecoteurs must be more exacting in their methods of manufacture and placement.
The relatively light weight of an ATV, coupled with the pliable, low air pressure tires, makes it possible for the tire to bounce over a standard 1/2” rebar spike cut at a 45-degree angle and sticking up 3” from ground level. To increase effectiveness we use 3/8” rebar with tips cut at an angle of 60 degrees or greater. For standard emplacements we use 14” long spikes, enabling us to have 4–5” above ground. As a general rule, for maximum stability, the length of the spike underground should be at least twice the length of the part above ground.
Before cutting rebar, notice that it has two longitudinal ridges running opposite each other. Start your cut on one ridge, since it helps form a sharp tip for the spike. While a hacksaw works well, also consider using metal-working tools such as a “Sawz-all” with metal blades or the special metal-cutting carbide blades for hand-held circular saws. If you use a metal grinder to sharpen tips, do not overheat the tip, as the metal will lose its temper, making it brittle.
Our most effective emplacement tool is a block of 1 1/2” plywood or three 1/2” plywood strips nailed together. The block should be 3 to 4 inches wide (enough to grip well) and 8 to 10 inches long. Align your spike tip and place the block over the tip and drive with your single-jack hammer. Plywood drives the spikes without dulling the tips and will not split apart. The plywood block is easily removed from the spike and will last a long time. It produces far less noise than metal emplacement tools, and is simple to replace. Plywood would also be easier to explain should one be questioned, or to toss if someone approaches.
As these spikes have sharp tips, wear gloves when handling them (you should wear gloves anyway, for security reasons, and should make sure the spikes don’t carry fingerprints). Consider making special containers for carrying your spikes — unprotected, they can puncture a backpack. We constructed spike “quivers” out of 3-inch diameter ABS plastic pipe. The 3” size holds 20 to 30 3/8” spikes. You’ll need two 3” caps; one should be cemented on, and the other attached with a small draw cord. D-rings can be mounted at each end by using large 3” hose clamps, and a nylon luggage strap can be clipped on to the D-rings to form a sling. The quivers can be carried in a day pack. When ready to emplace spikes, simply pull out a quiver, sling it over your neck and shoulder, and you have 20 spikes at your (gloved) fingertips.
— Robin Road
Spikeboards and Nailboards
Another weapon against tires is the spike- or nailboard. Short scraps of rebar, left over after making spikes, are useful here. For rebar spikes, take a 2 to 4 foot length of standard 2 x 4 or 2 x 6 lumber and stud it with spikes. Our spikes protrude 4 to 6 inches out of the board at a 45-degree angle and are usually placed 3 to 4 inches apart. The spikes can all be angled in one direction, or angled two ways, so as to puncture tires coming from either direction. To place the spikes, drill a hole the diameter of the spike, at the desired angle, through the board. After placing the spikes in the board, you may want to nail another board across the bottom as backing, so the weight of the vehicle won’t drive the spike down into the hole before the tip accomplishes its purpose. However, this may not be a hazard with the lighter ATCs and ATVs (a 4 x 4 ATV may weigh 500 lbs., sans rider).
Nailboards, made from strips of 1” or 1 1/2”-thick plywood with numerous nails driven through at an angle, are ideal for dirt bikes, whose narrow tires may miss rebar spikes. We recommend nails of at least 20d size, since smaller ones might be bent by the tires.
Nail- and spikeboards should be anchored to the ground. This is done by drilling a hole in each end of the board, and by driving an L-shaped piece of rebar through each hole. We use 14 inch “Ls” for soil emplacements and 36 inch “Ls” for sand or mud emplacements.
Bury the wood portion of your nail- or spikeboard in the ground. Carry a digging tool for this. Camouflage your emplacements. Be creative. Most ATV and dirt bike yahoos won’t think anything of running over a small piece of brush, tumbleweed, or litter which conceals a spikeboard.
Be sure to avoid leaving fingerprints anywhere on your spike- and nailboards, and on your tools.
Keep in mind that by making spikes sharper, and by using spike- and nailboards, we may increase the risk of injury — and that is not our purpose. Thus, use these emplacements only where there is little chance of injury to the general public.
— Dave Harleyson
Field Notes
-
An easy way to drive nails through a nailboard is to place the board on sand or soft dirt and drive in the nails through the board into the dirt. Turn it over and you have your nailboard.
-
To anchor nailboards, try driving large nails or bridge timber spikes through the nailboard into the ground.
-
Some field agents argue that nails should not extend more than an inch and a half cut from the board because they will bend on contact with the tires.
-
For cheap and easy nailboards: Stud a piece of irregularly-shaped cardboard (it looks more like trash that way) with roofing nails and spray paint the whole thing brown so the nails are not noticeable from a moving vehicle. Do the same with a piece of carpet scrap, but no paint this time.
-
Remember that many dirt bike and ATV riders are children and mentally-handicapped individuals. Be careful. Many dirt bikes travel at high rates of speed. Place tire puncturing devices with the safety of the rider in mind.
-
Other dirt bikers are of the most uncouth, violent, and potentially dangerous variety of Boobus americanus. Be careful. You do not want to be captured by these slavering morons or even suspected of doing anything against them.
How to Make Caltrops
Caltrops are extremely effective for flattening tires on stink machines of the two, three, and four wheel varieties. They are sold through Soldier of Fortune style mail-order houses for about $1.75 each and possession is legal. If you are a beginning welder you can easily make your own for less than ten cents apiece.
Take a welding class at the local community college. Learn how to cut and weld using an Oxy-acetylene outfit. You’ll be amazed at how much this will expand your horizons as a monkeywrencher. A cutting torch can slice through iron like a hot knife through butter. (See the Cutting Torch article in the Vehicles and Heavy Equipment chapter.)
Ingredients:
-
Oxy-acetylene welding outfit
-
Small diameter welding rod
-
Twelve pounds of 20d nails (bright box)
-
Sturdy workbench and two vises
-
Three pairs of welding goggles
-
18” handle bolt cutters
-
Medium weight hammers
-
Two pairs of pliers
Clamp one handle of the bolt cutters horizontally in the vise. Hold a nail in the jaws at a 45 degree angle with one hand and push the free handle down with the other hand to snip off the head and leave a nasty-looking point where the head was. Cut the minimum amount of nail off with the head. It’s easier to snip when the nail is jammed as far into the jaws as possible. You might as well do this to 600 nails while you’re at it. Wear safety glasses to protect your eyes in case a nail head flies off. Be careful to save every single nail head for appropriate disposal somewhere other than your workshop.
Now mark the center of each headless nail with a felt tip pen. The best way to do this is by marking two parallel lines on the workbench one-half nail length apart, and laying the nails over these lines to mark them. Once all the nails have been cut and marked, you’re ready to make a prototype caltrop.
Clamp one of those double pointed nails vertically in the vise with the mid-point mark just showing. Bang it over with the hammer until you have a wide “L” shape with an interior angle in the neighborhood of 110 degrees. Make sure it comes out with the bend at the midpoint. Do this to only six nails. Clamp one of these bent nails with one tip in the jaws of the vise so that it is in an upright “V” position. Balance another bent nail over the first one crosswise in the inverted “V” position. This is what a caltrop looks like. All you have to do now is weld the nails together.
Notice that there is a convenient place for two tack welds where the nails cross, and two more places on the underside. Strike the torch and do a tack weld. Before the weld cools, tweak the caltrop with pliers so that it is symmetrical. Do the other tack weld. Turn off the torch so that you will have two free hands to loosen the vise slightly. Grab the caltrop with pliers, take it out of the vise, and reposition it upside down to expose the two remaining tack weld areas. Strike the torch again and do those two welds.
When the caltrop cools, give it a test by placing it on the ground. No matter how it falls, one point should be vertical. It not, then either the bend in the nails is not the proper angle or you welded it crooked. When you’ve got a decent prototype, set it aside.
Tape a piece of cardboard to your vise and make a mark on it to serve as a bending guide for all the hundreds of nails you’re about to bend. Clamp a nail vertically in the vise with the midpoint mark just showing and pound it over until the tip is even with the mark. Carefully bend all the nails to the correct angle, one at a time. Now you’re ready for the welding assembly line.
To make the best use of both your time and welding gas, use a three-person production team with one welder and two helpers. This requires two vises on the workbench about two-and-a-half feet apart. Provide welding goggles, a pair of pliers, and a beer for each helper. The welder works one vise while the helpers set up a pair of caltrops at another. Each vise has two sides and can hold two caltrops at a time for a very efficient production line.
The welder does the first two tack welds on both caltrops in vise A while the helpers are setting two more in vise B, then the helpers flip the caltrops over in vise A while welding happens at vise B. Finished caltrops are placed on the floor to air quench.
When you have made 100 caltrops, double bag them in paper shopping bags. This is called a “Bag-o-Troops.” It’s a handy little item that can really increase the effectiveness of every Earth defender.
— Barstow Bob
Field Notes
-
Cover the jaws of the vise with pieces of wood, cardboard, or metal to prevent leaving distinct tool marks on the caltrops. Such tool marks may reveal the brand of bench vise, records of purchase, and may be linked to your particular vise. Dispose of the jaw covers after the manufacturing is complete.
-
If you haven’t the means to make caltrops as described above, you can buy caltrops on the surplus market from some advertisers in Shotgun News, These caltrops are military surplus from some war and aren’t always advertised, so keep looking. The advertisers who run full page ads with surplus items are the ones to watch. See an issue at your local gun store.
-
See the illustration for two other ways to make caltrops.
-
Somewhat cruder caltrops can be made with inexpensive arc-welding units as small as 70 amps. Sears has a 20–70 variable amp unit that can be obtained as cheaply as $59. Higher-amperage units are more expensive but will produce faster and more substantial welds. It is important to read the operating instructions carefully before arc-welding and to always use hand and eye protective gear (intense light can burn the retina).
Caltrops can be constructed as follows with the arc welder: Obtain nails at least 4 inches long, the thicker the better, and cut off the heads with bolt cutters or a hacksaw. Sharpen both ends on a grinding wheel. Extreme sharpness is not necessary as the weight of the vehicle drives the nail into the tire even if somewhat blunt. Weld at least 3 of these nails together in opposing planes so that there is a tripod effect no matter how a thrown caltrop lands.
To perform the actual welding, place one nail in a vise, hold the other in a pair of visegrips, and use your other hand to hold the electrode.
— Sidewinder
-
Short on caltrops? Put a caltrop or other sharp object inside a target. Many off-roaders love to drive over the random beer can or paper cup in the road, so put a surprise in one. Those Styrofoam clam-shell containers from fast food places even have a use. One will hold the business end of a broken bottle with its points up. These targets make cleanup afterwards easier and minimize possible injury to animals, hikers, ORVers, and yourself.
-
Effective caltrops can be made with 4 to 6 inch reinforcing mesh used in concreting. This mesh cut at an angle in the middle of each span will produce steel crosses. Bend them at right angles to form quick caltrops.
-
Spray paint caltrops black for use on asphalt so they will be less conspicuous.
-
For simple caltrops, drive a half dozen long nails through a golf ball so that they stick out in all directions. Spray paint the whole thing with a color similar to the surface on which they might be used. Remember that a box of these in your car or truck might look very suspicious to a policeman who, on a random traffic stop, decides to poke around in your vehicle in the hope of finding an open liquor bottle, drugs, or stolen goods.
Other Tire Flattening Methods
Roofing Nails
When flattening dirt bike tires to keep them from tearing up country, the monkeywrencher should be concerned about not endangering the rider. An effective, but seemingly safe, method is placing upended simplex roofing nails. These nails have large heads so they will stand on end easily, they are available at every hardware store, and they are cheap. The nails come in lengths up to 2 1/2 inches long. This is long enough for dirt bike tires (and regular auto tires), but not long enough to flatten a heavy-duty 4-wheeler tire. The safety advantage of roofing nails is that they won’t dump a bike from a blowout, but will eventually cause the tire to go flat — in a period of time from minutes to hours. The best place to set them is at the entrance to an illegal dirt bike trail. For maximum effectiveness, hand set them with the bases down and cover the bases with road dirt to camouflage them. Paint them the same color as the ground if you really want to hide them. One distinct advantage of roofing nails over a permanent installation is that the tire will pick up the nail and carry it away for a while. This ensures that the biker won’t be able to pinpoint the exact spot where the nails are deposited. A disadvantage is that these nails will probably go through a tennis shoe sole, so you don’t want to set them where runners will go. A single person can scatter hundreds of these nails in a short time. They can also be scattered caltrop fashion in order to evade pursuers, although many of the nails will not fall point up.
Hand setting the nails at strategic points will ensure that all the bases are down. Use a straight section of trail where the bikes aren’t breaking traction or side-slipping. This ensures that a single bike won’t ruin the entire setup by sliding through and scattering the nails off the trail. That way each bike through will leave some for the next bike, and the next .... If you want to get really elaborate, paint the bottoms of the bases black so the biker won’t immediately notice the foreign object sticking out of his tire.
— Porky Pine
Field Note
A company called Dings Magnetic markets a variety of road magnets to pick up nails and other metal on roads and at construction sites. This indicates that dropped nails are a major problem for tires.
Finishing Nails
Generally a metal object bends under a vehicle’s weight but doesn’t compress lengthwise. A well-anchored 6d finishing nail is adequate, provided it is set (see illustration) at the angle of purely compressional impact (Table 1). Lubrication facilitates penetration (a light oil also allows camouflaging road dust to be adsorbed). A simple wooden jig (see illustration) is used to set the angle in the field.
— Bernard Femow
Valve Core Extractor
An inexpensive tool known as a “valve core extractor” provides an alternative method for flattening tires. Remove the cap from the valve stem, insert the extractor into the stem. Twist until you feel the tool engage the valve core. Then unscrew (counterclockwise) the valve core and throw it in the bushes. Doing this to all the tires on a vehicle would immobilize it, without permanently destroying the tires.
Valve core extractors may be purchased cheaply at most bicycle shops (the valves on most bicycle tires are the same size as the valves on most automobile tires).
It is also a simple matter to let the air out of the tires of an unattended vehicle by depressing the post in the tire valves. A pressure gauge has a post on it to do just this; a nail or other slender metal object will work, too.
Railroad Spike/Tie Plate Trap
Railroad spikeboards are probably suitable only for special events (a particularly noxious off-road race, for instance), or for Monster Trucks (like “Bigfoot”) and other jacked-up rigs with very large tires. This is due to the work involved in making them and their heavy weight. They have the advantage of superior strength, and would probably penetrate most tires — including the $2,500 behemoths Monster Trucks use — quite readily.
When walking along railroad tracks, one commonly finds old spikes discarded when new rails were laid. It is also possible to find, along the tracks, discarded metal tie plates. The tie plate is a square metal plate, about 8” x 8”, which is used to fasten the rail to the ties. It contains four holes through which the spikes are pounded, to hold the rail to the tie. To make a railroad spike-board, place four spikes through the holes opposite the way they would be when holding the rail down to the tie. Weld these spikes to the tie plate. The result is a massive “spikeboard.” Railroad spikes are stronger than rebar, and the metal tie plate prevents the weight of a vehicle from driving the spikes into the ground-instead, maximum tire penetration is likely.
The weight of these spikeboards makes them suitable for use in desert canyons where Monster Trucks like to romp and frolic. The best place to put them would be in stream crossings under water. Pick known vehicle crossings. Or on rivers where the ORVs will be charging down rather than simply across a stream, look for narrow spots in the canyon where vehicles will not have much choice of route. If the bottom is rocky, simply place the spikeboards where the water is deep enough or opaque enough so they won’t be spotted by the oncoming drivers. If the bottom is sandy or muddy, find a flat rock and place a spikeboard on top of it. There must be enough resistance beneath the spikeboard to drive the spike firmly into the tire.
Another suitable location to nail Monster Trucks with railroad spikeboards would be in thick vegetation.
Railroad spikeboards are ideal for soft sand; the plate can be buried with only part of the length of the spikes protruding above the surface. If the spikes are spray-painted with a color matching the sand, and/or camouflaged with vegetation, they probably won’t be noticed by the driver of a speeding vehicle, particularly during a race. Multiple emplacements of these devices can create a formidable barrier.
Note: The discarded spikes found along RR tracks are usually rusty and dull. If so, sharpen the points before emplacement.
— Casey Jones
Field Note
Other methods have potential for dealing with large-tired ORVs in canyons. Place a waterlogged railroad tie, studded with sharpened rebar, in a stream crossing. You could also take a 2 x 6, drive numerous bridge timber spikes all the way through, and then nail the board, with the points of the spikes projecting upward, onto a waterlogged railroad tie. Since it may take a while to come up with a waterlogged tie, other means of anchoring a studded board under water may be easier. For example, you could anchor it with rocks or fasten it to a heavy piece of metal.
Slashing Tires
Suppose your neighborhood is infested with off-road vehicle scum, or you chance upon an unattended muscle wagon where it shouldn’t be. A quick slash job is in order. Drivers find it particularly annoying if all four tires are destroyed. Slashes in the tire sidewall will often be non-reparable, whereas punctures of the tread can usually be patched. The choice is yours.
An excellent instrument for the job is a thick-handled, x-acto knife with a symmetrical “stiletto-type” blade (x-acto blade style 23x). These can be obtained cheaply at hardware or art supply stores. The blade design prevents the knife from getting stuck in the tire, and the sharp point allows easy insertion into the sidewall. You can safely carry this tool in your pocket if a piece of cork covers the blade. Keep one in the glove compartment of your vehicle for use when the opportunity arises. Although probably not as damaging as cutting the sidewall, an effective method of deflating a tire is to cut off the valve stem, or to pull the valve stem out entirely with a pair of pliers. Another way to puncture is to place small pieces of wood spiked with long nails under the tires of a parked car, or do the same thing with a caltrop. However, this method is more time-consuming, less certain, and best reserved for situations where the sound of escaping air might give you away.
— Sidewinder
Field Notes
-
Less incriminating than an x-acto knife and equally (if not more) effective is the “Opinel” knife widely sold at camping and surplus stores. The 4” size is ideal. Get a model with a lockring. Sharpen both sides of the blade. These knives are inexpensive, extremely sharp, and do not elicit suspicion.
-
A small, sharp pocket knife works fine for slashing tires. Place the point firmly against the sidewall and push, with a slight sawing motion if necessary. The tire is ruined. It cannot be patched.
-
If you slash a tire make sure you really slash it so that it flattens. If you merely slice through part of the tire sidewall, not deep enough to flatten it, and give up, the tire may blow out while the vehicle is being driven. If this occurs at a high speed or on a curve, it could be very dangerous for the driver and passengers. Flatten tires; do not put people in danger.
-
Do not slash tires under high pressure. This can be dangerous.
Snowmobiles
It’s time to haul out the old monkeywrench and turn the screws on the snowmobiling cult. Snow machines harm plants and animals, waste energy and resources, and destroy the solitude of the woods with excessive noise.
One way to deter snowmobiling in sensitive areas that have marked snowmobile trails (much of the North Woods), would be a committed but decentralized effort, beginning with the departure of snow, to remove and ruin signs and posts associated with snowmobile trails. Trail markers and trail identification and promotion signs should all be removed. Safety signs, such as stop signs at intersecting highways, should probably remain.
Equipment for sign removal is minimal — usually a box-end or crescent wrench to turn out a couple of lag screws. Upon removal, the signs should be bent, defaced, or otherwise rendered unusable, then stashed under leaves or brush where they will eventually rot into the ground. If concealment is not a problem, a small pruning saw or bow saw would also be useful to cut the sign post into several pieces.
Removing snowmobile signs will serve to discourage the cult by decreasing the accessibility of trails, eliminating the “advertising value” of sign posts, and siphoning away at least some of the funds that would otherwise go to trail expansion.
In one northern Minnesota county recently, eco-raiders removed over $2,000 worth of signs out of a possible $5,000 worth.
Maintenance costs for snowmobile trails can also be increased by dragging dead trees and downed branches across trails. This is a good way to combine some low-commitment monkeywrenching with a hike in the woods. (Do not, however, push standing snags down across trails. Snags are vital for many birds and other species of wildlife.)
If we all do our work this spring, summer, and fall, the snowmobile trails should be in ragged shape by next winter.
— Windigo
Field Notes
-
It has been suggested that snowmobiles can be stopped by shoveling to bare ground a section of trail, preferably a section hidden by a bend in the trail. Drawbacks to this method are the amount of labor involved, and the fact that it would have little more than a nuisance effect on the snowmobiler.
-
A more effective deterrent might be to go after the trailers that pull the snowmobiles, while they are parked unattended at the trailhead. Tires are obvious targets, although by no means the only vulnerable points. Trailers are also used to haul other destructive “toys” such as ATCs and dirt bikes. Be cautious — it wouldn’t do to have the owners return while you were trashing their trailers!
-
Reportedly, monofilament fishing line spread out on the snow will suck into a snowmobile’s track mechanism and cause it to jam.
-
Remember that snowmobiles are often driven by overweight, poorly-prepared bubbas, who may be put into a life-threatening situation if their snowmobile is disabled miles from civilization. Be very conscious of the situation you may be creating and be concerned for the safety of the snowmobiler.
-
Some have suggested throwing handfuls of loose wire on snowmobile trails. Presumably this will become entangled in the track mechanism.
-
Just walk up to a parked crotch rocket with some wire cutters, press the throttle on the right handle bar to the handle and clip the exposed cable. Sprays to prevent car fan belts from slipping or some other abrasive sprayed between the track and the wheels might cause the whole thing to heat up and melt to itself. Snowmobilers are always concerned about their track melting to the rubber runners when they are traveling at high speeds in dry snow. This might work best with rental units — most operators of which are inexperienced. Snowmobile rental outfits have a hard time getting insurance anyway and with a little wrenching, these toys could become too expensive to play with.
-
Snowmobiles are also vulnerable to the methods discussed in the Vehicles and Heavy Equipment chapter.
Closing Roads
Most exploitation of the wild requires roads, and the industrial machine could not afford to constantly repair the road network on public lands if even a few hundred people across the country were making a spare time project of trashing it. Roads are difficult and expensive to maintain, especially in the areas we want to save. Selected areas, such as de facto wildernesses or roadless areas denied protection in the RARE II rip-off, BLM Wilderness Review, and subsequent “Wilderness” legislation, can be protected by closing the unsurfaced roads that are built and used in the process of exploitation.
Individuals can use the techniques described here, with simple, cheap tools, to prevent vehicle access to sensitive areas. You can deter the testing needed to prove commercial feasibility for proposed developments such as mining or oil & gas drilling. You can discourage the construction of a timber harvest road in a National Forest roadless area. You also can harass and render unprofitable an existing exploitative enterprise.
The simplest, and often most effective, way to inhibit vehicle travel is with “road spikes” (previously discussed). But for a variety of reasons, you may want to employ additional methods of stopping traffic. You might want to make the damage look like an act of nature (or at most, of vandalism). You may wish to prevent quick repair of the road. As each “road spike” is found, it can be removed, whereas some of these techniques will necessitate major repairs. On occasion, the money, equipment, and initiative to make the repairs will not come together, and they will be postponed. Numerous instances of damage to roads will multiply the effects and eventually large parts of the transportation infrastructure on public lands will be abandoned. In this era of high federal deficits, construction and repair of controversial roads that are continually being sabotaged will be recognized as pouring money down a rat hole.
The well-known methods of cutting a tree across or rolling a boulder onto a road are of limited value (but they are of value if enough people do them frequently). The intruder can cut trees out of the way and suffers little loss. Trees can be of greater use on footpaths where dirt bikes are a problem. Hikers simply step over, while the bike has to be dragged over the log(s). Of course the logs have to be placed in spots where dirt bikes can’t ride around the ends and this must be done in many places to present a real deterrent. A tree across the road might be effective in conjunction with another operation to delay motorized pursuit.
Tools
Any boulder you can drag into the road, some 4-wheeler with a winch can probably move out. But where you feel that a big rock or log can be placed in a hard-to-remove position, the most useful tools are: a come-along, rated two tons or heavier; 2 or more chokers; 2 spud bars; a hydraulic (car or truck) jack; large and small rock chisels; and log-splitting wedges. You probably won’t need all of these tools on any one job, but with a tool kit like this, you can move anything that is practical to move without machines. All of these items can be purchased cheaply at flea markets, and anyone who works in a construction trade can easily obtain the bars, come-along, chokers, and such.
A “choker” is a length of cable with a loop in each end: one loop is passed through the other loop and the cable is wrapped around the load to be lifted or moved. Pulling on the free loop pulls the slack out, choking the cable tight around the load, hence its name. You will need at least two chokers and four is better. Buy fifty feet of good, flexible 5/16” or 3/8” stranded steel cable and have it cut into four equal pieces where you buy it. (It takes a special cutter to do a neat job on cable.) Now double the ends back to form a loop of about 6” diameter. Then double cable-clip it. Cable clips can be bought in any hardware store and must be matched to the size of the cable they are to fit. They can be put on with a wrench or visegrips.
The “come-along,” or hand winch, can be attached directly to the object to be moved or it can be used in conjunction with other tackle. You can use it to pull a rope or cable through blocks to multiply its rated power. The small reel on a hand winch will only hold a few feet of cable so you have to secure the load and get a new grip frequently. A logging chain is handy for this type of work. For one thing it acts as its own choker since it has a fitting on each end that grips on any steel link it is slipped over. Steel carabiners are indispensable for all rigging work, especially for work as “fairleads” (those with the Teflon rollers are best) to lead cables and ropes over and around turns. Any library should have books explaining rigging and the use of tackle in detail. Nautical books such as Chapman’s have sufficient coverage of the subject.
“Spud bars” are just long, heavy-duty pry bars. You can make a nice one cheaply by using a piece of heavy-wall steel box tube. Cut a slot in the end of the box tube, slip a piece of leaf spring in the slot, and have a welding shop run a bead everywhere the leaf spring touches the tube. Use the come-along to pull on the end of a log as a giant lever if even a spud bar won’t do the job.
The hydraulic jack is useful for raising something enough to get a bar or roller under, and it can be used for “pushing” as described below. The rock chisels can be used to start blocks of fractured rock, as can the thicker splitting wedges.
Undercutting a Bank
Undercutting a bank is only a little better than logs and rocks since the rubble can usually be cleared out of the way or driven over with less trouble than it took to bring it down. However, it is possible to find conditions where a modest effort applied to an unstable bank (or cliff above the road) will fill up a section of road with no easy detours. Using the spud bar in the cracks of fractured rocks is sometimes feasible. After a bank is well undermined, a ditch across the top of the bank will help to bring it down. (Remain on the uphill side of the ditch and/or rope off to avoid becoming part of the landslide!) If, after undercutting the bank and ditching across the top, it still won’t slide, you can lay a pole on each side of the bottom of the ditch. Lay the hydraulic jack on its side between the poles, and jack them apart. They will spread the load along the ditch and push the undermined bank off.
Removing the Roadbed
Much better than blocking the road is to remove part of the roadbed. This is especially effective on a steep hillside where more fill is hard to get and stabilize in place. One simple, small-scale way to do this is to ditch the natural water flow downward across the road. The best place to do so is where a gully or watercourse crosses the road on a slope. Such a spot may have a culvert or waterbreak to keep the run-off from washing out the road. You can dig out a waterbreak and create a ditch across the road. Running water will deepen it and eventually make the road impassable to vehicles. (If it is too wide, it can be forded, however, and if it is too narrow and shallow, it can be filled with logs or rocks by a driver.) A pick, pry bar, and long-handled, pointed shovel are about the only tools you need for this kind of job.
Perhaps the best way to cut a road is to find the place(s) it is trying to slip off down the slope naturally. Clay slopes often slide as do fractured rocks bedded at a steep angle. On rocky slopes a spud bar and gravity should help you undercut the roadbed. This is especially effective on tight, outside curves and steep slopes. Don’t bother to dig off the entire width of the road; digging off just the outside will do the trick.
While clay slopes can be dug off, too, there is an easier method in some places. With practice you can spot a slope that is trying to slide off. The shoulders of the road will be cracked and slipped in a series of step-downs. If there is water on the uphill (inside) side of the road, stop up the drainage so that the ground becomes soggy. Dig holes to help the water penetrate the subsoil, and once the clay becomes saturated, it will slide.
Culverts
If the road has culverts, stuff the uphill ends with rocks and other debris. Then dig through the road fill to expose the top of the culvert. If this is done at the beginning of a seasonal rainy period or before spring run-off in snow country, most culverts will wash out, creating an excellent vehicle barrier. Keep your work hidden from drivers on the road, otherwise it might be noticed and removed before the next big storm. (See the next section for more ideas on plugging culverts.)
You can also remove the culverts, using the come-along or a vehicle to drag them out. First dig all the road fill off the top of the culvert and free an end enough to get a choker on it. Using pole A-frames and fairleads as necessary, pull upward on the end of the culvert, lifting it out of the road. Use the come-along or a vehicle to pull on the cable, through tackle as necessary, and then bend the culvert when one end is free, leaving it half buried in the road.
Bridges
Wooden bridges are vulnerable and require a major effort and expense to replace. They can be burned but it takes more than a can of kerosene and a match. A huge pile of dry firewood must be heaped up under the load carrying timbers of the bridge to sustain a fire of sufficient heat and duration to burn a soggy old bridge. Fill the available dry area under the bridge, or crib up a log platform covered with dirt, sand, or rock on which to lay the fire. Several arm-loads of small stuff, topped with progressively larger limbs and finally logs should be crammed right up to the underside of the timbers. After the small stuff burns a little and the fire collapses, you should stoke it with big limbs and logs and stuff the openings with branches. Then you can walk away confident of the results. (Do not try to burn bridges in drought conditions or fire season. You don’t want to be responsible for a forest fire!)
You can also saw through bridge timbers from the underside with a chain, bow, or crosscut saw. It is hard to avoid hitting nails — this conceivably could be dangerous with a chain saw (see the Tree Spiking section in the Developments chapter). If noise is a problem, a bow saw blade cuts easily when sharp and can be quickly replaced when dulled. A few drops of kerosene will make it cut smoothly in resinous or creosote-treated wood.
Simple, safe, and inexpensive methods such as these, done in your spare time, multiplied by dozens of similar actions by other ecodefenders in their particular neck of the woods, can effectively stop the destruction of many of our remaining wild areas by vehicle-borne logging, mining, poaching, and by mindless ORVing.
— Daniel Boone
Field Notes
-
In the proper location, it is possible for a group of people, using only their hands, to fill a road with enough boulders and other debris to act as an effective barrier to most vehicles. While a vehicle with a winch, a bulldozer, or a crew of workers might be able to clear the road to permit passage, most casual ORVers will be stymied. If this kind of minor ecotage of roads occurred often enough and in enough locations, many marginal roads would be abandoned. This type of road trashing can be done casually by a group on a hike, taking care that they aren’t caught by ORVers while doing it and being sure that they aren’t trapping some poor old fogey in a jeep on a dead-end jeep trail. Although extremely effective, this form of monkeywrenching bears fewer dangers than other kinds.
To effectively close roads, strike at numerous points along a single road, and at many roads within the road network surrounding a wild area. Maintain your campaign against the roads in the area — after they are repaired, strike again, and again, and again. Eventually it will become too costly for the Forest Service or whoever to continue repairing them and roads will begin to be abandoned. -
Keep in mind that as your campaign against roads becomes more effective and costly, your security precautions will need to become more stringent to avoid being caught in an increased law-enforcement campaign to protect the roads.
-
Concern about the federal deficit, budget overruns, and deficit timber sales are conducive to citizen road closures. Forest Service and BLM budgets will be tighter in the future. A massive but dispersed campaign of nibbling away at the road infrastructure on the public lands will soon exhaust agency road repair and construction budgets.
-
Many Forest Service roads have gates which allow the Freddies to close the roads at will for a variety of purposes (wildlife protection is one reason, but these gates may also be used to keep protesters out of a timber sale area). You can cause confusion by getting cheap padlocks at a city hardware store and closing and locking such gates yourself. A little Liquid Solder in the key-hole prevents the lock from being picked. Most FS gates have a casing around the lock to prevent them from being cut with bolt cutters. See the section on Jamming Locks in the chapter on Miscellaneous Deviltry for other ideas.
-
Close a road near the beginning. This keeps vehicles out.
-
One of the cleverest monkeywrenching escapades involved a controversial landing strip in the middle of the Selway-Bitterroot Wilderness Area in Idaho. In 1986, an unknown person dug 21 holes with a posthole digger in rows three-abreast along the strip. Salt was put into each. Elk and deer pawed up the holes to get the salt and made the dirt strip unusable for aircraft landing.
Plugging Culverts
In the last several years, many experienced monkeywrenchers have come to believe that the most effective single form of ecotage to defend wildlands is to plug culverts on dirt and gravel roads. Flood waters from storms or snowmelt, unable to flow under the road through the culvert, wash out the road, making it impassable. Done at every culvert on a National Forest backroad, the damage is immense, and considerable reconstruction and repair is necessary. Using basic common-sense security techniques, plugging culverts is as safe as any ecotage. It does not carry severe legal penalties (though you still don’t want to be caught!). It does not carry a “dangerous” onus like tree spiking. It is simple, quick, easy, and effective!
The idea is to plug the culvert inside the inlet opening so the plugging is not visible to road maintenance crews peering down from the road while leaning on their shovels or by Freddies driving by in their pickups.
In the last several years, many ecodefenders have begun to experiment with culvert plugging. The following are some of the methods developed. See also the section on Plugging Pipes in the Developments chapter for additional ideas. Use your imagination! Culverts are perhaps the most vulnerable part of the wilderness-destroying infrastructure.
1) To take out roads without heavy equipment or back-breaking labor, get some 2 x 4s, chicken wire, black plastic, nails, and staple gun. With such goods, a friend and I plugged six key culverts on one of the most notorious roads ever pushed into a wilderness — all in one night.
These materials and tools are light enough so that you and a friend can pack them into the area — thus not having to drive and leave your vehicle in an incriminating spot. You’ll generally be working below the road surface, so even if a car comes, you’ll either be out of sight already or you can watch for headlights and duck in time.
Scope out the road ahead of time. Measure the diameters of the culverts at strategic points on the road. Then go home and cut 2 x 4s to fit each of the culverts. For culverts 30 inches and less in diameter, all you’ll need are two pieces a few inches longer than the diameter. For larger culverts, you might want more strength than this simple “X” frame can provide. You could use three in the form of a triangle, or four in the shape of a tic-tac-toe. But don’t nail them together yet.
You’ll also need enough chicken wire and black plastic to cover twice the combined surface areas of your culvert ends. Bring a few pounds of galvanized 16-penny nails (3 inches long), staples and staple gun, hammer, wire cutters, and a pickax.
Nail the 2 x 4s together to make a frame that fits over the uphill end of the culvert. Once you’ve fitted the frame, cut a piece of chicken wire about four feet wider and taller than the end of the culvert. Center the wire over the frame and liberally staple it in place. Then cut an equivalent piece of black plastic and staple it over the chicken wire. (You may need to use several overlapping pieces.) Place rocks, soil, and other heavy debris on the bottom, top, and side to hold the plug securely in place. (This is where the pickax is handy.)
If there was water flowing through the culvert, it should now be backing up and forming a little reservoir. As long as your frame can support the weight, this lake should grow until it washes over the road. You might want to let some water continue to flow through by poking holes in the bottom of the plastic. This way, your efforts are more likely to remain unnoticed until after the next big rainstorm or until snowmelt. The increased flow during a storm will cause more damage.
— Siskiyou Sid
2) A very effective way of plugging a culvert is as follows:
-
Slide a plywood shelf into the culvert so you can lie on it (see illustration).
-
Drill six holes at the lower (downstream) end of the culvert while resting comfortably on your shelf.
-
Twist in heavy eye screws with a section of dowel.
-
Affix doubled-up 1 inch mesh chicken wire to the eye screws.
Flow-borne debris will form a solid plug inside the culvert up against the chicken wire and will block the culvert. None of the blockage should be visible from the road. Cutting the chicken wire after debris piles up against it should not be enough to flush out the culvert. On smaller culverts, simply wad chicken wire a leg’s length up the lower end.
— Carrie Ahn
3) Corrugated roofing metal or other types of sheet metal are ideal materials for blocking culverts under roads. Use your ingenuity to affix them to the culvert so they will stay in place in high water. (Try using eye bolts as suggested above, or drive large nails into the walls of the culvert.)
4) Steel culverts that are large enough to walk into and difficult to block can be wrenched by punching holes in their bottom with a rock pick. This allows water to seep underneath and cause the gradual washout of the culvert. The damage is irreparable but may take a long time, so plan ahead! This method works best in culvert bridges that are primarily backfilled with dirt.
5) For narrow culverts, make a trip to the auto junkyard and buy some of those collapsed “space saver” spare tires. These little things are hated by anyone who has ever tried using them, so they should be cheap. Position the collapsed spare in the culvert, then inflate it with a bike pump or other inflator. As it expands, it will firmly wedge itself in the culvert. This should be enough of a flow restriction, but you could also plug the “donut’ hole with debris.
6) Plug culverts on newer roads that haven’t been fully compacted. These wash out more easily. Plug culverts in road sections that have substantial fill on the outlet side. It is more difficult to repair these wash-outs.
7) Since round corrugated metal culvert pipe comes in 2” increments from 6” on up, it makes sense to use round stuff to plug ‘em:
-
I Volleyballs (@ 8”), soccer balls (@ 9”), and basketballs (@ 9”+) can be used to plug 8 to 12 inch diameter culverts. Partially deflate the ball, shove it into the culvert inlet a short distance, then over-inflate it in place with a small, portable, foot-operated tire pump (available at Sears with pressure gauge, 100 psi maximum, for under $10).
-
For 10 and 12 inch culverts, wrap the ball with absorbent material such as cotton toweling to make up the diameter difference. Cover the ball with debris and rocks, but not past (outside) the pipe opening. All of this stuff can be eas-ily backpacked, and tire pumps and sports equipment are not unusual items to have in your car or truck (the Feds are getting real snoopy these days). No fingerprints!
-
A partially inflated tire inner tube shoved in and pumped up to fill the void might also work. It would be more flexible for various culvert sizes, but would require more pumping. Even a large balloon, like a weather balloon, placed in the culvert and then inflated might work.
-
Plastic 5 gallon buckets with lids are a common sight in dumps and along the road. They are about 12” in diameter at the top, and could be wedged into a 12” culvert, tapered end first, then filled with rocks and debris. The round black plastic planter buckets available in nurseries also come in 2 inch increments (12, 14, 16 inches on up) and could be used in the same way.
-
Large culverts (16” on up) can be plugged with sandbags, which are routinely used for bank stabilization and temporary road sign ballast. Pick up a few and put ‘em in your car trunk or truck bed. The extra weight will give you better traction to get to those hard-to-reach culverts. Unless you’re built like Hayduke, it’s not advisable to backpack sandbags.
— Magic Mole
8) To jam a culvert:
A) You can do it like George Stewart in his novel Storm and jam a big old dead hog in it. Naw, too damn heavy to carry up a Forest Service road in a backpack.
B) If the sucker is between, say, six inches in diameter and two feet, you could use plastic two-part expanding wall insulating foam mixed in appropriate amounts in a trash bag which you quickly jam in the culvert as the stuff expands. The trash bag (small for small pipes, large for large ones) will force the foam to inflate across the pipe diameter rather than along its length — thereby plugging it instead of just laying along its bottom.
Buy the two-part (50/50 mix) expanding foam, which comes in 2 one-pint containers (available at most home builder supply stores). It supposedly expands forty times the liquid volume, but assume a 50 percent advertising exaggeration. Therefore, if you have an initial volume of 1 quart (2 pints), expect 5 gallons of foam to fill the pipe. But be scientific and experiment with the stuff before trying it in a culvert you want to plug. The couple of quarts of liquid, trash bags, and expanding foam are easy to carry in a backpack.
C) If the culvert is larger than 2 feet in diameter, you could probably tie several large foam bags together and emplace some kind of cross bracing to jam the pipe. Remember that a hell of a lot of water must be held back to jam a large culvert until the road erodes around the culvert, so think it through to make sure your plug will hold.
Blocking culverts is much better at reducing access to the forest than you might think. The roads the Forest Service must repair will take the same road construction funds needed for new roads. The more we can make them spend repairing existing roads that shouldn’t be there anyway, the less they will have to spend on building new roads.
— Tom Joad
9) Do your culvert plugging before the rainy season or snowmelt in your area. That way your plug need not remain undiscovered for a long time. Otherwise, small backups of water might be visible from vehicles on the road and Forest Service or other road crews would be able to unplug the culvert before a major runoff seriously damaged the roadbed. Watch weather reports and try to plug culverts shortly before major storms are forecast to hit the area.
10) If you don’t want to carry anything incriminating into the field for plugging culverts, use large rocks and multi-branched limbs on culverts up to a couple of feet in diameter. Bigger rocks won’t wash out readily; dead tree branches with many limbs will jam in place easily. Flood-borne debris will finish the job (especially if you toss a lot of debris in the streambed upstream of the culvert) and even make the washout look “natural.” Remember to restore the natural appearance at the mouth of the culvert to avoid tipping off a passing patrol.
— Bucky Beaver
Chapter 5: Vehicles and Heavy Equipment
The classic act of monkeywrenching is messing around with a bulldozer. Probably the best known technique is pouring sugar or Karo syrup in the gas tank or oil system. But this doesn’t really work! It just clogs the fuel or oil filter. There are better — and simpler — ways to “decommission” that piece of heavy equipment threatening your special place. The ‘dozer is a tool of destruction. But like David against Goliath, a little ingenuity and moxie can go a long way toward stopping a monster.
There are, of course, more incendiary ways to take out one of these behemoths. You can totally dismember one with a cutting torch. Or you can just barbecue one.
Be careful when doing this kind of “night work.” People who own expensive equipment don’t take kindly to having unauthorized maintenance done on their rigs and will encourage the police to do their best to find the culprits.
With the detailed instructions and clear illustrations presented here, even “mechanical idiots” such as your good editors can accomplish nighttime maintenance on heavy equipment.
Disabling Motor Vehicles of All Kinds
All (motorcycles, cars, trucks, heavy equipment):
-
Pour sand in the crankcase — Sugar and syrup are ineffective in gasoline or diesel fuel tanks and oil reservoirs. At best, they will merely clog the filter. A handful or more of sand in the fuel tank or oil is much more effective and much easier. Also, with sand you need not carry incriminating items like sugar or a bottle of Karo syrup.
-
Jam door and ignition locks with slivers of wood, a hard tough cement like “super glue,” or silicone rubber sealant.
-
Pour a gallon or more of water or brine into the fuel tank.
-
Pour dirt, sand, salt, or a grinding compound (like Carborundum) into the oil filter hole. If there is a filter (often present on heavy equipment), pour the sand, etc. down the dipstick tube and use the dipstick to ram it down. If possible, remove the outside oil filter and add the grit. (Very fine grit may go through an oil filter, though.)
-
Pour water into the oil filler hole. Amount needed depends on engine size — at least 2 quarts for a V-8. Use enough so that the oil pump will draw only water. The water should maintain “oil” pressure without lubricating at all.
-
Slash tire sidewalls. Sidewall stabs cannot be effectively patched, whereas tread stabs can be. On some tires, cutting the valve stems is an easy way to flatten them. Be careful: tires on some heavy equipment are filled with water under very high pressure and it can be dangerous to slash or cut these. Bullets ricochet off them, too!
-
Smash fuel pump, water pump, valve cover, carburetor, distributor, or anything else except the battery (for your safety) or brake system (for their safety). Use a sledge and a steel bar for precision blows.
-
Pour water and/or dirt into the air intake (usually the big hole right under the air cleaner). The more, the better.
-
Pour gasoline or other fuel into the oil reservoir. It will break down the oil and the oil filter will not remove it.
-
Put battery acid or some other corrosive in the radiator.
-
Put Carborundum or other small abrasive particles in the gearbox.
-
Pour a box of quick rice in the radiator.
-
Use a pair of bolt cutters on anything possible (except battery cables, other live wires, and brake cables).
-
Ferric chloride and some other etching compounds used in electronics have the interesting characteristic of eating away copper. If added to the water in a radiator, the radiator will fall to bits in a couple of days.
Heavy Equipment
Large machines, in the form of earth moving and logging equipment and haul trucks, are the most pervasive tools of land rape. Because of their purchase and maintenance costs, they are extremely attractive targets for monkey-wrenching. Downtime for repairs can exceed fifty dollars an hour, and a proper job of sabotage can idle a machine for weeks.
There are hundreds of different types and models of heavy equipment, from the classic bulldozer to the highly specialized harvesting and handling equipment found in the logging industry. Regardless of their specific use, they all have diesel engines and hydraulic systems that are the targets of the experienced monkeywrencher.
A good first step for the equipment saboteur is gaining basic familiarity with the more common types of machines. Effective teamwork can entail dispatching a friend to work on “that loader over there,” or to see if “that’s a security guard parked behind that scraper.” A common nomenclature can minimize confusion and enhance your safety and security. Study illustration 5.1, keeping in mind that the descriptive names are somewhat imprecise, due to the tremendous variety of machine types.
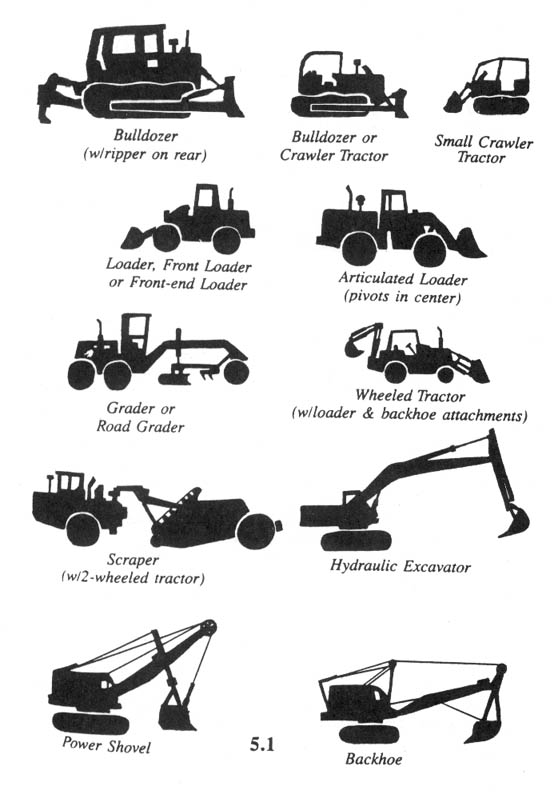
Basic Tool Kit
Effective sabotage may require nothing more than a handful of sand on the spur of the moment. More often, it entails planning plus a basic tool kit. In illustration 5.2 you will find the basic elements with which to begin. Since most of this mechanical work will be conducted under the cover of darkness, a good flashlight for each team member and rigid discipline in the use of the light are critical. The military surplus angle-head flashlight (A) is a good buy at most surplus stores. The red lens stored in the base, when mounted over the light, can increase your security. The red light is less noticeable from a distance, and will not ruin your night vision. A cheap acrylic artist’s red paint (B) will do in a pinch, as will some red cellophane, if you can find it. As always, wipe clean of fingerprints all parts of the flashlight, including the lenses, bulbs, and batteries. Do not use your flashlight indiscriminately. Cup your hand over the end, allowing only a thin sliver of light to illuminate the area on which you are working. Similarly, use your body to block the light from view. Use a lightweight cord as a lanyard, to hang the flashlight around your neck and avoid dropping and losing it.
A lightweight bag keeps your tools together (C) so that you don’t inadvertently leave them as evidence at the scene. Nylon can be noisy, so canvas (like cheap army surplus) is usually best.
Lightweight running shoes (D) allow silent movement and quick escape. Deck shoes, with their relatively smooth, pebbly soles, leave a minimum of distinctive footprints for matching with evidence at other monkeywrenching scenes. Never wear slip-on tennis shoes since they won’t stay on when you run. If the terrain requires boots, cover them with large socks (E) to obscure their distinctive waffle print.
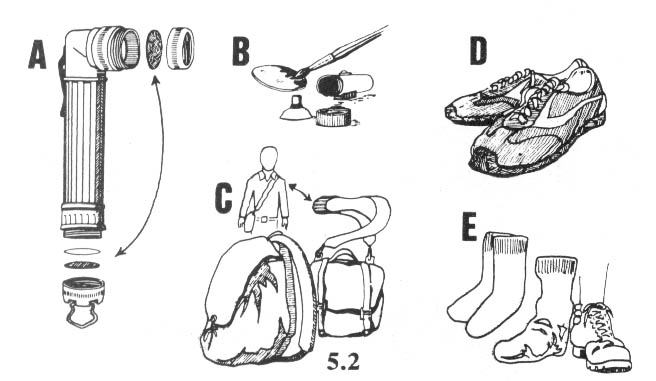
Your basic tool kit is shown in illustration 5.3. Cheap cloth gloves (a) can be purchased at almost any hardware or variety store. Dispose of them after a single job, or after a few jobs, depending on the frequency of your monkey-wrenching. Buy only one or two pairs at a time, and get different gloves from different stores to further confuse the trail of evidence (in case a cloth pattern imprints on a greasy surface or a few fibers snag on a sharp edge or rough surface).
A common one-gallon plastic jug (b) is ideal for transporting abrasive material like sand to the equipment. The cut-away bottle makes a good shovel-like scoop if sand can be found near the equipment parking area. If, on the other hand, abrasive material must be transported in, any plastic bottle, cleaned with soap, dried, and wiped free of fingerprints will suffice. A screw-type cap is your best insurance against accidental spillage.
Lastly, a cheap plastic funnel, available at most grocery stores (or variety, hardware, and auto parts stores) as seen in illustration (c) will allow you better access to the essential motor parts, some of which are not easily reached otherwise.
The advanced saboteur’s kit includes a can of spray lubricant (d), to wash away telltale signs of abrasive grit, and a spray handle for same (e) to improve your aim in the dark of night. In addition, a crescent wrench (f), wrapped in black electrical tape to eliminate its shiny metallic look and to silence it from banging inside your bag, is useful for gaining access to sensitive areas like oil filters that are rarely protected by padlocks. (Wear gloves when you apply the tape, as it makes an ideal surface for fingerprints.) Also useful for getting into diesel filter systems is a socket wrench and a selection of sockets (g) and an oil filter wrench (h) carefully wrapped with tape to prevent it from leaving telltale scratches on an oil filter housing.
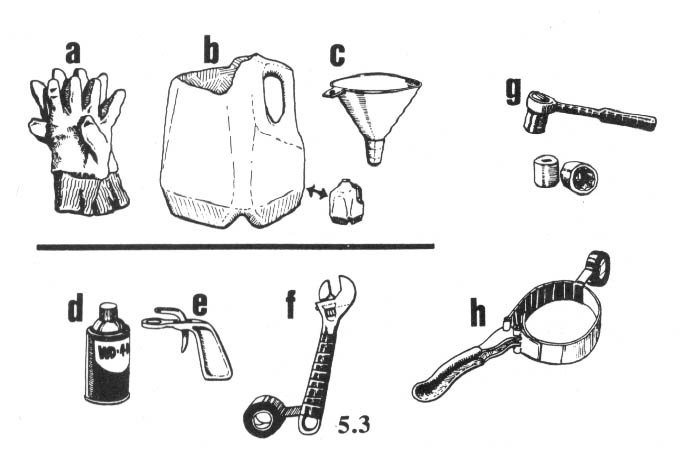
Abrasives
We will assume that you have studied the other operational methods described in this book, and are now standing beside a large mass of slumbering steel. At this point, you can vent your frustrations and attack it in every conceivable way, cutting hydraulic hoses, pulling out electrical wires, hammering at delicate parts, slashing the operator’s seat.... At no small risk to yourself, you will probably cripple the beast for only a few days, and the repairs will go rather quickly once the parts arrive.
But if you are a serious saboteur who wants to have maximum impact, you will work in silence, and when you leave, no one will know you have been there. At least not for a day or two. When your trail has gone cold, and evidence of your presence has been destroyed or hopelessly contaminated, the engines of destruction will literally grind to a halt. Only major shop work can repair them. You will have succeeded.
Experienced monkeywrenchers generally agree that the best and surest way to cripple heavy equipment is to introduce abrasives into the lubricating system. Illustration 5.4 shows you typical filler caps. The glove in (A) will give you an idea of their approximate size. Be aware that many filler caps have nothing to do with the lubricating system. One that does is the dipstick shown in (B). However, the narrowness of this access point limits the volume of abrasives one can introduce; and an experienced operator’s quick check of the oil level first thing each morning may reveal signs of grit on the dipstick. In (C) is a typical radiator cap, in (D) we see a filler cap on a small hydraulic reservoir, and (E) illustrates one of many styles of fuel tank cover, most noticeable for their large size.
Once you have found the oil filler cap, it is usually simple to pour in dry sand with the aid of a plastic funnel. Illustration 5.5 shows the best procedure for those machines that combine the large oil filler cap with the dipstick (a significant minority of heavy equipment). Unscrew and remove the cap/dipstick (a). Pour in abrasive sand (b). Apply liberal amounts of spray lubricant to wash any trace of sand down into the bowels of the engine (c). Re-insert the dipstick and pull it out again to make sure there is no revealing sand adhering to its surface. Many operators check their fluid levels first thing in the morning so you must leave no sign of your work. (Indeed, some companies now require checks of all fluid levels each day before starting equipment.)
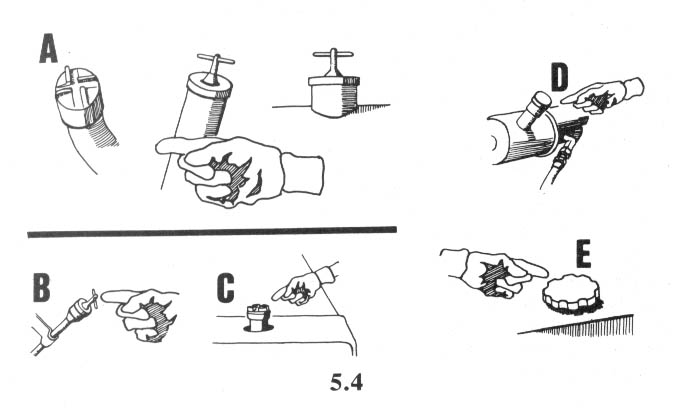
Gaining Access
Some equipment owners whose toys are parked in vulnerable areas use padlocks to secure every cap on the machine. Many manufacturers design caps that easily accept these padlocks. This will not stop the dedicated monkeywrencher. Illustration 5.6 shows how to use a crescent wrench to gain access to the oil filter housing of a Caterpillar bulldozer. The filter element can be removed and disposed of well away from the site. In its place goes a liberal dose of abrasive. Be careful not to get any abrasive in the tube marked (B). If this becomes clogged, you will not be able to re-insert the threaded rod that secures the lid onto the filter housing.
In 5.7 is another type of oil filter set-up. First use your socket wrench or crescent wrench to remove the small drain plugs (1). Use your open top plastic bottle to catch the oil and keep it from spilling everywhere. Next unscrew the filter case bolts (2) and the filter housing will drop into your hand. Dispose of the filter (3), pour in your abrasive (4), and re-assemble. Number (5) shows an exploded view of the parts involved.
Another filter type is the screw-on variety. These are gradually replacing the filter elements just illustrated. This type is removed with a good quality oil filter wrench found at any auto parts store. It’s as easy as changing the oil in your car. If you don’t know how to change the oil in your car, have a friend show you how. Once you learn this, you can adapt it to your heavy equipment night work.
Be careful to avoid too much oil spillage when removing the screw-type filter. Carry it well away from the machine before scratching out a shallow hole to receive the quart or more of oil inside the filter. Pour out the oil slowly and cover the hole to leave no trace. Fill the inside of the filter about 3/4 full of abrasive and screw it back on to the engine.
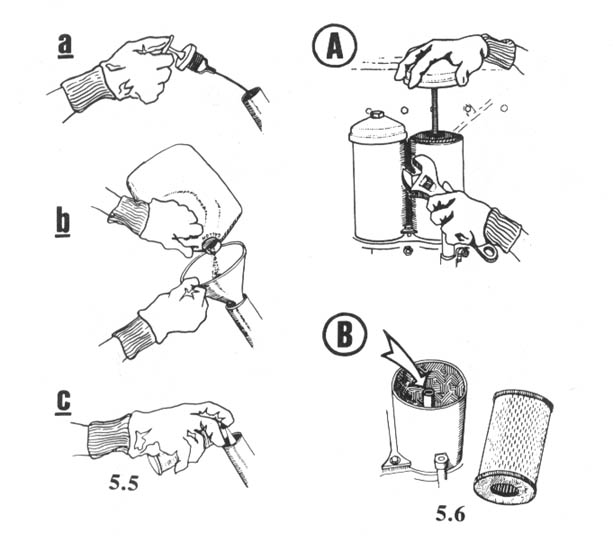
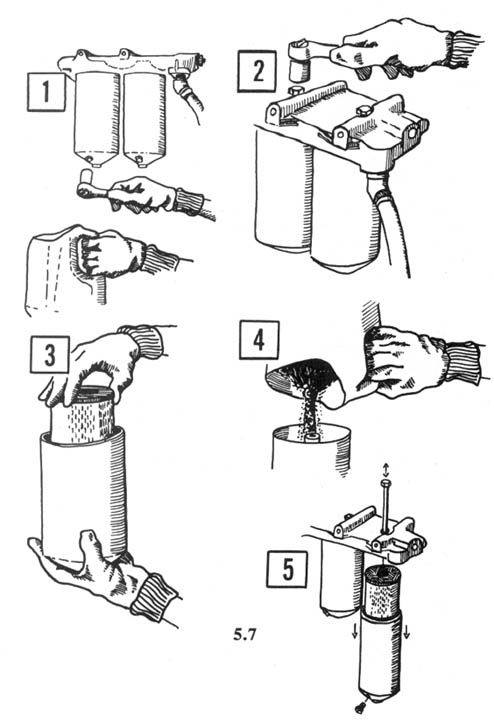
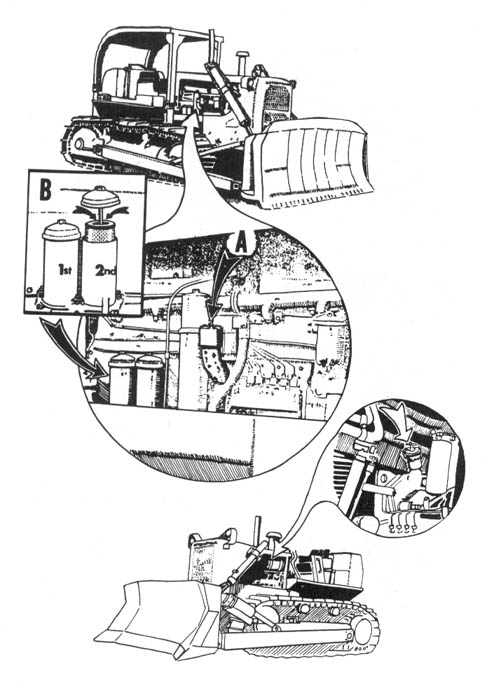
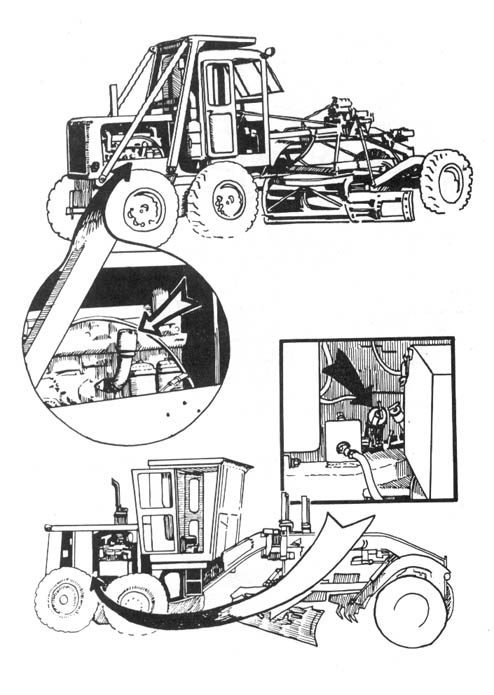
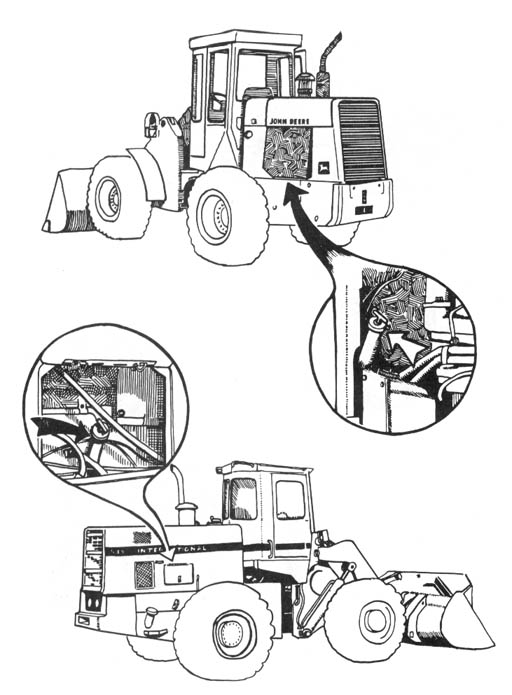

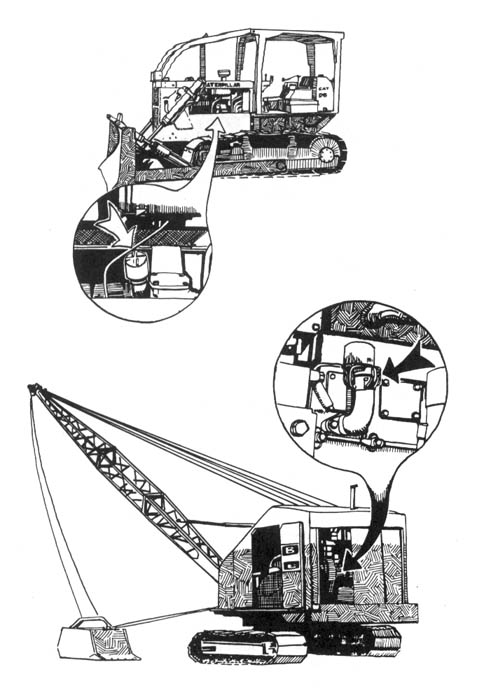
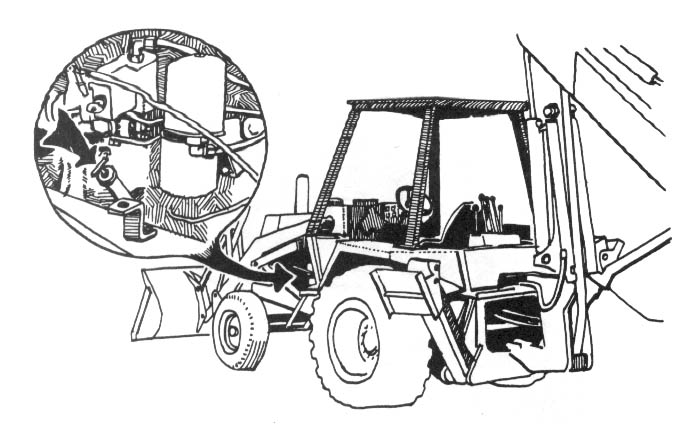
Oil-Access Points
Because of the large number of equipment manufacturers and the various models produced, it would be all but impossible to illustrate all of the oil-access points. The remaining illustrations provide a cross-section that will enable you to quickly learn what to look for. By all means, study whenever possible. When you walk by a piece of equipment, stop for a moment and practice spotting the oil filter cap. Keep your distance, though, so no one will suspect you of tampering. Once you have correctly identified a dozen or so filler caps, the rest come easily.
Remember that your equipment sabotage must not be noticed until the machines begin to break down. Carry a few dark colored rags to clean up any messes like accidental oil spills that may occur when removing filters. Don’t leave things spotless, however, as an extremely clean area on an otherwise greasy, dirty machine is also a giveaway.
Lubrication Points
In addition to the oil filler caps, other lubrication points can be creatively sabotaged. Even when the machines are locked up and you are denied access to the points previously discussed, you may be able to destroy the monsters through other weak spots.
Every moving joint must have some type of lubrication to prevent overheating and premature wear out. At any auto parts store you can find a grease gun (see illustration 5.8A), and with it you can introduce abrasives to these moving parts. First, remove about half of the grease from a standard grease tube. Replace this grease with sand or another abrasive and stir it to a smooth blend with a metal rod or dowel. You are now ready to “unlubricate” a machine at a dozen or more points. Look for the “zerk” fittings at every pivot point. Illustration 5.9 gives a close-up view of these grease fittings and shows a variety of locations where they can be found on typical machines.
A simple end wrench or box wrench can also provide access to these grease fittings. Begin by unscrewing the fitting as seen in (B). Use a stick or nail to remove some of the grease (C). After making room inside the hole, add a squeeze of highly abrasive “valve lapping compound” (found in auto parts stores). These handy little tubes are easy to use and allow for precision application.
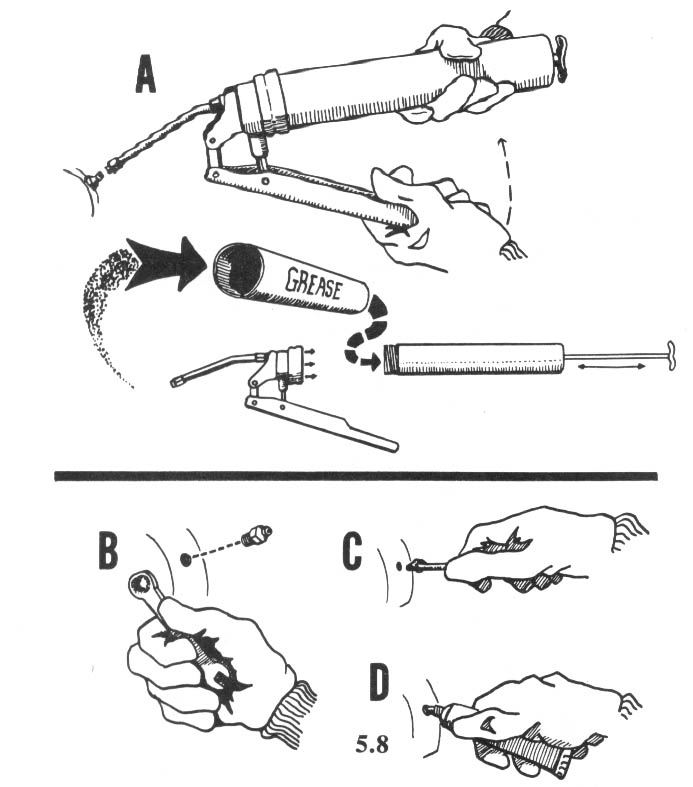
Other moving parts that must be kept properly lubricated are wheel hubs and transmission differentials. While simply draining the differential lubricant could cause substantial damage, operators in areas where sabotage has occurred have been known to even check these before firing up in the morning, so it is better to introduce abrasives into the lubricant. If you can reach the machine, you can reach these points, since no one has devised a means of locking out access.
The most important tools for this work are the “breaker bar” and sockets seen in 5.10A. The long handle provides the leverage needed to unscrew the caps. A short length of common pipe, called a “cheater” (B) can be slipped over the breaker bar handle to provide the leverage of an even longer handle.


Various types of oil filler caps found on wheel hubs can be seen in (C) through (F). In (G) is a plug in a differential through which lubricating oil (and abrasives) is introduced. A neat job will ensure that even if the operator checks, abrasives will not be immediately apparent.
Selection of Abrasives
Common sand is the cheapest abrasive for equipment sabotage. Ideally, it is dry and free of organic matter like leaves and twigs. You can use a small piece of window screen or fine mesh hardware cloth to remove rocks and gravel that would otherwise prevent smooth flow or even jam a filler tube on an engine. Simply pour the sand through the screen and into your plastic bottle.
You should not use sand from near your home. Forensic laboratory analysis might reveal the approximate source area the sand came from. This is done by comparing it to samples collected in various drainages where differing rock formations may lead to slight variations in the composition of the sand. Although this is a complex laboratory procedure not likely to be employed, it is best to take the extra precaution. By scouting ahead of time, you may locate a source of clean sand in the vicinity of the equipment parking area.
For the sake of variety, and to make it appear as though separate groups of monkeywrenchers are at work, you can purchase abrasive compounds from suppliers in big cities. Look for a medium-grit silicon carbide. Lapidary supply houses are a good source of top-notch abrasives which are used to polish stones in tumblers.
— T.O. Hellenbach
Field Notes
Many Earth defenders have experimented with various abrasives and methods of introducing them into heavy equipment. We report their ideas here, despite some redundancy and some disagreement over what is best. Pick what seems to work best for you.
Silicon carbide or “tumbler abrasive material” (available at “rock shops” which cater to hobbyists) is more effective than sand as an engine abrasive. Enough grit to destroy the largest engine can be carried in a pants pocket, and if used just right it is not as messy as sand. Very fine grit is so powdery that it feels like white flour. It will mix thoroughly with oil, so it’s easy to pour down an oil filler or dipstick hole. It also stays in suspension for a long time, so it will circulate nicely throughout the entire oil system to get into all of those little cracks. It can also be used in fuel tanks, because the tiniest particles are so small that they’ll go through filters, and in transmissions, hydraulic systems, and lubrication points.
Silicone carbide is also the easiest grit to transport and use. Dry, it pours well. Mixed with oil or other liquid (1 part abrasive to 4 parts liquid), it pours down the smallest pipes and goes through strainers, even filters. (Immediately prior to use, be sure to stir or shake well because the grit will separate out and harden on the bottom of the container.) Mix fine and coarse silicone carbide together for best results.
A little goes a long way. With just a quart canteen full of grit on your belt, you can decommission a whole fleet of Earth wreckers, while appearing to be nothing more than an innocent hiker.
For security reasons, take the usual precautions when buying this stuff, and don’t leave any of it lying around your home.
— Henry Ford
Aluminum oxide (very fine-grit sizes of 180 or higher) is almost as hard as silicon carbide, and is much more effective as a cutting agent on ferrous metals. There is probably no better abrasive for night work. Stock up on it before it is outlawed! Do not touch with your skin or breathe the powdery abrasive. Be careful when you pour it (you may want to even wear a face mask or bandanna).
Abrasive works by embedding itself in the softer metal (in machinery, parts that touch must be of different metals) and cutting out bits of the harder metal, which also begin circulating and causing more havoc. So the particles need only be large enough to stick up out of the oil film, which is approximately .0000001 — .000001 inch thick. The oil filter catches particles down to about .001 — .003 inch diameter, so it is good to use grit sizes above 180 (.0034”). Size 400 has particles of .0009”, and size 600, .00033”. These may seem too fine, but they will last long and continue cutting. Sand, even quartz, isn’t much harder than steel, and so isn’t as effective. However, a lot of sand could potentially clog up the oil filter and cause the bypass valve to open up, allowing sand to get into the works. Removing the oil filter may be unwise — it may cause the oil pressure warning light to come on.
Abrasive put into the fuel is good because it is pumped into the top of the engine and enters the cylinder compartment. Abrasive in the oil may or may not get picked up by the oil pump. If the engine is not moved around much (for example, on a large crane), the grit may stay in the bottom of the oil pan. This is why it is good to use very fine grit that will stay in suspension. The oil pump has a screen that excludes only large particles. Its intake generally floats on top of the oil.
Apparently, grit inserted via the oil filler hole doesn’t show up on the dipstick until after the engine has been running, and even then could be missed by a careless operator.
— Ransom Olds
-
For best results with silicone carbide (rock polishing grit), mix together different coarsenesses of the grit — from fine powder to fine sand in size. Mix 1 part grit to 4 parts motor oil in screw-on, plastic quart oil bottles or pocket sized, plastic squirt bottles of various kinds. Pour the mixture in the oil filler, transmission filler, hydraulic reservoir, fuel, or squirt it down the dipstick hole. A mere half pint of the mixture is enough to destroy a large engine in a few hours.
-
An excellent cheap material for introducing into oil systems of big yellow machines is titanium oxide, which is available in 5 pound bags at rock shops or lapidary suppliers. Purchase bags of both coarse and fine titanium oxide. Mix one pound of each with half a gallon of motor oil. Pour the mixture into the oil system of a bulldozer, earth mover, logging truck, or whatever. This will turn any piece of heavy equipment into a boat anchor.
-
It has been suggested that sandblasting aggregates have definite potential for monkeywrenchers. One possibility is a product named “Black Beauty,” which sells for about $6 for a 100-lb. bag at industrial supply outlets. While not as hard as quartz, it should still wear metal quickly. It also flows easily, and may camouflage better in dirty oil because of its dark color.
-
The precursor of the CIA, the OSS, during World War II created a clever device to destroy engines. It was called a “Caccolube,” and consisted of a condom filled with abrasive powders and crushed walnuts. It was dropped into an engine crankcase. The OSS manual reported that the condom would deteriorate after the engine was started and after 30 or 50 miles the engine would be damaged beyond repair.
-
Pouring sand into the oil reservoir of a big yellow machine can be a difficult endeavor, as you try to stuff grit into a one inch hole inside a cramped engine compartment. Spills lead to telltale signs of tampering, and tight spots lead to general frustrations for the midnight mechanic. To remedy this we invented the sand bong.
At your local hardware store buy a large common household funnel and two (2) feet of clear plastic tubing which will fit snugly over the end of the funnel. Bring this contraption on site with you and stick the open end of the tube deep down inside the oil intake of the machine to be serviced. Hold the funnel high and outside the engine compartment; pour fine, dry sand or other grit into the funnel, down the hose, and deep into the oil. Clean the oil off the tubing with a rag, stuff it all into a plastic bag, and put that into a day pack when you are finished and ready to leave.
This method is simple, easy, and leaves no sand stains. The only problem is the incriminating evidence of carrying this plumbing with you, but who’s really going to notice tubing and a funnel?
— The Bong Inventor
Other Sabotage Methods
None of the following methods are as effective as adding abrasives to lubricating oils, but are mentioned for the monkeywrencher who wants to break up her pattern by using differing techniques, or who is stymied by locking mechanisms on lubrication fillers. These ideas come from dozens of experienced ecodefenders.
Hydraulic system — Cut hoses with cable cutters or bolt cutters (a knife won’t work because of steel reinforcements in the hoses). Smash hydraulic pistons and fittings with a sledge. Don’t tamper with the brake system.
Fuel system — Smash fuel injectors with a sledge and steel bar. These are expensive and very hard to remove when effectively smashed “in situ.”
Tires — Use a sharp knife blade to puncture the sidewalls of tires. A good-sized cut is not reparable, and those large tires are quite expensive. If you use a folding pocket knife, it should have a good lock to prevent it from closing on your hand while you are slicing through the tough sides of a tire. Remember that a knife blade cut can be matched back to a blade as evidence. Don’t use your favorite blade or a good quality knife you would hesitate to throw away if circumstances demanded proper disposal of evidence. You can use a chisel to start the break in the sidewall of a large tire, and then insert a knife. Be careful when puncturing high-pressure tires. High-pressure, water-filled tires on heavy equipment are dangerous and are better left alone. You can also cut valve stems, or even pull the valve stem out with a pair of pliers. Large tires on heavy equipment may have metal valve stems, which could be cut with bolt cutters. Or chop off the valve stems with hammer and chisel. (See the various suggestions for flattening tires in the Roads and Tires chapter.)
Cooling system — Common table salt and drain-opening compounds like “Drano” will cause corrosion inside an engine. Introduce through the radiator cap. A small amount will not do, as these big engines have large coolant capacities. The engine must be cold before you remove the radiator cap. Dry rice can be added to a radiator as well. The small grains distribute throughout the system and when they swell with water, the system becomes thoroughly constipated. Or cut a #6 rebar with a chisel point and ram it into the usually accessible radiator. You can do this very quickly and comparatively quietly, if you cover all but the six inches at the point of the rebar with rubber or hose to deaden the sound.
Other contaminants — Each system of an earth mover requires different fluids to insure proper operation. The wrong viscosity of oil in the hydraulic system can cause serious damage. Diesel oil or gasoline added to lubricating oil will cause oxidation and loss of lubrication. Gasoline in excess of 90 octane will do serious engine damage if added to diesel fuel. Even simple overfilling of transmission fluid or engine oil can cause damage through lack of effective lubrication. A little anti-freeze/coolant (like you put in your car’s radiator) will destroy main bearings in short order if put in the engine oil.
Water — If sand is not handy, you can add water to either the oil or diesel fuel (see the section Water And Big Yellow Machines later in this chapter). One advantage of water is that it can be poured down the dipstick spout.
Sugar — Sugar or Karo syrup in the fuel does little more than clog the filters and is a relatively worthless method of sabotage.
Bolt cutters — Besides destroying the hydraulic system, a good pair of bolt cutters (at least 24” long) can be used to:
-
Cut locks to gain access.
-
Cut through or damage bolts, gauges, clamps, rods, linkages, pipes, hoses, hose fittings, grease fittings, wires, and anything else that can be fit between a bolt cutter’s jaws. (Think of the machinery as food for hungry bolt cutters.) It is amazing how much can be cut on most machines.
-
With the heavy jaws of the bolt cutters, smash windows, mirrors, headlights, taillights, reflectors, display panels, gauges, the front of the radiator, etc.
Wrenches and screwdrivers — With these, remove all fittings, bolts, plugs, filters, large hoses, pumps, and such. After damaging or disposing of the extracted items, damage the threadings and sides of the various orifices. Then for good measure throw sand or dirt in all of them.
Potato — This one’s for Dan Quayle. To disable cars and trucks quickly and easily, press a large raw potato into the end of the exhaust pipe so that it forms a plug inside the pipe. Use a stick to force the plug in and out of sight. When the driver starts the motor, it will cough and quit. After about three days, the potato will shrink and be blown out if the vehicle is started. This technique has been used since World War II and can baffle even skilled mechanics.
Gelscape — Viterra Gelscape is “a granular, organic, super-absorbent hydrogel designed to increase the water-holding capacity, drainage, and aeration of soils” according to the manufacturer. Since this stuff will turn water to Jell-O within minutes (and will repeat the same performance up to a hundred times after drying out again), it might be useful where quick, unexpected plugs are needed. It is not permanent and could eventually be flushed from a system. However, in interrupting water flow where related damage might ensue, or in plugging fine nozzles such as in irrigation or snow-making equipment (possibly in hydroelectric turbines as well, with enough quantity) results could be gratifying. For instance, in a truck radiator, it would let things heat up enough so serious damage (heads warping, gaskets blowing, valves cracking, etc.) occurs. The following procedure might work:
-
Package the Gelscape in water-soluble capsules, such as gelatin diet supplements are sold in.
-
Fit into a hose leading to the engine block (either from the radiator or the heater). With good timing the gelscape will be in the block when it hydrates. (If it’s simply put in the radiator, the core can be replaced — troublesome, time — consuming, but not very expensive.)
Gelscape costs about $108 for 15 pounds. One ounce will make a cup of water chewable. Calculate how much you need to do the job. Figure about one pound per gallon of water for a rubbery consistency. Experiment. You can also flush your time capsules down toilets, sinks, in sump pumps and wells. Troublesome and non-toxic.
Hacksaw — One good way to damage equipment is by hacksawing. Large hacksawing jobs become faster, easier, and quieter with the use of cutting oil. An assistant who would maintain a steady stream of oil (used motor oil is just dandy) on the blade would make large cuffing jobs possible. Use top of the line hacksaw blades and new horizons in monkeywrenching will emerge.
Take a ride — If you know what you are doing, an effective way to destroy a piece of heavy equipment is to take it for a ride. Hayduke drove a bulldozer off a cliff into “Lake” Powell, remember. In 1989, someone drove a 38,000 pound, $70,000 log loader off a steep road in the Nantahala National Forest in North Carolina. A local newspaper quoted one logger as saying, “If I’da known it’d be this much trouble trying to log, I’da sold watermelons and hot dogs instead.” Of course, be sure you can safely dismount the behemoth before it goes over. And be sure it will not cause damage to native vegetation or other natural elements.
Turkey Baster — Use a common kitchen turkey baster to suck acid out of the battery and squirt it into the fuel system. Two squirts should do.
Acid — Any acid corrosive to metal would do much damage if left overnight or longer in the delicate parts of an engine. A couple of quarts or more poured into the carburetor would probably get through to the pistons and rings and would certainly mess up everything in between! Some of the advantages of acids are quietness, relatively instant damage, and easy availability.
Some potential acids to use:
Hydrochloric — available at chemical suppliers. Don’t breathe the fumes.
Muriatic — just half-strength hydrochloric acid, used in swimming pool water and as metal etch, rust remover, etc. Look for this at hardware stores, swimming pool suppliers, auto body and repair suppliers, etc.
Sulfuric — used in car batteries. Buy from chemical suppliers or auto parts stores. In a pinch, one might use a machine’s own battery juice. Weighs about twice as much as water. Upon reaction with metal, the fumes are poisonous.
Avoid breathing all acid fumes. Wear rubber gloves and goggles.
Cross bow — If heavy equipment or trucks are parked inside a fenced, locked compound, it is possible, from outside the fence, to shoot metal bolts (arrows) from cross bows into the radiators. For a bolt costing two bucks, several hundred dollars worth of damage can be done. In one historic night, an entire fleet of vehicles being used in a nefarious development down South was temporarily put out of commission this way.
Radio cable pin — Logging trucks and other vehicles and heavy equipment often are equipped with CB or other two-way radios. These are easily sabotaged with a simple straight pin (as used in sewing). Merely stick the pin through the Coax cable and snip off the exposed parts of the pin with wire cutters. The radio will short out when used, but the cause will not be apparent. Several radios may be replaced before the cable is checked. The Coax cable is a special round cable used for CBs. It has both an inner and an outer conductor. Both must be touched with the pin to short out the cable. This can be done by aiming the pin at the center of the cable.
Field Note
Use caution and appropriate gloves, eye and facial protection (safety glasses or goggles) when cutting hoses or tubing or removing filler caps or otherwise gaining entry to pressurized systems (cooling and hydraulic systems). Diesel engines run hot and there may be pressure in those systems several hours after the machine is shut off. Be aware that light reflected from safety glasses or goggles may be visible far away.
Trucks
Often neglected by monkeywrenchers are the fleets of haul trucks used in earth moving and logging operations. Frequently these trucks are parked in a more secure area than the other heavy equipment, due to the ease of moving them around. Illustration 5.11 shows a typical hood lock and a couple of hood configurations. Many truck hoods are made of lightweight plastic or fiberglass and are easily opened. As illustrated, handles, and even hood ornaments, are used to open hoods for access to the engine. Look closely at some trucks, as if out of curiosity, before attempting clandestine access.
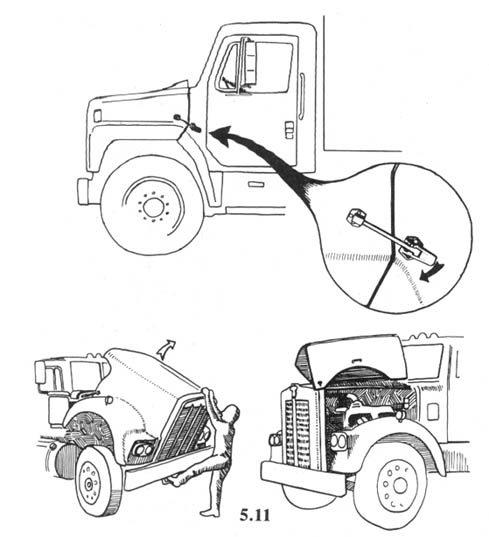
The engines in these trucks are the same or similar to the diesel power plants found in heavy equipment, so the same principles of introducing abrasives apply here. They also have large numbers of tires waiting to be flattened.
Never tamper with the air hoses or electrical wires that connect truck and trailer. These operate safety equipment, and careless drivers (the majority) who don’t check their vehicles thoroughly before heading out in the morning can cause an accident. Do not sabotage brakes, lights, or any other safety equipment.
— Frank Duryea
Related Targets
Conveyors — Construction and mining operations frequently use conveyor belt systems to move and sort material. The belts are similar in composition to automobile tires, with thick rubber reinforced by fiber cords. The simplest form of sabotage is slashing with a sharp, thin-bladed knife. A common hardware store item, the “utility” knife, is ideal. Blades are inexpensive, replaceable, and usually can be stored inside the handle.
Since cuts that run straight across the belt are easily repaired, all your slashes should be at an angle, and as long as you can make them. Do not attempt to cut completely through the belt. A number of deep cuts at different points will cause the belt to deteriorate rapidly under use. Breakdown and early replacement become necessary.
Maintenance Facilities — If you can gain access to garages, fuel trucks, or maintenance yards, contaminate any fuel and oil you find. Add water to diesel and dirt and sand to oil. Also, put diesel into any lubricating oils you find.
Remember that guards often hang around garages and maintenance yards.
— Hank Frick
Security And Heavy Equipment
Because of the high cost of heavy equipment and its extreme vulnerability to sabotage, security efforts are often concentrated on its protection. Always be alert for guards around machinery. A security guard might park his pickup truck amongst the equipment.
Often these machines are brought together at night where they can be more effectively guarded. They might be parked alongside a busy road so that passing traffic alone will discourage monkeywrenching. Or they might be parked in a special compound, with the protection of a fence, lights, and possibly even a guard dog. Remember that every security measure adds to the costs of raping the planet. Even driving the machines to and fro every morning and night adds to lost work time.
If you suspect a guard is present, you might want to force him to reveal his presence by using the decoying methods described elsewhere.
In addition, it is possible to wire heavy equipment with a “pager” type alarm system that will summon a guard by radio signal if someone tries to break into the cab. If you plan to force your way into the cab of a machine (perhaps to smash the instrument panel), check first for any antennas, and snap them off at the base when you find them. This will greatly diminish the transmitting range of the alarm system and limit its effectiveness. This type of alarm system has received some attention in logging magazines. (Potentially dangerous booby traps, such as tear gas or even firearms, have been used to protect heavy equipment in areas rife with monkeywrenching. Be careful!)
Also, if you are carrying a portable CB for communication with lookouts or your driver, switch it on before breaking into the machine. An intermittent tone lasting 5 to 10 seconds can indicate an alarm transmitter trying to signal a pager in the possession of a guard.
If you chose to strike shortly after the end of the work day (often before a security guard arrives), watch for the maintenance crew. These fellows usually drive a truck loaded with fuel and lubricants. It is their job to top off the diesel fuel tanks to prevent water condensation overnight. Often they check and adjust the levels of lubricating oil. Because of this, they may work a couple of hours to service a large number of machines.
— Al Pinkerton
Field Notes
-
After repeated sabotage of heavy earth moving equipment, some companies have mounted heavy steel plates over engine and cab access points and secured them with padlocks. Lock jamming methods described elsewhere in this book can create lengthy and costly delays when operators arrive for work. A series of lock jammings, randomly occurring over a long period of time can cause the company to abandon this security measure or employ more costly and time consuming methods, such as extra guards, fenced and lighted compounds for overnight parking, or complete removal of all equipment from the site each night. Any additional security precautions impose financial burdens on the opposition and therefore help to accomplish the monkeywrencher’s objectives.
-
If the engine compartment is padlocked, remember that the hood is both hinged and locked to a panel that bolts on. Slip the jaws of an 8 inch crescent wrench over the brass body of the lock and twist. You can rip off the hasp or its panel.
-
Many semitrailer trucks have their oil filler hole in the grill. This is convenient for those who wish to add abrasives to the oil.
-
It is possible that both the oil filler pipe and the dipstick tube on heavy machinery will have locked caps. It may be possible to punch or drill a small hole (large enough for the tip of your funnel) in the filler pipe, dipstick tube, or their locked covers. If this is done in an inconspicuous place and well camouflaged, it might not be discovered until too late to save the machinery.
-
Barbed wire can do a lot of damage if it gets into the undercarriage of a bulldozer or other heavy equipment, especially on the newer models. So cautions an instructor in bulldozer operation. Although we don’t have more specific information — what kind of damage and the like — this may be an important approach considering the security devices standard on newer model ‘dozers which limit access to fuel and oil intakes, for example.
-
Heavy equipment operators and mechanics can identify sabotage to their machines and may then guard them in the future. So do it right the first time when the risk of detection is lowest.
Cutting Torch
A cheap, light-duty cutting torch designed for artists and hobbyists is a suitable tool for cutting rebar for use as road spikes. However, a medium or heavy-duty torch (costing about $60 to $100 more) should be used for structures or heavy equipment. This set-up can handle larger volumes of gases and therefore can cut larger pieces of steel faster (like bulldozer blade arms and railroad rails in less than a minute each). Since the use of a torch for monkey-wrenching is a team operation anyway (an oxy-fuel flame is very bright — if you use it alone, you’re asking to get caught), the additional cost for equipment may not be so burdensome.
Get the equipment at a welding supply store. They can provide the right equipment, the gases, and the instruction manuals. Use of a cutting torch is fairly simple but certain safety precautions must be observed or torch use becomes dangerous. The instruction booklets I’ve seen are very thorough on both technique and safety. However, they assume you are cutting clean metal. If you cut metal contaminated with oil or grease, be careful. Oil and grease can burn explosively in pure oxygen.
Get the largest oxygen bottle you can reasonably transport. The whole principle of flame cutting is to burn the metal in a stream of oxygen — the fuel is needed only to preheat the metal. Thus the amount of metal you can cut is directly related to the amount of oxygen you can dispense. Charts provided with the equipment give you the data you need on gas requirements.
Consider only acetylene or propane for fuel. Each has advantages and disadvantages. Both are equally effective for cutting. Acetylene looks less suspicious in the field because it can also be used for welding, but it’s more expensive (unless you rent the bottle). It is also much bulkier to transport, a little trickier to handle, and can be obtained only at welding supply shops.
Propane is cheaper and easier to handle, can be obtained almost anywhere, and can be used in camp stoves. But it cannot be used for welding. The cutting torch attachment, handle, hoses, oxygen bottle, and oxygen regulator are the same regardless of fuel. Only the cutting tips, fuel bottle, and regulator are different with different fuels (although an acetylene regulator is fine for propane, a propane-only regulator is cheaper).
If you lack money and do not have a propane bottle already, go with oxy-acetylene and rent the gas bottles. If you have propane equipment already, or no need to weld, or if weight is a major concern, go with oxy-propane and either rent the oxygen bottle or buy an aluminum oxygen bottle. Don’t buy a steel oxygen bottle — aluminum ones weigh only two-thirds as much. A supplier of medical gases would be the best place to start looking for an aluminum oxygen bottle. You don’t need to be a gorilla to backpack a heavy-duty oxy-propane set-up with an aluminum oxygen bottle of sufficient capacity to cut up a bulldozer.
If you must be neat or conserve gases, use the right size tip for the thickness of the metal you are cutting. If you want to destroy something as quickly as possible, use the largest tip appropriate for the amount of gas you have.
Besides using it for cutting, you can use your torch to melt bearings, destroy hydraulic pistons, fuse joints, wreck gear teeth, etc. (watch out for grease and oil). In short, a torch may be the optimum tool for converting an expensive machine into a pile of scrap safely, quickly, and quietly. Any metal that readily oxidizes can be cut with an oxygen torch. Aluminum burns very fast; copper burns slowly; stainless can’t be burned at all. Since you need to practice anyway, experiment at home with scraps of the same material you’ll be up against in the field. Beware of volatile metals like zinc and cadmium (common plating materials) because they can produce dangerous fumes (cadmium is as toxic as mercury and is retained by the body longer.)
While seldom useful or safe for the solo ecoteur, a cutting torch can be a very important tool for a monkeywrench gang. It is much more hazardous than other hand tools, but, in combination with other tools, it can virtually eliminate the need for explosives. Appropriate technology and safety are always important considerations when defending the Earth.
— Robin Hood
Field Notes
-
Remember that a cutting torch is very bright and makes you visible at a considerable distance. It will of course be more visible at night. If possible, use a screen. Have lookouts who can warn of approach a considerable distance away.
-
In case you have to abandon your equipment to escape, be sure there are no fingerprints or other marks on it that could link it to you.
-
Prosecutors consider use of a cutting torch for ecotage to be arson: Penalties may be higher if you are caught and convicted for property destruction with a cutting torch than with grinding compound or bolt cutters.
-
Use extreme security measures in purchasing cutting torch equipment. In the Arizona Five case, records of cutting torch purchase were used against one of the defendants, who was also identified by the salesperson.
-
If you are packing a cutting torch to a remote location, it is difficult to disguise your equipment. Scratch the operation if you are seen. One of the Arizona Five defendants was seen by two hikers as he was lugging his equipment up the trail to sabotage ski lift towers outside of Flagstaff. When the local newspaper offered a reward for information, they remembered the nervous fellow with the strange pack they had seen on the trail near the ski area. They contacted police, positively identified the man in court, and collected their reward.
Burning Machinery
The section on Burning Machinery in previous editions of Ecodefense had some errors. For that reason it has been replaced with the following simple guidelines and cautions.
Pros And Cons Of Burning
There are two main advantages of burning machinery and heavy equipment: It can utterly destroy the bulldozer, yarder, or whatever. And, a machine that has its engine compartment, oil intake, and so on protected by locks can still be burned.
Disadvantages include:
-
It is difficult to achieve a hot enough and extensive enough fire.
-
A fire is very noticeable and quickly attracts attention.
-
Burning something is considered arson and may carry stiffer legal penalties than non-arson ecotage. Law enforcement agencies may make a higher priority of investigating arson than sand in the crankcase.
-
Arson elicits a more negative reaction among the public than other methods of damaging heavy equipment.
-
Setting fire to a piece of heavy equipment is potentially dangerous to the monkeywrencher.
-
There is a chance that a burning piece of equipment could cause a forest fire.
Any Earth defender contemplating burning instead of other methods of decommissioning bulldozers and other heavy equipment should carefully consider these negative aspects of burning machinery.
Igniting Machinery
Burning a large metallic object requires dousing it with a flammable fluid. Gasoline is highly explosive and very dangerous to work with. Anyone who uses gasoline to start a fire is risking self-immolation. Also, gasoline drips off surfaces and won’t stay where it is poured. Mixed with soap flakes (use Ivory Snow, not a detergent) gasoline turns into jellied gasoline or napalm. In this condition, it is still very volatile but is more stationary. The classic method of using jellied gasoline is in a “Molotov cocktail,” a glass bottle of gasoline and soap flakes with a denatured alcohol-soaked rag stuffed in the mouth of the bottle. The end of the rag outside of the bottle is lit and the Molotov cocktail is immediately thrown against the target from as far away as possible. The bottle shatters upon impact and the gasoline ignites. If this is all that is done to a large machine, the gasoline in the bottle may be all that burns and relatively little damage may be done. If the targeted machine is previously soaked in diesel fuel or, more dangerously, jellied gasoline, complete destruction is far more likely.
A Molotov cocktail is a very dangerous tool. Anyone contemplating its use should be very careful. Because of the inherent danger, the use of Molotov cocktails is not encouraged.
Diesel fuel, unlike gasoline, is not explosive. It is denser than gasoline and burns longer but not as hot. It is much safer to use but much more difficult to ignite — especially in cold weather. It sometimes will not even ignite when a match is held to it. A Molotov cocktail can be used to ignite diesel, but a safer way would be to simply use a rag soaked in solvent, or denatured alcohol, which readily burns but is not explosive. (The second edition of Ecodefense mistakenly suggested using a rag soaked in rubbing alcohol. Rubbing alcohol does not readily burn.)
Preparing A Machine For Burning
To keep the diesel fuel from running off the bulldozer or other object to be burned, soak rags (cotton are better than synthetics) in diesel fuel. Other absorbent materials — like sawdust or straw — can also be used. Stuff the soaked rags in the engine if it is accessible, under exposed wiring, hoses, and gauges, in treads or around tires, and in the cab under the dash. As little as two gallons of diesel may be enough if used in this way. Place the rag soaked in solvent alcohol on the diesel-soaked rags and light it.
Getting Diesel Fuel
An ideal place to get diesel fuel is right out of the machine you are about to burn. Use a short piece of hose to siphon fuel onto the machine, into a container, or onto nearby machines. Soak everything well. If there is a tank of diesel on site (there often is), cut the padlock off with a large set of bolt cutters, and use a 12 inch crescent wrench (if necessary) to open the valve clockwise. Be very careful as the fuel may be under pressure and could spray out of the valve. You can also bring your own diesel fuel (or kerosene which has similar burning properties) in plastic jugs (don’t fill them all the way or they may leak). Put the empty jugs where they will burn along with everything else.
Or you can take the drain plug out of the fuel tank on the machine to be burned, drain the tank under the machine, and light it. Do this only with diesel fuel which is non-explosive and not with gasoline which will blow yo to smithereens!
Security
If you get diesel fuel on you, you will smell like diesel for a long time. This could be incriminating. Wear an old pair of coveralls (from Goodwill) which you can safely dispose of after the action. Don’t use rags from your home because they might be traceable. Goodwill is a good source. Be very careful not to pollute a nearby stream or area of vegetation with run-off diesel fuel. Make sure the machine(s) to be burned will not catch the forest on fire — burn only in the open. Punishment for arson is severe; practice all standard security measures rigorously. Leave no evidence!
Delayed Ignition
There are a number of simple ways to light a fire after you are safely away from the scene. Experiment with any delayed ignition technique several times before using it to burn a machine or other target. One such method is the use of SCORE hair dressing and swimming pool cleaner described in the section Billboard Burning in the Propaganda Chapter. Others include:
-
A similar delayed ignition method is to pour brake fluid over swimming pool cleaner. After several minutes (perhaps as many as 15) the mix should burst into flames. Experimentation would be necessary to determine the proper quantities of each for the optimum delay. One mix has been field tested: Put 3 tsp. of dry chlorinator in a paper cup and cover it with 2 tsp. of brake fluid. The delay time is about one and a half minutes. If you cool the brake fluid first, there will be a greater delay in ignition. Using warm brake fluid causes less delay. Brake fluid is cheaper than SCORE.
-
HTH swimming pool cleaner will spontaneously combust with regular everyday oil. Try putting it into the oil fill cap of an engine sometime. At the very least, the oxidation will destroy the lubrication integrity of the oil. HTH pool chlorine is very nasty stuff and can cause severe chlorine burns in the lungs if inhaled. Working with it at night or under stressful conditions could be disastrous. Therefore, the editors do not recommend any of the suggested techniques using it.
-
A simple but effective time fuse can be made with a cigarette, a book of matches, and a rubber band. Spread the heads of the two lines of matches apart, light the cigarette, put it between the lines of match heads, close the match book, and put the rubber band around it to hold it shut. The time delay can be adjusted up to 7 minutes by how much of the cigarette has to burn before it lights the matches. In case this time fuse fails, you don’t want your fingerprints on the book of matches. Get your book matches from a hotel, bar, or restaurant where a basket of match books with advertising is displayed. Pick up several books at once, touching only the two on the end of the stack. In this way only the end books have your prints.
-
An untested delayed-ignition method is to use a “gag” candle for birthday cakes — one that can’t be blown out once it is lit. Make a hole in a ping-pong ball the diameter of the candle. Put the candle in the hole so that most of it is above the surface of the ping-pong ball. Place the device where ignition is wanted. Light the candle. When the candle burns down to it, the ping-pong ball, being highly flammable, is supposed to burn fiercely.
-
A much more dependable and longer-lasting delayed fuse than SCORE can be made as follows: Empty the powder out of four or five shotgun shells into a small paper matchbox. Cut a notch vertically in the middle of one end of the box, big enough to hold a cigarette. In the other end, cut a larger notch. Now soak a long strip of rag in diesel or kerosene (or in solvent alcohol). It should be soaked lightly so that it will not drench the gunpowder.
At the work site, place one end of the rag through the larger notch and into the gunpowder at that end of the box. Then lay the rag out over to the object to be burned. In the smaller notch at the other end of the box, place a burning, long, unfiltered cigarette so that the non-burning end just barely pokes through the notch into the gunpowder.
You now have a good 8 to 15 minutes to vacate the area, the exact time depending on the kind and length of cigarette, wind, and humidity. This technique is much simpler than it sounds, and with a little practice works almost every time.
— Smokey Bear
Water craft
Power boats, jet skis, and other motorized watercraft are permitted in many National Wildlife Refuges and other sensitive wildlife habitats. Their operation is no less disturbing to wildlife than are snowmobiles and dirt bikes in other areas. The wake from jet skis and motor boats causes shoreline erosion and damages bird nests. Their exhaust, fuel, oil, and other fluids pollute water and air.
Such craft may be most safely approached from the water by someone with snorkel, fins, and mask, or with SCUBA gear. The standard methods of engine ecotage will work on watercraft. Propellers can also be removed or fouled. For particularly destructive craft, the entire boat can be sunk. Tires on boat trailers can be flattened as well, but that will make it difficult to haul the damn thing off to a less inappropriate play area.
— Robert Futon
Aircraft
Helicopters
Helicopters are used for dam building, logging, spraying toxic chemicals, and other heinous practices. The monkeywrencher seeking to destroy or disable a helicopter should be especially cautious. Very few of the helicopters used in large-scale construction operations come with a price tag of under a million dollars and anyone caught tampering with that kind of investment is likely to be treated mercilessly. Also, it would not be difficult to endanger someone’s life. The idea is to protect the Earth, not to reduce helicopter pilots to blobs of protoplasm. The smooth, sneaky approach should give way to obvious destruction so as not to cause an in-flight accident.
Helicopters are generally made of light materials which are easily damaged by a sturdy instrument wielded by strong arms. Their rotor systems are extremely delicate. The slightest nick or dent on either a tail or main rotor will definitely mean mandatory replacement of the rotor. I once observed a helicopter main rotor latch onto a candy wrapper, and it sounded like a giant pterodactyl receiving a barbed wire enema. That chopper had to be shut down for a 12 hour inspection.
The air speed indicator is a little five inch projectile that sticks out of the “nose” of the helicopter. Whack it good. They’re easy to ruin and expensive to replace. Damage also the cargo hook, which is on the belly of the machine. Remember, the more diverse the damage you inflict, the longer the machine will be shut down.
Helicopters rarely fly at night and will generally be kept at a heliport set up somewhere near the construction site, or perhaps at the nearest airport. Check thoroughly for a guard before you commence destruction.
The beauty of effective “helicopter management” is that one can shut down an entire operation while replacements are sought. At $250 to $2,000 a flight hour, a chopper is a heavy investment even for the likes of Bechtel.
In short, an individual with creativity and a crowbar can quickly and easily shut down a helicopter. But again, it needs to be stressed that you should destroy the chopper where it sits, not while it’s flying.
— Igor Sikorsky
Fixed-Wing Aircraft
Light planes are used in a diverse array of destructive enterprises. Specific planes can be targeted by observing them at work and noting their general description and number. A check of local airports will reveal their home base. Sometimes a phone call to the airport can reveal the pilot and type of plane with experience in hunting predators, or ferrying oil exploration crews. Simply pretend you’re a big shot or corporate functionary looking for an experienced pilot for a specific type of work.
Aerial predator control is becoming increasingly popular on both sides of the law. Once confined to lawless ranchers living out fantasies of being an ace, currently we are seeing state wildlife agencies gunning down Gray Wolves and Coyotes from Alaska to Arizona. Winter is the gunners’ favorite season for this, since the targets are easier to spot against a blanket of snow. Following are some of their methods:
Random search — This involves flying low-level grid type patterns or scouting wide open expanses like frozen lakes. If you live in such an area, a decoy made to look like a target animal might lure in gunners for identification.
Radio telemetry — Temporarily halted in Alaska, this technique will likely be used again to destroy whole packs. A wolf fitted with a radio collar after being caught in a leg-hold trap will later lead gunmen with radio directional equipment to the entire pack.
Predator calling — A ground crew in a jeep or pickup stops on a back road and turns on a siren. After a moment or two they shut off the siren and listen for the answering howls of a Coyote. When they hear it, they estimate the direction and distance. This information is radioed to the aircraft which closes in for the kill.
Both small helicopters and light planes are used for this type of slaughter. Planes are usually of the “wing-over” type, with the wing on top to prevent it from blocking the view of the spotter and shooter. In addition to the pilot, one or two shooters are aboard, usually armed with shotguns (which requires them to get within 40 yards of the target).
If you spot this type of crime in progress, remain out of sight and use your binoculars to identify the plane or copter. Note the direction they fly when they leave, as this might lead you to the airstrip or airport where the aircraft is parked overnight. They might return to a private commercial airport, or they might be temporarily or permanently based at a ranch airstrip.
Sabotaging Light Planes
Ways to sabotage a light plane range from the silent and sneaky to the loud and severely damaging. Save the louder methods for when you can immediately flee after 60 to 90 seconds of raising hell.
The illustration shows the vulnerable points on a typical light plane. Almost all significant repair on an aircraft is expensive because most of it, by law, must be done by certified specialists called A & Ps (for airframe and power plant).
A. Control surfaces. These are the various flaps that control the plane in flight. They are carefully designed and must be properly balanced by an A & P before the plane can be certified. Like the rest of the aircraft skin, they are made of lightweight aluminum and are best damaged with a large ax. One good blow to each aileron, elevator, and the rudder will ground the plane. These members are so precisely balanced that even the paint must be applied by a certified shop. Imagine what a good sound ax blow will do.
B. Antennas. Snap these off to prevent radio communication.
C. Windows. Aircraft windows are made of Plexiglas and are easily marred. An owner can, with considerable difficulty, replace side windows, but the windshield must be replaced by a certified mechanic. The softness of the plastic makes sandpaper, or better still, sanding blocks, the ideal tool to quietly mar them. Even an oily rag and a handful of sand can be used to achieve the same effect, but with more time and effort involved.
D. Tires. Punching holes in the sidewalls ruins them. Changing flat tires on a plane is much harder than on a car due to their unusual construction, split rims, etc.
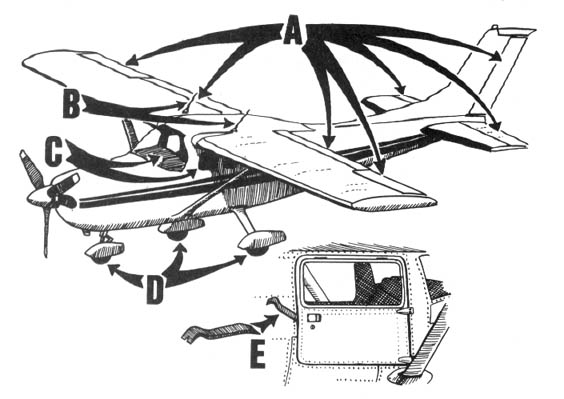
E. Instruments. Use a regular prybar from a hardware store to force open the door of an airplane. Once inside, use the end of the prybar to demolish the instrument panel.
Never tamper with an aircraft engine or its fuel. A mechanical failure in mid-air is life-threatening. The monkeywrencher should aim to ground the plane with as much damage as possible, but without endangering anyone’s life. For this reason any monkeywrenching of an aircraft should be made obvious, with no attempt to disguise the work. Keep in mind that ecotage directed at an aircraft may entail felony violations of federal law or FAA regulations. Practice strict security on these operations.
— Sky King
Advanced Aircraft Ecotage
An aircraft mechanic suggests the following: An aircraft can be easily crippled by the judicious use of a small (about 2 pound) hatchet. It is more effective to apply a heavy blow at right angles to the rivet lines so as to damage the underlying structure than to put holes in the easily replaced skin. Damage the attachment points of fixed surfaces and hinges of moveable surfaces. Don’t bother sanding Plexiglas when a solid blow with a hatchet will do a better job without leaving incriminating evidence. Don’t bother with side windows; the windshield is much more troublesome and expensive to replace, but is also made of heavier material.
It’s easy to break into and damage the instrument panel of any aircraft, but don’t neglect the radios. Flight instruments are more costly than engine instruments, but radios are much more expensive than either. Caution! Don’t hit the master switch. This is usually separate on the switch panel, red, and labeled. You can hit anything else if the master switch is off, but if it’s on, sparks begin to fly. The master switch connects the battery to everything else.
Field Notes
-
Piper Super Cubs are reportedly the favored airplanes of aerial wolf hunters in Alaska.
-
The wind speed indicators are vulnerable. They are located under the wings and look like small metal tubes bent forward so that the hole in the end faces into the wind. These are on any pilot’s pre-flight checklist, so the plane won’t even get off the ground if they are damaged. All you need to do is bend them.
-
A thick layer of any petroleum-based paint remover can be carefully spread on the windshield and windows of aircraft. Plexiglas, like most plastics, does not stand up to paint removers. The results of such an application are spectacular. In a matter of minutes, the paint remover will dissolve or severely damage the Plexiglas.
Industrial strength paint removers work best, but the type sold at your neighborhood hardware store will do the job. Get the kind sold in steel cans. Recommended brands are Zip-Strip and Strypeeze.
Make sure your damage to windows is blatantly visible. Damaged windshields and windows must be replaced before an aircraft is certified as operational.
Vehicle Modifications for the Serious Monkeywrencher
Part One: Electrical
Sometimes you just don’t want the dome light in your vehicle to come on in the “dark of the night” or those bright “tell tail” brake lights to flash as you stop in an out-of-the-way spot. The careful monkeywrencher may want to rewire her car before committing to a life of ecotage. Locate a wiring diagram for your vehicle before you start any modifications, and ask for help if you have no electrical knowledge.
Dome Lights
Dome lights are useful at times for map reading, finding the monkeywrench under the seat, etc. But the damn things also come on when the door is opened. To stop this, disconnect the door jam switches — either unclip them from their housings or cut and tape the wires (make sure no “open” or “live” wires can touch ground). Most cars and trucks have a light switch with an instrument light dimmer that when rotated all the way up will turn on the dome light — even with the door jam switches disconnected.
When you cut the wire to the dome light, you can add a switch instead of taping the ends. That way you can still have light when you want it.
Auxiliary Headlight
The use of a small “tractor light” as a secondary headlight is a good way to navigate after dark at slow to moderate speeds without using the headlight switch, which usually runs the tail and marker lamps as well. Tractor lights are low intensity lights commonly used on farm and construction machinery and can be bought at most auto parts stores.
A hood can be constructed out of almost anything and should be added to the light (see illustration). A large tin can or a small piece of sheet metal will work well as a hood. Paint this shield flat black. The hood will stop excessive upward and sideways glare while the lamp is in use.
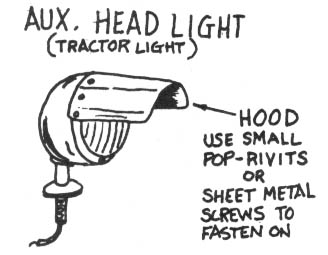
Brake Light Lock-out
Install a switch to lock-out the brake lights. Most brake light switches are located on or near the brake pedal. The illustration shows a typical switch and how to wire it. Remember not to leave the brake lights off if you aren’t “on the job.” It’s a sure pullover and ticket (I put a warning light on mine). Also remember that all other rear lights will still work — turn signals, emergency flashers, tail lights (see Auxiliary Headlight above), etc.
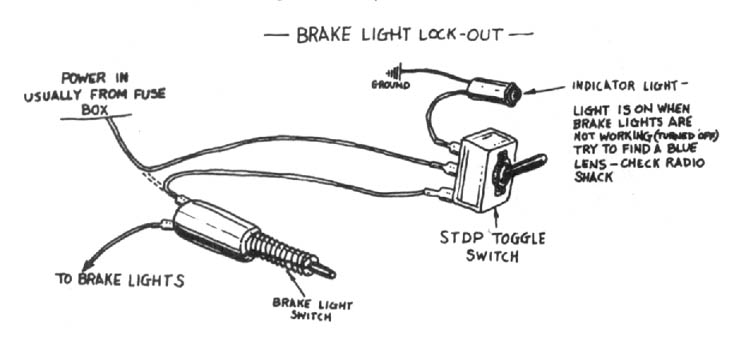
Back-up Lights
If your vehicle is working properly, every time you put it in reverse, the back-up lights will come on. It is usually not worth the trouble to override this circuit. Each manufacturer incorporates this system in a different way. The back-up switch for most automatic transmissions is on the lower steering column and is usually incorporated with the neutral safety switch. Most standard transmissions use a sending unit in the transmission. The best way around the whole mess is to wire a new back-up light on the vehicle and disconnect the old system (just remove the bulbs). I use a couple of tractor lights which I find more useful anyway.
For added security, disconnect the warning buzzers which tell you when you have left the key in the ignition or failed to fasten your seat belt.
If you add a switch to this line, you can still use your headlights. In most cars all the lights on the back switch from near the front of the car so fitting a bank of switches under the dash is fairly simple.
Coil Lock-out System
There have been times when I’ve wanted to either feign mechanical failure or disable my vehicle. At such times, a coil lock-out switch comes in handy.
I put mine inside the driver’s compartment in a panel with the rest of my “auxiliary switches.” With the switch off, the engine will turn over but not start. Be careful not to flood the engine (keep your foot off the gas pedal) or run the battery down. With the switch on, electricity hits the coil and the engine will start
This switch is also handy when you’re going to leave the vehicle — for hiking, camping, or “whatever.” If the unit is to be left for a long period of time, it’s wise to disconnect the battery and to somehow lock the hood (be creative). The illustration should be self-explanatory.
Remember to solder and insulate all connections.
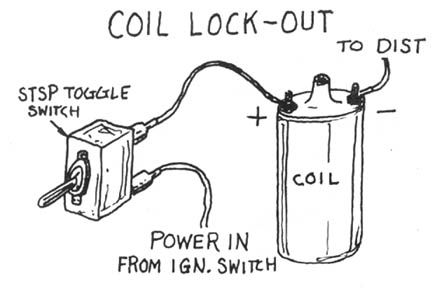
Part Two: Fuel Systems
Most stock fuel systems are inadequate for the serious eco-raider. The first problem is lack of capacity — 20 gallons doesn’t go far in a 3/4 ton truck, so extra tanks are in order. You should be able to carry 40 gallons in on-board fuel tanks. Most manufacturers have auxiliary fuel tanks as an option; or they can be purchased from after-market dealers.
Jerry cans are more mobile and transferable, but mounting and space requirements make too many of them impractical and unsafe. However, 3 or 4 five-gallon cans and at least one on-board reserve tank would be ideal. If you install two auxiliary tanks, mount them on opposite sides of the truck in about the same location for balance. Use a brass tee so equal amounts of fuel will be drawn from both tanks at the same time. Always use locking gas caps for your own protection (there are people out there who put contaminants in fuel tanks!).
Most vehicles have only one mechanical fuel pump and one small and usually inaccessible fuel filter. By adding an electric fuel pump and an in-line filter for each tank, you can prevent trouble (i.e., plugged filter or bad mechanical pump) when you can’t afford it (when you have to leave quick or “just can’t stop now”). See illustration.
Everything needed to upgrade your fuel system can be bought at your friendly auto parts store. It is a good idea to mount a small fire extinguisher in the cab of your truck. $20 is cheap insurance.
— Happy Hunting,
Mr. Goodwrench
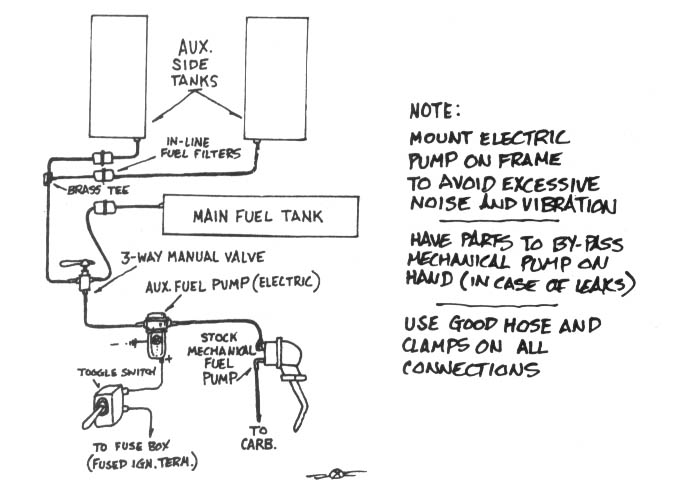
Water And Big Yellow Machines
Well — here I am again — telling all you environmental blowflies how to hurt good yellow machinery. The problem is every time one of the tricks I know is printed, it warns all the pro-development people about what to look for.
Like if I say that diesel engines don’t like water, then all the paranoid diesel engine guys who read this would figure out ways to protect their equipment. Well... I guess a lot of assholes wouldn’t, so....
The best way to use water is to get it into the fuel injection system (see illustration). Most (if not all) diesels have at least one water/fuel separator and possibly a warning system so you have to run enough water through the system to bypass it. Once the water gets to the fuel injection pump, it’s history time for R & R.
A simpler way to use water is to fill the air intake with it. Once water sucks into the cylinders (water can’t be compressed), it will jam the pistons and the engine can’t turn over-time for repairs (downtime for repairs, that is!). If the engine is running when the water is introduced to the cylinders, it will jam the pistons and bend the connecting rods — a lot of work for the poor bastard who has to fix it.
Another good way to use water is to push the machine off a cliff into a lake. While I’m at it, let me tell ya why I like cement:
-
Mix up a batch of cement in five gallon plastic buckets.
-
Climb up on top of your favorite large piece of destruction equipment.
-
Have your partner (yes, this is a family activity) hand you the buckets.
-
Open the rain flap on the exhaust pipe and pour the cement in.
As long as we’re on the subject of diesel equipment, remember that if the gear lube is drained from a transmission or differential, the engine noise will drown out the gear noise. By the time the operator thinks something is wrong — it’s too late.
— Mr. Goodwrench
Field Notes
-
Salt water is more effective than ordinary water in causing internal rusting. Salt water is also effective in the oil. Don’t use so much that the oil level rises noticeably. Leave no sign of tampering, so that the engine gets run and destroys itself. Friday and Saturday nights are good for putting salt water in machines, since any spilled water will dry out before Monday morning when the workers return.
-
An effective way of introducing water into the air intake when the motor is going (maximum damage) might be to put it in a balloon.
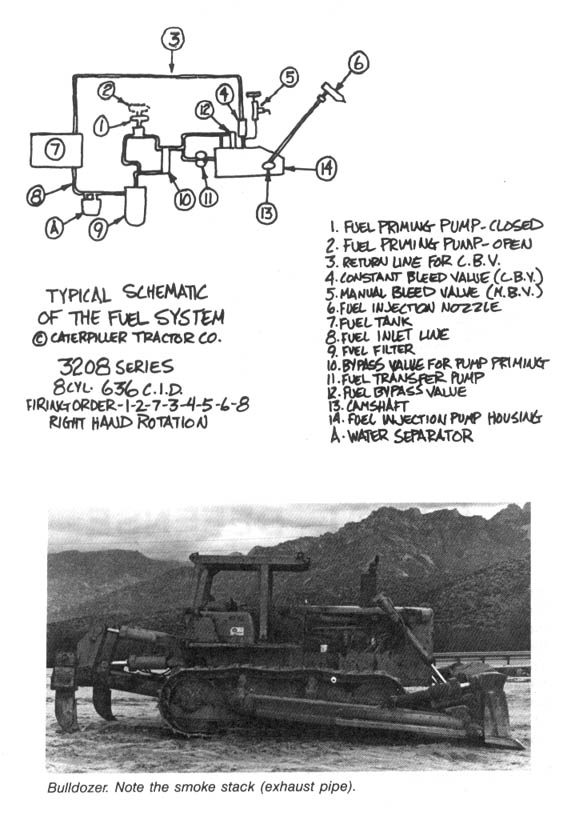
Chapter 6: Animal Defense
I’ll admit it right out front: I am a hunter and proud of it. But I’m not proud of much of what passes for hunting these days or what passes for a “sportsman.” Slob hunters and poachers generally travel by pickup or some other form of mechanical conveyance and if you take their wheels out from under them, they’re helpless. An even more sinister and despicable “hunter” is the trapper. Trapping is cruel, serves only greed and vanity, and disrupts the population balance of important carnivorous “furbearers.” The leg-hold trap should be outlawed. But until that glad day, you can stop the trappers yourself in your neck of the woods. Be careful. These good of boys are armed and have the law on their side. Don’t end up with your hide nailed to some yahoo’s barn door.
By using the following, field-tested techniques, you can make trapping difficult — if not impossible — for even the most experienced and dedicated trapper. Remember the wolf.
Trap Lines
One of the most widespread assaults upon the Earth and its creatures is trapping. Fur trappers kill whatever animals bring in the dollars, not the often-hyped “damaging” predators or overpopulated species. Regulation by state game departments masquerades as “scientific management,” when in reality no reliable population figures or no significant studies of the impact of trapping on target species are available, and trapping regulations in the field are seldom enforced due to the scattered and widespread nature of this destructive activity. Many states set no limits to the killing of Coyote, fox, Badger, and numerous other species. The attitude seems to be “the only good one is a dead one.” Only the strength and resilience of Mother Nature keeps many animals from following such once-common animals as the Gray Wolf down the slow path toward extinction.
To get some idea of the destruction and suffering wrought by trappers, examine these “body counts” for a typical Western state (Colorado) for the 1982–1983 season (a one year span):
Coyote — 14,419
Bobcat — 2,505
Beaver — 7,516
Raccoon — 4,800
Red Fox — 1,735
Badger — 1,832
These grim statistics are repeated in state after state, and must be added to the death toll of federal “predator control” programs that can destroy over 100,000 coyotes in a single year. Your state game department has published figures on the reported kills in your area.
How is this slaughter accomplished?
First, you must realize that the great majority of licensed trappers are amateurs, school kids, and part-timers whose techniques are crude. Consider, however, a typical Coyote’s experience with a professional trapper of considerable ability.
Coyote’s first sign of danger is the snap of steel jaws as the leg-hold trap seizes a toe, foot, or leg. Filled with pain and fear, the Coyote tries to flee. If the trap is chained to a stake, her attempted escape is short-lived. If the trap is attached to a drag (a hook or anchor-like device on the end of a short chain), the Coyote instinctively runs for shelter, dragging the trap until the hook snags in brush to hold her fast.
At this point, the actions of a trapped Coyote vary widely. Some lie down and quietly await death. Although most states require periodic checking of traps, there is no realistic way of enforcing such rules in the backcountry. It is not unusual for a trapped animal to spend two or more days locked in the grip of a leg-hold trap. When bad weather sets in, as it often does in the prime winter trapping season, the wait grows longer. Trapping authorities often recommend leaving the animals to freeze to death while trapped, which eliminates the need for killing by gun or club and thereby insures an undamaged pelt for market.
Most trapped animals fight the trap to some extent. “Wring-off” is a trappers’ term used to describe the animals whose twisting, biting, tugging, rolling, and chewing causes them to sever or amputate the toes, foot, or leg held in the trap. Although some animals crippled by their escape live to hobble around for many years, most die of infection or from starvation due to impaired hunting ability.
The Coyote who remains in the grip of the trap until the trapper’s arrival will usually be killed in one of two ways. If only a couple of toes are caught in the trap, the professional will use a .22 rifle to make the kill so that his approach does not frighten the animal into pulling free. Unfortunately for the trapper, this method can damage the pelt.
The most popular method of killing involves beating the Coyote in the head with a long stick or club. Although some trappers beat the animal to death in this manner, the professional strives to merely stun the animal or knock it unconscious. He will then stomp on the rib cage or kneel on it in order to crush the chest cavity and cause death by internal bleeding (the blood often fills the lungs and causes death by suffocation).
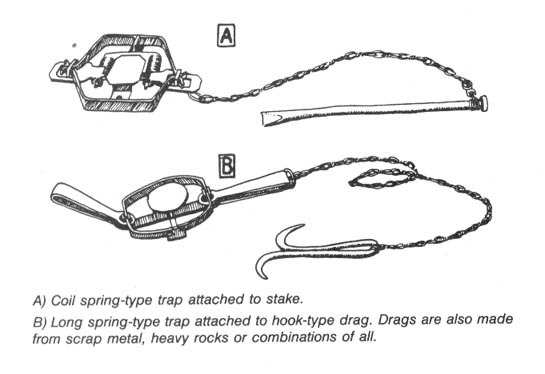
Also common to trapping is the death and injury of so-called “non-target” and “trash” species. These are any type of animal, including house pets, that the trapper does not want to catch. Skunks are often the first animals to investigate a trap line laid for Coyote and Bobcat, and the trapper may virtually eradicate the skunk population to get to the furbearers he wants. Trapped skunks may be carved up and used as trap bait, so investigate the ground around any skunk remains.
With the professional and amateur trapper alike, the non-target animals constitute between one-third and two-thirds of the animals trapped, and include deer, squirrels, skunks, ravens and crows, hawks and eagles, pet dogs and cats, and others.
Perhaps most amazing is the way that trapping has persisted in the face of widespread public opposition. An extensive federally-funded survey conducted by Dr. Stephen R. Kellert of Yale University found that 78 percent of the public opposed the steel-jaw trap. In addition 57 percent disapproved of killing furbearers for clothing. Almost two-thirds of the trappers indicated that they did most of their trapping between the ages of 13 and 20, and a whopping 86.4 percent reported that trapping has never been a major source of income for them. Even a survey conducted by the American fur industry found that less than 3 percent of trappers derived most of their income from trapping.
Trapping is a mere hobby for most of its practitioners, yet one fourth of trappers surveyed by a major trapper’s magazine boasted that they would disobey any law that banned the leg-hold trap.
Where to Find Traps and Trap Lines
Locating trap lines usually requires patience and practice. Many states have regulations that prohibit setting traps in areas where the public is likely to witness the cruelty. The authors of Fur Trapping, published by Winchester Press, advise that “the trapper would be well advised to stay away from roads. This generates a massive amount of bad publicity against all trappers.” In addition, “Public campgrounds are also an area that the trapper would do well to avoid ... many of the campers have small children who might become caught in a trap and injured.”
Begin your search with a trip to the local office of your state game department to obtain a free copy of the trapping regulations. This will give you an idea of where traps are set (for example: not within 25 yards of a public road or highway), when to find most of them (trapping season dates), and guidelines on the frequency with which the trapper must check his traps. If your state, for example, requires trap checks once every 48 hours, this may indicate the frequency with which the typical trapper takes to the field (an important security consideration).
Since most trappers prefer to drive instead of walk, many trap lines are found along rural roads, powerline easement roads, ranch roads, and roads that dead-end at abandoned mines and such. In tall timber, old logging roads and firebreak roads are favorites. In the desert regions, dry streambeds double as roads. Because of this, you should be suspicious of any slow vehicles cruising these types of roads. Favorite trapper vehicles include pickup trucks, assorted four-wheel drives, and station wagons. All of these provide a space to haul equipment and animal carcasses. Sometimes a peek into the back of a camper shell will reveal traps, chains, and other indicators. Some trappers don’t bother to clean off the telltale bloodstains on the backs of their vehicles.
Most trappers who work along roads observe their trap sites from their vehicle, sometimes with the aid of binoculars. Therefore be alert for any sight or sound of approaching cars and trucks.
In more densely-populated areas, like the Eastern states, a trapper is more likely to park his vehicle and make a walking circuit to check his traps. Some also use horses, dirt bikes, and the three and four-wheeled all-terrain vehicles. Look for signs of a large pack or trap basket used to carry equipment and hides.
In the north country, many trappers use snowmobiles, often setting their traps near snowmobile trails which are favorite travel paths of Lynx.
Because the vast majority of trappers work their lines on a part-time basis, they often check their traps before going to work in the morning (this also limits the loss to trap thieves who steal the trapped animals). A hand-held spotlight can allow them to check their traps in the pre-dawn darkness. Trappers are most active on weekends and holidays. Be extremely cautious at these times.
Trappers range in age from 10-year-olds to senior citizen pensioners. Most live in rural areas and small towns. In many areas, state wildlife officers are among the most avid trappers, cashing in on their job-related knowledge of wildlife habits and locations.
Some of the most lucrative trapping areas are around the boundaries of National Parks and Monuments, Wildlife Refuges, Wilderness Areas, Indian reservations and military lands. Within the so-called “wildlife refuges,” trapping is often hidden from public view behind signs reading “Public Not Permitted Beyond This Point.”
Typical Trap Sets
-
Bait set using small animal or piece of meat suspended from tree limb.
-
Set near where animal path crosses dirt road. Also used where culverts cross under roads.
-
Traps set near where two streams or arroyos meet.
-
Trap set on trail. Sharp rocks and sticks placed on trail force animal to step on clear spot where trap is hidden.
-
Hole dug to simulate an animal’s digging. Bait or lure placed inside hole. Large rock is sometimes placed on top to keep animal from digging after bait from above.
-
A favorite. Trap(s) set at scent post (indicated by scratch marks left in dirt around bush, rock, stump, etc.).
-
Trap set under remains of campfire (usually used to trap fox).
-
Lure or scent sprayed under cow chip or flat rock propped up with stick. This keeps rain from washing away scent.
-
Trap set at fence corner
-
Multiple sets used around dead animal (horse, cow, deer, etc.). Scent or lure also sprayed on nearby scent posts.
-
“Cubby set. “ Branches leaning on tree force animal to approach bait from one direction only. Illustration shows bird wing nailed to tree as bait.
-
Trap set on slide used by muskrat, otter or beaver along streams.
-
Trap attached to log partially submerged in stream or pond.
-
Trap set on beaver dam.
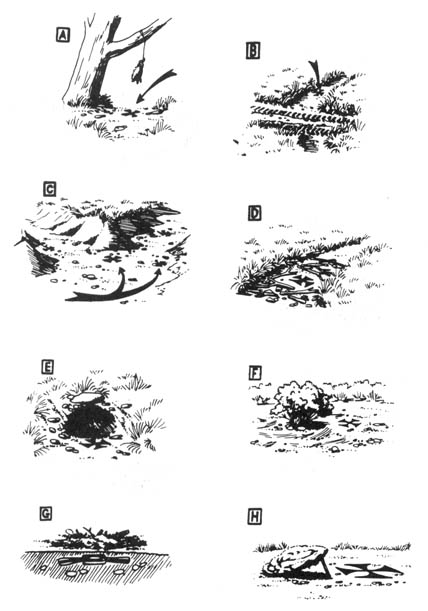
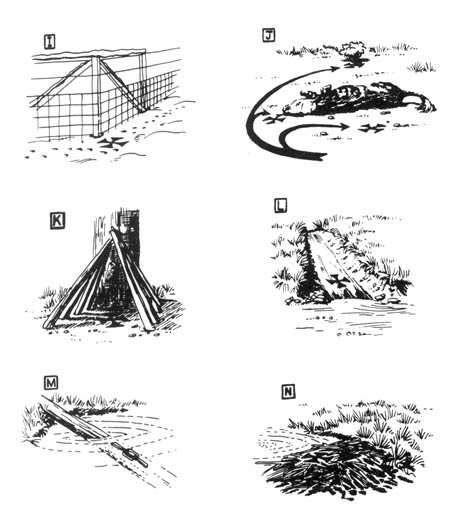
Be suspicious of any small markers like strips of cloth, plastic flagging, or wire twist-ties that you find attached to barbed-wire fences or tree limbs alongside roads. These markers are used to sight along by trappers whose sets are back away from the road.
Experienced trappers favor trap sets near natural animal pathways like deer trails, cow paths, streambeds, fence lines, and high observation points. In desert washes they favor piles of drifted brush and small brushy islands. Where other wildlife or livestock use the paths, the trap will be set off to the side to prevent deer and cattle from ruining the set. Small clearings, holes, and bare patches of dirt on snow-covered ground are ideal for traps.
Sometimes a small piece of cloth or strip of light-colored fur will be hung above a trap to lure in the curious predator. Some trappers carry animal droppings and set them near the trap as an additional lure.
After a trap is buried, the surface will be restored to its normal appearance, making it difficult to spot. Use your foot inside heavy boots (not running shoes!) to probe suspicious areas like slight depressions, small clear spots surrounded by twigs and rocks (designed to make the animal step on the attractive clear ground), or around holes (any hole — animal or man-made). Many traps are set beside a “backing” like a rock, bush, clump of grass, or embankment to insure that the animal approaches the bait or scent lure from one side only.
Trap line saboteurs have also used leashed dogs and metal detectors to locate buried traps.
Where you find one trap, you will usually find more. Traps are commonly set by twos and threes within a small area. As many as ten can sometimes be found within a 100-yard radius.
Trap line saboteurs can walk or drive through suspected areas. Cross-country skis can be used to quietly prowl along snowmobile paths. Consider carrying a white bed sheet in your pack to use as quick camouflage if you hear a snowmobile approach from afar.
Motorized road patrolling is best done with two people, one to remain with the car or truck as a lookout. A cheap plastic whistle can make a good warning signal. Always have a good reason to give for being in the area. Props like binoculars, cameras, bird books, and the like make it more convincing. One trap line saboteur carries a partial roll of toilet paper as a prop to explain what he’s doing back in the weeds off the roadside.
Mountain bikes, or just an old clunker from the Goodwill store, provide a silent way of prowling roads while keeping an ear cocked for the sound of an approaching engine. To avoid leaving telltale tracks, ride only in the other tire tracks so that the next passing vehicle will erase signs of your passing. If you wish to stop and check an area more closely, do not ride off the road. Stop in the track, pick up your bike and carry it into the brush, stepping carefully on rocks, twigs, and clumps of grass to avoid leaving obvious footprints. Soft soled moccasins leave a minimum of footprint, and you can quickly change into boots when you’ve found an area likely to contain traps.
You can determine trap locations by careful surveillance of suspected trappers. Observe from a safe distance to see where the driver slows, stops, or uses a spotlight to observe trap locations. If the trapper checks his traps every morning, or on weekends, find an observation post on high ground and use binoculars and a note pad to chart his movements.
If you know where a trapper lives, you can piece together his route. Follow him a short distance when he goes out. Next time, pick him up again where you left off last time and follow another short distance. In this way you can gradually determine his trap line route without betraying your interest.
Trappers’ home addresses can be determined in many ways. Some states require the trapper to put his name and address on a plate on every trap. An inflammatory anti-trapping letter in the local newspaper may draw trappers out of the woodwork with their defensive responses. Telephone inquiries can reveal who is buying furs in your area. Sometimes these brokers will visit an area for a few days and purchase furs at a prescribed meeting point. These fur sales, and meetings of trapper clubs are good places to obtain license plate numbers for use as described in the Intelligence section of the Security chapter.
Also, don’t ignore the fur business infrastructure. There are about 30,000 “country collectors” operating in the U.S. who buy directly from the trappers. They in turn sell to a broker or auction company. [In many small towns in the rural West, the visit of the “fur buyer” is announced in advance in the local newspaper or on community bulletin boards and is an event of major social importance.] Once you have located these smaller buyers, call them to obtain the names of the brokers or auction companies to which they sell. You could pretend to be an exclusive clothing shop owner or a clothing designer looking for a volume dealer. The “pretext” phone call is a tremendously valuable intelligence-gathering technique, so practice in advance to sound convincing. Also, infiltrate a fur auction or the pre-arranged gatherings where trappers sell their goods. Pretend to be a novice trapper and keep your ears and eyes open. Use the intelligence-gathering methods described elsewhere in this book to follow up such leads as names and license plate numbers.
Trap Line Sabotage
Locating a trap with your boot or a stick will trip it and thus render it ineffective until the trapper comes around next. This method is not effective for long, and if repeated regularly, may cause the trapper or state game agents to put the trap line under surveillance.
Furthermore, any type of trap line interference is illegal, so you might as well do a thorough job and totally dispose of any traps you find, as this is no more illegal than simply tripping them and leaving them intact. Although no tools are necessary, a pair of “linesman’s” pliers, with their dual plier/wire cutter head, is handy for cutting traps off chains or pulling out trap stakes. Do not carry them in plain view, of course.
Only removal or destruction of a trap will insure that it is not used again. Removing all the traps could have the added benefit of financially crippling the trapper.
Rather than destroying a trap by loud hammering or pounding, quietly disposing of it is safer. Traps can be gathered and buried in well-hidden locations. After removing the trap from its set, restore the area to its exact appearance before your arrival. Remember that experienced trappers can follow your tracks and recognize disturbed ground. Carefully brush out your footprints at a trap set. Practice walking without leaving obvious traces. Study your own and other people’s tracks to learn what types of surfaces show sign clearly, and learn to use rocks, logs, pine needles, clumps of grass, etc., to avoid leaving tracks. Wear soft soled moccasins for the approach. Learn to walk slowly and carefully, applying your weight evenly to the whole sole to avoid leaving deep toe or heel impressions. Tracking pursuers can be thrown off by frequent and irregular changes of direction. When you first start back to home or to safety, walk in an entirely different direction and gradually zigzag back. Small deviations to one side or another of an obvious path of travel will fool no one. Think like a tracker. Also, make sure you know the area well enough or have map and compass to avoid getting lost in the woods. If you know that you left distinctive tracks around the trap line (perhaps before you first discovered a trap) avoid wearing the same footwear in that area again.
Unearthed and tripped traps can be disposed of by tossing them into ponds or streams where they won’t be visible from the bank. Or they can be thrown into heavy brush far away from the trap line. Remember not to leave fingerprints on a trap. If you don’t have gloves with you, use a bandanna, handkerchief, or even some toilet paper to handle the trap. See the illustration showing how to make a bandanna into a field expedient glove.
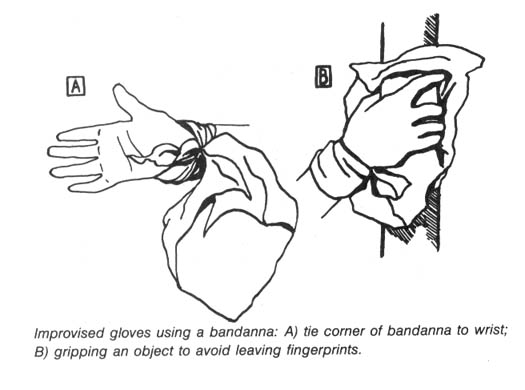
Keep in mind that where you find one trap, there are probably more. Always be alert for the trapper checking his line. Take cover if you hear a vehicle or person approaching. Remember that some trappers check their lines from afar using binoculars.
Because many trappers run their trap lines along primitive roads, spiking such vehicle trails is an effective way of discouraging trapping as well.
Handling Trapped Animals
A simple walk in desert or forest might someday lead you to an encounter with a trapped animal. Naturally, trap line sabotage greatly increases the odds.
In some states, it is a felony to free an animal from a trap, although we know of no person being convicted of releasing a trapped animal for humane reasons. Visit a state game department office (in a distant city to better protect your identity) for a free copy of your state’s trapping regulations and laws.
There are several ways to release a trapped animal, but we cannot recommend the method used by an elderly Texas woman who quietly approached a trapped Coyote and released it without a fuss. A trapped animal is probably frightened and in pain and might attempt to bite or scratch you. Be cautious.
One release method involves throwing a coat or tarp over the animal’s head to calm it down and put a barrier between its jaws and the trapped limb. If two people are working together, one should focus on restraining the animal while the other effects the release from the trap. Avoid any animal foaming or frothing at the mouth as this may be a sign of rabies (the odds of this are very slim). Once the animal is free of the trap, step back and allow it to run out from under the coat.
Simple Noose Sticks
-
Hardwood walking stick with two inconspicuous holes drilled in shaft to accommodate eye-bolt hardware. Carry hardware, rope and wrench in pack or pocket. Can be assembled in two minutes. Walking stick can also be used to probe for traps.
-
Variation of # 1 using only one eye-bolt. In place of second eye-bolt guide, wrap rope loosely around shaft. Knots on cord allow for sure grip.
-
Field expedient noose stick. Be sure to select a strong and relatively straight stick or branch.
-
Tie one knot leaving several inches free on end.
-
Tie second knot to long cord which then loops back through.
-
Variation using a short cord to make a loop guide for noose.
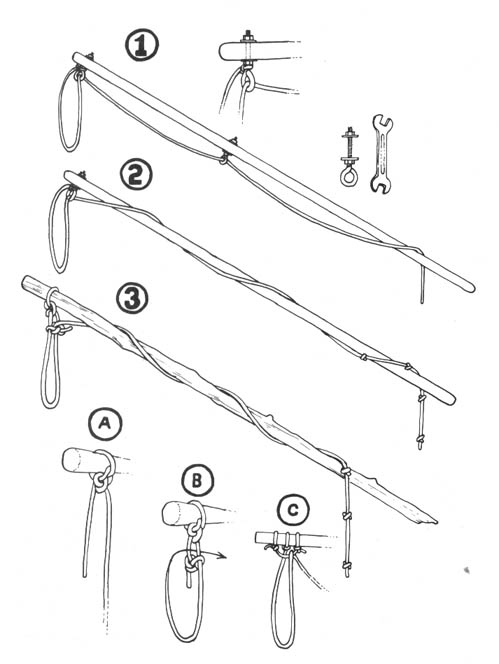
The best way to release the trapped animal is with the aid of a “noose pole” to restrain the animal and protect you from bites. Commercially manufactured noose poles are available through veterinary supply houses that advertise in dog magazines. They come in various lengths, starting at three feet. One good pole is the “Snarem” (Ejay Veterinary Specialties, P.O. Box 1835, Glendora, CA 91740) whose five-foot models cost around forty dollars. The Cadillac of noose poles is the Ketch-All (Ketch-All Company, 2537 University Ave., San Diego, CA 92104) whose nifty five-footer costs just over sixty dollars. If you need something inexpensive or compact, make your own noose pole:
The Ecodefense Deluxe Noose Pole
To meet the need to conceal an anti-trapping noose pole in a small car or a backpack, this collapsible noose pole was designed. Made of thick-walled PVC pipe, it is extremely lightweight and can be assembled in less than an hour with materials costing less than ten dollars.
All the materials can be bought at any hardware store, but to avoid suspicion, spread your business around to different stores.
Materials: One length of 1 /2 inch (internal diameter) Schedule 40 (thick, not thin-walled) PVC pipe (you will use only 3 — 5 feet). One end cap for pipe (Illustration A). Two or three screw coupler sets (Illustration D). Four feet of 1/8 inch braided steel cable. One cable “stop” for the above (Illustration B). One cable “ferrule” for the above (Illustration C). Four or more feet of 1/4 inch braided nylon rope. PVC solvent and cement (for assembling pipe pieces).
As you can see from the diagram, the end cap is drilled with two holes to pass the noose cable through (A). Before gluing the cap to the end of the pipe, place the cable stop (B) on one end (crimp it to the cable with a couple of hammer blows), and crimp the other end into the ferrule, along with one end of the nylon rope (C). Pulling on the rope will tighten the noose.
Cut the PVC pipe into the lengths you require. Think about this first. If you plan to carry it inside a small pack or under a car seat, measure the space first. Then size your individual segments accordingly. If the sections are longer, you may want to go with three pieces; if shorter, try four segments. Don’t be surprised if they don’t screw together completely and some thread shows.
Into the end of the last section cut two notches about an inch deep to accommodate the nylon rope (E). Tie knots into the end of the rope at intervals of about one-and-a-half inches. When the rope is slipped into the notch in the pipe, the knot will not pass through and will lock the noose tight around the neck of the animal you are rescuing.
A sturdier, heavier, and only slightly more costly version of this noose pole can be made by substituting galvanized pipe for the PVC. Look for the less-conspicuous black-finish galvanized pipe. Have it cut and threaded at the store where you buy it.
A simple noose pole can be improvised from a shock-corded aluminum tent pole. Also see the illustration for Simple Noose Sticks.
The lightweight PVC noose pole will bend and flex if an animal struggles. Do not use brute strength to subdue. Keep your distance and wait for the animal to calm down. See instructions for tightening the noose until animal is unconscious, but take such extreme measures only if really necessary.
Store your noose pole in a cloth bag to keep your fingerprints off and to keep dirt and grit from fouling the pipe threads. If confronted, say you carry it because you’ve had to release your pet dogs from traps before.
Using The Noose Pole:
Approach the animal slowly with your noose pole extended to the front. If the animal is agitated, softly talking to it or quietly humming can have a calming effect. Some animals will sit still, paralyzed with fear, while others will struggle and try to pull away.
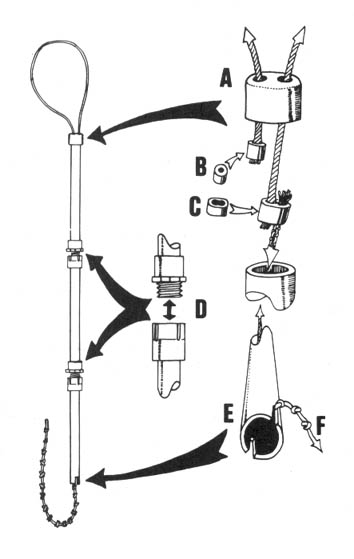
Tighten the noose around its neck, then restrain the animal to prevent it from injuring itself by struggling. Usually you can push the animal’s head to the ground and step on the trap springs with your feet to effect the release. If the animal struggles, you may have to cut off its air by tightening the noose. The animal will pass out and go limp. Loosen the noose immediately, but only slightly, to permit the unconscious animal to breathe again. The animal will recover in a few minutes, after you have removed the trap. Remember, though, that they may revive at any time.
When actually loosening the trap by stepping on the springs, you may find that a previously docile animal begins to struggle. Sometimes the trap cuts off circulation, eventually deadening the pain. As the pressure of the trap jaws is released, the revitalizing blood flow can cause extreme pain in a paw that is swollen, cut, or broken. Be prepared for an animal to suddenly struggle or attempt to bite (even pet dogs often react this way and bite their people). Before releasing an animal from the noose pole, make sure it has a clear escape route away from you.
An additional aid for releasing trapped animals is a heavy coat or tarpaulin. Throw this over the animal to calm it. This can be especially helpful when releasing cats or birds of prey, as the cloth can prevent them from scratching with the free foot.
Special Release Problems.
Eagles, hawks, and other birds — Some scumbag trappers still use dead animal baits that lure curious birds of prey, ravens, vultures, and others into the trap jaws. (The so-called “mountain man” Claude Dallas, who murdered two game wardens in Idaho, was such a man.) To avoid their claws during release, grab the wing opposite the trapped leg and stretch the bird away from that leg before releasing the trap jaws. Eagles are very powerful and difficult to release. Cover the free leg with a coat or heavy cloth and hold it alongside the trapped leg to prevent scratching. Step back quickly when releasing an eagle. Heavy leather gloves help protect you from scratching. The best type are heavy welder’s gloves with gauntlets that protect the wrist.
Porcupines — Gloves are no protection against porcupine quills, and you should never throw a coat or cloth over a porcupine as this can injure the animal by pulling out quills. A noose pole can be used to stretch the victim away from the trap by snaring the tail or a back leg. Since porky often protects itself by turning its back and raising its quills, one person can hold the tail down with a stick and then carefully grasp the long hairs and quills (when grasping, move your hand slightly to the rear, in the same direction as the quills). Lift the porcupine by the tail, using the other hand to support the abdomen. A second person can then release the trap jaws.
Badgers — The Badger is one of the toughest critters around and must be handled accordingly. Even finding them can be a bit of a problem. A trapped Badger usually tears up everything within reach, leaving a circle of torn-up earth around the trap. Sometimes a Badger will succeed in burying itself in the loose dirt. If you find this torn-up circle and no Badger, use a long stick to probe the loose earth. If you still find no Badger, it may already have been killed and taken away. Check the vicinity for new trap sets.
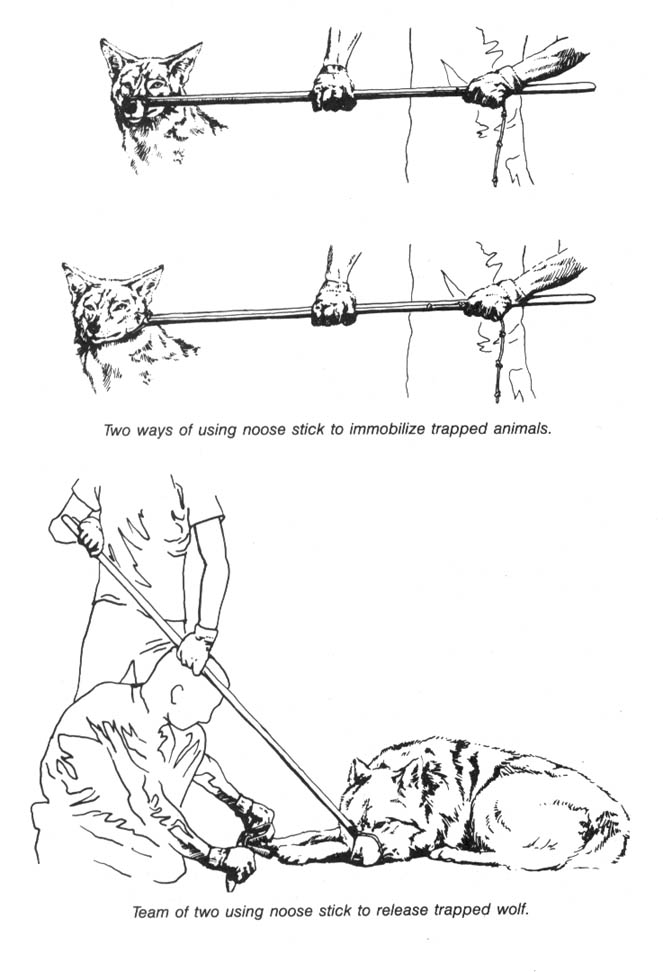
Skunks — Only the bravest and kindliest souls release skunks. Our experience with live-trapping skunks to remove them from civilized areas has shown that their temperaments vary. Some are calm as house cats, while others show total panic. It is possible to lure the skunk into several spraying attempts to “empty” it out (several times). Be prepared to move fast and remember that skunks can spray as far as 12 feet.
For more information on trapping, consult your local library. Do your reading at the library, if possible, to avoid leaving a check-out record showing an interest in the subject. At bookstores look for a trapping book with information on trapping the wildlife found in your area. The monthly magazine Fur-Fish-Game (which can be purchased anonymously at a newsstand or grocery store) regularly has trapping tips, advertisements for suppliers, and dates and locations for trappers’ conventions (use your imagination here).
— Dick Summers
Field Notes
-
A skunk’s spray not only sticks to your clothing, but also penetrates your clothes and sticks to your skin. Therefore, a non-permeable garment is needed. You are probably not one to ruin a good rain suit on every trapped skunk you come across. Also, wearing nylon on the job is a no-no. There is an alternative: military chemical warfare gear. It is not terribly expensive ($15 or less) for a matching set of coat and trousers. They are said to be impenetrable to nerve gas, chlorine gas, and mustard gas — and they work well with skunk spray, too. Old worn sets, though, are worthless! Buy only those sealed in their original package. Never launder this stuff either, or you’ll take out the protective chemical. It is also wise to get a good gas mask. Surplus Israeli Civil Defense masks are now available from many sources (mine cost $7). So: buy local, pay cash, and remember the words Paper trail. Good luck and happy trails.
— Mephitas
-
When you discover a trap line of any type, careful surveillance of the trapper checking his traps may reveal still more sets. Watch to find out when he checks his traps. Check all likely locations for traps. Use a couple of short poles and your feet to probe sections of game trails. Check the entrances to culverts and under bridges. Look for low spots under fences. Bodies of dead animals, chunks of meat, or feathers might be suspended from bushes over buried traps.
-
Some trap saboteurs have used a dog on a leash to locate traps set for Coyotes. The dogs found traps carefully buried next to small bushes or tree stumps that were sprayed with urine from captive coyotes, making false “scent posts” that attracted every curious Coyote in the area.
-
Two pairs of vise grips make the job of extricating an animal from a trap quick and easy. Simply apply a vise grip to each pair of springs on the trap.
-
Perhaps Coyotes under pressure from “varmint hunters” can be “trained” to avoid the gunmen. Hand-held varmint calls and instructional tapes are available through gun shops and sporting goods outlets. Those who don’t want to learn the calling techniques, can use portable loudspeaker systems with cassette tapes in the field. Many books describe the hunting techniques in detail. With this information, the monkeywrencher can camouflage herself well, take to the field, and call up Coyotes, Bobcats, etc. A rifle or handgun used to fire blanks or even send live rounds whizzing safely past Coyote will make her be more cautious in the future, much to the detriment of the varmint calling “sportsmen.” As long as you obey state game laws (such as purchasing a hunting license), this is perfectly legal.
-
It may be possible to monkeywrench a trapper’s vehicle while he is away setting his traps. Since most trappers are too lazy to go far from their wheels, such opportunities are rare and risky.
-
“Bug zappers” indiscriminately slaughter flying insects and should be outlawed. Until then, they should be put out of commission whenever possible. They can be taken and destroyed, or shot out with BB guns, pellet guns, or slingshots.
The Trap Line In Snow
The winter trap line environment often presents a special danger in the form of snow. It is difficult to conceal your tracks in snow and hide the evidence of your work. Trappers are often sensitive to tracks because they use them as a guide to animal travel and trap set locations. A number of tactics can minimize this liability and even turn it to your advantage. (Many of these points apply in other seasons, too.)
-
Follow the same roads the trapper uses. When walking, stay in the tire tracks so passing vehicles later will wipe away your prints. If driving, use a suitable winter vehicle equipped to get you unstuck. Scout your routes ahead of time to memorize the layout and become aware of road hazards that might leave you stranded.
-
Always have a good cover story for being in the area. Rehearse. Firewood cutting, and hunting (with rifle, license, and knowledge of what’s in season) are good covers, but don’t pretend to be another trapper. Trappers are the biggest “trap thieves” and are always suspect.
-
You don’t want to drive past the scene of an animal release/sabotage on your way out. Have your vehicle pointed to exit, not enter, the area.
-
Stop your vehicle on hard ground to minimize sign of entering and exiting. On narrow one-way roads, pull past the target a short distance and walk back. If the trapper shows up while you’re working, you may hear him stop and get out of his vehicle before he walks up on you.
-
Minimize footprints and disturbed ground by walking the same path in and out. This is especially important in snow.
-
Keep any equipment accessible, yet hidden, inside your vehicle.
-
If you don’t want to carry a noose pole to free trapped animals, consider a short heavy stick about four feet long with a fork on one end just deep enough to pin a small animal neck to the ground. Pin down the animal’s head and neck as far from the trap as possible. If the trap chain is taut, the animal’s trapped leg pulled straight, and the head pinned as far away as possible, the chances of being bitten or scratched (cats) is minimized. (The same principle of pulling the animal tight away from the trap applies to noose-pole releases.) With the forked end of the stick pinning the animal’s neck, lodge the other end into the front of your shoulder and use your body weight to hold the animal down. This frees both hands to open the trap.
-
If there are two of you, the one securing the animal’s head doubles as lookout.
-
Never carry the trap away with you. Toss it as far as you can into trees or dense brush, down hillsides, into water, or the like.
-
If you use bolt cutters to cut trap chains, remember they may leave tool marks on the cut surface. Take care of this problem by cutting the link completely free of the rest of the chain and tossing it in a different direction. The chances of a search turning up a single cut chain link are very small. Even if the trap is recovered, the cut link bearing tool marks will be missing.
-
Many people carry a broom (sometimes shortened) to sweep snow off their cars in winter. You should also, and use it to wipe away your tracks. Avoid wide sweeping moves that are obvious on the ground. Use the tip of the broom to wipe away each track one at a time, both around the trap set and on your trail as you walk backwards out of the area and back to your vehicle. You won’t be able to both work fast (which is important) and eliminate all sign, so concentrate on eliminating prints that can be traced back to you.
-
Accompanied by your pet dog, you can claim, if caught, that you were just freeing your dog from a trap. Act extremely irate that someone would do that to your dog.
-
Learn to use the weather to your advantage. Going out just before, or in the early part of a snow storm may mean a blanket of fresh snow will hide your activity. This is not a substitute for wiping away your footprints, just an added advantage. Follow weather reports closely and learn by studying local weather patterns in the area where you operate.
-
If operating on foot in snow, have two or three pairs of winter boots (cheap moon boots are good), each with different soles. After working a trap line, retire the boots you were wearing for a few weeks at least. If that sole print is evident in the snow around your home, tromp around in a different pair of boots to obliterate the prints. A visiting game warden might be curious about tire tracks and footprints that may resemble those found near the scene of sabotage.
-
If stopped and questioned, be friendly and give your rehearsed cover story. If questioned at home, don’t deny traveling around the area to hike/hunt/cut firewood, etc. If more than a day has passed, be vague and uncertain. Tell them you went a lot of places that day. Remember, an investigating officer might consider you a possible helpful witness rather than a suspect. Play the part.
-
Be aware of ground conditions. Warm weather may leave bare ground that won’t take footprints readily. Doing your work early in the morning or during cold snaps may let you do most of your walking on hard frozen ground. South facing slopes and windblown areas are most likely to have bare ground but watch for mud. It’s better to leave tracks in snow that will melt than in soft ground that will only harden and preserve your footprints.
-
If only trappers use a certain road, consider accidentally dropping nails for their tires (or other tire-flattening methods discussed elsewhere). Do so near a recognizable landmark so you can remove the nails after trapping season.
— Jim Deakins
Snares
Another insidious trap, used against small game, such as rabbits, and predators, like Coyotes and foxes, is the wire snare. This device consists of nothing more than a loop of lightweight cable or braided wire (as is used to hang picture frames) set in a place where animals will likely pass. (See illustrations.) The snare works like a miniature cowboy’s lariat, tightening around anything unlucky enough to pass through it. It is draped over small branches around an animal trail or outside an animal’s burrow. Stockmen and government trappers will put them in low spots that Coyotes dig for trails under woven wire fences. Corners where two fences come together are especially popular. As the animal passes through the noose-like snare, it tightens about her neck and slowly strangles her. Smaller animals are frequently snared around the middle of their bodies and may be almost cut in half after a prolonged and fruitless struggle.
Usually, you must look closely to spot snares. When you find one, cut the wire in an inconspicuous manner, perhaps close to the point where it is anchored or tied, or in a spot hidden by brush or loose dirt. This will insure that it cannot strangle any passing animal. If you take the entire snare, the trapper will simply and cheaply replace it. Make the snare look perfectly normal after disabling it, and the trapper will be none the wiser.
— Rags the Digger
Coyote Getter
This handy tool can be used while browsing through the fox, Bobcat, Lynx, Badger, Beaver, Cougar, Coyote, Ermine, Mink, and Muskrat coats at your “favorite” fur shop.
The “coyote getter” consists of an inexpensive air brush modestly customized. Badger makes one for around $35 (model #350) including hose and bottles. An 11 ounce can of propellant runs about $4.
Modify a cheap pair of gloves so you can conceal the brush and tip in them. Cut a small hole in the glove just large enough to expose the spray tip. Paint the tip the same color as the glove. Use tape or rubber bands to fasten the brush to your hand and wrist (put the brush in your palm and use your thumb to press the trigger). Run the air hose up your arm and down to your coat pocket (the coat should have a hole cut in the inside of the pocket for the hose to come through). Fill the paint bottle (carried in your coat pocket) with your favorite fluorescent dye or paint, and hook up the hose to the propellant can.
While browsing, surreptitiously “decorate” the coats where they won’t be immediately noticed from the aisle, and leave.
— Mr. Goodwrench
Snares
The wire or cable snare is another trapper’s tool designed to strangle an animal to death.
A) typical wire snare.
B) Snare set in crawl hole under fence.
C) Snare set on trail. Tilted branch keeps larger animals like deer and livestock away from snare. This trick also used with leghold traps.
D) Snare set on a log crossing a stream.
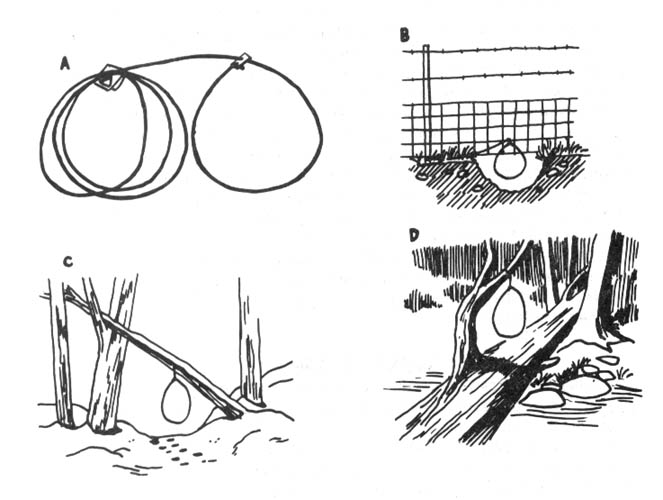
Field Notes
Browse through the fur coats on the rack at your local classy department store with a razor blade concealed in hand. Slice the lining of the coats from the inside as you admire them.
Fence Cutting
One of the ugliest sights you are likely to encounter while traveling about the West is the all-too-familiar dead Coyote dangling from a rancher’s fence. Never are you presented with a better reason to stop straddling the fence and start cutting it.
The tactics used will vary depending on whether you’re in your neighborhood, or just passing through. Your primary consideration must be to avoid being caught, since small town juries and judges in ranching country are not likely to sympathize with a goldang Coyote lover.
In Your Neighborhood
When you first spot the dead coyote, do not stop or even slow down to look. Casually look about to see if anyone is observing you or working in the area. Drive out of the area and wait at least ten minutes before driving past the scene again. On this second scouting run, use your odometer to measure distances from landmarks that will be visible at night to the scene of the crime. If necessary, make brief cryptic written notes of distances, but remember to burn the note after committing the key information to memory. Your notes might read, “Hwy. junction 21.5-gully 22.1-m.p. 145 22.7-X [marks the spot] 23.2-bridge 23.9,” and you will memorize that the target is 1.7 miles from the highway junction, and one half mile past milepost marker 145. If you approach from the other side, you know it is seven tenths of a mile past the bridge to the target. This precise pinpointing of the target by distance will keep you from making the classic error of cruising the rural road or highway in a slow and conspicuous manner while you squint into the darkness hoping to glimpse the dead Coyote. Always assume it will be hard to spot at night.
Wait for a suitably dark night, and have a trustworthy companion drive while you cut. Approach when there is no other traffic. You may have to drive by more than once to accomplish this. That is why you need landmarks and mileages from both directions. If the area has homes or ranches located next to the road, don’t drive by more than a couple of times. It’s safer to wait for another night. After all, that Coyote isn’t going anywhere. When you make the hit, try to leave the vehicle on the road, rather than leaving traceable tire tracks on the shoulder. You will, of course, be wearing dark clothing, smooth-soled shoes, and gloves. Your cutting tools will be thoroughly wiped clean of fingerprints in case you drop them or have to ditch them. Wire cutters might suffice, but a fence tool is best (see the section on Grazing in the Developments chapter).
Leave one of the top two strands of barbed wire intact. This will keep cattle from straying onto the road. In sheep country, leave a strand or two of the woven wire panel on the bottom intact. Barbed wire should be cut once between each set of fence posts. Woven wire (usually a crisscrossed four by four inch welded smooth wire) should be cut on each side of a couple of fence posts, and generally butchered. Do all of the cutting you can in 60 to 90 seconds and promptly leave. Don’t try to cut the whole fence down. Just cutting it up near the dead Coyote will convey the message. (Be careful when cutting tightly strung wire since it may pop back at you and take a slice out of your body. Cut wire next to the post and stand to the side.)
If the target is located near a house, consider having your partner drop you off nearby to let you approach it on foot. Carefully pre-arrange the time and location for your later pickup. Have a backup time and place in case anything goes wrong. You may also want to carry a pepper spray (see the section on Dogs in the Security chapter) in case man’s best friend gets rowdy.
Drive away from the area at normal speed to avoid suspicion. You may want to bury or otherwise dispose of the wire cutters since they are probably the only thing short of a confession that can positively link you to the crime. That safety and peace of mind are well worth a few dollars. If you are questioned as to why your car stopped out there that night, you can always say that you stopped to take a leak, or that something ran out in front of your car and you stopped so fast you stalled the engine.
Just Passing Through
If you are traveling through the area, you may want to do your fence work immediately. Always carry a dark plastic bag with some dirty, empty aluminum cans in your car. Pull off the road and pretend to be picking up cans. When the coast is clear, check one last time. If it’s still clear, whip out your trusty cutters and quickly, but casually, go to work. Don’t ever run in broad daylight as this looks mighty suspicious even from a long way off. In daytime, you should only do as much cutting as can be accomplished in 15 to 30 seconds. Casually stroll back to your vehicle and leave at normal speed.
Do not stop anywhere in the area unless you are desperately low on gas. Leave the county. Cross at least two county lines before stopping for the night. If the state line is nearby, modify your plans and vacation in another state for a while. Changing to a different highway might throw off a deputy or highway patrolman checking travelers for the elusive Coyote lover.
Admittedly, all of this seems awfully elaborate for a little fence cutting, but your Coyote-killing rancher will consider a crime against his property to be just about a capital offense. In Texas, where a lot of stockmen favor this type of fence decor, it is a felony, punishable by up to five years in prison, to cut a fence. This law is a hold-over from the open-range fence cutting wars of the 1880s and 90s, but it is still on the books, and might be used on you if you get cocky or careless.
So, watch those fence lines, plan ahead, be careful, and strike back!
— Old Three Toes
Animal Enterprise Protection Act
On August 26, 1992, President Bush signed into law the Animal Enterprise Protection Act of 1992. It establishes as a federal felony attacks on zoos, circuses, rodeos, livestock facilities, aquariums, and labs where damages or research losses total $10,000 or more. This, of course, means that the FBI may investigate such raids. An FBI agent said, “We consider these acts to be domestic terrorism in every sense of the word.” The FBI is currently cracking down on suspected animal rights activists. Several people are sitting out the year in federal prison for refusing to testify before federal grand juries, and some well-known activists have gone underground to avoid being hauled before grand juries. One wonders when lunatic fetus-worshippers who are bombing family planning clinics and murdering doctors will get the same attention from the Department of Justice.
— Aguila Wolf
Chapter 7: Miscellaneous Deviltry
In this chapter, we look at a potpourri of tricks in the monkeywrencher’s bag. Smoke bombs and stinkers, lock jamming, returning trash ... this is where the ecoteur can have fun! After all, we need to let our hair down once in a while. Enjoy. But don’t forget security!
This chapter also includes ideas and techniques for urban and computer ecotage because we couldn’t decide where else to pigeonhole them.
In this Third Edition of Ecodefense, we have dropped several items in the “harassment” line. For those interested in a wide array of clever and wicked methods to harass and torment individual evil-doers, we suggest you consult books like Get Even by G. Hayduke (not to be confused with Ed Abbey’s George Hayduke). Such books are available from mail-order houses like Loompanics (POB 1197, Pt. Townsend, WA 98368).
The suggestion in previous editions of Ecodefense for mailing business reply mail taped to a brick back to the company will not work. The Post Office does not even send it. We have completely dropped that section.
Urban Monkeywrenching
No campaign of monkeywrenching is complete without consideration of urban area targets. Most corporations that ravage mountains, oceans, forests, and deserts are headquartered in major metropolitan areas. The decision-makers for these businesses feel secure and untouched by most monkeywrenching in the field, and their continuing callous actions reflect this isolation.
Attacks on urban targets will rattle the cage of the upper corporate echelon and force a more serious consideration of the issues involved. Operating in the urban area also provides the monkeywrencher with a wider range of targets. As security is increased at rural target sites, ecoteurs switch occasionally to less secure targets previously left untouched. These include equipment yards, sawmills, warehouses, corporate offices, and retail store outlets. Thus the offending business is forced to incur still higher costs as their penalty for Earth rape.
Even individuals should not feel completely exempt from true justice. The corporate structure routinely shields decision-makers from the consequences of their greedy acts. Corporate presidents, board members, and managers are rarely held accountable under the law, the usual punishment for crimes being a token fine paid by the corporation. Then it’s back to business as usual, with violations of health, safety, and environmental laws simply better concealed than before.
When fixing blame for callous corporate activities, it is important to avoid field level managers simply carrying out orders. There are occasional exceptions to this, however, such as a militantly anti-environmental logging supervisor. Sometimes a local or on-site manager will seek to enhance his or her standing with the bosses by cost-cutting measures. This frequently occurs in the case of improper disposal of toxic waste. A plant manager will arrange for illegal disposal of hazardous materials rather than pay for proper removal. This increases the profitability of the operations, enhancing the manager’s chances for a raise or promotion. Even when following orders in a case like this, the local manager is a knowing accomplice who is shielded by the law.
Imagine the chilling effect on destructive business activities if the owners and managers knew they might be held personally accountable. To spread the chill, publicity should accompany such hits. Efforts must be made to garner public attention through the press. Failing this, brief cautionary phone calls (Editor’s note: security!) can warn key individuals that their office or home might be next. Raids on personal residences should be planned and executed carefully, so as to avoid any chance of injury to individuals such as might result from a face-to-face confrontation. For this reason, these raids should probably be limited to spray-painted slogans on walls and autos, and the like.
A great deal of concern has recently been expressed over the use of civil suits by corporations to silence legitimate opposition (SLAPPs, Strategic Lawsuits Against Public Participation). Land developers, timber companies, animal experimenters, and billboard companies have all filed suit against private individuals and public officials to stifle dissent and subvert regulatory laws. The immense financial resources of these corporations almost insures victory over their individual opponents. Even a victory in the courts for the activist/victim does not avert financial ruin, due to the high cost of legal services.
We may have already reached the point where only the monkeywrencher can deter this threat to liberty. The corporate decision-makers and their attorneys must be held accountable for their attempts to subvert the constitutional guarantee of free speech. They must be made aware that they face years of harassment if they attempt to misuse the court system to stifle opposition. If enough tension is generated, the legal system may actually move to curtail such abuse.
Attack on an Urban Residence
Any “hit” on an urban residence must be planned so as to avoid the possibility of a confrontation with the owner or a neighbor. Never use intrusive methods like window-breaking on any building where people live.
The best type of urban residential operation is an embarrassing slogan painted on highly visible walls. The slogan must be tailored to fit the crime, like “I poison your children” for the home of a toxic waste dumper.
Verify the accuracy of the address through at least two sources. The phone book and city directory may help, though these may not be up-to-date and many prominent people will not be listed in phone directories. Books like Who’s Who and its various regional editions have biographies of many corporate types, and while they do not give street addresses, they at least pinpoint the community in which they reside, so that a little additional detective work may turn up the actual address. When you have a likely phone number, you can verify it by calling under some innocent-sounding pretext. Matching license plate numbers at the corporate parking lot and at home is a good way of being sure that your target actually resides at a given address. Another way would be to pose as a prospective property buyer and inquire at the county courthouse about who owns a particular residence. This information is a matter of public record.
Once you have a house pinpointed, study the layout of the neighborhood streets carefully. This will prevent your driver from inadvertently taking a dead-end street in an attempted escape. Scout by day and by night. Decide ahead of time exactly what slogans will go on what walls. Unpracticed sloganeers do stupid things like running out of space for a full message.
Check the target at the exact hour and night of the week just one week before the hit. This will reveal any routine activity for that day and time that might interfere with your plan.
Follow the basic security precautions outlined elsewhere. Make sure your license number can’t be read. If possible, use a brief drop and pickup-style hit, but avoid stopping directly in front of the target home.
If, on the approach to the target, a neighbor or passerby sees you, scrub the mission and wait for another time. Be patient.
Hit at night or during cold or damp weather, all of which will keep the neighbors indoors. But never strike in the wee hours of the morning when no one else is on the road.
Never tamper with the mail box, as this may be a Federal offense.
Private Automobiles.
The corporate criminal’s car can be hit at home, at work, or in the grocery store parking lot. Smelly liquids or aerosols can be used on the interior, and paint stripper can be used (carefully!) to slogan on the paint of the auto’s exterior. It is usually too dangerous to tool with the engine (like sanding the oil), but tires are easy to ruin.
Attacks on Corporate Offices
Corporate offices may range from small “store-front” operations (such as a fly-by-night real estate developer might use) to the massive glass and steel office complexes favored by the big multinational corporations. Corporate offices are vulnerable to a wide variety of monkeywrenching techniques, including some tactics that would not be appropriate for a private residence. For instance, a quick night raid involving breaking windows (through which paint or stink bombs might be tossed for good measure) might be clearly justifiable for the offices of a corporate criminal, while a similar action at a private residence might be interpreted as life-threatening vandalism. Other appropriate tactics for corporate offices include lock jamming, spray painting slogans, dumping noxious effluent, and the like. These techniques will be covered later in this section.
The “Daring Daylight Raid”
At times, much favorable publicity can be obtained from an action against a corporate office in broad daylight and during working hours. Prime examples of this were the raids carried out against corporate offices in Chicago by “The Fox,” who dumped raw sewage on the carpets of polluters. However, urban daylight operations are riskier than night operations, and require absolute precision in their execution. Following are some proven methods to follow:
Planning. Study the target building and surroundings in detail. Among the most important details are:
-
Locations of doors and windows.
-
Building security (i.e., guards and closed-circuit TV cameras).
-
Parking (for lookouts and getaway car). Lighting (mainly important for night hits).
-
Approaches and escape routes (don’t rely on just one of each).
-
Out-of-the-way access (loading docks, parking garages, etc.).
-
Locations of possible witnesses.
Use any available pretext to examine the building layout. Dress like a typical businessperson and stroll about purposefully. Stop in as a pedestrian to ask for directions to a nearby building. Conservative-looking team members can inquire about renting office or convention space, and perhaps get a tour of the facility from the building supervisor. Always have a prepared story in case you are questioned. For detailed information, one of your team could try to get a janitorial job in the building (quit well before the hit, needless to say).
Detailed building plans may be on file and easily accessible at the office of the city or county building inspector. Pose as a prospective buyer (or buyer’s representative), architectural student, etc.
If feasible, determine typical conditions ahead of the action by scouting the target both one week and one day prior to the hit (at the same time of day). This will reveal patterns of activity to expect at the time of your hit.
Consider a dry run to test your plan. Timing is important.
Getaway vehicles must blend in with the area. If you require certain parking spaces, be patient and wait until they open. To be safe, get there well in advance.
When necessary, use diversionary tactics. A smoke bomb set off safely in a planter might distract security. A well-timed phone call might distract a solitary receptionist in a front office waiting room.
Some type of disguise is usually a good idea. The basic type is an eye-catching garment that tends to distract eyewitnesses. A brightly-colored ski mask, scarf, shirt, or the like tends to dominate in the descriptions later given to police.
Wigs and fake mustaches can be bought cheaply at second-hand stores (like Goodwill) and at novelty shops. Use special wig cleaner (available at wig shops) to clean any second-hand wig. Wigs commonly cost five dollars or less.
Avoid elaborate disguises. Most don’t look good close up, and may make someone suspicious. Shaving real facial hair or wearing a fake mustache can be an effective but simple disguise. See books like Corson’s Stage Makeup (in most college libraries) for details on how to properly apply facial hair.
Such disguises are most effective if they can be quickly removed before one escapes the area or enters the getaway vehicle. The simplest method is to discard a garment while exiting the area. For example, a light jacket or second shirt worn on top of the first shirt (both bought at Goodwill) can be discarded in the trash, an unlocked closet, elevator, rest room, etc. Never discard a wig in this manner as it will invariably contain some of your hairs. Another disposal/quick-change method involves passing the items to a confederate totally different from you in appearance (for example, passing a brightly-colored shirt and wig from a man to a woman), with the receiver smuggling the items out in a large purse, shopping bag, or briefcase. This same person can also smuggle the disguise items into the target area for donning just prior to the hit.
Escape is the most critical item in your daylight raid plan. If foot pursuit is possible, a sack of BBs or bottle of cooking oil sloshed on a tile floor can delay pursuers, particularly in the confines of a hallway. If an elevator is necessary to the plan, have a confederate hold the door open to insure quick getaway. Also, don’t neglect the fire stairs in high-rise buildings. Keep in mind that you can readily enter a fire escape stairwell, but locked doors prevent you from re-entering the building (without the aid of a friend to open them from the inside). If there is a lobby security guard who might block a front door retreat, a well timed phone call might tie up the guard’s phone and delay warning.
Yet another way to delay pursuit is to use a locking device on the door after you leave. A pre-positioned length of lumber can be run through door handles to delay pursuers. Study your prospective exit doors closely and use your imagination to design simple and quick methods to secure them after the hasty exit. The locking device must be concealed near the door just prior to the job, or be installed at the critical moment by a waiting accomplice.
Once you have fled the building, either walk inconspicuously to a waiting car or simply flee. If you plan to run, consider wearing a jogging suit and running shoes to avoid suspicion. Similarly, a bicycle can be used for a quick getaway without arousing the suspicions of passersby. The bicycle is usually used for a few blocks and then hauled away in a car or truck, or passed on to a confederate of totally different appearance, who calmly rides off.
Urban hits are far more effective if accompanied by a press communiqué. Such a communiqué must be delivered only after the successful operation. See the section on Media Relations in the Security chapter for further information about secure press contacts.
— Zorro
Fun With Slingshots
This versatile tool, available at large discount houses for a few dollars, can be used to knock out office windows from the relative safety of a passing car. In the illustration you will see the conventional type (a) and the more compact and easily concealed folding variety (b). Missiles must be small, dense and relatively round (c). Avoid irregularly shaped objects (d), as they don’t fly true. Small rocks, steel bearings, and large nuts (e) are good. In illustration (f) you can see how one or two slingshotters can hit a target from a passing car. The hand holding the slingshot must not extend outside the vehicle (f). The driver must signal when it is safe, ensuring that the hit cannot be observed by nearby drivers. Avoid using your brake lights or deliberately slowing down and then making a fast getaway. Try a couple of practice sessions on a remote country road first. To a passerby, the hit must be indistinguishable from the actions and movements of a typical passing car.
Accuracy with a slingshot comes only through practice. Shooting into an empty cardboard box from gradually increasing ranges is good practice. Do this in a remote area, rather than leave your backyard littered with the same type of ammunition found at the scene of the hit.
— William Tell
Field Notes
-
Round ice (the kind sold in machines) is an excellent pellet for slingshots involved in night actions. They can be shot through windows, breaking the window, but then melt, leaving no evidence. They do not break plate glass, but are fine for thin glass.
-
Paint pellets (used in C02 air splat guns for war games) can be fired from slingshots. They are water-based paint in gelatin. This means they are politically-correct-biodegradable, but the paint splat does not last long on your target. Unfortunately, some break with the initial pull of the slingshot.
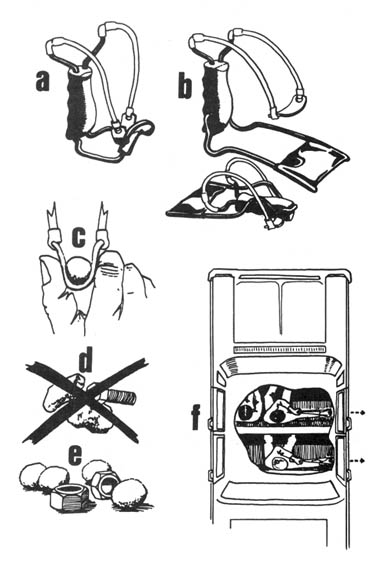
Condo Trashing
The following method has been suggested for use against environmentally objectionable construction projects such as condominiums and shopping centers. It involves action to “impair” the electrical wiring system and the plumbing during the construction phase.
After the concrete slab foundation is poured, the connections for the plumbing (especially sewer) are exposed. Usually these connections are covered by duct tape to prevent foreign objects from being accidentally dropped down the pipes. Should someone remove the duct tape and deliberately put foreign material into the pipes, and then carefully replace the duct tape, the results are interesting. The material put in the pipes should be designed to cause a permanent stoppage (e.g., concrete or epoxy). (Check the section on Plugging Pipes in the Developments chapter for methods of plugging pipes.) Imagine the consternation if the blockage is not discovered until the project opens for business, and sewage begins flowing out of toilets onto the occupants’ rugs, etc.
Similarly, a monkeywrencher can go after the electrical wiring after it has been installed in the drywalls, but before the Sheetrock (or other form of wall-board) has been hung. One can go from wall to wall wherever wires are found, cutting them in inconspicuous places (for instance, behind studs or cross ties, or under joists) and then replacing the wire ends, perhaps taping or gluing them into place so as to make them appear untouched. When the Sheetrock crews finish, there will be no evidence that anything is wrong until the sad day when the tenants move in and try to get their microwave ovens to work.
Obviously, these tactics can be applied to a wide variety of buildings. Remember, though, to chose your targets well. Make sure that the “victims” of such monkeywrenching well deserve to be singled out as egregious environmental rapists. There is no place for aimless vandalism in the monkeywrenching campaign.
— Captain Swing
Field Note
Salt is very bad for concrete. If quantities of salt could somehow be introduced into cement bags or sand piles for making concrete, foundations and the like would be weakened.
Computer Sabotage
Monkeywrenchers need to acquire new skills to keep up with the spreading computerization of industry. Virtually all commercial operations plundering the planet depend to some degree on computers. A two or three week shutdown of computers can cost a large company millions of dollars, and even small companies and contractors are becoming addicted to high-tech services for planning, payroll, inventory, and countless other essential functions.
There are three basic types of computer sabotage:
Hardware sabotage: This is simple destruction of the computers themselves. It requires physical access, forced or otherwise, to computer facilities.
Records sabotage: Because information storage and retrieval is the primary function of computers, physically destroying computer tapes and discs can severely impede many destructive activities.
Software sabotage: This includes “borrowing” embarrassing information from corporate files, diverting company operations away from critical areas, and planting so-called “logic bombs” or “viruses” that use predesignated cues to trigger massive erasures of records and operating programs.
All of these methods are highly effective when carried out in a planned and intelligent manner. Major destruction of hardware calls for new equipment. Labor repair charges usually exceed $60 an hour, with downtime ranging from several hours to a few weeks. Destruction of records forces prolonged and expensive reconstruction from non-computerized data, if it is still available. And a “logic bomb” can destroy costly programs and shut down a system for extended periods while operators search for other “bombs.”
Because the potential for extremely damaging sabotage is so great, computer operations are increasingly viewed as industry’s most sensitive and vulnerable activity. Computer sabotage must be well planned and thorough. The ideal hit would include combinations of the various types mentioned, so that newly repaired or replaced hardware would be immediately shut down by “logic bombs.” The reason for this is simple. Your first hit on any particular target might be your last easy opportunity. Heightened security measures of all types almost invariably follow on the heels of successful monkeywrenching.
Hardware Sabotage
First, locate the target. (See the Software section.) Next, scout the target to determine the physical layout; multiple routes of approach and withdrawal; alarm systems and other security; access points like doors, windows, sky-lights, and air conditioner ducts; and the best hours for a hit.
Select tools adequate to gain access to the (usually) locked facility. Always carry pry bars and heavy screwdrivers in case you encounter unexpected locks that must be forced. Wear clothing normal for the setting, and soft and comfortable shoes with thick rubber soles that do not squeak on tile floors. Because some computer centers are equipped with closed-circuit television (often to monitor the employees), don a hat to conceal your hair, and a bandanna or ski mask to conceal your face. And, of course, wear gloves.
Read the Security chapter, especially Basic Security and Counter-Security, before undertaking an operation of this nature.
Special tools for wrecking computer hardware might include the following:
-
Large screwdrivers. Good for prying open access panels. These must have insulated (e.g., plastic) handles.
-
Small pry bars. Also useful for accessing the guts of these machines. These must be insulated by coating all but the working tip in “Plasti-Dip” (available at better hardware stores everywhere) or several layers of electrical tape.
-
Long-handled axes. To force access to computer rooms, as well as wreak untold havoc once inside, an ax is ideal. The squeamish can substitute long-handled sledge hammers. The disgruntled Freddie can substitute a Pulaski.
-
Water balloons or water bottles. Salt water is far more conductive of electricity than plain water, and salt water is also corrosive. Even after drying out, the salt will remain and continue to corrode circuit board copper and IC pins whenever the humidity is high enough. Make a saturated solution of salt water by adding table salt to hot water while stirring. Add salt until the water won’t dissolve any more. Water balloons can be thrown a distance, keeping you safely away from the computer innards. Water bottles are also useful (and easier to carry). They should be of durable plastic, leak proof, and have wide mouths, like a jar, to allow you to toss the water from a short distance.
Depending upon the size of the computer operation, once you arrive on site you will face a variety of computers, terminals, disk drives, and supporting equipment. Visit a good library or bookstore to familiarize yourself with the appearance of various types of units pictured in countless books and magazines.
Start right away on the largest computers. Pry off access panels until you are looking in at rows of circuit boards (again, study pictures first at the library). Once you have gained access to the circuitry, locate the power switch and turn the unit on. Stand back and toss in your water, frying countless circuits. Most computer circuits do not carry dangerous electrical current, but never take chances. Your distance of a couple feet, the plastic bottle or balloons, and your rubber shoe soles will protect you if the water should contact a higher voltage.
Pour water into terminal keyboards after turning on the power. With disk drives, pour the water in at any handy access point.
You obviously can inflict considerable damage with the ax or sledgehammer, but first pry or pound off the outside panels. It doesn’t do much good to simply dent the exterior.
The cathode ray tube (CRT) of the computer terminal (like a TV picture tube) is a tempting target, but should either be ignored or saved until last. These tubes are costly but carry high voltages. Don’t punch them out with anything but a long-handled tool or other object that gives you a good distance plus the insulation of a wooden handle. Also, the vacuum inside the tube causes them to implode violently when broken, scattering fine shards of glass about the area. The danger to your eyes, if you are standing in front of the terminal when you hit it, is serious. Also, the fine glass fragments can lodge in your clothing (virtually invisible), and stay there until the clothes are laundered. This could mean “wearing” evidence out with you.
If you plan to break the CRTs, take some golf-ball-sized rocks with you, and break them from a long distance just before you leave (be sure there are no fingerprints on the rocks).
Note: Although most parts of computer hardware carry only low voltages, always assume the greatest danger. Even a computer that is turned “off” can have substantial current stored in some components (like the cathode ray tube). Always use well-insulated tools, wear rubber-soled shoes, and avoid unnecessary contact with machine parts or other metal.
Field Notes
-
Few things can do more damage to a computer keyboard or any of a computer’s internal circuitry than the old classic Coca-Cola. America’s favorite soft drink is very acidic, chock full of electrolytes (conducts electricity), and will make keys stick forever. You don’t need to turn the computer on (and expose yourself to the risk of getting shocked, or setting off an alarm tied into the electrical system); Coke will do the work for you. Unless it is cleaned up immediately (which it won’t be if the job is done at night), the victimized mass of transistors will be a loss.
-
If you do pour water into the computer while it is on, or if you smash one with a hammer or an ax, make sure you are not touching anything in contact with the computer or you run the risk of getting shocked. Avoid touching anything that is grounded. If you are leaning against a metal table, your rubber soles won’t do any good.
-
If you aren’t pressed for time, you can open the case to the computer and remove one resistor or another small element. It won’t be obvious what is wrong, only that something is wrong. It is likely that a repairperson will spend a lot of time trying to find the problem before they can fix it, at about $100 an hour.
-
Drop a teaspoon of iron filings into any opening of a computer. This will send it careening off course. Fine sand or clay will serve in a pinch especially if washed down with Coke or Pepsi. Drano or nail polish remover also work well.
-
Small magnetic shavings in data storage will work miracles on the computer memory disks.
-
For the less sophisticated among us, computers do not like to be dropped onto hard surfaces.
-
Super glue applied liberally to a diskette works wonders when the disk is put in its normal position inside the disk drive. Do this to every drive slot; many machines have two drives.
-
To trash the backups: If you see anything that looks like an undersized videocassette (about 4” x 6”), zap it immediately with a powerful magnet or a cigarette lighter. These are the data cartridges used to back up large amounts of important work. This equipment costs about $1000 and looks like a car stereo 8-track player. It’ll probably be sitting on top of or next to the computer itself, and can be trashed just as easily as any other piece of hardware (see above).
Records Sabotage
Computer data is stored on large reels of magnetic tape, or on the newer discs composed of flexible plastic with a magnetic coating on both sides.
With computer information, duplicate records are routinely made by most businesses, particularly when critical data is involved. These duplicates might be stored with the originals, or in a separate room, fire safe, at another building, or at the home of a company or organization officer. Whenever possible, locate these duplicates before planning a hit to destroy records.
Tape reels and disks are stored on various types of shelves, sometimes in ring-binder type holders, special shielded cases (to protect against accidental erasure by magnetic fields), or in fire safes which range from small strong-boxes to multi-drawer cabinets. Although possessing locking mechanisms, these fire safes are essentially just heavily insulated boxes designed to survive fires. They can be forced open with the usual tools.
The best way to damage magnetic tape is to cut into the side of the tightly wound spool with a small sharp knife. You don’t have to cut all the way through. Even a shallow cut through many windings of the tape will prevent it from feeding into the computer.
Disks are usually protected by easily-opened hard plastic cases. Simply gouge the face of each disk. The read/write head of the disk drive operates so closely to the disk surface that a speck of dust can cause it to “crash.” A single deep scratch renders the disk, and the information on it, worthless.
Field Notes
-
Quickly touching a floppy disk with a magnet destroys it.
-
Anyone familiar with tape readers might try attaching a small magnet so it is hidden within the tape’s path so future tapes used on that machine will have their data destroyed. A piece of adhesive flexible magnet strip (available in many hardware stores) stuck near a tape path or near the disk drive slot could also erase data if the media passed close enough to the magnet.
-
To trash 5 1/4” floppies:
-
Fold them in half and wheel a desk chair over them.
-
Douse with any liquid.
-
Stick several pinholes all the way through the disk.
-
Slash through the magnetic film (the black layer inside the protective jacket) with a razor-guaranteed permanent damage.
-
Cover with nail polish remover to dissolve the magnetic film.
-
-
To trash 3 1/2” microdisks (much tougher than their larger ancestors):
-
First, slide back the metal guard to one side, revealing the black magnetic film within the tough plastic casing.
-
Then:
-
Apply hair spray liberally.
-
Apply nail polish remover; Coke and water aren’t as effective, especially since Kodak plans to coat their Verbatim brand with Teflon. Go for the gusto here.
-
Scratch or slash the film.
-
Because computers store information magnetically, passing a powerful magnet over either hard or floppy disks can erase or scramble stored data. One could break in as described above and use a magnet to destroy records and then leave without any evidence of your activity until such material is used later by the operator. It may also be possible to hide a powerful magnet on your person and gain access as a visitor to a company’s or agency’s computer room during normal business hours. By merely walking close to hard or floppy disks with a magnet, you may inflict serious damage on records. This method may not be realistic, however. Any magnet strong enough to wipe out data at more than an inch would attract small metal objects (paper clips) at a considerable range. Magnetic fields follow an inverse square law. That means the magnetic field is reduced by a factor of four for each doubling of the distance between the magnet and the data tapes. A magnetic field at a data tape four inches away from the magnet is sixteen times weaker than if the magnet is one inch away. Eight inches away means a 64-fold reduction in field strength. Any magnet powerful enough to be effective at that distance would draw suspicion when paper clips and ball-point pens start sticking to you.
Software Sabotage
This can entail simply snooping for secret information that can embarrass a corporation or government agency, changing recorded data to create a book-keeping nightmare, or inserting “logic bombs” to destroy data at the time of your choosing.
To undertake these activities, you must first have a working knowledge of computer operation and programming basics. The necessary training is best obtained through community colleges or other state-sponsored schools where the cost is reasonable. If you spend enough time around school computers, you will usually encounter “hackers,” those fabled individuals with an all-consuming passion for computers. They can provide you with an education in the fine art of obtaining access (often illegal) to various computer systems. Pretend to be interested only in computers. Never tell them your real intentions. Many of these people have a love of the machine that would define heavy-duty sabotage as a capital offense. Learn from them, but never trust them.
Once you have an education in computers, attempt to infiltrate the target by applying for a job, or setting up a simulated remote terminal with telephone access to the target computer.
If you operate from the inside, be constantly aware of employee monitoring. More and more businesses are installing closed circuit TV and sophisticated programs that keep logs of all users’ work records, phone calls, and such. Remember also that when insiders are discovered, it is usually because suspicion leads to interrogation and a confession. If questioned, assume that the interrogator is very sophisticated (especially if he or she doesn’t appear to be) and consistently lie. Usually, only those who break down and confess ever get into hot water.
The most you should ever concede under questioning is that you “might have made an error.” About 85 percent of computer data loss is caused by operator error. Ideally, you’ll do your snooping or tampering in a way that can’t be traced back to you.
Entering systems from the outside, or “hacking,” is a complex and ever-changing field. For basic reference in this area, read:
Out of the Inner Circle by Bill Landreth, Microsoft Press, Bellevue, WA. This book is widely available in bookstores.
The Hacker’s Handbook by Hugo Cornwall, E. Arthur Brown Co., 3404 Pawnee Dr., Alexandria, MN 56308. This book may be available at larger bookstores. (Experienced hackers tell us that this book is virtually useless in the United States, but worthwhile in Europe.)
The recently published The Hacker Crackdown by Bruce Sterling describes law enforcement efforts against hackers, while Clifford Stoll’s The Cuckoo’s Egg gives a detailed account of phone tracing used to apprehend a hacker.
Software sabotage calls for locating the remote terminal access for the system (if it has one). Hackers obtain their information from the thousands of “bulletin boards” operated by individuals and computer clubs, from the professional “data retrieval services” set up to provide businesses with reports on competitors (allowing hackers to pinpoint their various operations and narrowing the search for the computer facility), and sometimes by automatically dialing the phone numbers around the known company phone number until a computer answers.
Remote terminal sabotage should usually steer clear of the software that handles a company’s finances since this often has the highest level of security. Other computer functions may be just as critical, yet less well protected since they are not as attractive to thieves.
The most damaging form of software sabotage is the virus or “logic bomb.” Hidden instructions are inserted into the operating program to initiate erasures at a given signal. Further damage can be inflicted by hiding other “logic bombs” in the electronic data files. The storage capacity of computers, coupled with their high speed of operation, can make the detection and neutralization of logic bombs very time-consuming and costly.
Security Tips for Hackers
The primary way to investigate computer hacking is tracing phone calls. You can minimize risk in several ways:
-
Minimize contact with the computer. Some security systems notify the operator when more than three consecutive attempts are made to insert a password (such as when you are trying different possibilities). Obviously, the more times you enter the system, the more chances there are for calls to be traced.
-
Avoid leaving obvious long-distance phone records. Use gateway nodes to access a system through a local phone number. Then leapfrog through several networks and switches before actually linking with the target computer. Initial trace-backs will end at the gateway node where the call goes local. At this point, they will have to stand by and wait for your next intrusion.
-
Make your contact short.
-
Use briefcase portable computers and pay phones to make tracing more difficult. Drive-up pay phones are even safer. Keep it short and leave the area immediately.
-
Use someone else’s phone system. Look on the outside of a house or office building where the phone lines come in from a pole. Find the small plastic box or soft rubber cover on the terminal block. Attach a telephone with alligator clips to the terminals holding the red and green wires. You then become one more phone on that system. In office and apartment buildings, the terminal block is often found in the basement or a closet, protected by a cabinet. Books on phone wiring for do-it-yourselfers show pictures of these key access points.
Be security conscious. Make sure no one else is “in” where you are using the phone line. Keep a lookout.
— Hal
Field Notes
A tremendous source of information about computers and telephone crime, mostly from the side of the hacker or phreaker is: 2600 Magazine, POB 752, Middle Island, NY 11953 (516)751–2600. Subscriptions are $18 per year.
A source for all kinds of quasi-legal electronic gizmos and gadgets (FM transmitters, satellite decoder chips, cable boxes, etc.) is Nuts & Volts Magazine, POB 1111, Placentia, CA 92670. Sample issue upon request, $12 per year.
Another source for technology information is Consumertronics, 2011 Crescent Dr, PO Drawer 537, Alamogordo, NM 88310. A catalog is $2. They have information on hacking, phreaking, fireworks, ATMs, etc.
Beware of using your own address or leaving a paper trail.
Stink Bombs
Stink bombs have numerous applications for the ecodefender. These can range from the introduction of a foul odor into a corporate board meeting during a daring daylight raid, to the introduction of more insidious and lingering substances into offices via small holes in windows during nocturnal operations.
Among the chemicals with potential for stink bombs are the following, which can be obtained from school laboratories and over-the-counter chemical supply houses:
-
Carbon disulfide
-
Hydrogen sulfide (smells like rotten eggs)
-
Skatole (feces smell)
-
Ethyl amine (fishy smell)
-
Proprionic acid (sweat-like smell)
Butyric acid will make a remarkably effective stink bomb. This is a weak acid (not dangerous) with an incredibly powerful stench. It smells like vomit and thus is particularly appropriate for expressing opinions about land rapers. Only a very small amount is needed — 2 drops will befoul a room. An ounce will perfume a building. The odor is resistant to cleaning and lasts for weeks.
Because of its power, delivery can be a bit of a problem. A medicine dropper can be used, but I use a hypodermic needle and syringe. This allows small amounts to be delivered into areas difficult to enter (through the rubber seal around a truck window, under an office door, etc.). This also keeps the liquid off your hands — important, not only because it is incriminating but because it will dramatically hurt your social life. The best solution for spills on clothes is disposal.
The main problem with butyric acid is acquisition. It is used in some tanning processes, manufacture of lacquers, and organic syntheses. It can be purchased through industrial chemical suppliers or scientific supply houses. It is not a controlled substance — no police records are kept. It commonly is stocked by college chemistry stockrooms and some high school chemistry classes. Collaboration with an instructor or graduate student at your local college chemistry department might enable you to get some. You don’t need much — the stuff is so powerful that a quart is a long-lasting supply for even the most ardent enthusiast.
Butyl mercaptan makes an effective stink bomb. This chemical is used to make natural gas odorous so that a leak can be discovered, and in higher concentrations has the odor of skunk. It comes from chemical supply houses sealed in glass. If opened, it needs to be resealed with a gas flame. A small container, broken in the ventilating system of a building, will evacuate the place. But it will not stay long, and will soon be flushed out without harming anyone. Hatpin, a self-defense catalog for women (Hatpin, PO Box 6144, Santa Fe, NM 87502) sells “Repulse,” a small glass vial of butyl mercaptan and a second vial of “neutralizer.”
Pet and veterinary supply houses (check the yellow pages or the ads in national dog magazines) sell “animal trail scents” and “breaking scents.” These often foul-smelling liquids are used to train hunting dogs. Sporting goods stores often sell skunk sprays in small aerosol cans, used by hunters to mask their scent in the field.
Also, don’t neglect to visit the stores found in most large cities that specialize in novelties, jokes, magic tricks, and the like (look in the yellow pages under “novelties” or “costumes”). Here look for “gags” like “Fart Spray,” a wonderfully obnoxious 4-oz. aerosol. Read the labels closely, though. Some of these aerosol sprays are just room fresheners with funny labels. The truly foul-smelling ones usually say so on the label. Some of these gems are available through mail-order houses like Funny Side Up, 425 Stump Rd., North Wales, PA 19454. As in any inquiry or order to a mail-order house, use all security precautions. It is not inconceivable that some mail-order addresses given in Ecodefense are fronts for law enforcement agencies hoping to ensnare monkeywrenchers.
— Mr. Wizard
Field Notes
-
Most laboratory grade butyric acid can be diluted with tap water by five or ten to one, stretching its use without diluting it overmuch.
-
Feed and tack stores and home improvement centers sell a useful fly trap. The bait is a small bottle of putrid concentrate (sexual attractant and rotting meat) that sells for less than $3 at discount stores and up to $6 at feed stores. This stuff stinks like hell and draws flies like crazy.
-
Jewelers use a compound called liver of sulfur to make silver turn black. It stinks like the worst fart ever expelled and is activated by dropping a small quantity into a glass of water. It is available at jewelry/metal working craft supply houses. Use it in large doses to clear the offices of your favorite bureaucrats.
-
Besides butyric acid, caproic, capryllic, and caproanic acid all smell like goat. One standout in the field is n-butyraldehyde, a sublime melange of vomit, goat, sweat socks, babyshit, and bilge water. As long as we’re ruining backhoes and earth movers, why not try n-butyraldehyde there? In the engine block of a Caterpillar (or an executive limo or Lear jet) it does not go away. A drop or two of this stuff will last for six months or more. Almost no one would be willing to drive a machine which smelled like n-b, and the resale value is naught. Isovaleric acid is even more revolting than n-b.
Stink Grenade
This device is an adaptation of an aerosol spray can, making it usable as a “grenade,” which can be thrown and will discharge its contents while the monkeywrencher escapes the premises. It can be used effectively with such commercially-available aerosols as hunters’ masking skunk sprays and novelty “fart” sprays. The mechanism is basic and highly adaptable. (The design illustrated is approximate, since size and shape of cans will vary.)
As a safety precaution, wipe all parts free of fingerprints before beginning assembly. Wear rubber gloves while assembling. When putting the mechanism together, wear safety glasses or goggles to protect your eyes from accidental spraying.
To change an aerosol spray can into a grenade, first remove the spray nozzle head (a) and with the aid of a C-clamp, glue it to a short (3/4 inch to 1 inch) length of 1 /2 in. diameter wooden dowel (b) and a large, wide rubber band (c). The common cyanoacrylate “super glues” are ideal.
After a day’s drying time, stretch the rubber band around the aerosol can and glue securely to both sides of the can (d). If necessary, the rubber band can be cut and the C-clamp used to hold it in place for gluing. The idea is to have a lot of tension on the rubber band when the spray nozzle head (a) is reinstalled.
After another day for the glue to set, install the spray nozzle along with the modified cap as pictured. The soft plastic cap has been modified with three simple cuts (e), one window to allow the spray out, and two smaller notches to accommodate the rubber band. The cap is not glued in place until the mechanism is tested and found to work. Before re-assembling, install a safety “pin,” such as the nail (f), through a hole drilled in the wooden dowel. The pin holds the nozzle head up just enough to prevent it from spraying. This is a fine adjustment and must be made carefully. The spray nozzle must fit snugly in its hole in the can without accidentally going off.
The rubber band does not provide enough pressure (usually) to push the spray head down. Its purpose is to hold the spray head down after you push on the end of the dowel. This allows you to drop the “grenade” and leave, knowing the entire can will discharge. Test the mechanism out-of-doors for a second or two to insure its proper functioning before cementing the cap to the can. While assembling, never allow the spray nozzle to point directly at you or your clothing.
Once you have a working spray you can do one of two things with it — glue the can to a flat wooden base, causing the can to stand upright while discharging, or glue on a piece of stiff cardboard as shown in (g). Note how the cardboard protrusion prevents the can from rolling to a position that discharges the spray into the ground or floor.
As a final step, carefully glue some cheap, coarse burlap to the smooth exterior surfaces of the can and cap. This burlap will not take fingerprints and allows you to handle the “grenade” without leaving any fingerprints on it.
Deliver the stink grenade to the target site in the pocket of a cheap cloth coat or jacket bought at Goodwill or another second-hand store. Casually drape the coat over your arm. Throw the garment away if should it accidentally become contaminated with the odor. A cheap woman’s handbag or shopping bag will do, but only if made of cloth (to keep from leaving fingerprints — avoid leather, naugahyde, or plastic).
Drop the stink grenade to the floor just inside the door to an office or meeting room, in the fur section of a department store, or wherever appropriate. Walk away casually and leave the building immediately.
— the Sorcerer’s Apprentice
Smoke Bombs
Smoke In Their Eyes!
Many times the object of an act of ecotage is to disrupt or delay an activity. A very useful tool in the monkeywrencher’s bag of tricks is the smoke bomb or smoke grenade. A wide variety of these are available to the public with no legal restrictions on their purchase. These devices are safe to use and offer the imaginative monkeywrencher many options for upsetting the activities of the greedheads who damage Earth for fun and profit.
Although it’s possible to make your own smoke bombs at home, this is not recommended for two reasons: 1) if you do it wrong the things won’t work, and 2) if you really do it wrong you blow yourself up. A wide variety of smoke bombs and grenades can be bought by mail with no record or legal hassles. The commercially-produced devices come in two basic types. The first type is designed to be ignited by lighting the fuse. The second type is designed to function like a hand grenade. The user pulls a pin and the device self-ignites several seconds later. These devices generate very large amounts of smoke (anywhere from 3,000 to 115,000 cubic feet), and will make smoke for up to ten minutes. These smoke bombs and grenades even come in a variety of smoke colors. White, gray, red, green, yellow, and violet are available. To give you an idea of the quality of smoke produced, burning crude oil has a TOP (Total Obscuring Power) rating of 200; some of these devices have a TOP of 2100.
How To Use Them
The most effective use of these devices is in booby traps and ambushes. Both of these uses allow the monkeywrencher to be safely away when the crap hits the fan. Examples: R.J. Hardhead calmly seats himself in the driver’s seat of his dozer ready for another day of tree trashing. He is unaware of a fine piece of fishing line running from his dozer blade to the smoke grenade taped securely under the dozer. As R.J. starts up and lifts the blade, the grenade pin is pulled loose and the dozer and a very confused driver are swallowed in a large cloud of green smoke. After the smoke clears, he and his buddies waste even more time figuring out what happened.
A Motorhead, ace cross-country motorbike racer, surges into the lead at the Annual Dirt Maniac Race. He doesn’t notice the thin nylon line running from a firmly-planted stake to the pin on a smoke grenade taped to another stake a few yards away. As he and dozens of others yank the pins from these scattered grenades, clouds of multicolored smoke fill the air, forcing those behind them to stop short or risk kissing an unseen cactus or rock.
The smoke bombs with fuses can be used as in the first example but the fuse needs to be taped to a part of the machine which gets hot enough to ignite the fuse (exhaust pipe or manifold).
These devices aren’t cheap but when used well they’re worth a lot. Besides after you’ve gotten R.J. and his buddies paranoid, think what a beer can painted the color of your smoke bombs (and hooked-up to make them think it’s real) will do. By the time they get the bomb squad out there to collect the evidence, they’ll have wasted an hour or more. Then when they start up something else; poof! goes the real one. Be creative. Rig the porta-john door. Use them for early warning devices on protests to slow the bad guys down and to let the protesters know where they are.
Keeping a couple of smoke grenades on hand to toss out the window while fleeing the scene of an act of ecotage is a good idea too.
The use of smoke bombs and grenades is a very easy and effective method of ecotage that poses little risk of injury to either man or machine. Other than causing panic and high blood pressure, the smoke does not hurt people. Care should be taken with these devices, though. There is no point in saving a forest from the bulldozer by accidentally burning it down. A number of available military handbooks detail the uses of these devices. Check your local military surplus shop or a paramilitary mail order store for copies.
— Mooncrow
Information Sources:
Bill More Publications, PO Box 1600, Cottonwood, AZ 86326
Paladin Press, PO Box 1307, Boulder, CO 80306
Smoke Device Sources:
Superior Signal Co., Inc., PO Box 96, Spotswood, NJ 08884
Yankee Manufacturing Co., 59 Chase St., Beverly, MA 01915
Aztec National Inc., Suite 341, Jimmy Carter Blvd., Norcross, GA 30093 Phoenix Systems, Inc., PO Box 3339, Evergreen, CO 80439
Field Notes
-
As always, be extremely careful when mail ordering anything used for monkeywrenching. Leave no paper trail.
-
All fur shops are equipped with smoke detectors and sprinkler systems. A smoke bomb set off in a fur shop will set off the sprinklers and cause expensive damage.
Jamming Locks
One extremely effective means of hassling all sorts of villains is jamming the locks to their places of business or to their machines of destruction. Calculate the number of hours between your hit and the time when employees will first attempt to gain access to the building or equipment. Select almost any hard-drying glue or adhesive that will set-up within this time. The “liquid metals” are very good for this. Before the operation, cut or drill a hole in the screw cap of the glue tube so that the contents will come out in a stream thin enough to enter the lock’s keyway. Cover this hole with a piece of tape until you are ready to use the glue.
Conduct the usual scouting of the target, establish a plan and prepare all your equipment in the standard manner to assure that no fingerprints, fibers, or other evidence are inadvertently left at the scene. The drop and pickup method of delivery is usually the safest. (See the chapter on Security.)
Clothing worn should blend in with the locality and season of year. Gloves can be rather conspicuous in warm weather, so get some of the thin, tight-fitting surgical-type gloves used in hospitals and some food service establishments. At night they pass for flesh even at short distances (for white folks). If you are working in daylight, you may want to coat your fingertips with clear fingernail polish to avoid leaving fingerprints. If so, carry fingernail polish remover.
When actually jamming the lock, stand close enough to avoid ready observation by passersby. Force as much glue into the lock through the keyhole as you can, but don’t smear it on the padlock or door knob. Carry a paper towel to clean up any excess so there is no evidence to alert a passing security guard or policeman before the glue has set. (Of course, remove the used paper towel from the scene and dispose of it safely.)
Tapered hardwood shims can also be jammed into the keyway and broken off. A small screwdriver can be used to force the wood farther into the lock. Properly executed this can accomplish the same basic mission as the adhesive/glue technique — necessitating the summoning of a locksmith to gain access. It does not cause permanent damage to the lock mechanism, however, as does the glue.
Lastly, make sure that all entrances are similarly jammed. This may seem obvious, but out-of-the-way entrances are often neglected.
— Belle Starr
Field Notes
-
Instead of worrying about hardwood shims for jamming locks, try flat toothpicks: Stick one about halfway into a lock, break it off, and jam it in with a piece of wire or another toothpick. Repeat several times until you can’t fit any more in. This is as effective as hardwood shims; since the typical person will not be able to remove the toothpicks, a locksmith or pair of bolt cutters must be summoned.
-
A very quick, efficient, and unobtrusive lock jammer can be made from a paper clip. Simply bend one prong of the paper clip out at a 90 degree angle with a little hook in the end. Insert the hooked end in the keyway channel and twist so the hooked end breaks off and remains in the keyway channel thus preventing a key from being inserted.
-
Super glue is the best way to jam a lock, especially a cylinder lock. Toothpicks placed in the slot are usually pushed aside or can be retrieved with a small pick. After super glue is put in a lock, you cannot even hammer the key into the slot. It is fast and easy. Super glue must have some moisture in order for it to set. In areas of very low humidity, you need to merely blow into the slot first to make it damp enough in the lock for the glue to set. After supergluing, the lock cannot be repaired.
-
Lock jamming is effective for closing roads with locked gates or seasonally bolted barriers. Often, there are so many locks and keys for various gates (especially on checkerboarded public and private lands) that a logistical nightmare has been created. Government employees after driving two to three hours on a washboard dirt road only to find that they can’t get a gate open are inclined to take the rest of the day off. One observer noticed them coming back three days in a row trying out different keys. Many locks are routinely left open out of convenience and laziness. Often this is concealed from prying eyes by the welded steel bell that protects the locks from ORVers, hunters, and other riff-raff. You can snap the lock shut and then jam it, or you can replace it with a different but similar lock. Many road closure barriers are just highway guardrails with heavy bolts and no locks. Whacking the bolt with length of silent, hollow pipe makes the nut impossible to remove without a cutting torch.
Disrupting Illegal Activities
It is quite possible that you will chance upon others committing illegal acts, environmentally harmful acts, that is. You should do everything you can (without jeopardizing your own security) to see that these offenders are brought to justice.
A common illegal activity you may observe in rural areas is the dumping of toxic wastes. Be especially alert for this if you live or are operating in an area with chemical plants and the like. Signs of illegal dumping include tank trucks or closed trucks (concealing large drums) leaving industrial plants after dark, or driving along deserted back roads (especially if creeks or rivers run nearby). In some parts of the country secluded sites in the desert are favored by dumpers.
If you see illegal dumping, carefully monitor the activity, using proper surveillance techniques. Information and evidence obtained should be passed anonymously to both state police and state environmental control officials. However, be careful. In many areas, the illegal disposal of industrial wastes has become a lucrative business for organized crime. These people will not hesitate to use violence to protect their interests. Do not discount the possibility that local police might be “on the take” — receiving bribes to look the other way. Always practice security measures to protect your own identity.
In the Southwest, monkeywrenchers might come across cactus poachers. Watch for two or three individuals, usually in a jeep or pickup truck, driving slowly along back roads, jeep trails, and even newly bulldozed subdivision roads. Look for signs of fresh digging in the area. If you witness the poachers digging cactus, or come across parked vehicles containing untagged cactus (cactus obtained legally under permit will be tagged), you might disable the vehicles (three or more flat tires should do it), then call the sheriff’s office with an anonymous tip.
In certain National Forest areas, illegal timber poaching and commercial fire-wood cutting are major problems. Use similar tactics as with cactus poachers. Gather evidence surreptitiously, disable vehicles if you can do it safely, and make an anonymous tip to the authorities.
— George Maledon
Trash Return
Here’s one that makes for a great hobby and might even be legal!
Scattered along the back roads of America, countless thousands of privately dumped trash piles blight the land. Civic-minded and neighborly citizens should consider returning these “lost” items to their rightful owners. Since “wildcat” dumping is illegal in most areas, the previous owner must have “accidentally” dumped his possessions there.
Dumping of organic matter is often legal, however, and in most cases, is not bad for the land. Piles of grass clippings, tree trimmings, etc. should simply be scattered about to hasten their return to the Earth. Brush piles left intact can provide good shelter for wildlife, so use your best judgment.
What one sees most often on the back-roads, however, is trash: paper, glass, cans, plastic.... Even a moderately enterprising sleuth (moderation in all things) can find the identity of the original owner by searching through this type of refuse. Discarded envelopes, letters, magazine address labels, and assorted junk mail usually betray the dumper. In the interests of fair play, you should find several such clues before firmly deciding on your target.
To return the material, collect empty boxes from behind your local supermarket and fill them (not quite to the brim) with the offending matter. Although returning illegally dumped garbage is probably not illegal, you should take all the usual precautions. The evidence you leave on this type of endeavor may lead investigators to other, more illegal, activities. Besides, you may inadvertently return some garbage to the chief of police or the county sheriff. Pick up your grocery store boxes after dark (in the early, not suspiciously late, evening) and always wear gloves when handling them and the garbage. This type of activity is good teamwork training for more serious capers later.
Scout your target thoroughly. Map the neighborhood, and make sure that your wheelperson knows every way in and out. Every way. You’ll understand why soon.
Plan your mission for the evening hours. In the wee hours of the morning there’s usually so little traffic that you would stand out and draw the attention of patrolling gendarmes. Dress your team accordingly: dark clothes, gloves, and possibly hats (to hide your hair and to keep it out of your face). If you have a choice of vehicles, a pickup truck is best. The ideal team consists of one driver and two dumpers. More than this will get in each other’s way and will not fit comfortably (and perhaps legally) in the cab of the truck.
Just before making your run at the target, have one team member use a canteen of water and a little dirt to make mud to smear on your license plate. Daub a little on the bumper so it’s not so obvious that it “accidentally just got on my license plate, officer!” Save some water to wash it off later. If you do this a lot, you may want to periodically spray the plate with a couple of light coats of a clear spray varnish. This will protect the paint from the abrasion of the dirt and mud, which otherwise will eventually start rubbing off the paint.
Cruise by the target at least once to make sure the coast is clear. You can drop off a lookout in nearby brush to quietly observe for about ten minutes and make sure no witnesses are about. Make your final approach run at normal speed and brake normally. (Once our driver was so wired-up with nervousness that she careened into a U-shaped gravel driveway in front of the target house, slammed on the brakes, and put us all — two of us riding unprotected in the back — into a four-wheel skid sideways that brought us to a grinding halt only inches from some steel posts set in concrete.) If possible, dump the trash while remaining inside the bed of the pickup. If necessary, one person can hop out and dump the boxes that the other hands to him or her. Usually we leave the boxes at the scene, since they’re clean of fingerprints, anyway. (We rarely get them from the same dumpster twice since that might facilitate attempts to trace us.) Besides, the poor slob who gets his trash back will need something to put it in!
After returning the trash, promptly leave the area. We were once pursued by the irate trash recipient and only our knowledge of the neighborhood enabled us to elude him without heading down any dead end streets (which are common in suburban neighborhoods).
As soon as it’s safe, get everybody back up in the cab and wash that filthy old mud off your license plate, for chrissakes!
— Norton
Field Note
Keep in mind that scattering organic debris like plant trimmings in a natural area could lead to the sprouting of exotic plants. Avoid this!
Mountain Bikes
There are many places where mountain bikes (and especially some of the dildoheads who ride them) do not belong, but mountain bikes can be useful to those who use extralegal means of defending our Homeland from the Mad Machine. The bikes are light, quiet, portable, and will go almost anywhere. They do of course entail costs and hard physical labor. The following is a guide to help you use the mountain bike effectively in your ecodefense operations.
Getting Started
For those with limited off-road cycling experience, I suggest reading some of the books on how to buy, equip, and ride a mountain bike. Pay special attention to the sections on carrying gear. For non-camping outings, you will still need a sturdy rear rack, tool kit, tire pump, a set of rear panniers, and either thorn-proof tubes or a tube protector like “Mr. Tuffy.” Be sure you have “full knobby” tires. Many mountain bikes have tires with a raised middle ridge. These tires roll easier on pavement, but have limited traction on dirt. Choose tires appropriate for your area.
Advantages of Mountain Bikes
Unlike cars or motorcycles, mountain bikes are easily carried by people or cars. A group of people and bikes can be brought to within 10 miles or so of a work site in a van or truck, dropped off, and picked up someplace miles away. A bicycle can also be easily carried across washed-out sections of roads, or lifted over fences and gates.
Bicycles can be easily hidden in the field, which is important when one is in a “closed area,” or does not feel like making explanations to “authority figures.” The bikes can be stashed in the bushes (be sure you remember where!) for a quick getaway after an action. A person on a mountain bike can quickly scout out access and exit routes (most Freddie maps don’t show all of the logging roads, jeep trails, and connections). Most people in good shape can ride 20 to 50 miles in a day depending on terrain. Just about any jeep road or logging road can be ridden, along with many below-timberline hiking trails (see Editor’s note) without too much pushing and carrying. Stay off Wilderness Area trails and any steep, erodible trails, please! (Unless in a real emergency.)
Disadvantages of Mountain Bikes
Mountain bikes can make ecodefense easier, quicker, and safer, but they won’t work in all situations and a good mountain bike is expensive, from $300 to $1,200 for the 15-speed low-geared light bikes. Not all of us are renegade yuppies with that kind of money. Some bikes in the $250 to $450 range, which aren’t as chic, work adequately on the trail. Also check for used bikes.
Mountain biking, especially with a load of gear, can be very hard work. Unlike pavement riders, mountain bikers must continually watch the road (or trail) ahead for loose rocks, ruts, holes, etc. A crash while on the job would be no fun! This makes it hard to see or hear someone watching you from off the road.
Unless you’re a shaved ape, you probably won’t be able to carry many tools. Most mountain bikes weigh about 30 lbs., and you probably won’t want to carry more than 30–40 lbs. of water and gear.
Consider the type of terrain in your area. If roads and trails follow sandy washes, or if they are frequently covered with deep, slick clay mud, you’re better off walking or riding a horse. Loose rocks can be a lot of extra work.
Security
A very important consideration is not implicating yourself or your bike in any “wrongdoing.” Paint everything on your bike flat black or camouflage. Wrap brake handles and other non-paintable areas in cloth or duct tape. Shiny paint and chrome can reflect headlights and sunlight. Remove all reflectors (replace them for legitimate night riding).
Make as little noise as possible. Curse quietly if you do an “endo,” or get stuck hub-deep in water or mud. Prevent the chain from slapping against the frame. Be sure all tools are wrapped and secured so they don’t clink against one another as you ride the bumps. Unfortunately, mountain bikes can leave very distinct tracks. You do not want to be stopped with a muddy bike whose mud and tires match tracks left near a “boat anchor.” A solution to this would be a stretch rubber covering with a different tread pattern which could be put on over tires and hidden after each action. Unfortunately, such a thing is not available. Changing tires after an action would be awkward and difficult to do in the field, and dragging brush behind you wouldn’t work on clay soil. Other ideas on this problem are needed.
Finally, a word about night work. This should only be done on moonlit nights or on a road or trail you’ve ridden at night before. A generator-type headlight gives enough light by which to see, but the generators make pedaling more difficult and are noisy on most mountain bike tires. A headlamp may be better, but any such artificial light is conspicuous.
— the Mad Engineer
Editor’s Note
While we do not approve of the use of wheeled vehicles of any sort on mountain trails, and certainly not in Wilderness Areas, we do think that mountain bikes have great potential for the ecodefender, especially as a rapid and silent means of getting around on all those thousands of miles of Forest Service logging roads. One should take certain security precautions, however.
Tire prints would constitute serious evidence if an eco-raider were ever apprehended, even long after the fact, as long as that person still possessed those tires. Since getting rid of bike tires after each “hit” would be an expense beyond the means of all but the richest eco-warrior, we suggest that mountain bikes be used only to ride to the general vicinity of the work site. The bikes then could be hidden and the ecoteurs would go the rest of the way on foot. It’s cheaper to replace shoes than tires. It might be wise to learn what are the most popular tires in an area and use only those. Tracks may be traceable to individual tires, however, and not just types.
Field Notes
-
If you have several minutes to spare after a job, the best thing to do is change your tires. Either have extra tires stashed or carry them on your bike or person. Foldable tires with a kevlar bead are best, but cost $25–30 each. It’s a good idea to invest in these since they are compact and light, and can be hidden between hits. If you don’t want this expense, look in dumpsters behind bike shops for free regular tires. Check regularly for used but still usable tires, and, after a job or two, ditch them in another dumpster far away. Don’t tell anyone about your tire source or it will dwindle.
Quick release hubs are best because they enable you to remove a wheel quickly and without a crescent wrench. Changing your whole wheel set is quicker than changing tires. Upon reaching your hidden replacement tire after a job, you need only flip your bike over, change wheels, and take off. Practice! Make sure both wheel sets have rims of similar widths, or you’ll have to adjust your brakes. -
Keep gear and braking systems properly adjusted. Escape time can be lost if shifting and braking are not smooth and quick.
-
Before a job, rub down your bike with mud to cut down on light reflection.
-
Wear a dark-colored bike helmet or other protective headgear. Limited visibility and rough ground invites falls. Since much bicycle clothing and equipment has reflective patches to make a rider visible, check your gear and cover any reflective patches with non-reflective tape or other material.
-
Prevent chain slapping with rubber strips designed for this purpose. Handle bar tape wrapped around the chain stays also works.
-
I do some monkeywrenching from the back of my horse. I carry a few items of clothing (wrapped in plastic) under the saddle for a quick change, a light “tool kit” under the fenders (rustlers’ traditional hiding spot for running irons), and some water soluble white paint for camouflage — my horse has been an Appaloosa, a paint, and had one to four white stockings.
— Tonto
Chapter 8: Propaganda
Propaganda — psychological warfare — has been around ever since the early agricultural cities of the Fertile Crescent began quarreling and pushing each other around. Half of your battle is won when your enemy is afraid of you.
Propaganda is a good way for the monkeywrencher to not only present her message to the public, but also to cause sleepless nights for the black-hearted Freddies, developers, subdividers, gutless politicians, sleazy advertisers, and others. Besides the well-known act of cutting down billboards, other entertaining ideas in this chapter can leave the evil ones sweating and sleepless in their beds.
Advanced Billboarding
Monkeywrenchers are rarely called upon to enforce the law, but with the lack of proper enforcement of environmental legislation, vigilante action is increasingly easy to justify. A clear-cut case is the subversion of the 1965 Highway Beautification Act by the outdoor advertising industry. This law, intended to eliminate the roadside clutter of billboards, has been systematically gutted by an industry that flouts environmental and highway safety concerns. Although American taxpayers have spent millions to pay for the removal of these eye-sores, the sign companies have gone so far as to use the tax dollars paid them to remove signs to erect new signs. Billboard industry lobbyists in Washington have insured that appropriations for sign removal are pared down to the level where new sign construction outstrips removal by a factor of three to one.
Several factors underscore the civic-minded nature of billboard-cutting.
First, all billboards within 660 feet of the highway are technically in violation of federal law, although the sign companies have unabashedly used loopholes to circumvent enforcement.
Second, with unprecedented federal budget deficits, Congress is not likely to allocate tax money sufficient to the task. The billboard-cutter will not only aid in law enforcement, but will contribute to the patriotic task of keeping a lid on federal spending. In addition, every time a billboard falls, a landscape is created.
Last, and perhaps most important, studies in Minnesota and New York have proven that sign-free highways are safer. The incidence of highway accidents was found to be related to the number of billboards and the distractions they provide to drivers. In short, roadside advertising is a threat to public safety.
The clandestine battle against this roadside blight began in 1958 as the billboard lobby successfully defeated an early attempt to regulate signs. In June of that year, unidentified billboarders, enjoying popular support, cut down seven signs outside of Santa Fe, New Mexico. A dozen years later, a group called the Billboard Bandits systematically sawed down close to two hundred signs in Michigan. These six high school students, one a senior class president, were arrested in mid-1971 for destroying numerous billboards. They were stopped on the main street of a small town where police found a saw and an ax in the trunk of their car. After a failed attempt to prove the signs (not the sign cutting) illegal, the youths pled no contest to one count of malicious destruction of property and each was given a suspended jail sentence, three-and-a-half months probation, and a $150 fine.
The lessons from this case are many. Six young men driving through a small town at night will likely draw interest from the police anywhere. In the previous three weeks, 35 signs had been downed in the area, and police were on the lookout for suspects. This case shows clearly why tools not in use must be locked away. When police ask to search your vehicle, the answer must be a polite but firm “No.” They may threaten to take you to jail or hold you until a search warrant can be obtained, but you must not give in to this intimidation. Once you consent to a search, anything found can be used to convict you. If the police conduct an illegal search, any evidence found can be excluded from use against you. (On the positive side in this case, by pleading “no contest,” the teenagers avoided an admission that could have led to a civil liability.)
Other billboarders active in the early seventies included “Americans for a Scenic Environment,” who once replaced a downed sign with a small tree. During 1976–77, the “Vigilante Sign Committee” in Jackson, Wyoming, dropped every highway billboard in Teton County. In Arizona, a group called the “Eco-raiders” cut down numerous billboards around Tucson. According to one member, “If enough billboards are cut down, it will become prohibitively expensive to advertise that way.”
Effective sign-cutting requires a three-member team: a driver and two cutters. With four, your cutting team can have a lookout who can alternate with the cutters in shifts. A five-member team is the largest size for safe operations and permits two teams of cutters and consequently faster work at the target site.
Only work with friends ideologically committed to uncompromising defense of Earth. Billboarding is excellent preparation and training for more advanced forms of monkeywrenching. Those simply looking for excitement and action lack the necessary depth of commitment. All must be willing to study, learn, and discuss the essential issues facing all Earth defenders.
Target Selection
Your first billboard raid should be an easy target in a remote location, far from any houses, but with good access. Limit yourself to one sign the first few times out. Group morale is built upon success, so insure that the first few jobs come off without a hitch. Only after learning efficient teamwork should you consider more complex targets like billboard clusters, lighted signs, or sign company headquarters in urban areas.
Once you are ready to begin your sign-cutting campaign in earnest, commence information gathering. Map your potential targets in enough detail that you need only a quick drive-by to confirm the current accuracy of your data and to note any changes. This limits your exposure to possibly suspicious people while scouting for new targets. Land owners who rent space to sign companies, as do many farmers and ranchers, will be on the alert once the signs begin dropping. Get information as far in advance as possible.
Avoid operating in one area excessively. Police, security guards, and beer-guzzling posses will be alerted and may stake out possible targets in the hope of apprehending you. It’s best to hit several signs in an area one night and wait at least a few weeks before hitting the area again. Time is on your side and there is no shortage of targets. Wear the opposition down slowly.
Some billboarders favor crosscut saws, the type used by loggers of old. Others use a D-frame (bow) saw commonly found in hardware stores. If you use this type, carry one or more spare blades. An ax can be used to notch the poles on the side of the intended fall, but be careful of the noise, especially near houses.
Safety
Safety in billboarding is of utmost importance. Think of the sign as a giant fly-swatter and yourself as the bug. Never stand in the area where a sign can fall (front or back). Watch a sign closely the entire time you are cutting. Leave the outermost poles for last.
A good pair of safety goggles, available at hardware stores, stops sawdust from getting in your eyes. Goggles are essential for contact lens wearers. Remember that goggles are reflective. Always pull them off your face before looking at passing cars.
Sign-Cutting
Use the drop and pickup technique described in Basic Security in the Security chapter to get to the target sign.
When sawing, duck while cars pass if they can see you in the periphery of their headlights. Stop periodically to listen for any indication of discovery.
Felling is accomplished by pushing on the outermost poles, aided sometimes with ropes. See the illustrations. Use the rope(s) only for monkeywrenching since you may have to abandon it if your work is disrupted — you don’t want it accumulating fibers, dirt, and oil stains that can link it with your home or work-place. Store it in a plastic trash bag between jobs.
Dropping a billboard face-up will allow you to inflict additional damage by spray-painting across the front of the advertisement.
Sign companies are adding protective metal strips to the sides of wooden poles to prevent cutting. Carry a crowbar to remove these; or where possible, dig dirt away from around the base of each support and cut the wood below the protective metal.
Billboarding is dirty work. Evidence that may remain with you may include bits of brush on clothing, and dirt and sawdust on boots. If you wear dark coveralls, remove them before the pickup and wrap your tools in them. Deposit this bundle in a locked trunk or camper shell in case you are stopped by a curious policeman. After a night’s work, clean off your boots and launder your clothes. Vacuum your car trunk, seats, and floor carpets. Drop the vacuum cleaner bag in a dumpster or public trash can, never in your home trash.
Metal Posts
Metal posts are becoming common, no doubt partly in response to the popularity of billboard monkeywrenching. A skilled team using a cutting torch could probably fell the smaller ones, but security problems would make this method extremely hazardous. The larger ones, which have a single tubular steel post sometimes several feet in diameter, are simply not practical for felling.
These billboards are susceptible to other forms of monkeywrenching, such as paint bombs and slogan alteration (described later). In addition, most large billboards are lighted at night, and may have an electric meter and one or more electrical boxes affixed to one of the posts. Smash the meter and boxes with a large rock or sledge (stand back and be careful not to electrocute yourself).
It has been suggested that tubular-metal billboard posts could be rusted out with acid. Muriatic acid (an impure form of hydrochloric acid sometimes used as a swimming pool cleaner) and battery acid (sulfuric) have both been suggested. A clay dam could be constructed around the post to contain the acid, or a hole could be drilled into the post and the acid poured in. This technique has not been field tested, as far as we know.
Other Targets
The headquarters of sign companies, located in every urban area, provide other targets. Additional techniques discussed in Ecodefense may prove suitable for making your point at these locations.
You might also plan action against the businesses that buy the billboard advertising space. Give them a warning, by phone, several months in advance. When the deadline passes and no remedial action is evident, bide your time since this will be their time of greatest vigilance. Do not contact them by phone again since they might tape record or attempt to trace a second call. Strike a few months later. A variety of actions, ranging from egg-throwing at a car dealer’s latest models to lock-jamming, might discourage an advertiser from using the towering eyesores that make our highways unsafe.
Chain Saw
The use of chain saws for billboarding is usually too dangerous due to the incredible racket they make. Nonetheless, extremely remote signs (miles from the nearest dwelling) and masking weather conditions (wind blowing strongly or heavy rainfall) have brought out sign-cutters armed with these labor-saving devices. One must be particularly alert for passing cars when using a chain saw.
Safety is the primary consideration with chain saws, regardless of their use. Before using one to fell a sign, you should be able to operate it safely blind-folded, since the dark of the night adds to the danger. This is not a tool for novices. You should wear a safety helmet, goggles, heavy gloves, and steel-toed boots.
With your first cut, remove a wedge of wood from the side towards which you want the sign to fall. Repeat this on all poles, always starting in the center and working out to the ends. The “felling” cut is made as shown in the illustration. Don’t cut through the “hinge” of wood between the two cuts. Always cut the outer poles last because they will support the sign while you work. Wear ear protectors to prevent the whine of the saw from deadening your ability to detect suspicious sounds. Remove them during security pauses to ensure that your work is still undetected.
The nation is ready for a new generation of “highwaymen.” Billboard vigilantes are needed now more than ever.
— Michelangelo
Field Notes
-
Axes might leave microscopic marks on the wood that can be matched to a specific ax in the possession of a suspect. Saw marks, on the other hand, are usually impossible to match up. Like files and grinding wheels, their surfaces are constantly changing, and so are the marks they leave.
-
Some billboard bandits have made their own chain saw mufflers. These have been four times as large as the stock muffler, but absorb almost the entire engine sound — 90 percent quieter. If you’re mechanically inclined, you might try making your own heavy duty muffler.
-
Billboards should be chopped up after felling. Otherwise, they are just put back up. The best method is for one person to split it down the middle with an ax. Others should stand far away. It is too dangerous to have a couple of people wielding axes close together in the dark.
-
Watch out for guy wires coming down from large billboards. They are difficult to see in the dark. Billboard bandits running to the next billboard or away from car lights have run into these and suffered injury.
Billboard Trashing
Billboards and other targets can be “painted” by the following simple method:
From a large paint supply store or hardware store, buy a gallon of a common brand of oil-based house paint and a gallon of paint thinner. Select a light color for dark targets and vice versa. From a grocery store buy several pairs of latex gloves and the thinnest sandwich-type plastic bags you can find (again, a major name brand). From the dumpster in back of the grocery store or a liquor store, get a cardboard box that contains a cardboard divider (used for separating glass jars of food or bottles of liquor).
Find a secure location to prepare your “paint bags.” An outdoor location allows a little sloppiness in the preparation. If you are working indoors, spread a thick layer of newspaper about your work area. Dispose of the newspaper and incriminating paint spots by burning them or dropping them in a dumpster in back of a business.
In an empty milk carton or similar disposable container, mix a 50/50 batch of paint and thinner. Thinning the paint assures maximum spatter. Don your plastic gloves and open the box of sandwich bags. Lay out several for filling. Use a piece of heavy paper to improvise a funnel and pour the paint into the first bag. Do not fill it more than one-fourth to one-third full. Carefully tie the top shut, leaving as little air in the bag as possible. Do not use the twist-ties that come with some bags since the wire inside them can easily poke a hole in the bags.
Line the inside of the cardboard box with a plastic trash bag or two and reinsert the cardboard divider. Make sure the plastic bags have only been touched with gloved hands (the same goes for the box and divider — all of these surfaces hold fingerprints). The plastic liner will keep a leaky bag from running all over you or your car.
Carefully insert the paint bag into one of the segments of the divider. The cardboard divider keeps the bags from sloshing around and makes them easy to retrieve when the time comes.
Repeat the above procedures until you have as many paint bags as you need, with a couple to spare.
Throw the paint bags at an angle from the side of the billboard so that they spatter away from you, rather than splashing back on you. Decorate vehicles, buildings, and even interiors (after tossing a heavy rock through the window first).
At your earliest opportunity, check your skin, hair, and clothes to make sure you bear no incriminating paint. Keep a small can of paint thinner and some rags on hand just in case.
— Leonardo
Field Notes
-
Screw-lid small bottles (like those for Mickey’s Malt Liquor) can also be used for paint “bombs.” Keep in mind that greater force is needed to break these than paint bags. Don’t forget about possible fingerprints on the bottle and the lid.
-
Glass Christmas tree ornaments make good paint bombs which break easily. Remove the base, pour in paint, and seal with duct tape. Avoid fingerprints!
-
Eggs are also very effective paint bombs. Insert a needle in the top of a large raw egg, gently breaking away a small amount of shell, and then stir up the yolk and white. Poke another hole in the same end of the egg, about an inch from the first hole. Blow through the second hole so that the yolk and white come out the first hole. Have an omelet! Pour your paint/thinner mixture into a thin-nozzled, screw-top bottle (such as catsup comes in at restaurants). Seal the second hole in the egg with a pasty mixture of flour and water, or candle wax. Pour in the paint through the first hole and seal it. You now have a perfect-sized, semi-biodegradable missile.
— BUGA UP, Sydney, Australia -
Another proven spattering technique uses a pressurized water-type fire extinguisher. Empty out the contents and relieve all of the pressure inside. Next, open the top and use a funnel to pour in a well-stirred 50/50 blend of paint and thinner or the preferred water and acrylic-type house paint. Pressurize the extinguisher secretly at a gas station; watch the pressure gauge to know when to stop. Use this spray gun to deface billboard ads. Do not attempt to cover the sign face, but make the most of your paint. Clean the extinguisher out after each use or it will clog up.
-
When using either the sprayer or paint bags, be sure to wear grubby clothes (Goodwill is a good source of cheap clothes) or inexpensive coveralls, since you will occasionally get spattered with paint. Keep your hair pulled under a hat to keep out paint. A dark, wide-brimmed hat provides further splash protection.
-
Some experienced billboard trashers prefer balloons over paint bags. Buy good quality, medium-sized, round balloons. Mix paint 50/50 with thinner. Attach the balloon to one end of a 5 or 6 foot section of old 1/2 inch hose or tubing, and put a small funnel in the other end (or use something with a spout to pour). With the balloon end down, pour thinned paint into the funnel. Cradle the balloon gently in your hands. The weight of the paint in the 5 or 6 feet of hose will cause the balloon to expand and fill with paint. Fill to desired throwing size. Quickly pull off, pinch closed, and tie off tightly. Wipe your fingerprints off softly with a cloth or, better yet, wear gloves while filling. Store the balloons together in a cardboard box lined with plastic. Paint balloons are fairly sturdy, last for weeks, can be carried upside down and in many different containers (even gently in a large pocket), and really work!
-
You’ve no doubt seen ads for a toy called a water balloon launcher. It’s a giant slingshot designed to be operated by three people and can hurl a liquid-filled balloon up to 120 yards. With practice, these things are even reasonably accurate. It’s available from Winger Sports, 1306 W County Road, Suite 110, Arden Hills, MN.
Billboard Revision
Even more persuasive than felling, burning, or spattering billboards is revising them. A group in Sydney, Australia, BUGA UP (Billboard Utilizing Graffitists Against Unhealthy Promotions) has turned the revision of billboards into a major campaign.
Even if you only paint one billboard a week, you’ll cost the corporations between $500 and $5,000 per year, depending on your thoroughness; and, of course, money is the only language billboard advertising companies understand. Nothing will get those ads down faster than if their profits are reduced by escalating maintenance costs. Still more important than this financial factor is the effect that the revised ad will have on those who read it.
Select a billboard that 1) advertises a product from a notorious eco-raper (ORVs, for example), or 2) lends itself well to being transformed into an environmental message.
Purchase your can(s) of spray paint as discussed in the section on spray painting. For billboards, black and chrome are the most versatile colors, but red, blue, purple, and white are also good for some billboards.
Break down the power of the billboard ad by answering it, looking at the space available and the way in which the words and images lend themselves to addition, alteration, or comment. Humor is extremely effective in exposing the advertiser’s real intentions — turning the ad’s message back on itself. Finally — do not make spelling mistakes!
If the offending billboard proves too high to reach, either get a ladder or build a spray can extension rod:
Obtain a broom handle or another solid, strong but lightweight wooden pole (see illustration, #1). At one end, cut out a wedge, half the width of the pole. Fit a flat metal bar to the remaining wood (#2). About one foot from this bar (or the height of your spray can), attach a support clamp on which the can will rest (#3). Fit an angle bracket on each side of the pole, about 8 inches from the end (#4). The spray can should fit between these brackets. Tie a length of plastic coated wire to the flat metal bar (#2) and feed it through a hole in the support clamp (#3) and screw eyes attached the length of the pole (#5). This wire, when pulled, will press down the nozzle of the spray can and paint will spray out. An optional extra is the roll-top of a deodorant bottle, fitted to the support clamp (#6). This will help maintain an even distance between the spray can and billboard. You may have to experiment a bit to get the right measurements to fit a can of spray paint.
You will find these spray paint can extension rods clumsy to use at first, but with practice they become very effective.
— BUGA UP
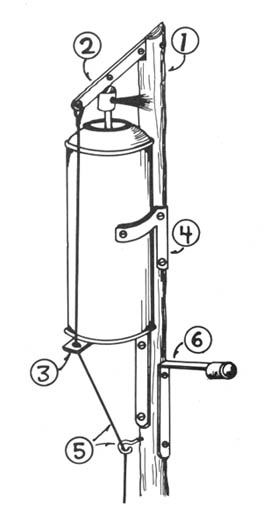
Field Note
Here is a British technique for revising billboards by enlarging a graphic you have on an 8 1 /2 by 11 inch (regular size) sheet of paper to something large enough for a billboard. You need access to a photocopy machine that enlarges 200% or, better yet, 400%.
Put your graphic on a standard sized sheet of paper. On the reverse side of the sheet, draw lines dividing it into quarters and then sixteenths. Cut the sheet of paper up along these lines so that you have sixteen little bits of paper — a jigsaw puzzle of your graphic. Enlarge each of these on a photocopy machine by 395% (not 400% or you may lose some of the graphic off the edges). Now you have sixteen large sheets of your cut-up graphic. Put it back together and your original graphic is sixteen times the size of your original.
Paste them all together indoors with water-soluble glue (like you used in elementary school). Round the edges, redo bits in colored paper, touch up with paint — your imagination sets the limits.
Make paste from white flour and water. A ready assembled graphic can be pasted up in less than 3 minutes on a billboard.
If you can only get a copier that goes 200%, quarter the picture, blow it up, then quarter each quarter again.
If you want to fit something over an irregular sized picture, measure the original and work backwards. A 50% reduction is the reverse of a 200% enlargement. Draw up a scale of what you want to revise and see how to fit sheets of paper into it. Stare at it long enough and it becomes apparent.
For lettering, use a computer printer to do the alphabet, one letter per sheet of paper. These are your originals. When you want a slogan, use a copier to blow up each one-letter sheet.
— T. Hearne
Burning Billboards
It is important to remove billboards. It is also important not to get caught (so we can remove more billboards). I have always felt that burning billboards (particularly in desert situations) is most effective. But it is somewhat “revealing” when a 50 foot high sign explodes in front of your very eyes, and those of who knows who else, lighting up everything around for half a mile. But there is a solution.
SCORE hair cream and swimming pool cleaner. I’m completely serious. My friend Oscar explained it to me. Now I will tell you. Here are the ingredients you will need:
1 envelope
1 tube SCORE hairdressing
1 canister “HTH dry chlorinator” (accept no substitutes).
Squirt about one and one-half inches of SCORE gel in one end of the envelope. In the other end, sprinkle about 2 tablespoons of HTH (it’s granulated chlorine and will also clear up your sinuses if you get too close). Now, fold the envelope in the middle so the contents can’t mix ... yet.
Go forth into the night and find a billboard that particularly deserves cremation. Liberally douse the posts with gasoline. Now, it is time for the envelope. Unfold it and let the HTH mix with the SCORE. In fact, mush it up real good with your fingers (on the outside of the envelope, you idiot). Place the package at the base of the soaked post, get in your truck, and drive away.
Four to five minutes later, about the time you’re saying, “Yes, a pitcher of Bud, please,” the envelope will start to smoke and hiss and produce a horrid, acrid aroma (air pollution) followed by intense heat and... Eureka! ...spontaneous combustion. The flames race up the post spreading rapidly in the dry desert heat.
The next day you drive by and chuckle. But a word of warning: practice with this stuff first. It takes a while to get the right mixture. If it’s not just right, it may simply smoke a lot. Remember, practice makes perfect.
— the Head of Joaquin
Field Notes
-
This delayed-action fire starter can be used for burning things other than billboards, too. Check the section on burning heavy machinery in the Vehicles and Heavy Equipment chapter.
-
Practice and experimentation are essential with this technique. In some tests, the “starter” ignited not much over 30 seconds after mixing. Even such a short time might give someone a chance to get far enough away from the target to avoid being seen, however.
-
The active ingredient of “HTH dry chlorinator” is calcium hypochlorite. Other brands containing this ingredient may work; test them first.
-
SCORE hair gel and HTH (swimming pool cleaner) are better segregated in Zip Lock bags. You can use a small bag tie to keep them apart in transit. The bag won’t tear like an envelope when mixing. The reaction is totally exothermic, so no air is necessary for the reaction to proceed. If the chemicals are cool, you have more escape time.
Paint Remover
Previous editions of Ecodefense have given attention to the use of paint in monkeywrenching operations. However, not much has been said about paint removers. Here are some updates of products which must have been formulated with ecodefenders in mind.
1. 3M Corporation manufactures a water-based, non-caustic paint remover called “Safest Stripper.” This marvelous product does not burn your skin or dissolve plastic (conventional petroleum-based paint removers do), yet is powerful enough to destroy the finish on a car.
One of the nice features of Safest Stripper is its ability to cling to vertical surfaces (doors, walls, signs). When applied, it looks like thick white pudding. Since it does not dissolve plastic, the standard paint delivery systems (plastic bags, balloons, jars) will work. When tossing paint stripper bags, put some muscle into your throw; the thick consistency of the stripper might act as a cushion, preventing breakage of the bag. After three hours, the coating looks as though it has dried and is no longer active. Don’t let appearances fool you — Safest Stripper remains active up to 30 hours after application. When someone tries to remove the crusty white coating by scrubbing or scraping, the paint will come off and bare metal or other material will be exposed.
Safest Stripper is sold in most hardware stores for $15 to $18 per gallon. It’s easy to find — it’s the only paint stripper sold in plastic containers.
2. Dupli-Color (an automotive touch-up paint manufacturer) markets “ST-100 Paint Stripper,” a petroleum-based paint remover sold in spray cans. This stripper is spectacular. When sprayed on the finish of a car, the reaction is almost instantaneous — within 30 minutes, bare metal is exposed. ST-100 does not hold well on vertical surfaces: if applied to a door, wall, or sign, a very unsightly mess will be created quickly as the paint and paint stripper run down the surface. ST-100 is sold in most large automotive parts stores, particularly those which specialize in paint. One can (11 ounces) will cost about $4.
— Donatello
Field Note
Brake fluid will remove the paint on cars and trucks. It comes in handy squeeze bottles.
Etching Cream
Glass etching cream is a wonderful tool for monkeywrenchers. My favorite thing to do with it is to paint slogans and messages on windows and windshields. Unlike paint, etching stays until the glass is replaced. Sometimes, though, an etching cream bomb is better.
For an etching cream bomb, try an egg. Xmas tree ornaments won’t work because the cream will etch away the ornament before you can throw it. Put a new blade in your x-acto knife. Score a circle about 1” — 1 1/2” diameter around the pointed end of the egg. After scoring deeply, make little holes around the scored circle. The end of the egg should then lift off easily. Dump out the egg (use it later) and rinse out the shell. Dry. Carefully spoon in the etching cream. Then lay a small piece of tissue paper on top. Melt some wax and paint it over the tissue and seal the edges down to the egg. Add another coat of wax after that one dries.
This can all be done without leaving fingerprints by wearing thin cotton jewelers gloves — available cheap by the dozen from jewelry supply companies like Rio Grande (1-800-545-6566).
Put the finished egg back in the carton for transport. When thrown with conviction, these little dudes leave a large and explosive design on the window of a fur dealer or other land and critter raper.
— Bob Wire
Posters and Silent Agitators
Posters
Most Americans do not realize that commercial logging takes place in their National Forests. They believe that the Forest Service protects the Forest. In the early and mid-1980s, Earth First! used the Smokey the Bear Chainsaw Letter to educate National Forest campground users about what was really happening on their National Forests.
These 8 1/2” by 11” posters (see illustration) were stapled or tacked to the bulletin boards in Forest Service campgrounds, picnic areas, trailheads, Ranger stations, etc. Some particularly nasty wilderness fanatics kept a box of “Smokeys” and a staple gun in their vehicle at all times and struck at every Freddie bulletin board they saw.
The chainsaw letters infuriated Freddie timber beasts. In fact, after we started using them, the Forest Service sent out a memo nationally to all their offices inquiring where they were coming from.
Since then, there have been dozens of variations on this theme. Use your own creativity and artistic ability.
Of course you should be careful in putting such posters up, since the Forest Service would be more than happy to give someone a ticket for “defacing government property.” Also, anyone caught doing this type of low-key monkey-wrenching would automatically become a suspect for more serious ecotage incidents in the vicinity.
— Raoul
Field Note
Using staples or tacks to attach your posters to bulletin boards allows easy removal by zealous Freddies. Instead, coat the back of the paper using a can of permanent spray mount (available from art supply houses). Or use paste made from white flour and water. This, too, makes it difficult to remove the poster.
Signs
Make authentic looking signs to protect your favorite wild places:
Closed to Vehicles — Violators Subject to Arrest
Germ Warfare Research Zone — Do Not Enter
US Air Force Bombing Range — Live Ammo — Keep Out — Violators Subject to Arrest
Road Closed — Landslide Ten Miles Ahead
Some yellow tape and a sign reading “Crime Scene” is another way to close an area. Better yet is to find some “crime scene” tape used by police. On “For Sale” signs, simply place a large “Sold” sign. Observe all security precautions in making and placing these signs (no fingerprints or materials that can be traced).
Silent Agitators
Earth First! borrowed this tool from the Industrial Workers of the World (the Wobblies). “Silent Agitators” were merely little stickers that a Wob could stick up on a wall or on a piece of machinery in a plant. Other workers and the management would then know that the IWW was present and watching.
Earth First! Silent Agitators originally came in two varieties (see illustration) and proved to be very popular. The “Coors” agitators were placed in the rest rooms of bars that served Rocky Mountain Mouse Piss, and they educated other beer drinkers about the demented politics of the Coors outfit.
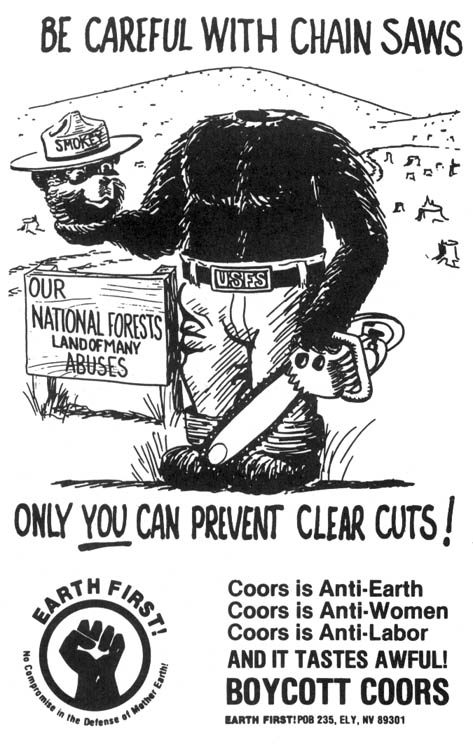
The other agitators, featuring the Earth First! “fist” logo were placed wherever people wanted to leave a message that the rape of Earth would be resisted. They proved particularly effective in Forest Service offices and more than a few were found in police paddy wagons and jails. During the 1983 Bald Mountain road blockade in Oregon, silent agitators were a constant means of psychological warfare against Freddie bureaucrats. The District Ranger finally began locking the rest room in the District office because he was tired of having to look at a silent agitator reading “No Compromise in Defense of Mother Earth” every time he took a leak. Forest Service personnel had to get the key to the bathroom from him and he would check afterward to make sure nothing had been stuck on the wall.
Silent Agitators are extremely easy to design and have printed. Since the original Earth First! agitators, dozens of other designs and messages have been used by activists. Be creative and have some printed for your particular issue.
— Raoul
Field Note
Specialty silent agitators have included these:
1) A well designed dolphin sticker for putting on dolphin-unsafe cans of tuna (this was produced by an informant for the FBI!).
2) A round red sticker reading “Kills Butterflies, Songbirds, Fish and their Babies” to be placed on bottles of Round-Up herbicide.
Correcting Forest Service Signs
This is for all of you frustrated artists who drive by the big “Land of Many Uses” signs and get pissed off because you know what the Forest Circus really means by that. Here is a way to make the signs more accurate.
Get a sheet of 1/4” plywood (thicker is fine, but heavier), some oil based yellow paint, nails, and glue. You will need a router to engrave the lettering, and a saber saw to cut out the curves.
Measure the sign you wish to modify. Using the plan illustrated, lay out and cut the (replacement) bottom of the sign. It will be in two pieces, since most plywood is only 8 feet long. Paint it with a yellow paint as close to the Forest Service color as possible. Then, lay out the lettering from the plan, and use the router to engrave it into the wood. Make the letters in the same style as the Forest Service lettering so it will look as much like the original as possible. Use a drill or a hole saw to put two 1-1/2” diameter holes in the board. These will accommodate the bolts which stick out of the existing sign. After the sign is finished, transport it as inconspicuously as possible to your target sign. Coat the back with glue. To hold it in place while the glue dries, use finishing nails. The corrected sign may not fit perfectly but driving by at 60 mph, most people probably won’t even notice your correction! (Except you and me, of course.) Have fun with this. I hope to see corrected and accurate Forest Service signs as I travel.
— The Mad Engineer
Field Note
It is easier to simply alter one word: change “Uses” to “Abuses.”
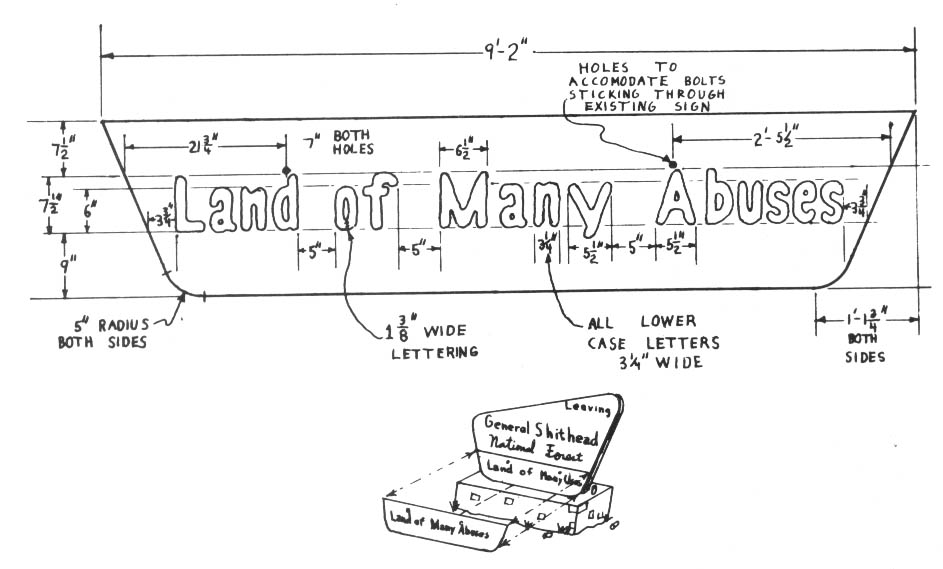
Spray Paint Slogans
It has been said that the freedom of the press belongs to the man who owns one. In this day and age the press is owned by the corporations and access to it is limited by them to sanitized viewpoints. No city newspaper will present true alternative ideas of “no-growth” or biocentrism, or opinions questioning control by the corporations. Fortunately, a can of spray paint and a little boldness gives anyone a press release that can reach thousands of people.
The limitation of spray paint is that you must reduce complex ideas to a few simple words: a slogan. In your slogan, express a complete idea in two to four words. Make your best slogan your hallmark and use it often.
More complex messages may be your only way of being quoted in the media (which likely will be staunchly opposed to your illegal actions). Nonetheless, these longer spray painted messages are secondary to your main slogan.
The use of initials, such as the initials of a clandestine organization, can also convey a strong message of resistance. First, however, they must be presented repeatedly with the full name spelled out until people and the media begin to make the association. The single letter “V” (for Victory), for example, was used by the French Resistance during the Nazi occupation during World War II. It was quick and easy to paint (and therefore safer) and carried a complete message: “Resist!”
Slogans and programs can be presented through flyers and small signs, but this requires secure access to printing or photocopying equipment, and will reach only a small audience. Bumper stickers are difficult to apply without leaving fingerprints (you must wear gloves every time you handle them) and are not easily manufactured.
The slogan hastily painted on a wall in full view of auto traffic on a busy thoroughfare, however, is the poor person’s way of reaching a wider audience.
Your sloganeering operations should be as carefully planned and executed as any other type of clandestine endeavor (see the Security chapter). Do not spray paint walls belonging to private individuals since this will unjustly aggravate them. There are plenty of “public” walls to use as your “newspaper.” (In certain cases, of course, you may want to spray paint walls belonging to particular individuals or corporations.)
Select a common brand of spray paint that can be purchased through any number of retail stores or large discount houses. Shop at different places — spread your business around! Look for the inexpensive plastic pistol-grip handles that can be mounted on any can of spray paint. These insure that the paint always sprays in the direction you want (not towards you!), even on the darkest night. A pouch worn on the belt is a good “hands-free” way of carrying it into the field.
If the target wall is in a busy location, the painter should be accompanied by at least one lookout. In quieter, or more rural locations, a painting team can consist of the painter and a driver, who will deliver her to the target area and retrieve her later (in five minutes, say). Rarely is it safe to just stop the car and go to work. A half-finished slogan and a fast retreating car can lead you into considerable trouble. A lot of novice sign painters suffer from the jitters and are responsible for the hasty, illegible scrawls you see on many walls. The person chosen for the job must have the presence of mind to do a neat job.
After a while, it will be easy for the police to recognize the “hand” of a single sloganeer. Vary the look of your work to make it appear that your slogan is being used by many people and represents a broad constituency. Switch from all capitals to all lower case, then to a blend of the two. Change painters randomly since everyone will do it a little differently. Change color now and then.
A planned program of controlled variation can give the appearance of several groups at work. One area may have slogans only in black, another in red or brown. One painter will slogan in one part of town, another in a different part. The slogans themselves can be changed and attributed to fictitious organizations.
Radio communications via portable and mobile CB units can greatly aid in coordinating sloganeering efforts.
After a while, the opposition will discover that industrial strength paint removers will remove paint even from porous cement block walls. Sloganeering again on the same target can be a good psychological warfare tactic, but risky.
Sloganeering is as dangerous as any other form of ecotage but should not be approached too timidly. Anyone can paint a few small slogans on out-of-the-way walls or signs. The opposition will take you far more seriously, though, if your choice of targets indicates competent boldness.
— Citizen Kane
Field Notes
-
Thompson’s Water Seal spread over your spray-painted slogan may render it more resistant to industrial strength paint removers. Using it, of course, complicates and lengthens the job, thereby making it more dangerous.
-
If you are an enemy of the throw-away society, here’s how to bring your message to an appropriate audience:
Dumpsters make fine “billboards” for our message, requiring only paint and perhaps a stencil. Large disposal companies like Waste Management Inc. (WMI) and Browning Ferris Industries (BFI) have dumpsters all over. (WMI’s are maroon; BFI’s are blue.) Good slogans to put on these companies’ dumpsters would advocate curbside recycling — “Your garbage is polluting my neighborhood! Demand recycling now!” and “It’s time to try recycling!”
This dumpstering will help fight the mindless creation of more landfills and trash incinerators. Ninety percent of our waste is recyclable, and the rest (Styrofoam, etc.) shouldn’t be produced in the first place. If you use this technique to fight a new landfill or incinerator, you may want to alert trustworthy local media to a dumpster painting party — wear Reagan masks to protect your identity!
Organizations like Greenpeace (202-462-1177) and Citizens Clearinghouse for Hazardous Waste (703-276-7070) have published excellent reports documenting the crimes of the waste hauling giants. WMI has been fined more money for environmental violations than any other company. -
Here’s a way to do a big paint job in a hurry. Obtain an empty disposable freon tank from your friendly refrigerator serviceman. Have him pull a vacuum on it (remove all the air). Get a few feet of pressure hose to fit the tank valve, two hose clamps, and a schrader valve (tire valve).
Clamp the hose to the tank. Mix a gallon or two of your favorite paint color to a spraying consistency. Dip the end of the hose into the paint, open the valve, and the paint will be drawn into the tank. Clamp the schrader valve in the hose and go to a gas station for compressed air (sometimes tire stores and truck stops have better pressure).
When you get to the job site, remove the core from the schrader valve with a core remover tool. The schrader valve will act as a restriction and nozzle to give you reach and to break up the stream. Turn the jug upside down, open the valve and spray at will. Have fun.
Stencils
A stencil can be very useful to the monkeywrencher for spray painting small slogans or logos in certain places — for example, an anti-cow message on the ubiquitous “open range” or “cattle guard” highway signs. Several groups made stencils that spelled “Watt” during his tenure as Secretary of the Interior and sprayed stop signs with them. “MX” stencils were also used in the Great Basin during the period that the racetrack deployment mode for ICBMs was being promoted there. In some Great Basin towns, every stop sign said “Stop MX.”
Before making your stencil, visualize what you want to say (or the logo you want to use), where you want to paint your message, how large it should be, etc. Linoleum is probably the best material from which to make a stencil. You can buy linoleum in various thicknesses, lengths, and widths at building supply, hardware, or floor covering stores. Allow several inches of border around the cut-out message or logo on your piece of linoleum for sturdiness and to provide room to hold it so you won’t spray paint your hands (or your partner’s hands) while holding the stencil up to your target. (If you’re using red paint, you can literally get caught red-handed this way!).
We’ve found that the soft, somewhat pliable 1/16 inch thick counter top material with an unbroken surface works the best. It’s comparatively easy to cut, but substantial enough to lay flat against your target — which is important if you wish to leave a well-defined spray paint image. You want a vinyl or linoleum material that you can cut holes into with a utility knife and then hold up vertically against something without it dropping.
Cutting
On the rougher side of your material, sketch your message or logo with a pencil and ruler, compass, or protractor. Don’t get too elaborate unless you want to spend more than a couple of hours cutting it out. Remember, any line that encloses a space will cause that space to fall out, leaving a hole in the stencil. Narrow “tabs” must be left for parts of certain letters and numbers (A, B, D, O, P, Q, R, 6, 8, and 9, for example). You can buy pre-made stencil letters to use as guides in making your stencil.
The cutting takes some concentration and time. With a good utility knife, carefully cut at a 90 degree angle along your lines firmly and gently. Start slowly. As you gain practice, the cutting will go much quicker and easier. A metal straight edge is useful for straight lines. Miscuts can be glued. With use, numerous layers of paint will help hold it all together, too.
Transport
After cutting out your stencil, you will need a way to protect it during transport and to keep it from public view. It needs to be stored flat so that the longer, more narrow protrusions don’t curl up. (Curled stencils allow the spray paint to blur.) A good method is to sandwich the stencil between two pieces of 1/4” plywood. It is also wise to place the slick side of another similar sized sheet of linoleum next to the painted side of your stencil. If you don’t do this, your stencil can stick to the plywood (even though the paint feels dry, it may not be) and you may have a horrible mess the next time you try to extract your stencil for use. Even with the extra sheet of linoleum or vinyl, you should always try to let your stencil completely dry before placing it against anything. This whole assemblage can be stashed in a vehicle and it will be safe from damage and public view. With proper use and storage, your stencil should last for hundreds of applications.
Painting
High quality, quick drying lacquer or enamel spray paint is the best to use with a stencil. Gloss white is the most versatile and visible color, although other colors can be useful under the proper circumstances.
You should take the standard security measures, of course. Be particularly careful about fingerprints — spray paint records fingerprints all too well. Wear gloves while using the stencil and for touching whatever you are painting.
With your stencil completed, there’s nothing left to do but use your imagination. Go out and leave your message wherever appropriate.
— Rafael
Field Note
A simple stencil can be made very easily, cheaply, and quickly out of thick art paper, very thin cardboard, or similar materials.
Chapter 9: Security
It is important not to get caught. The information in this chapter comes from experienced monkeywrenchers who have studied police science, law enforcement officers from several agencies, and military veterans who have served in “unconventional” units. Don’t take this chapter of Ecodefense lightly. It may be the most important chapter to you in this entire book.
You may find some redundancy here. That is deliberate. Security rules are so important that we want to hammer them home till they become second nature to the serious ecodefender. As monkeywrenching becomes a more serious threat to the greed-heads ravaging Earth for a few greasy bucks, they will force law enforcement agencies to crack down on Earth defenders. You can stay free and effective, by carefully keeping security uppermost in your mind.
Since the publication of the first edition of Ecodefense, several prominent monkeywrenchers have been arrested and jailed. One, Howie Wolke, received six months in a tiny cell for pulling up survey stakes. He has publicly stated that he was caught because he was careless and let his security down. Don’t follow his example to the slammer.
Dave Foreman, one of the editors of Ecodefense, was arrested in 1989 as the target of a major FBI operation to “send a message” that monkeywrenching wouldn’t be tolerated. Four other Arizona activists were also arrested and ulti-mately served time. Two, Peg Millett and Mark Davis, were still in the federal penitentiary when this edition went to press. Even the most sympathetic observer would have to admit that all of the people involved in this case violated numerous security guidelines discussed in this chapter as well as common sense in their dealings with undercover FBI agents and informants. Although dozens of FBI agents were employed and over two million dollars spent trying to entrap the Arizonans, poor attention to security gave the G-men the openings they needed.
The Forest Service has also begun special anti-monkeywrenching training for their law enforcement specialists. Park Service and Forest Service cops have been identified at Earth First! and other conservation group meetings. They are taking monkeywrenching very seriously. But they can’t touch you if you rigorously practice the security precautions in this chapter. Carelessness will put you in jail.
Because of the crucial need for good security practices by monkey-wrenchers, we have expanded and updated the material in this chapter. Read it. Study it. Make it second nature — like buckling your seat belt when you get into your car.
Basic Security
Target Selection
Most operations worth monkeywrenching consist of a long chain of events ranging from the corporate boardroom or government office to actual field activities. Before selecting a target for monkeywrenching, gather as much information as possible on this “chain of command.” Research may reveal better targets, or point to the most vulnerable link in the “chain.” Newspapers and magazines, as well as physical surveillance of buildings, storage areas, work sites, etc., will help in the selection of targets.
Proper intelligence gathering efforts will insure fairness. Do not lash out blindly at targets without first making an effort to understand the overall situation. Make sure that an action is fully warranted and well deserved. There is a difference between monkeywrenching and plain vandalism. In recent years, that difference has been ignored in some cases. Some targets of monkey-wrenching, like the Santa Cruz power line in 1990, were not warranted. Of course, some of these questionable ecotage incidents may have been done by government or industrial agents to give ecodefense a bad name.
Most damaging projects on public lands are more or less analyzed in public documents by the managing agency (Forest Service, Bureau of Land Management, etc.). These documents — environmental analyses (EAs), environmental impact statements (EISs), land management plans, timber plans, etc. — are available free to the interested public and have fairly detailed information, including maps, on offending projects. Merely by contacting the National Forest or BLM District office in question, you can get on a mailing list to receive such reports.
Of course, the serious monkeywrencher may not want to be on such a mailing list due to security considerations. If possible, have a trusted friend, who does not plan to engage in monkeywrenching, get on the mailing list and then give the documents to you. Perhaps you have a trusted contact in an environmental group who gets such documents and who can pass them on to you. Maybe you even have a trustworthy contact within one of the offending government agencies — if so, for added security and her own safety and integrity, never, never let her know what you plan to do with the information. If you do not wish to involve friends or acquaintances, however indirectly, you might receive the information from the agency under an assumed name at a post office box or addressed to your alias in care of one of the private mailing services, found in big cities, which provide confidential forwarding of mail. Or you might even go to government offices in person, well in advance of intended “hits.” If asked to fill out a request form, use a fictitious name and address (don’t forget the name you give them!). Before going into an office to request information, leave your wallet with your IDs in your car, so that you can honestly say, if asked, that you left it in your car. If they persist in asking for ID, you can tell them you’ll go and get it, leave the building, and never go back. Note: avoid going in person to request information that later might prove incriminating if you are likely to be recognized by anyone in the office.
Much of the work done by Federal agencies is contracted out to private individuals and small businesses, generally on the basis of competitive bidding. Examples of this include some survey work and timber stand exams. It is possible to obtain information about many such projects by getting on lists to receive announcements of projects as a potential bidder. Again, it may be best to have someone else get this information to protect your security.
Federal agencies will release their mailing lists under the Freedom of Information Act. This means that corporate gumshoes or “Wise Use” thugs can get addresses of conservationists who ask to be on Forest Service, BLM, and other agencies’ mailing lists. Of course, law enforcement agencies have access to such mailing lists.
Any method of obtaining timely information on environmentally destructive projects in your area of interest is valid, so long as you do not compromise your security in the process. A great deal of useful information on potential targets for monkeywrenching can be obtained from periodicals. Publications of conservation groups, especially local and regional, are obvious sources of such information, but don’t forget trade and industry publications, either.
Local newspapers are an excellent source of information on what sort of development is currently going on or planned — this goes for big-city dailies as well as rural weeklies. (The latter often report regularly on government timber sales, permits for oil and gas exploration, and local mining activities.) A good place to read a variety of publications without compromising your security is the periodical section of your public library.
If you are interested in more detailed information, such as the names of individuals owning a business or a particular piece of property, a little bit of investigative work in the library or at the county courthouse can usually produce results. City directories or business directories (such as Cole’s or Polk’s) may tell you who lives at a specific address or who owns a business. In most states, the office of Secretary of State usually maintains records of corporations incorporated in that state. You may be able to obtain copies of these records for a nominal fee. Finally, your city or county recorder has public records on deeds which show who owns what land or buildings. The tax assessor has public records of property taxes which also indicate ownership of all properties. Also, the “Grantor” and “Grantee” books record all real property transactions alphabetically by names. Anyone can ask to see this material.
Finally, mining claims on the public lands are a matter of public record. They are usually filed at the county courthouse. These records are also kept at the state level by the BLM.
Field Note
Repeated monkeywrenching of a certain target may cause the offenders to take increasingly drastic measures to protect their investment. For example, if you monkeywrench open bulldozers by the side of the road, the engine compartments will probably be locked the next time you come by. If you cut the locks and do your work, they’ll probably put the machines behind a fence somewhere. If you cut the fence and wrench the equipment again, they’ll probably hire a guard. Now it’s getting expensive.
The point is, the offenders are always vulnerable somewhere, and if you keep hitting them where they’re most vulnerable, sooner or later it will affect their operations. Obviously, this means more persistence and hard work on your part.
In the case of the above fenced and guarded bulldozers, perhaps you can still cut the fence or spike the access road or cut their power lines or hit their main office or alter their billboards. Do whatever it takes to make it too expensive for them to continue ravaging Earth.
Planning
Thorough planning for every step of the operation and all feasible contingencies will keep you out of jail. Every team member must fully understand the work to be done, individual assignments, timetables, radio frequencies and codes, routes to and from the scene, etc.
Even the best of plans can be quickly disrupted by unforeseen events. Coping with and adapting to such problems is the ultimate test of one’s monkeywrenching abilities.
The target should be reconnoitered in advance. If an urban target, know the layout of all the roads you might use during your withdrawal. Otherwise, you might find yourself at the end of a dead-end street while trying to make a quick escape. If you are planning a night operation, familiarize yourself with the target during both day and night. Landmarks visible in daylight may not be so at night, and certain security measures (lighting, security guards) may be used only at night. If your target is in remote country, know the location of all trails, roads, and natural drainages in the vicinity, in case you have to make alternate escape plans.
If it becomes necessary to use written notes and maps in preparing for an action, destroy all such paperwork before commencing work. The best way to destroy paperwork is by burning. Indoors, paper can be burned in a fireplace. Absent a fireplace, burn in a large pan or bucket (place under a kitchen stove hood exhaust or a bathroom fan). It may be preferable to burn such material outdoors in a shallow hole. Since intact ashes can be analyzed in the laboratory to reveal something of their contents, even ashes should be crushed and disposed of. Outdoors, grind up the ashes and bury them. Indoors, flush them down the toilet.
The Team
In selecting people for an operation, keep the number involved at the minimum necessary to get the job done. Although some activities are fine for a lone monkeywrencher, the small group of two to five members is most effective. (Some very experienced and effective monkeywrenchers, however, argue for doing everything alone.) The group provides mobility through a driver, security through a lookout, and the sympathy of a friendly ear to relieve the inevitable tension of the underground. Usually it is just too dangerous for an individual to engage in sabotage and look over her shoulder at the same time. So begin your organized monkeywrenching with a close friend who shares your values. Start small, with the simplest plans and easiest targets, until you learn to function as a team. (If you do not have an entirely trustworthy partner, it is better to operate alone.)
Recruiting new team members begins with evaluating your close friends as prospects. Bear in mind, however, that not everyone is suited for this sort of activity. A monkeywrencher should be able to function well under stress, but no test has yet been devised to determine who is likely to crack under stress and who is not. The persons doing the selecting simply have to use their best judgment. Avoid the faint-of-heart, the excessively paranoid, and the not- quite-thoroughly committed. Avoid the casual acquaintance you only see at a protest rally, especially the ones who “talk tough.” Such people may well be police spies or agent provocateurs. Government use of such infiltrators is widespread, both here and abroad. In Britain the authorities have attempted to infiltrate anti-hunting groups, and have even set up sham groups of their own to stage violent acts to discredit their opponents. In the US, cases in which the FBI or other police agents have infiltrated radical groups and even encouraged or participated in criminal acts are too numerous to mention — the histories of the anti-war and civil rights movements are replete with such stories.
The success or failure of law enforcement often lies with the informer, known in police circles as the “confidential informant” or “CI” These are usually individuals “turned” after their own arrest, who aid the police in exchange for favorable treatment. Such persons produce perhaps 90 percent of all criminal arrests. (In the “Arizona Five” case, there was one full-time professional FBI agent operating undercover, several FBI agents who attended Earth First! parties or demonstrations, and at least five confidential informants and perhaps a dozen. These people were active during 1988–89; an undercover Tucson police department officer was unmasked at a Mt. Graham demonstration in Tucson late in 1992 [his automatic pistol fell out of his hippie day pack], three and a half years after the Arizona arrests.) The best way to avoid the informer is to work only with close friends, ideally of many years’ acquaintance. A tight-knit group of friends, loyal to each other and careful to minimize leaving evidence at the scene, is virtually impossible to penetrate and apprehend.
Throughout history, secret societies have reinforced group cohesion with an oath for secrecy and loyalty. The oath of secrecy was so successful during the Luddite uprisings in early 19th-century England that oath-swearing was made a capital offense! Although it is not necessary to have a formal initiation with a swearing-in ceremony, it is important that group members openly and directly declare their willingness to protect one another. Psychologically, the act of swearing loyalty is of far greater value than the mere assumption of the same. The memory of such a moment can provide an added ounce of strength under police interrogation (when most groups come unraveled).
Once you have singled out a prospective recruit, use casual conversations to gauge the depth of her commitment to defending Earth. If all goes well, you will next proceed to carefully introduce the topic of monkeywrenching into your conversations, perhaps with the aid of a news broadcast or newspaper story dealing with environmental sabotage. This will help to measure whether feelings about conventional law and order might override deeper moral concerns. Be patient. Never rush a recruitment. It may take months to find out that a certain friend is simply not suitable as a team member.
If all goes well, you will eventually suggest doing a “job” together — perhaps something simple like spray-painting slogans on the outside walls of an offending land rapist. Do not, under any circumstances, tell the potential recruit that you have had experience in such matters. If she gets cold feet at the last moment and backs out, she will still have no knowledge that can harm you.
Once your first hit is successfully completed, you are bound together by shared danger and experience, and you may consider introducing the new recruit to the team. If the recruit seems paranoid or expresses doubts during or after the first hit, wait until she has a bit more experience before introducing her to other team members. The ideal recruit responds with excitement and enthusiasm to the rigors of direct action, but is not reckless.
Field Notes
-
Some experienced monkeywrenchers argue against working with one’s spouse or significant other — in case of a romantic breakup in the future, he or she may turn on you. They also argue against minors participating. Other experienced ecodefenders have long operated with their spouse or romantic partner; some with their children (“kids can be a great cover”). It depends on the individuals.
-
Some experienced and effective monkeywrenchers have done all of their work alone.
Insertion
The team will most likely be carried to the vicinity of the target in a motor vehicle (see also the section on Mountain Bicycles in the Miscellaneous Deviltry chapter). Whether it be a motorcycle, car, or truck, it should look ordinary, and lack anything that might be conspicuous — such as a special paint job, provocative bumper stickers, or personalized license plates.
On most operations, one should not stop directly in front of, park near, or repeatedly cruise past the target.
When exiting the vehicle, do not slam the car doors. Instead, push on the door until it partially latches. The driver can stop briefly after leaving the target area to close doors properly. In rural and suburban environments, it is generally best to drop off the team well away from the target and let them walk to it cross-country. In built-up areas, the drop is usually made closer to the target to avoid being stopped by police patrols when walking down city streets. The aim is to avoid having a casual passerby witness the drop and later report a description of you, your car, or your license plate.
Parking near the target is usually dangerous. After the drop, the driver should leave the area immediately and stay away until the agreed-upon time for pick-up. Keeping the vehicle moving in evening traffic on major streets or highways may be the safest way for the driver to pass the time. If you choose to park, do so only in busy areas near restaurants or movie theaters where you will blend in with the crowd. Avoid operating in the early morning hours when traffic is so light as to make you stand out. The best time for urban operations is usually from nightfall to midnight.
In a rural or sparsely populated area, it may be more dangerous to drive after dark, and you will want to conceal the vehicle by parking it in the woods or on jeep trails adjacent to the highway. Have such a parking place selected beforehand so you do not have to cruise around searching for a place to park out of sight.
Withdrawal
When a team is dropped off, it has a designated length of time to finish its work and withdraw to the pick-up point. The location selected for the pick-up usually should be different from that of the drop, in case the drop was observed. Timing is important, and the driver must not have to rush and break speed limits to arrive on schedule. If the team does not make the first pick-up run, the driver will return at pre-determined intervals of fifteen minutes, a half-hour, or whatever.
If police are in the area, both the team and driver will go to an alternate pick-up point a few blocks or a few miles away, and up to several hours later if necessary. If danger from police is imminent, team members will conceal their tools for later recovery and leave the area without anything incriminating on their persons.
After a successful pick-up, the vehicle should leave the area at normal speed. Once safely away, the team should stop briefly to put all tools or other incriminating items out of sight.
In order to avoid leaving tire tracks as evidence, the pick-up vehicle should not leave the paved surface of the road. Of course, this may not be possible in rural areas or on forest roads. If you are parking the vehicle, it may be possible to sweep away tracks (both human and vehicular) with a broom or branches.
The duration of a “drop and pick-up” type of operation may be anywhere from a few minutes for an urban “hit” (such as the delivery of a bucket of raw sewage to a corporate office) to several hours or possibly even days for a complex action in the field, such as major tree spiking or road destruction.
For recognition of the pick-up point, the team can mark the spot by setting a pre-determined object on the shoulder of the road (such as a discarded oil can or beer bottle); but permanent landmarks, such as bridges, culverts, road signs, or mileage posts, are better. The pick-up vehicle can carry an extra light, like a powerful flashlight, on the dashboard so that the team will recognize it on its approach run. Use the brakes as little as necessary, since brake lights can be seen from a great distance. One can avoid too much use of the brakes by stopping more quickly and using the parking brake more. The serious monkeywrencher might consider vehicle modifications (see section on Vehicle Modifications in the Vehicles and Heavy Equipment chapter).
Radio communications are valuable to coordinate the pick-up, or to advise the driver to use the alternate pick-up location due to unforeseen troubles. (See the section on Radios later in this chapter for appropriate equipment.) Again, the alternate pick-up can be anywhere from a few hundred yards to a couple of miles from the primary pick-up point; but it must be out of sight of the primary pick-up point, out of sight of the target, and preferably, on an entirely different road.
Night Operations
Begin by reviewing your plan and equipment. Leave any unnecessary items behind. Do not carry any ID, wallets, loose change, or anything else that might identify you or make unnecessary noise. (A college student was arrested for monkeywrenching a bulldozer in Colorado in 1992. His checkbook was lying beside the sabotaged machine.) If you are carrying a car key, use a safety pin to secure it to the inside of your pants pocket.
Before heading into the dark, allow your eyes to adjust to the dark. Five minutes in the dark without looking at bright lights is the minimum necessary, and it’s best to wait half an hour before entering a dangerous area. Any bright light can temporarily ruin one’s night vision. If it becomes necessary to look into a lighted area or to use a flashlight, cover one eye so as to retain some night vision in the other. Using a flashlight with a red lens filter will not damage your night vision, but beware that even a red light will be visible from some distance away. When looking at something at night, do not stare directly at it. Everyone has a blind spot in the center of their field of vision. It is easier to see an object at night by keeping the eyes constantly moving than by looking directly at it. Practice by taking walks at night. And eat your carrots!
Travel at a steady pace and avoid running in the dark. Lifting knees higher than normal when walking will reduce the chance of stumbling over rocks, roots, and low branches. To avoid being hit in the eyes by low branches, extend one arm in front of your face and well ahead. This is a safe way of “feeling” your way in the dark. If you must run, focus your attention on the ground just two to three steps in front of you and run at a slight crouch. The crouching position keeps you from taking long strides, which is dangerously uncontrollable at night. Concentrating just a short distance ahead alerts you to the smallest hazards, which are usually the ones that will trip you. Again, keep one arm extended to protect your face. Practice moving at night without a flashlight before you find this necessary on an action.
The sense of hearing becomes much more important at night and will often reveal as much or more than the eyes will. Always pause for several minutes before entering a dangerous target area to listen for the footfalls of a guard or passerby. Make sure your hat does not cover your ears, and cup your hands behind your ears to help pick up faint sounds. An ear to the ground won’t help.
Communication between team members is best done with hand signals. Tap someone on the shoulder and point to possible danger sources. If you must talk, cup your hands over your friend’s ear and whisper. Night bird sounds, like owl hoots, should be used as danger signals only, to avoid excessive use. In addition, whistles worn on a cord around the neck can provide emergency signaling when the team is spread out over a large area. All team members should be assigned numbers or fake names for emergency shouting at night.
— Etta Place
Field Notes
-
Exposure to bright sunlight on the day before a mission can impair your night vision. Wear sunglasses in bright sunlight to prevent this.
-
Get in the habit of walking around your home at night in the dark to become used to moving and seeing in the dark. Practice walking without a flashlight when camping.
Military Movement
Direction and Distance
If the target is in unfamiliar terrain, or you expect to be in dim light and dense vegetation, bring a compass. Backpacking and other outdoor stores sell a wide variety of compasses, and instruction books on how to use them and topographic maps.
You will improve your compass skills if you can reliably estimate your distance of travel. Learn how to count your pace, as in infantry training. Measure a distance of 100 feet, pacing the distance several times, and counting the paces of the right or left foot. Practice this in dense vegetation and on other rough terrain, to master staying on a predetermined direction and distance while going around obstacles on the route.
The direction and distance to a particular terrain feature or human artifact (e.g., road junction, hilltop) can be easily determined from a topographic map during planning, using the scale and a protractor. Note that conversion of the map angle to a magnetic (compass) angle is important. This conversion is typically shown at the bottom of topographic maps.
An easy method of keeping track of pace count is to mount small flexible plastic discs on a small section of cord. The discs should be mounted so that no free movement can occur on the cord. During the movement, one disc is moved from top to bottom at each pace count of 100. This simple device is commercially available and cheap at places where military supplies are sold. This device allows you to concentrate on other aspects of movement.
Alternate Assembly Areas
These are predetermined areas where the team can regroup when rapid escape is necessary, and separation of people is likely. These areas should be determined during planning, utilizing map and recon information, and should always be at natural or man-made terrain features easily recognizable during limited visibility conditions.
In choosing alternate assembly areas, consider availability of concealment along the routes thereto, and distance; remember: the team will be carrying equipment, and visibility may be low. Consider the feasibility of destruction or concealment of incriminating evidence at the reassembly area. Select an alternate route to safety, too.
The prearranged signal to reassemble at an alternative area should be clear to all members of the separated team, but meaningless to any observers. Non-verbal signals may be preferable to radio codes, due to reliability and speed. Smoke grenades or modified flashes could provide secondary benefits.
Silent Communication
Plan visual signals that convey messages to separated members without being conspicuous. The typical military movement commands may have value due to the simplicity of the hand and arm movements. Some large bookstores have titles dealing with military leadership development.
A rendezvous of team members at night may arouse suspicion if members signal with noise as they approach. A visual signal instead, such as a taped pattern on the red lens of a microlight, provides positive identification, and could save time and embarrassment by preventing the accidental rendezvous with a noisy raccoon or an alert security guard.
— Dan Shays
Rules of Security
Limit each team member’s knowledge of operations to what they need to know. You can’t slip and talk about something you don’t know about. This will protect your associates as well as yourself.
Don’t discuss your illegal activities on the telephone. Not even on pay phones!
Avoid storing potentially incriminating tools, clothing, shoes, paint, and documents in your house or apartment. (This includes maps of the project in question.) If possible, hide them in the woods or in a rented storage locker (rent one under an assumed name). If you must keep anything potentially incriminating at home, hide it well. Keep in mind that a remote corner of your property away from your house can be legally searched without a search warrant.
In a 1988 decision, the Supreme Court ruled that the Bill of Rights provision against illegal search and seizure (Fourth Amendment) does not apply to garbage. Justice Whizzer White said that citizens do not have a “reasonable expectation of privacy” for their garbage, even when it is sealed in opaque bags. The upshot is that police do not need a search warrant to go through your trash.
Destroy potentially incriminating materials:
Tools — Periodically dispose of all tools that leave a distinctive mark (pry bars, bolt and wire cutters, etc.), and replace them with similar items from a different manufacturer. Right after a particularly “heavy” job is a good time to dispose of tools, but it is not the only time you should take this precaution. Remember, the cost of replacing tools is far less than what a good lawyer would charge you for an hour of legal services. Tools may be disposed of in dumpsters, buried in remote rural locations, or dumped into a deep body of water. Buy only well-known, popular brands of tools so an unusual purchase does not stick in the mind of the salesperson.
Papers, maps, and documents — Burn completely and crumble the ashes. Bury or flush down the toilet the crushed ashes.
News clippings, diaries, addresses, etc. — Do not keep any newspaper clippings about monkeywrenching. Mention nothing of possible relevance in your diary, calendar, Day-Timer, or other notes. Do not have addresses, phone numbers, or names of other monkeywrenchers in your address book, Rolodex, or even on scraps of paper. Such addresses and notes constituted major evidence against one of the defendants in the Arizona Five monkey-wrenching trial.
Paint — Dispose of in dumpsters. (Avoid fingerprints on paint cans.) Don’t neglect to dispose of rags or clothing that may carry paint spots.
Shoes and clothing — All clothing should be laundered as soon as possible after a job. Clean boots and shoes as well. This can help remove incriminating dirt, fibers, plant debris, and the like. Pay particular attention to grease spots from heavy equipment. If in doubt, dispose of shoes and clothing. These items can be discarded in dumpsters, buried, or burned, as appropriate. Be especially wary of shoes. A distinctive footprint often can be positively connected to the shoe or boot that produced it. Shoes found in their homes were used as evidence against two of the defendants in the Arizona Five trial.
Don’t worry about the cost of replacing tools, clothing, and the like. Freedom is priceless.
Clean your car — After using a vehicle on a job, vacuum the floor and wipe off the seats to get rid of incriminating soil, grease, etc. Don’t forget to clean under floor mats, cracks in seats, etc. After vacuuming, dispose of the bag, or better yet, use a vacuum at a commercial self-serve car wash. If you’ve been driving on unpaved roads, thoroughly wash the vehicle’s exterior too. Don’t neglect the underside of the vehicle, especially the wheel wells and inside of bumpers. A self-service, commercial car washing establishment is a good place to wash and vacuum your car. Incidentally, spreading a little mud on your license plate before an operation to prevent it from being read at night is a good idea, so long as you are operating in an area in which mud would not seem out of place. Use common sense, though — a muddy plate on an otherwise clean vehicle would probably attract suspicion.
Remove floor mats before an operation so they don’t accumulate evidence. Replace them after the car has been vacuumed. Clean behind the front part of the doors under the hinges and between the front part of the doors and the body. Dirt accumulates there. Do all of this after the car has been professionally washed. Then go to a self-service car wash and re-wash the entire car. Be sure to direct the high pressure water and soap under the chassis and in the wheel wells. Consider changing the air filter. If witnessed, this compulsive car cleaning may be suspicious. Try to be inconspicuous.
Never carry anything incriminating with you if it is not essential. After completing your mission, resist the temptation to carry out survey stakes, surveyors’ flagging, stolen or damaged pieces of equipment, and the like. If you are stopped and searched (whether by an actual law enforcement officer or by an irate miner, logger, stockman, or whatever) such items would likely be legally admissible as evidence against you.
Always have a story prepared to tell the police if you’re stopped in the target area. Keep it short and simple and avoid unnecessary details.
Operate with a small group of trusted friends, and never have more people on an operation than are absolutely necessary.
Assign each member of the team a fictitious first name or number for operational use. Numbers may be best, since fake names may be more confusing. Memorization of these nommes de guerre will take concentration and practice; otherwise, during the stress of an operation it will be too easy to revert to using real names. Never use your fictitious names in public when not on a mission.
Limit talking when on an operation. Practice a few simple hand signals in advance, at least if there will be enough light to see them during the operation.
Avoid nights of the full or nearly-full moon. A quarter to half moon should ordinarily give enough light for night movement.
Don’t keep a diary or other written records of illegal activities. Don’t get drunk and shoot off your mouth down at the corner bar. Bragging has put more people in jail than any other factor.
If you are engaging in serious monkeywrenching, avoid overt political activism, rallies, demonstrations, and the like. When the police begin looking for suspects, they will begin by consulting existing records of activists, especially those with records of arrests and convictions. These records are very detailed, never destroyed, and are available to any police agency requesting them. Investigative detectives will visit known “hangouts,” attend workshops and demonstrations, and make “radical” statements to elicit invitations to clandestine circles. The head of the local Sierra Club chapter or another “respectable” environmental group may be questioned, and she may cooperate fully, even to the point of suggesting suspects. (Some mainstream conservation groups, like the Western Canada Wilderness Committee, have offered substantial rewards for monkeywrenchers in a futile effort to gain credibility with politicians and industry.) Keep a low profile.
Let knowledge be your greatest ally. Go to the public or university library and study police investigative techniques.
Avoid patterns. This is easier said than done. You will tend to establish patterns as to type of target, days of the week on which you are active, times at which you strike, etc. Police investigators will look for these patterns and can be surprisingly good at predicting one’s moves. This can lead the unwary monkeywrencher into ambushes. Make a conscious effort to keep your actions as random as security permits. Periodically “lay low” for awhile. If you suspect that the police are investigating your activities or conducting stake-outs, cease all activity for a few months. Limited personnel and budget will force the authorities to assign their investigators to more pressing matters.
Such interludes are good times to dispose of tools, intelligence files, and other possibly incriminating materials. Be clean as a whistle in case investigators get a lead on you, or otherwise become suspicious enough to haul you in for questioning or obtain a warrant to search your home.
A final rule: Don’t hurt anyone. Respect all life.
— Fearless Fosdick
Disposing of Evidence
Recent arrests have included the seizure by police of large amounts of material as “evidence” from suspected eco-raiders’ homes. Carefully observe all security precautions for disposing of evidence. After any job in which you may have left tool marks from pry bars, screwdrivers, wire cutters, and the like, immediately use files and emery cloth to alter the tools’ prying/cutting edges to prevent a positive “match” between your tools and evidence left at the scene. This must be done before the tools are stashed away. If you’ve used something like spray paint or glue during a “job,” get rid of any remaining and replace it with a different brand for the next action.
Have a well-rehearsed drill for disposing of evidence in an emergency. If you don’t have a stove or fireplace for documents, you should have a sheet of metal or metal container in which you can burn documents without burning your house down.
If you must leave your house to dispose of tools and other evidence, make a dry run first to check for ambush or surveillance before taking the tools out of your dwelling. Have at least two emergency plans for disposing of tools. Dumping them in water is best, but only if they cannot be seen from above. Don’t dump things in a stream in the dark only to find that in daylight the objects are easily seen! Select your dump spots ahead of time (and beware of places where the water level rises and falls). Plan both your approach and departure routes. Though it’s best to scatter the tools about in the water, do it quietly from the edge of the water. Loud splashing noises may attract the attention of an unseen passerby.
If a watery grave is not available, tools can be buried in remote spots (ideally, several spots), or tossed from open car windows while driving down remote highways (after having been cleansed of fingerprints, of course). Items tossed from vehicles should be thrown far back in the brush where hunters and casual passersby are unlikely to find them.
Don’t wait for an emergency situation to find your disposal sites — plan ahead.
If you prefer to temporarily bury your tools between jobs, either on your own property or at a remote site, consider the following:
-
Decoy pieces of scrap metal can be buried at many spots around your cache to mislead and discourage searchers using metal detectors.
-
Avoid burying at night. Even if the use of a flashlight doesn’t betray your presence, you may have a hard time returning the ground to a normal appearance that will pass muster in daylight.
-
Be careful when burying or digging up your cache, even if it’s in a remote location. Sit down and watch and listen for awhile, then move on to another spot and repeat, before commencing digging operations. Your burial site should be a location where you cannot be observed except from close up. Be wary for hikers, hunters, or other passersby.
-
Getting out of a car with a shovel and heading into the woods looks suspicious. Use a folding entrenching tool (found at military surplus stores) that fits into your pack, or even a small backpacker’s trowel designed for burying human waste.
-
Encase your tools in several layers of sealed plastic bags to protect against moisture.
-
Frozen ground can be a problem in winter. Bury shallow in winter. Mixing salt with the covering soil can limit freezing problems somewhat.
-
If you are caught at a burial site, claim that you were just walking by and saw something sticking out of the ground. If you took proper precautions when you buried your tools, there will be no fingerprints on the tools or bags. Of course, if you are carrying a shovel, you might have some explaining to do.
-
Never bury tools used in ecotage on your own land or that owned by friends or associates. Police agencies are experienced in the use of metal detectors to uncover buried caches. You can throw off metal detectors by burying metal tools in old landfills that have other metal present or by scattering nails and scrap metal through the soil where you do bury your “monkeywrenches.”
— Pinky Burns
No Evidence
After any act of ecotage, it is essential that there be no evidence — in your possession or at the site of the action — that could link you to the “crime.” The basic principles for eliminating all potentially incriminating evidence are:
-
Don’t leave anything at the site that can be connected with you.
-
Don’t take anything away with you that can be connected with the site. More specific suggestions include the following:
-
Wear coveralls or common work clothes. Should a button or another fragment from practical clothing of this type be lost on the site, it would be unlikely to arouse suspicion. Use common work gloves, such as cheap cotton ones.
-
Minimize what you wear and take with you onto the site. The less you carry, the less likely you are to drop something which might later be used as evidence.
-
Remove fingerprints from everything on your person before you enter the site — even such internal parts as flashlight lens, bulb, and batteries; radio batteries; and the insides of cases and tool boxes. Authorities will fingerprint any possible piece of evidence they find, in every conceivable place you could leave a fingerprint.
-
Don’t leave footprints. Wear common work boots or shoes. Cover them with a cloth bag or wrap to blank-out the sole. Cotton duck canvas and burlap work well for this, and are easily disposed of.
-
Don’t leave tire tracks. Use a common brand, size, and style of tire. Avoid damp or muddy ground. Generally, if you stay on compacted roads that site workers use, tire tracks shouldn’t be a problem. If you must drive where tracks will be conspicuous, sweep with a branch or broom; or drag a large branch tied in such a way that it can be released quickly while driving. This last technique is often ineffective on wet ground.
-
Use top-quality tools. Tools that break cause injury and leave evidence. Use common US brands such as Proto, Thorsen, Challenger, Utica, Bonney, Wright, Snap-On, New Britain, SK, Diamond, Ridgid, H.K. Porter, Channellock, Craftsman, etc. Avoid tools made in Taiwan or Hong Kong.
-
Use a stone or file to dress-up after use the working surfaces of tools like wrenches and bolt cutters that leave distinctive marks. Better yet, remove the broken bolts, nuts, chain-link pieces, and other fragments of metal that you have cut; discard them off site.
-
Anything written should be either innocuous or coded. It’s safest never to write anything related to the action.
-
Use deliberate “false evidence” with great care, if at all. If no real evidence is left behind, the scattering of false evidence is a waste of time. It can also backfire and/or get innocent persons in trouble.
-
Remove dirt, grease, oil, paint, etc. from tools and clothes as soon as possible. Use an ultraviolet light to check for special marker dyes. If you suspect a special marker dye, dispose of the article. Clean tools of plating chips or paint chips before and after the action. (Remember that if you worked on your green car yesterday with the same wrench, and you leave green paint on the bulldozer, it may be incriminating. Likewise, if you have yellow bulldozer paint on your wrench.)
-
Think. The length of your step is evidence. Your blood is evidence. Watch for infrared cameras or any strange electronic equipment. Don’t photo-document your action (surprisingly, some people do!), and never tell anyone who doesn’t need to know.
-
Avoid creating suspicion in the first place. Act normal. Use clothing and equipment that have other legitimate uses. Don’t hide anything that wouldn’t be hidden under normal circumstances. Use big tool boxes that can be used to hide things in a “legitimate” manner. Prepare your story/alibi in advance.
-
— The Shadow
Written Records
While written records are the classic security mistake that leads to many convictions, you may occasionally have to keep simple notes when planning a mission. Avoid obvious references to targets. A monkeywrencher’s note “Uranium mine turnoff milepost 149.3” can become a nature lover’s “beautiful rocks m.p. 149.3.”
A written note on a cigarette paper can be easily eaten, balled up and dropped, or hidden in clothing seams. Write only with pencil (No. 2) in case you have to swallow your work. Another suitable paper type is the edible paper made of starch fibers that quickly dissolves in water. It is sold in novelty/magic shops and on the novelty/gag racks at some tourist junk shops. It can also be purchased from mail-order outfits like Johnson Smith Company, 4514 19th Court E (or PO Box 25500), Bradenton, FL 34206–5500. Ask for their catalog. Practice with this paper before using it and learn to keep the pieces small.
Most important: remember that any paper or cardboard underneath the slip you’re writing on will carry an impression of your letters (and make dandy evidence in court). Impressions can also be left in other relatively soft materials such as a wooden table used to write on. Writing on a piece of glass or mirror is a good way to avoid such traces.
— Mata Hari
Avoiding Arrest
If you have been active in one area for any length of time, the police will consider baiting a trap to catch you. In setting a trap, the authorities will look for any patterns you may have inadvertently set. Perhaps you only work on certain nights. Perhaps you hit certain targets more than others. Perhaps your routes of approach and withdrawal to your targets are known. Monkeywrenchers have narrowly escaped from police traps on some occasions simply because they were silent and alert, while the opposition was bored with weeks of fruitless waiting. The best way to avoid traps is to hit your target one time only, but with maximum effectiveness.
Sometimes a trap will be baited by deliberately leaving heavy equipment temptingly parked along rural roads. In such a situation, chase cars will be carefully hidden in the area, often on back roads and dirt lanes, sometimes one on each side of the “bait” but a good distance away, ready to intercept suspect vehicles. If you see such a tempting target, be careful! Instead of striking immediately, scout the area carefully ahead of time, carrying nothing incriminating.
In cases where construction equipment has been successfully sabotaged repeatedly, the owners will often move it at night to a more public location, such as a roadside, to facilitate protection by police or private guards. Look for the vehicles of private security guards, which may be concealed among the pieces of heavy equipment.
Be aware that monkeywrenchers may run afoul of the law in a completely unexpected manner. Don’t break speed limits when going to and from an operation — you could fall victim to a speed trap or police radar. A simple rule to follow to prevent most routine traffic violations is to have the front seat passenger (i.e., the person in the “shotgun” seat) watch for road hazards, and caution the driver if the car exceeds the speed limit. If the driver is over-sensitive about this, she shouldn’t be driving.
Another conventional law enforcement activity to which unwary monkey-wrenchers could fall victim is the local game warden on the lookout for jack-lighters or poachers. A tactic used frequently by game officers is to park on a hill that allows a long view of a road often used by poachers at night. Drive by the local office of the Department of Fish and Game to learn what type of vehicles the game officers in your vicinity use. If you are out on a job at night and think you have spotted a game officer in the vicinity, scratch your operation and wait for another night. These men and women are providing a valuable service in fighting poaching and should be helped, not hindered or distracted. Also, game officers are full-fledged law enforcement officers with all the power of the state behind them, and may enforce other laws besides game laws. Since they may stop you at night, never carry rifles, spotlights, or anything else that might make you look like a poacher when on a monkeywrenching operation.
Keep in mind that every time a law enforcement officer stops to check any suspicious person or thing, a record is made of the event. Even if you are just briefly stopped and then released, that record may later be used to place you near the scene of an illegal activity. If stopped by a cop before you hit a target, cancel the mission. If stopped after you have already carried out an operation, go to special pains to destroy all evidence as soon as you arrive at a safe location.
— Trav
Field Notes
-
When placing lookouts, consider all possible routes of approach. Place lookouts to cover these.
-
The growing popularity of monkey business is also making it more dangerous. Here’s a method of approach that has proven safe for day or night, by one person or a group.
-
Always observe from a distance first. Because daytime is riskier, stay well away and use binoculars. Day or night, hide in deep shadow and don’t let shiny or brightly colored objects betray you. Watch for as long as you can, especially if a parked vehicle nearby might indicate a watchman in the area.
-
If all appears quiet, you’re ready to do a “walk-by” to either spot a watchman or trip an ambush. We usually put on our new monkey shoes at this point, but carry nothing incriminating. The idea is to be clean if you’re stopped. Quietly, but out loud, practice the casual and friendly answer you’ll give when confronted. (Practicing your comments silently in your mind is not nearly as effective as practicing them out loud. All good public speakers, singers, and other performers know this.) Scout as hikers, bird-watchers, young lovers, or the like.
-
Walk past — but not through — the target area, glancing about casually (in daytime from behind sunglasses) for sign of trouble. If no one confronts you, sit down a short distance away and continue to look and listen.
-
If you are still uncertain, do a dry run to trip an ambush. Pause at the target, like a bulldozer, and pretend to be doing something to it. Do not actually touch it. If caught at this point, you can just explain that you’ve always liked big machines and were curious. You’ve committed no crime.
-
Since the Freddies will read about this, add a final step of leaving the immediate vicinity and hiding nearby to see if anyone emerges to check whether you’ve actually done any damage. Or have a hidden lookout watch.
-
If all is still clear, go to work.
— Safety First
Camouflage
Light Reflections
Light reflections off the face are rarely a problem in night-work. Still, if for certain jobs you feel reflections could be a problem, tone down bright spots by rubbing a little burnt cork across the forehead, on the cheekbones, on the top of the nose and on the point of the chin. Never spread the blacking all over the face — hitting the aforementioned high spots lightly is sufficient. This form of night camouflage is rarely used, mainly because it makes the user stand out, and anyone observing an individual so made up would almost certainly conclude that they were engaged in some illegal activity. In certain wilderness operations, however, it may even be beneficial to use camouflage face paint (available at sporting goods and bow hunter supply stores). How-to books for bow hunters may be your best guide. Anyone using either of these techniques is advised to carry a couple of packets of moist towelettes (like “Wash ‘N Dry”). These should be carried carefully safety-pinned into a pocket (make sure that the pin does not pierce the inside of the packet, or the towel will dry out). After an operation these can be used for quick cleanup. Camo face paint is easy to remove if you put a thin layer of baby oil on the areas to be camouflaged before applying the face paint. This is at least true for the military stuff and possibly for bow hunter face paint.
Footwear
Proper footwear is important. Remember, shoes and boots leave prints which may constitute valuable evidence. Such prints do not produce leads on suspects, but they do constitute physical evidence that might be matched up later when other means produce a suspect. Cheap tennis shoes that can be thrown away after a major job or series of minor hits are ideal. If it’s not too awkward, one can buy shoes a couple of sizes too large and wear extra pairs of socks to fill them out. This will confuse the investigators who may photograph and/or take casts of footprints at the scene of the “crime.” If good traction is not critical, obtain shoes with smooth soles. If you do not throw your monkeywrenching shoes away, at least avoid wearing them for any other purpose. Do not ever wear them around your home, since the dirt around your house and driveway will be the first place that the authorities will look for matching footprints.
For some operations, lightweight shoes will be impractical. For work in rough terrain or at night, where the danger of falls and sprains is real, sturdy boots are generally called for (though some people even backpack off-trail in light-weight running shoes — one possibility is to tape your ankles before wearing running shoes for night or rough ground work). Since it may be costly to throw away boots after a “job,” one might consider covering the boots with oversize socks (dark for night-work). Carry several pairs if operating on hard or stony ground. Dispose socks after an operation, since minute fibers will have been left as evidence. You could also make boot coverings out of heavy canvas.
Field Notes
-
It is hard to determine just how effective footprints are as evidence. During the Arizona Five Trial in Prescott, the FBI lab specialist could not definitely match a very clear print to one of the shoes seized. The testimony indicated shoe prints were vague and indefinite evidence. In contrast, there have been recent claims that podiatrists can not only match a shoe with a track but can positively identify the foot in it, presumably from pressure points, weight, and so forth. Whatever the reality is on shoe prints as evidence, it is unwise to keep shoes worn during any serious ecotage operation, and absolutely fool-hardy to keep them in one’s home.
-
Do not wear anything on your feet to disguise your tracks that may seriously impede your speed of movement or maneuverability. Strapping boards to one’s feet (“Air Bakers”) has been proven to make a monkeywrencher helpless.
-
A recent arrest in Utah shows how law enforcement relies on evidence like footprints. Ecodefenders must never let their curiosity cause them to leave incriminating footprints near heavy equipment and the like. You can get stuck with something you didn’t do.
-
Here’s one monkeywrencher’s recommendations on footwear: “To be ready on a moment’s notice, I buy different brands of cheap canvas shoes. The newest pair goes into my backpack. I use them for fording streams, but I back into the stream with them on and erase the footprints behind me. Once my hiking boots are back on, I smear out the canvas shoe prints on the bank where I exit the stream. This way, I can be ready for a spur-of-the-moment hit, knowing that I left no prints behind me that can be linked to the scene.
“Once a pair of these ten-dollar shoes have left their prints at a hit, I never carry them again in daytime when escape is difficult. They are then reserved only for nighttime escapades, and not even worn around the house (I don’t want to leave nasty old footprints in the flower bed by mistake).
“Out here in hostile territory where redneck cops can get a search warrant quicker than a turd gets flies, these shoes are either stashed in the back-woods or put in specially-built hiding places inside the homestead.”
Editor’s Note: The precautions enumerated here seem worthwhile, with one exception, and that is the propriety of keeping shoes that have left a print at a “hit” anywhere around one’s dwelling (or place of employment or whatever) no matter how well hidden. If you are suspected by the authorities, they may well tear your house completely apart looking for “evidence.” You should weigh the cost of a cheap pair of shoes against the cost of months or years behind bars, and choose accordingly.
Clothing
Never underestimate the importance of proper clothing. What is good for one type of operation might not be for another. Urban or rural, day or night, season of the year — all of these factors affect what type of clothing is best.
As a general rule, avoid the exotic and unusual. One should not stand out. Dress like the locals, be they construction workers, loggers, or corporate executives. It may be necessary to blend in with the local scene to escape from the target area. Dress and cut your hair like the locals. Women should avoid halter tops, short shorts, or other outfits that make them noticeable.
Camouflage may be of many types. For a wilderness operation (tree or road spiking, for example), consider traditional, military-type camouflage clothing, which ranges from expensive, tailored gear available from fancy sporting goods firms to used, genuine military uniforms sold by “war surplus” stores. Military camouflage comes in many patterns designed for different geographical regions, such as woodland pattern or desert pattern. Consult the specialized literature, such as military training manuals on camouflage or how-to books for bow hunters (which also give instructions for using camo face paint).
For many operations military-type camouflage is not only unnecessary, but might actually make the monkeywrencher stand out as suspicious. In operations around construction sites or machinery, coveralls and a hard hat might be best. A monkeywrencher so attired might pass for a worker if seen. Used coveralls can be purchased for a reasonable price at many linen supply companies. The serious monkeywrencher might purchase several pairs, in different colors.
Some plaid patterns are nearly as good as camouflage and fit right in with local styles. Pendleton “Black Watch” plaid is good in coniferous forests. Some brown plaids are good in arid environments. Janitors, mechanics, and the like often sport a grayish-green work shirt. It’s good in a variety of landscapes but especially in sagebrush country.
Dark clothing is the rule for nightwork. Long sleeves protect the arms and cover light skin (visible on moonlit nights). Avoid too tight clothing that restricts movement, and too loose clothing that snags on branches, barbed wire, and the like. If stealth is particularly desired, nylon and plastic clothing should be avoided, since it makes a “swishing” noise when one moves. Wool is quieter than cotton. However, woolen garments are particularly susceptible to leaving fibers behind. Brush, cactus, barbed wire fences, and even rough brick can snag clothing and cause the ecoteur to leave fibers. Although it is unlikely that investigators would find minute clothing fibers left at an outdoor monkeywrenching scene, you should nonetheless avoid unusual, exotic clothing, and should consider discarding clothing after a particularly “heavy” operation.
Used clothing stores such as those operated by Goodwill or the Salvation Army can be sources for cheap, throw-away clothing (don’t set a pattern of frequently buying such items at one store and becoming known by the clerks). Again, coveralls (dark) may be best, although “work” shirts and pants are probably adequate.
Many commercial laundry detergents contain chemical “brighteners” that increase the reflectivity of clothing (ever notice your sleeves glowing under a “black light”?). Avoid these when washing clothes to be used in secretive activities. Only actual laundry soap, like Ivory, will leave you with the wonderfully dull and dingy look while still getting out those telltale body odors. All detergents will increase the reflectivity of your clothing, and will make you more visible to night vision devices. (See the section on Eyes of Night.)
Gloves
Gloves are a must to avoid leaving fingerprints. Each type of glove has its own characteristics:
Leather — Good, highly durable, and suited to general purposes. However, leather can leave distinct prints like fingerprints, especially if it becomes contaminated with oil or grease.
Cloth — Not as durable as leather, but adequate for most work, and cheaper. The low cost makes it practical to dispose of cloth gloves after an operation; a desirable thing to do. Cloth patterns can be left under the same conditions mentioned above for leather.
Plastic or Rubber — Usually good for light work only. They will make one’s hands sweat. When disposing of this type of glove, one should keep in mind that the insides carry a perfect set of one’s fingerprints. Burning them in a fire insures thorough destruction by melting.
Regardless of which type you use, dispose of any manufacturer’s labels before heading out. Make sure your gloves cover the entire palm, as any part of the palm can leave distinctive prints for investigators.
Field Notes
-
Some monkeywrenchers argue that cotton gloves are better than leather. Because leather is cow skin, it has a grain as unique as a human fingerprint. A good “gloveprint” can be positively linked to a specific glove taken from a suspect. The cotton glove is a woven material whose prints might be linked to a certain manufacturer, but only anomalies like tears or manufacturing flaws will connect them to a specific glove. Most important, since you can purchase cotton work gloves cheaply, you can afford to buy and properly dispose of several pairs a year, rather than be tempted to keep expensive leathers for “one more job.” The thinnest cotton gloves (like photographers use) might on rare occasions leave a fingerprint, but heavier cotton work gloves will not. To further confound law enforcement, buy a different brand of glove each time, and never dispose of evidence at or near the scene of a hit.
-
Dispose of your gloves very well. Like hats, they most likely contain an arm or hand hair which can be traced positively back to you (assuming you’re caught near the scene of the crime or are “questioned” later). If you are pursued, it may be tempting to simply toss away gloves with incriminating paint, grease, etc. on them. Better to take a moment to bury them (ineffective if dogs are on your trail), or to continue to carry them until escape is assured and then dispose of them safely by burying or burning. Disposing of gloves near the crime scene should be done only if capture appears unavoidable and immediate.
Headgear
Headgear is important in some situations for warmth and disguise. Knitted wool watch caps are both commonplace and comfortable. Wide brimmed hats hang up on brush and tree limbs and should be avoided. Ski masks and bandannas can be used for disguise, but their use may constitute an additional violation of the law. Do not lose your headgear at the scene of an action. It will contain samples of your hair.
If you have long hair, tie it back. Ponytails and braids can be stuck down inside a coat.
Vehicle Camouflage
For lower visibility, paint your truck, van, or whatever one color with a good automotive “semigloss” or flat paint. Good colors are white, yellow, orange, green, or brown.
You may want to install a CB antenna or two, even if you don’t have a CB radio, in order to blend in with the local bumpkin proletariat.
Paint the wheels the same color as the vehicle, or else flat black. Avoid tires with raised white letters, and any other custom accessories. Avoid “suggestive” bumper stickers on the vehicle. An American flag decal or NRA sticker might be a good idea, if you want to fit in with the local “good ol’ boys.” (Scotch tape them to the inside of a window so you can later remove them.)
Cover packs or other camping gear with a plain canvas tarp. Tool boxes, torches, and other “working gear” left out in the open are a good idea if you wish to look like you belong on the job.
A set of official-looking magnetic door signs might also be useful in order to look like a contractor of some sort who has business in the area. Magnetic door signs are instantly removable or installable. This helps disguise your vehicle.
Make sure your registration, driver’s license, and vehicle identification number are all legal. A recently-purchased car might not be in the computers yet, and thus could give cause to detain you. If ownership of a car can’t be established, that alone is sufficient cause for a police agency to obtain a search warrant for the car.
Tires, windshield, blinkers, and brake lights should be in good condition, to avoid giving the authorities probable cause for stopping you.
Switching license plates is not advised. Make sure that your front and back plates match. Incidentally, in the West, Idaho plates are the hardest for officers to read, while Utah plates are very legible. Colorado, Arizona, Nevada, and California plates all fall somewhere in between.
— The Invisible Man
Field Notes
-
Many ecodefenders claim it is safer to monkeywrench out of state than in one’s own. This is not true for activists with California license plates — they are considered fair game by most non-California badge wearers who get their jollies by hassling residents of the tarnished golden state. In California, however, out-of-staters are rarely bugged just because of their origin except for those with Mexican license plates.
-
If you have suggestive bumper stickers on your car, you can cover them with masking tape and duct tape while “on the job” or visiting unfriendly towns like Escalante, Utah. Cover your sticker with masking tape first, then cover the masking tape with duct tape. The masking tape will protect your bumper sticker from being peeled off or torn when the duct tape is pulled off. When your need for maintaining a low profile is over, simply peel off the duct tape and there is your bumper sticker proclaiming its message to the world. If you are serious about security, however, you will remove such bumper stickers from your vehicle while on the job.
Field Notes — General Camouflage
-
Before you go into the woods at night, check your running shoes, clothing, pack, and other equipment for reflective patches and remove them. For example, many running shoes today have reflector stripes on them to make runners along roads at night visible to cars. To check, dress exactly as you would for nightwork, stand to the side of a road, and have a trusted friend drive down it with the headlights on as you turn around — if anything you are wearing reflects light, she should notice it.
-
Campmor offers in their catalog what they call the “world’s quietest pack.” It is touted as, “The pack when you don’t want to be seen or heard. Made of 26 oz., water resistant, virgin wool. This pack will not pull, thread or catch. Forest green color blends into the woods nicely.” Sounds like it was made with monkeywrenchers in mind!
Tools of the Trade
Keep the number of tools used in an operation to an absolute minimum. Useful tools may include adjustable pipe and crescent wrenches, hacksaws with spare blades, heavy duty wire cutters or bolt cutters, pliers, pry-bars, screwdrivers, and crosscut saws. Especially noisy tools should be avoided. Hammers fall into this category, although they are essential for certain types of work, such as spiking. Chain saws are usually out of the question for any clandestine type of activity. Insulated handles (tape may be used for this) minimize the sounds of tools clanking together.
If you are carrying only one or two tools, secure them to your wrist or belt with a short cord, to prevent loss by dropping them in the dark. Otherwise, carry tools in jacket pockets or in canvas bags slung from the shoulder or attached to the belt. If bags are used, they should be easy to open and close. Before heading out, shake the bag to insure that the tools don’t rattle or bang together. A dark towel or rag can be used to deaden any noise. A towel will also prove useful if you need to cut wire: drape a couple of layers of towel over the wire and then cut. The towel will deaden the sound of the wire separating. Be sure the ends of a taut fence wire don’t snap back and cause noise. A shallow cut followed by flexing the wire back and forth should allow the wire to separate quietly. Practice.
Choose tools of common manufacture and buy them with cash at large retail outlets or discount houses where the cashier is not likely to remember you. If asked for name and address, even for a warranty, give false information or none at all.
If you must buy special tools, materials, books, or the like by mail, don’t leave a “paper trail” for investigators to follow. Don’t use charge cards or personal checks. Send postal or bank money orders instead, and do not fill out your name and address in the part labeled “sender.” Remember, bank accounts are accessible to the police, and provide a detailed account of purchases, travel, and even political opinion. All checks cashed, by law, must be recorded on microfilm. A basic step in police investigation is to gather complete bank records of all possible suspects and co-conspirators. Your bank does not tell you when they hand over copies of your records to a police agency. In the Arizona Five case, the FBI secretly acquired complete bank records for the accounts of Dave Foreman, Earth First! Journal, and the Earth First! Foundation, well before any arrests.
Microscopic marks left by tools can sometimes be used to link a specific tool to the scene of a “crime.” Also, paint flakes or other material from a “crime scene” may be found on a tool and used as evidence to link that tool to a specific site. Because of this, too, it is prudent to dispose of tools regularly and to replace them with tools of a different brand, size, or type.
Before beginning a “mission,” prepare the tools to be taken by donning gloves and wipe them free of fingerprints with a rag. Store the “clean” tools in a bag to prevent accidental handling (cloth laundry bags are good). All surfaces must be wiped off. In the case of a flashlight, for example, you must be certain that no prints will turn up on batteries, bulb, reflector, or any other part you might have handled.
Hardware
Cutting tools — For cutting chainlink fence, small (14”) bolt cutters work well. For something smaller, try the Sears 8” wire cutter with compound-action jaws. Fence tools should be used for cutting barbed wire. Most wire cutters and fence tools will cut chicken wire and hardware cloth, but they are slow. If you anticipate much of this type of cutting, tin snips or compound leverage sheet metal shears are faster (available from Sears).
Wrenches — If your project involves removing bolts, you may want to scout the job ahead of time. Investigate the bolts and nuts so that you can bring the right tools. Adjustable wrenches work for most jobs, but others require proper sized wrenches, hacksaws, or other tools. Measure the distance between parallel sides of the bolt head or nut. Are they standard or metric? Copy any markings you find on the bolt heads. What do they mean? If they indicate that the bolt is heat-treated or case-hardened, they cannot be cut with bolt cutters and require special hacksaw blades. Are the bolt heads and nuts square or hex (6 sided)? Are they standard type or will specialized tools be required to remove them? Notice the placement of the bolts and nuts. Can you reach them with crescent, end, or box wrenches, or will it be necessary to bring socket wrenches and extensions?
Place a few drops of Liquid Wrench or Penetrating Oil on the nuts and bolts during your recon so they can be more easily removed later, but wipe off the drips and use a product with a minimal odor so you don’t tip off workers or security guards. Be careful during recon not to be seen; later on your work night, if anything seems abnormal, figure you were seen. Cancel the job and slip away.
Based on your recon, use crescent, end, box, or adjustable wrenches if bolts are accessible. If you must use socket wrenches, use 6 point sockets for hex bolts/nuts since 12 point may slip if the head is worn. Eight point sockets fit square nuts and bolts. These are available from Sears, Snap-On, and others. If the bolt studs protrude very far through the nut, you may need to use Deep or Bolt Clearance sockets. Six point deep sockets are readily available but 8 point deep sockets are only available from Snap-On.
Drive tools may be necessary for difficult nuts and bolts. Very large bolts may demand 3/4” or even 1” square drive tools. These are heavy. When removing bolts, block the head or nut with a crescent or pipe wrench or another socket. Use a breaker bar (cheater) to loosen the bolt. When the bolt is moving, put a Ratcheting Adapter (Snap-On #S67) between the socket and the breaker bar and finish pulling the bolt or nut. Two short lengths of pipe joined with a coupling will make your cheater easier to carry and conceal. If you anticipate using heavy force on nuts, select thick-walled, heat-treated Impact socket wrenches. Heavy duty Slugging wrenches are also good. A hammer-operated Impact tool can be used to loosen stubborn screws and bolts, though this is noisy.
Power tools, chain saws, and oxy-acetylene or propane torches all bear serial numbers (sometimes not readily apparent). A tool such as these dropped at the scene of a hit can be traced from the manufacturer to the retailer who sold it. Leave no paper trail linking you to the tool purchase.
A Fanny Pack For Monkeywrenchers
This fanny pack system allows the eco-raider to work without the loss of speed and agility that backpacks cause. This set-up has been developed and field tested over several missions and works quite well. However, others should experiment and develop a system that suits their own specialty and style of ecotage.
Wear the pack on your fanny until you need something, then turn it around your waist so that the compartments of the pack are in your lap. This way you don’t need to remove the pack which is important so you don’t lose your toys.
See the illustration.
Note 1: The upper compartment should be used for gloves and kerchiefs.
Note 2: The main compartment should hold the basic kit. Take only what you may need. Some examples are:
-
Food
-
Survival equipment (space blanket, matches, maps, gauze pads, antiseptic, wet wipes, water purification tablets, etc.)
-
Flashlight
-
String and ropes of small diameter
-
Super glue (if used frequently, keep it in your pocket)
-
Whistle (dog and regular)
-
Spikes and a hammer
-
Tools (fence tool, pliers, adjustable wrenches, etc.)
-
Kerchiefs
-
Blaze orange vest with reflectors (to blend in with hunters or construction crews)
-
Caltrops
-
Spray paint
Note 3: A rock climber’s chalk bag is convenient for carrying items used more frequently. The bag closes with a draw string. Uses include storage of:
-
A radio (scanner or walkie-talkie)
-
Camera
-
Water bottle
-
Marbles or caltrops
-
Flashlight and/or tools
-
A container with grinding compound or sand.
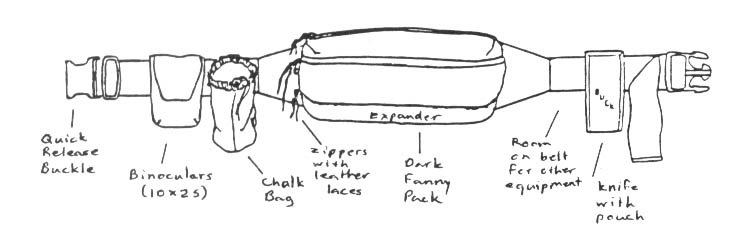
Miscellaneous
Flashlights may be essential for night operations. See the section Eyes of Night later in this chapter. Watches are needed to coordinate the timing of actions, drops, pick-ups, etc. Any reliable watch with a lighted or luminous face will do. Particularly useful are waterproof digital watches that feature an alarm, a stop watch with an alarm, and a timer with an alarm. Get one with a button to light the face. Black, of course. A flexible terry cloth wrist sweat-band in a dark color, available at sporting goods stores, will cover up the tell-tale light and protect the watch from abuse.
Every team member should carry at least two quarters (in separate pockets to prevent noise) for emergency phone calls. If you become separated from your team or miss a pick-up, you may need to walk to a pay phone and call for an emergency pick-up. (Set up such an emergency phone number with someone on duty at it as part of your planning.)
— Shade Tree Mechanic
Radios and Communications Equipment
A radio is perhaps the best tool a monkeywrencher can have to avoid getting caught. Radios allow you to place a lookout miles away on a mountain top or along an access road. This changes warning time from moments to minutes and allows a clean getaway. Beware, though, that use of any radio equipment for illegal purposes or to aid anything illegal is a violation of FCC regulations and is therefore a federal offense. Take this into account especially in cases where the act of monkeywrenching itself is relatively minor in the eyes of the law.
Types of Radios
CBs — A basic piece of radio equipment is a full-power (5 watt) citizens band (CB) hand-held transceiver (“walkie-talkie”) with multichannel capability (preferably all 40 channels), an internal 12-volt battery supply, and a high-low power switch.
Five-watt transmitters have an effective range of from one to a dozen miles or more depending on local terrain, weather, and electrical interference. Greater power is rarely necessary, and even with this amount of power you could be overheard by the wrong people in many areas. Thus use the high-low power switch to save batteries and minimize the chance of being overheard.
CBs are recommended because they are relatively cheap, easy to get, and common enough to look only minimally suspicious. Also, because they work in the low frequency AM mode, their signal bends easily and is thus more suitable for rugged terrain than higher frequency FM.
A 12-volt power requirement for the radio allows the unit to be plugged directly into a vehicle electrical system for mobile use. For portable use, the power supply is usually either eight standard AA size alkaline or ten AA nickel- cadmium batteries in series. Alkaline batteries have about twice the electrical capacity of nicads and cost about half as much, but they cannot be recharged (I’ve read that some kinds of alkaline batteries can be recharged, but I’ve never seen them). Nicads can be recharged hundreds of times, offsetting their initial cost of about three dollars apiece.
Nickel-cadmium batteries are especially convenient when they can be charged from a vehicle’s electrical system. A special charger for this purpose can be built for less than 10 dollars from parts obtainable from any Radio Shack or other electronics store. Using a transistorized voltage doubler circuit solves the problem of the vehicle battery being the same voltage as the radio battery pack. Complete plans can be found in the 1982 edition of The Radio Amateur’s Handbook, and assembly requires little knowledge of electronics. Small, portable solar battery chargers are now available from stores and catalogs specializing in energy efficient items. Such a solar battery charger could be used in the field to recharge radio batteries.
Regardless of whether they are charged on a standard home battery charger, on a vehicular battery charger, or in a solar recharger, nicad batteries should be fully discharged before recharging each time. If they are only partly discharged before recharging, they tend to develop a “memory” at that point and may not provide service beyond that point in the future.
A basic radiocom set-up can be purchased for about $100. This includes a mobile CB for vehicle mounting (as low as $40 new through Scanner World) and a hand-held transceiver with choice of three crystal-controlled channels (as low as $60). Even without shopping around for the best price, you can get good quality equipment for a total cost of under $200. As always, think of this cost in comparison to $50–100 an hour in attorney’s fees.
Pager — Some types of radio equipment other than the regular CB “walkie-talkies” may be appropriate for monkeywrenchers. One relatively low-cost system includes the pager-type alarm systems designed for use as a “silent” car alarm. These consist of a compact CB band transmitter and pager-type receiver that beeps when a signal is received. A lookout can use this as a one-way communications system to contact a team of saboteurs. Avoid the Radio Shack alarm of this type, as it is underpowered and virtually worthless for this application. The best model is the “Page Alert” available at large auto parts stores. The transmitter can be mounted in the vehicle permanently, as for an alarm use, or can be made more portable. For portable use, carry the transmitter with a portable CB antenna (commonly available magnetic or gutter-mount types) and a portable 12-volt power supply. This portable power supply can be made by wiring two 6-volt lantern-type batteries (the large ones) together in the following sequence: Connect the positive (+) terminal of one battery to the negative (-) terminal of the other; connect the remaining positive and negative battery terminals to the appropriate positive and negative leads as indicated on the wiring instructions for the transmitter. Tape the batteries together, side-by-side; place them in a small cardboard box and fit the box into a small pack or pouch for easy carry.
If you intend to use the transmitter from a vehicle but do not want to mount it permanently, use the same types of antennas mentioned above, but instead of the battery pack, wire the unit to a cigarette-lighter type plug (available at any electronics store) to enable you to set up quickly and easily.
To transmit, simply flip the switch “on” and the unit will send out a signal for five to ten seconds and automatically shut off. The signal transmission can be repeated by flipping the switch “off” and then “on” again. The “Page Alert” system broadcasts at four watts and has a range (ideally) of one to two miles. Test it in the field to determine realistic ranges. Also, keep in mind that the pulsing signal sent out by this unit can be picked up by other CB radios and even by TV sets if they are close enough to the transmitter.
On the receiving end is the pager-type receiver about the size of a pack of cigarettes. The unit has a clip on the back for affixing to a belt, but this is most unreliable when put to rough use. It is best carried in a shirt or jacket pocket with a button-down flap. When the signal is received, the pager will emit a loud “beeping” tone until shut off. This sound can (and should) be muted by putting several layers of electrical tape over the small opening on top that emits the tone.
Although this system allows only one-way communication, a system of repeated transmissions can be used as a crude form of sending two or three different messages (pre-arranged). One of the chief advantages of this system is that you can set it up for under $150. One warning should be noted, however. The pager-type receiver cannot be relied on to receive transmissions inside a building containing large amounts of metal in walls or frame.
Walkman-type — Yet another kind of radio equipment that is becoming increasingly popular is a short-range unit, the size of a cigarette pack (designed to be carried on the belt), equipped with lightweight headset and microphone. Look for a unit that allows you to choose between a “push-to-talk” switch and a “VOX” switch (this activates the microphone automatically at the sound of your voice). These units are available from Radio Shack as well as survival supply houses.
These “walkman” type units have a maximum range of about a quarter of a mile under ideal circumstances (rarely achieved under field conditions), so they are not suitable for all operations.
Practice and Use
Practice with radio equipment before undertaking an operation. Learn, especially, how buildings and topography affect the range of your equipment. A pre-mission “dry run” to test radio communication may be a good idea on some jobs.
A very real danger with radios is that a casual listener or radio buff may pick up your transmissions and become suspicious. Due to the vagaries of radio transmission, such a listener might be miles away. To make such interception meaningless, develop a simple code that will make your conversation sound commonplace, even boring. Never use real names on the air. Be wary, — sheriffs and rangers often have CB scanners in their cars.
Perhaps the greatest danger in using radios on an operation is the chance that security guards or passersby might hear the user’s voice (rather than the transmission itself). Using the earphone headset of the “walkman” type radios will keep the messages you hear from being overheard, but the sender’s voice is another matter. To keep your voice from carrying, cup your hand around the mike and hold it as close to your mouth as possible. Speak in a low voice, slowly and calmly, pronouncing all words very clearly. If you have trouble hearing or being heard, remain calm. Never raise your voice, as this will be more likely to reveal your location than to help the transmission.
The larger portable CB units (“walkie-talkies”) with their external speakers present a greater danger of being overheard. Nevertheless, they are valuable for operations requiring long-range communications. A few precautions with this type of equipment will lessen the chances of being overheard. A small terry cloth towel (dark color!), worn like a scarf under shirt or jacket, or carried in a pouch with the radio unit, can be used to muffle the sound of your voice. When transmitting and receiving, follow this procedure: Post other team members as lookouts, and to warn you if your radio or voice is too loud. Sit down cross-legged or kneel down with your back to the area of greatest danger. Cover your radio and head with the towel and/or a heavy jacket. Bend low to the ground, keeping the antenna straight up, and switch the set “on.” Avoid long transmissions. Always use pre-arranged codes.
When using radios for key parts of an operation, such as calling the pickup vehicle after a mission is completed, always have a backup plan in the event of radio failure. (Your driver might swing by the pre-arranged pickup point at certain times, or automatically fall back to an alternate site.) Pre-arranged times for radio checks (example: every half hour at ten minutes and forty minutes after the hour) will help to insure proper radio links and build confidence.
Field Notes
-
Try communicating with a code of clicks on the mikes instead of a possibly identifiable voice.
-
Lookouts equipped with radios can improve your security greatly!
Radio Fingerprints
Every radio is unique; in fact, the term “radio fingerprint” is sometimes used, referring to minute variations in the transmission (frequency variations?) detectable each time the same radio is used. Sophisticated techniques are certainly necessary to identify a certain radio, and one’s radio traffic would have to be recorded and analyzed. Nonetheless, that this is possible makes radio security all the more important.
Because of this, limit the number and length of all radio transmissions while on the job. Encode your conversation so it doesn’t sound suspicious.
If you use a CB radio or walkie-talkies for covert activities, do not use the same radio openly. Comparison of the “fingerprints” from recorded radio traffic during a monkeywrenching operation with that from the CB in your vehicle, for example, could be the link necessary in court to convict you.
Military Surplus Radios
Army surplus PRT-4s (the RT stands for “radio transmitter”), PRR-9s (RR = “radio receiver”), and PRC-25s provide a low-cost, high quality communications system which might be of interest to monkeywrenchers. The PRT-4s and PRR-9s are Army squad radios that operate in the 47–57 megahertz bands. The transmitters use two 9-volt batteries (alkalines are a must!) and the receivers use either four 1.5-volt n-cells or a 9-volt battery with a 6-volt adapter. The transmitters put out about 450 milliamps of power which seems pretty good when you consider that the radio shack headphone mini-radios put out about 100 milliamps. Range for the PRT-4/PRR-9 is easily 1 1 /2 miles line-of-sight. Two PRT-4s with two PRR-9s cost the military $1,600 but can be pur-chased surplus in excellent working condition for $150 plus shipping ($5).
Since these radios were constructed for the military, they have been considerably over-engineered and can take plenty of abuse. Transmitters have worked even after klutzy paratroopers dropped them from a thousand feet! Since these radios do not have an FCC approval stamp on them, it is illegal to use them — but not to own them. However, enforcement is difficult since the FCC would have to catch you in the act of transmission. Another advantage of these radios is that the transmitter and receiver are separate units. This allows two people to have a duplex system (i.e., I transmit on one frequency while I receive my friend’s transmission on a second frequency). This decreases the possibility of someone scanning and picking up both sides of a conversation. Another advantage is that for another 70 bucks you can pick up a piece of equipment called an ID-1189 which is a test machine that allows you to change frequencies once you buy new crystals which are about $6 each.
Another advantage of the PRT-4/PRR-9 combination is that it can net with the larger 920-channel PRC-25. (A few weeks ago while out testing radios, I was in a river bed and easily transmitted and received transmissions with a PRC-25 that was over 5 1/2 miles away with three intervening ridges.) Unfortunately, the PRC-25 costs $650.
In the previous edition of Ecodefense, we reported that another military surplus radio, the PRC-77, had crypto-capability which would allow the user to encrypt their transmissions so no one could figure out what was being said if they overheard your transmissions. This is not true, we have learned. A separate piece of equipment is required to encrypt, and that item will never be available legally. Nonetheless, the PRC-77 is one of the best and sturdiest radios. It costs about $800.
Military surplus radios are rugged, inexpensive for the quality, lightweight, and dependable.
Police Band Radios
It is hard to overstate the value of a radio capable of picking up police calls. These units can tip you off to surveillance or warn you of a patrolman or deputy dispatched to the scene of your recent hit.
Before buying, read. Look for books at your local library, bookstore, or radio shop. One excellent reference is The Complete Action Guide to Scanners and Monitors by Louis A. Smith II. It is published by Tab Books, a major “how-to” book publisher. Additional valuable reference data is found in the Betty Bearcat Frequency Directory, which has an eastern and western edition. These provide an extensive listing of frequencies, including many used by police agencies. Look for it at radio shops or in stores that sell scanners. Still another volume of this type is Monitor America, which contains fewer frequency listings but has a number of partial police radio codes which can help you understand police communications. An excellent source of police frequency information is the series of “call books” published annually by Hollins Radio Data. The nation is broken down into regions covered by ten separate volumes. As always, check all the radio shops in your nearest big city, where they retail for $6.95.
Perhaps the best scanner frequency listings are to be found in the “Fox Scanner Radio Listings.” As of this writing, 28 area directories are available, with more in preparation.
Check for frequency directories at radio shops or with the mail-order suppliers that advertise in the amateur radio magazines available at good news-stands.
Radio specialty shops are often the most expensive source of these radios. Look for them at department stores or the catalog showroom type of store (like Best or La Belle’s). Also, the ads in specialty magazines like Amateur Radio and Popular Communications can lead you to mail-order suppliers. Good units can now be bought for under $150. One low-cost supplier is Scanner World USA (10 New Scotland Avenue, Albany, NY 12208), with an extensive catalog of scanners, CBs, and frequency directories.
There are two types of radios for monitoring police calls. The older type is crystal-controlled, and requires buying a separate crystal for every frequency you wish to monitor. Because of the security problems associated with purchasing these crystals, this type of unit is not recommended.
Your best choice is a “programmable” scanner that has a keyboard on it which allows you to select the frequencies you want. Once programmed, these units will scan a large number of frequencies, stopping on one when a transmission is picked up. This can allow you to monitor just the frequencies that are important on a specific job or in a certain area (those of any combination of city, county, state, or federal agencies).
Here are the major features to look for in a programmable scanner:
-
AC or DC power. This allows you to use the scanner both at home or in a vehicle.
-
16 or more channels, to insure that you can monitor even the large number of frequencies in and around a city.
-
Search capability. With this you can search portions of the radio band, seeking out frequencies not listed in the directories.
-
Should be able to pick up the following bands:
-
30 to 50 MHz (megahertz) — VHF Low Band
-
144 to 174 MHz — VHF High Band
-
440 to 512 MHz -UHF Band
-
Most of the scanners made by Regency and Uniden have all these features and more. Again, though, make sure your scanner can take either AC or DC power.
Once you get your scanner, listen to it at home. Locate the important frequencies in your target area. In addition to local law enforcement agencies, you can seek appropriate federal agencies (Forest Service, Park Service, BLM, etc.) and the frequencies assigned to the forest products industry (in Oregon and Washington, for example, these can be found at: 158.145, 158.160, 158.175, 158.205, 158.220, 158.235, 158.265, 173.250, 173.300, and 173.350). The federal law enforcement agencies (like the FBI, DEA, and BATF) are extremely difficult to monitor. Even if you find their frequencies, they often use sophisticated scramblers, making the messages unintelligible. A source for the frequencies used by federal agencies is The “Top Secret” Registry of U.S. Government Radio Frequencies, by Tom Kneitel, available from Loompanics Unlimited, PO Box 1197, Port Townsend, WA 98368.
By listening at home, you will learn to understand much of the jargon you hear and to decipher the radio codes in use. Most common is the “10-code” that assigns meanings to numbers from “ten-one” to “ten-ninety-nine.” Study the ten-codes in directories and pay attention to what you are hearing. Often an explanation of the call will be broadcast in plain English and in the 10-code. In the Forest Service, because of confusion over the 10-code among users, there is now a trend toward communications in plain English. The Park Service, on the other hand, continues to use a 10-code, perhaps because of its greater emphasis on law enforcement in day-to-day operations.
Police agencies may use codes based on the numbers assigned to various criminal statutes. For example, a “914” or “nine-fourteen” may refer to statute number 12–914 for, say, armed robbery. The statute books in the reference section of a public library will give you the statute numbers. Also, by listening to police radio calls and making notes, and comparing your notes to newspaper accounts of crime incidents, you can further break the codes.
Another informative type of scanning to try at home is listening in to the detective frequencies that carry surveillances. These channels are most active when detectives are usually at work, between 8 AM and 5 PM, Monday through Friday. You can, of course, hear some surveillances in the night hours. These detective frequencies are not as active as the standard patrol frequencies, so you may want to use your scanner’s “lock out” option to eliminate the patrol calls while listening for the detectives.
When searching for police frequencies, note the frequency numbers as you pick them up. The locations you hear broadcast over the air will indicate whether you are listening to a city or county agency. When learning about the patrol frequencies, concentrate on weekend nights when police are usually busiest.
Once you have developed some proficiency in monitoring police calls, take your radio out in your car or truck for practice and testing on the road. Keep the radio within easy reach, with a cardboard box, paper bag, or something similar to conceal the unit. Listening in on police calls from a car is illegal in some areas, and is considered highly suspicious in all areas. Plug into the cigarette lighter for power, so you can quickly unplug and eliminate evidence that you were actually listening to the radio. Keep the radio hidden.
Scanner reception is vastly improved with a longer antenna, which you can attach to the external antenna jack. Again in the interest of secrecy, get the type of antenna that looks like a normal car antenna. These were invented years ago to protect mobile CB owners from thieves. You can buy a combination CB/AM/FM antenna at a radio shop.
Another valuable scanner is the hand-held type suitable for use by a team on the ground or by a lone monkeywrencher. These are about the size of a walkie-talkie and have most of the features of the larger units. Their major weak point is their standard short “rubber duckie” type of antenna. Whenever possible, buy and use a longer and thus more effective antenna.
If the driver of a team’s vehicle is monitoring police or agency calls, she should notify the rest of the team immediately by radio if it seems likely that the authorities are en route to the area. A note of caution is in order here: If you are using mobile vehicle units, make sure that you don’t run down the car battery if you have to park for any length of time. Experiment ahead of time to find how long you can listen to the police radio and your own CB system before the battery is run down to the point where your vehicle won’t start. The driver may have to drive around for 15 minutes or so to recharge the battery.
It may be preferable to rig up an auxiliary battery for your radio system. The auxiliary battery should be wired in such a way that it never draws on your vehicle’s main battery. An RV and trailer supply house can provide you with all the information and equipment, and even installation if desired (though for security reasons you should do your own installation). The auxiliary battery must be mounted in a ventilated area. Use a deep cycle storage battery rather than the usual car battery. Sears makes an excellent RV/marine battery.
— Guggy Marconi
Field Notes
-
In your pre-operational checks, replace weak batteries or recharge nicads. Always keep your batteries wiped clean of fingerprints.
-
As with all your radio equipment, test your police band radio or scanner under field conditions before taking it on an actual operation.
Further Comments On Radios
An experienced monkeywrencher and radio user offers the following details
-
Auxiliary power packs (plug-in) for radios and other devices that have a power input jack can easily be constructed using battery holders (Radio Shack Number 270–387 and others), 9 volt battery clips (RS #270–325), and co-axial plug connectors (RS #274–1571). Be sure to get the correct plug for your device and to observe the correct polarity when making these external battery packs. It may be better to simply carry spare batteries, alkaline preferred.
-
Scanners. When working with scanners, be sure that you have the correct frequencies. The Betty Bearcat frequency directory has too many errors. Visit your local radio specialty shop and purchase a good directory. Use your scanner to hear the National Weather Service station in your area. Consult your frequency directory or try the following frequencies: 162.400; 162.420; 162.425; 162.475; 162.550. Mobile use of scanners is illegal in some areas. Federal law prohibits making use of anything you hear on a scanner for illegal purposes or to commit a crime.
-
CB Radios. Some 5 watt walkie-talkie type CB radios have an earphone jack which cuts off the internal speaker when an earphone is plugged in. This quiets communications. (Earphone: Radio Shack #33–177.) External microphones and shorter Rubber Duckie antennas are also available. (Rubber Duckie Antenna: RS #21–980.) Magnet-mount antennas for mobile use of scanners and CBs are available. They are easily and quickly removed when not needed or to avert suspicion.
-
Walkman-type two-way radios 49 MHz. Do not confuse these with the toy-type radios. Toy type: RS #60–4016. Real radio: RS #21–400. Maxon is a good brand. These units have an effective range of about half a mile. They are available as handi-talkie types or as Walkman-type units. The Walkman-type units with headsets operate in either push-to-talk mode or VOX (voice-activated) mode. The handi-talkie models operate only in the push-talk-mode. Both are available in one-channel and five channel models. Available from Maxon Communications:
| 1 Channel | 5 Channel | |
|---|---|---|
| Handi-talkie model | 49-H | 49-HD |
| Headset (VOX) model | 49-S | 49-H5 |
| Power source | 9 volt battery | 4 AA batteries |
| Cost | $30 each | $50 each |
All units function on the same five frequencies. Order all one channel models on the same frequency. Available from DAK Industries, 8200 Remmet Ave, Canoga Park, CA 91304.
Single channel models are slightly smaller and lighter. With these units you cannot accidentally get on the wrong channel. With the five channel model, if there is interference, you have an alternative channel. Warning: Signals from these units can be picked up by scanner radios. Also, the 49 MHz band is used by some “Baby Monitors” or “Nursery Monitors” such as the Fischer-Price Baby Monitor. These baby monitors also produce interference which will disrupt all nearby communication on that channel. Some cordless telephones also operate on the 46–49 MHz band. You may want to avoid using these radios in urban areas. The Radio Shack #43–189 Rubber Duckie antenna designed for use on cordless telephones can be used on 49 MHz walkie-talkies. Units with telescoping antennas, properly mounted and connected, might work on headset-type units. Get a Radio Shack catalog from your local store.
— Deejay
Unusual CB Channels
The major drawback with CBs is their commonness. During an action in the Kalmiopsis during the Summer of 1987, CBs gave us reliable communications in difficult terrain, but jamming by loggers was annoying, and local officials listened to everything we said. Here is a way to minimize these problems.
The Citizens Band occupies the part of the radio spectrum between 26.965 MHz (Channel 1) and 27.405 MHz (Channel 40). Most channels are 10 KHz apart, but some (Channels 3 & 4, 7 & 8, 11 & 12, 15 & 16, 19 & 20) are 20 KHz apart. Those cheap 3 or 5-channel walkie-talkies that you see at Radio Shack or at discount stores are crystal controlled. You can order crystals for any frequency you wish, in or near the CB band. By buying crystals for frequencies not designated as a CB channel, you reduce the chance of being overheard or jammed. Of course, you can never be absolutely sure that you have a frequency to yourself, since there are sets around that can operate on any frequency. But these are not common, especially in rural areas, and are rarely installed in vehicles.
Try 5 KHz above or below one of the designated CB channels. Say, 27.120 MHz (which would be 5 KHz above Channel 13–27.115 and 5 KHz below Channel 14–27.125). This small separation of 5 KHz, though, leaves the possibility of interference from nearby channels, and due to the lack of selectivity of many of the cheaper CBs, you might still be overheard, albeit probably not clearly. Anyway, it would be better to pick a frequency between the channels with 20 KHz separation. These frequencies would be 26.995 MHz (between channels 3–26.985 MHz-and 4–27.005 MHz), 27.045 MHz (between channels 7 and 8), 27.095 MHz (between channels 11 & 12), 27.145 MHz (between channels 15 & 16), and 27.195 MHz (between channels 19 & 20). These frequencies would give 10 KHz separation which should protect against interference from adjacent channels unless they are located very close by.
When you install (or change) the crystals in your walkie-talkie, retain one or two crystals for the official CB channels. Then you can communicate with someone using one of the newer CB sets which use a frequency synthesizer instead of crystals. These non-crystal sets can operate only on official channels. Until about 15 years ago, all CB sets were crystal-controlled. It still may be possible to find one of these old sets cheap at a flea market or CB repair shop. If you do, install it in your vehicle and put in crystals matching the ones you have put in your walkie-talkies.
Custom crystals can be obtained through several sources. Ask at your local CB repair shop, or anywhere “good buddies” congregate. You can also write to Jan Crystals, 2341 Crystal Drive, PO Box 06017, Ft. Meyers, Florida 33906–6017. Ask for their catalog and price list.
Warning: Transmitting on a non-FCC-designated frequency is illegal and would subject the guilty party to federal charges should they be caught. Luckily, the Feds have just about given up trying to police the CB. But using a radio in the commission of a crime, whether on authorized or unauthorized channels, would likely get their attention. Be careful.
— Murrelet
Cellular Telephones
Cellular telephones are already replacing radios in localities where there is good coverage from base stations (there is complete coverage, for example, in almost all metropolitan areas). Cellular phones have certain advantages over radios, among them simplicity of use.
Cellular phones work to an extent in some rural areas. Some hunting guides are even using them on horseback! They report that from the crest of a ridge or top of a hill, cellular phones usually work in the backcountry.
When satellites for them are up, possibly in a couple of years, cellular phones may work virtually everywhere. At this point, they will be much more versatile than radios. (It may be expected that law enforcement, land managing agency, and industry crews will be equipped with them.)
There are disadvantages, though. Each cellular phone has a number, of course. Thus there will be a record of all calls, such as with long-distance on conventional phones. Also, conversations can be picked up by anyone with a scanner for the proper frequencies.
— Alex Bell
Eyes of Night
Flashlights
A few mechanical aids may help night operations. The most basic is the flashlight. Small, pen-type flashlights can be easily carried and used when working on equipment, locks, etc. Larger flashlights may be easier to manipulate with gloved hands. The lens should be covered with a couple of layers of electrical tape, leaving only a narrow slit to emit light. Best among the larger flashlights are the green plastic military types with the lens at a right angle to the body. The bases of these flashlights unscrew to reveal a spare bulb and two special lenses that can be mounted over the standard clear lens by unscrewing the “0” ring and popping them in. The translucent white lens converts the visible beam of light to a white spot suitable for signaling. The red lens allows the user to illuminate an object without ruining her night vision.
Military studies show that blue filters are even better than red filters — they illuminate without destroying night vision and they cannot be seen from a distance as well as red light. (Blue light might be bad for people with epilepsy, though.) Moreover, a red filter can make the brown contour lines on a topographic map invisible.
Each member of the team should carry two flashlights — one medium and one small. A flashlight with a plug-in headlamp attachment may be useful when you need both hands for work. With this type of headlamp, the battery case can be kept in an inside pocket, warmed by body heat, for longer battery life. This can be important for cold weather operations.
Standard Optics
Binoculars and spotting scopes can help at night, especially for observing a well-lit area. At least a 50 mm objective lens (the lens closest to the object you are viewing) is needed for optimal light gathering qualities. Some of the better military surplus houses sell special binoculars designed for night use. On moonlit nights in open country, deserts, and in snow, binoculars are quite effective. Remember, bright moonlight can reflect off binocular lenses and compromise your position. Such reflections are very visible through “starlight” systems.
Infrared Spotting Scope
This device dates back to World War II. It consists of a battery-powered spotlight that emits infrared light (invisible to the unaided eye), and, mounted directly below, an image converter tube that allows the user to clearly see what the spotlight is illuminating.
This system allows you to see into dark areas. It is also the least expensive night vision system. Suppliers who advertise in “survival” magazines sell them for $600 to $1,400. Edmund Scientific Corporation (101 E. Gloucester Pike, Barrington, N. J. 08007) sells a unit for $1,195.
Infrared spotting scopes have disadvantages, too. The range is limited to what the spotlight can effectively illuminate — rarely more than 300 feet. A unit is bulky, and the user must have a strap or harness to prevent dropping and banging it while keeping one’s hands free for climbing or other activities. An infrared spotting scope is also very visible to someone scanning the area with a starlight scope.
Starlight Scope
This Vietnam-era development uses a battery powered scope to amplify existing light from moon, stars, rotting forest vegetation, and ambient city light. Avoid first generation units, as later designs have an “anti-blooming” device that shuts the unit down if, light levels suddenly get high enough to damage the costly image intensification tube.
Advantages: A starlight scope can be used beyond the range of infrared scopes since the device is “passive” and does not rely on projecting a beam of light onto the area or object to be observed. With a starlight scope you can readily detect the presence of an infrared device, since the scope converts the otherwise invisible infrared light to visible light. Conversely, neither the infrared nor another starlight scope can detect a starlight scope, since it emits no radiation.
Disadvantages: Extremely high cost. Suppliers, like those mentioned above, will charge anywhere from $3,000–12,000 for units that vary from relatively compact hand-held scopes to goggle-type units that strap on to one’s head. Expect to pay at least $4,000 for a good unit. Starlight scopes must have some light present in order to be effective. On a moonless, overcast night in the desert, a starlight scope may be useless. Even on a clear night, a starlight scope may be ineffective under certain conditions, as, for example, when the observer is on a hill looking down into a dark valley.
There is also some question as to the legality of these systems. Nevertheless, they are advertised in the survival magazines.
Using a starlight scope temporarily wipes out your night vision. The military usually operates in pairs when using them so that one person with night vision escorts the starlight user. This is important since your peripheral vision with a starlight is nil and you need someone to watch your backside while you scope.
Starlights do not slowly go dim when the batteries run down. Once the batteries fall below an operating power threshold, the device goes off instantly, without warning. Again, the two-person rule helps immensely because, if you lose power with no partner, you may find yourself without your starlight and night blind to boot.
If you can afford starlight goggles, you may find it useful to drive without lights, using your goggles. Of course, if the goggles lose power, you may have more excitement than you can handle. Dust, fog, or heavy rain reduce the depth of field when driving — like swimming underwater with your eyes open.
Whether walking, driving, or surveilling with starlights, shadows and bottomless pits look the same. Military personnel have a number of accidents each year because of starlight scope users mistaking a gully or trench for a shadow or dip in the path. Also, things can hide in those holes that you cannot see with a starlight.
If you can get some of the new infrared chem lites, you can make dandy signaling devices, trail markers, and the like which will only be visible to those with starlights or thermals. We do not know what effect IR chem lites have through an IR scope.
Russian military night vision devices are now being advertised in Shotgun News at “very competitive prices.” The release of sophisticated Soviet equipment on the US surplus market could make these items much more available for use by logging companies, private security outfits, and even monkeywrenchers.
Thermal Imager
These are probably too expensive and difficult to acquire for monkeywrenchers, but law enforcement operations may have them. Thermal imagers exist in hand-held and vehicle-mounted versions and are very effective. The key advantages of these passive night devices over starlights are:
-
They are much more efficient rapid scanning devices. Unless you’re working in a herd of buffalo, all someone with a thermal has to do is scan across the terrain looking for the hot spots.
-
They are considerably better at seeing through fog, snow, rain, dust, or light vegetation, and can also be used during the day in such conditions.
-
They can be used on the darkest night.
Their disadvantages are:
-
Depending on the range and the particular device, it is often hard to make out the details (e.g., is that a cop over there or a deer?).
-
Many of the more portable types must be cooled using special gas cylinders. As the gases run out (usually a matter of hours), the sensitivity of the device drops, reducing its effectiveness and forcing the user to recharge it. When you’re out of cylinders, you’re out of night vision.
-
Thermals can be fooled by chemical heating pads, IR chem lites, fires, and the like.
-
Thermals are line-of-sight and they can’t see through dirt, rocks, or thick trees. If your target isn’t sitting on a field of flat grass, you should be able to plan an approach that negates the thermal’s advantages.
Remember that neither a monkeywrencher nor a cop can be everywhere or see everywhere. Night devices can be a great help, but they can also create a false sense of security if relied upon too heavily.
Protection From Night Vision Surveillance
Those active in an area subject to law enforcement investigation and surveillance might encounter nighttime stakeouts utilizing sophisticated night vision devices. The most sophisticated of these will amplify existing starlight tens of thousands of times. This effectively turns night into day for the viewers, but it does not penetrate into shadowed areas very well. The addition of an infrared spotlight allows invisible infrared light to penetrate even the shadows within the range of the spotlight.
Beware of ultraviolet brighteners in your clothing. These chemicals, which are now in all laundry detergents, make you glow in the dark to an officer quipped with night vision equipment. This problem is so serious that the US military specifies that no brighteners be used in, the manufacturing or cleaning of combat fatigues.
A commercial remedy is readily available in the hunting supply market. Hunters are trying to reduce their visibility to animals whose eyes are far more receptive to ultraviolet light than is the human eye. “U-V Killer” (and a detergent called “Sport Wash”) can be found in better sporting goods and hunting supply stores, or, as a last resort, through the manufacturer: Atsko/Sno-Seal Inc., 2530 Russell St SE, Orangeburg, SC 29115.
When purchasing retail, simply pose as a hunter or the wife/girlfriend of a hunter. Follow directions carefully and set aside specific items of clothing that are specially treated for your nightwork. It won’t make you invisible at night, but it will keep you from standing out like a neon sign.
Bionic Ear
The “bionic ear” is little more than an amplified microphone that plays back through a set of headphones, but it could be useful to the lookout listening for the footfall of a night watchman. A small parabolic dish that attaches to the mike for higher gain is usually available as an option for a small added cost. These devices are widely advertised in hunting magazines. Total cost is about $110 to $130.
The use of a shotgun versus a parabolic type microphone may be preferable due to the slim profile which increases the ease of concealment and transport. Several mail-order companies advertise kits and assembled models, typically in the $100 to $150 price range. These sources also list compatible inexpensive padded earphones. One disadvantage would be that the low light profile of a shotgun mike resembles an aimed weapon. This would tend to panic an unwary observer. However, in redneck areas, it probably wouldn’t elicit a second glance.
— Strix
Tracking
Learn to track. Tracking allows you to locate trap sets where a trapper walks his line. It warns you of recent activity in your area of operations, such as surveillance or patrols by law enforcement. Perhaps most important, only by learning tracking can you learn proper counter-tracking measures — walking so as to leave a minimum of sign that can be followed by others.
Following is a brief summary of tracking methods as taught by the US Border Patrol and used in their pursuit of illegal border crossers. For detailed descriptions see Tracking: A Blueprint for Learning How by Jack Kearney (Pathways Press 1978) or Mantracking by Roland Robbins (Search & Rescue Magazine, 1977).
The only tools you will need are a straight walking stick, three to four feet long, and two rubber bands. Go to an area of loose, dry soil that has a minimum of rocks, grass, and brush. Tracks are easy to see under these conditions, and you should start easy to acquire the basic principles. The best time of day to practice is early or late, with strong direct sun at an angle (this makes the shadows in the tracks more visible).
Walk a straight line of tracks for thirty to fifty feet and circle back to your starting point. Now take your stick and lay it beside the first tracks as shown in Figure T-1. Place the tip of the stick at the heel of one track and position the rubber bands to mark the heel and toe of the previous track. This gives you the length of the track and length of the stride.
Move ahead to the next track by setting the stick alongside the route of travel to the next track, lining up the rubber bands with the heel and toe impressions. Near the tip of the stick you will find the next track. Repeat this procedure to the end of the line of tracks.
This approach may seem simplistic to some, but it is essential to start this way. Learning to track is not a game of successfully following a line of tracks. What is important is what you learn along the way.
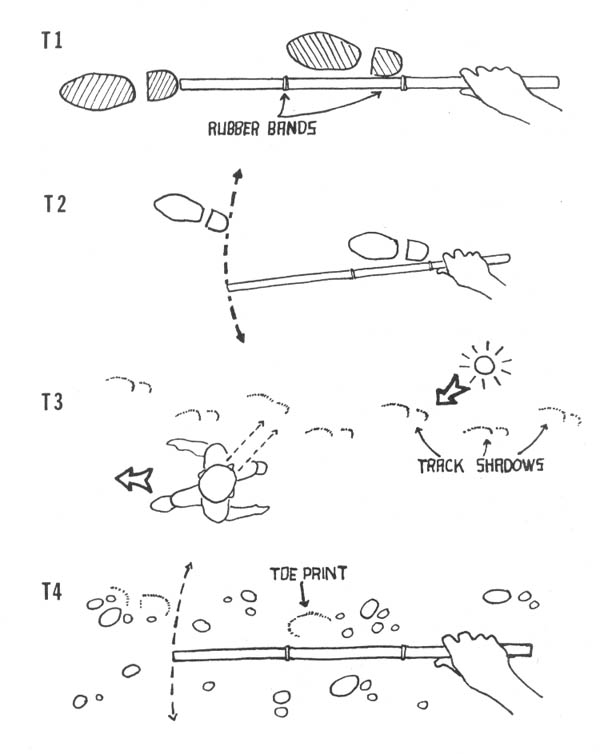
Once you have mastered the above method, lay down a zigzag line of tracks and repeat the procedure. To locate the next track, sweep the tracking stick in an arc. The next track will be found somewhere along the curved line you make with the tip of your stick (see Figure T-2). Do not skip even one track. You are learning what “sign” looks like. If a track is hard to spot, get your nose to the ground and look for indicators: rocks or pebbles pushed into the dirt, thin cracks in the soil, a small lip of dirt that throws a shadow, a broken twig or bent blade of grass. You learn by studying every track. In difficult tracking conditions, these subtle indicators may be all you have to go on!
Only after you have acquired the ability to locate every track in easy terrain should you move ahead to more difficult circumstances like rocky ground, grassy areas, or tree shaded tracks. As you make it more difficult for yourself, you learn more — still by locating every track.
As you practice tracking, always put the track between you and the sun. The sun will throw shadows in the edge of the track making them visible to you while you stand or crouch. Try walking off to the side while looking over your shoulder (Figure T-3). Do not erase the tracks as you go. If you lose the trail, go back to the last clear footprint. While learning to track at a walking pace, use the tip of the stick to scratch a mark next to each verified track. You can then easily come back to the last clear track, get down and use your tracking stick as described above to locate the next track, and the next one, and so on.
Under difficult conditions, you may find only a slight heel or toe impression. This is why you use rubber bands to mark the distance between heel and toe. Regardless of how little evidence of a track you find, the tip of your stick will reveal the approximate location of the next track. (Figure T-4).
As you progress to more difficult tracks (perhaps set by a friend who gives you no clues as to where they ultimately lead), you will eventually lose the trail completely. To relocate, walk slowly in a circle about ten feet from the last clear track. Look closely for another sign. If necessary, move out five more feet and repeat. Work in ever larger circles until you find the tracks again. While learning, you may want to use the track diagram on a piece of paper to be sure you have the correct track. (The penciled diagram of the track showing the pattern of the imprint is used in law enforcement and search and rescue work; eco-saboteurs use it only in training, never in the field while at “work.”)
Eventually you should practice following someone’s tracks laid down at a jogging and running pace. Studying varying depths of heel and toe prints will teach you how to spot running tracks in the future.
Learn how to age tracks by studying a line of tracks over a period of time (ideally checking them every day). Notice how wind carries small debris into the track, how the edge crumbles with time, how heavy dew or light rain alters the appearance. Lay down tracks in damp and wet soil and come back after they’re dried to learn from them. Sometimes just touching a track will reveal that they were laid down when the ground was wet (then think back to when the last rainfall was). With enough practice, the next time you’re prowling around a bulldozer in the woods, you’ll know when the last tracks were laid down, whether tracks walking past or around the machine indicate a security patrol, and whether tracks on nearby trails indicate possible surveillance teams lurking in the brush.
Learning how to spot, follow, and age human tracks will help you in the study of vehicle tracks. This may tip you off to a motorized security patrol at a construction site, or lead you to the ideal choke point to build a road or trail block against ORVs.
Since a lot of monkey business occurs at night, you should practice spotting tracks at night. Here you will check roads or trails leading to a target site for signs of recent passage. A flashlight with a red lens (which won’t ruin your night vision) held close to the ground, will throw shadows into tire or footprints. In the field, use this method only in areas where you can’t be observed from a distance, such as in thick brush, a low spot, or near a curve.
As you learn to track, you will learn what conditions are most unfavorable to tracking. Use this knowledge to minimize your own tracks. Never assume a pursuing tracker knows less than you do. You may have just walked across two hundred yards of slickrock, leaving no sign at all, but as soon as you step off into the dirt again, you’ll start to leave some sign. They will know this also.
Recent reports indicate that federal law enforcement agencies are developing methods of precisely measuring footprints for use as evidence. They want to measure not just the type of shoe you wear, or your approximate weight and height (determined by depth of impression and length of stride, respectively), but specifics of how you walk. To upset the evidence, vary your walk in and around the target (such as in loose soil around a bulldozer). Walk “pigeon-toed” (toes in slightly) or try a “duck walk” (toes pointed out), to ruin some of the evidence. A thick piece of cardboard placed inside or outside your heel will alter your footprints subtly, but significantly. Twisting your foot as you lift it will smear your footprint. By walking on tiptoes and giving a sharp twist or pivot each time you lift your foot, you can leave tracks that look like old cow prints. As always, practice in daylight where you can study the effectiveness of your methods (then erase those tracks before you leave).
Tracking and counter-tracking skills are only acquired after considerable practice. Such practice can be a pleasant outdoors diversion or a challenging game among friends. Regardless, the above methods can enable a person with a little backwoods experience to track another human being and preserve her own safety during nightly activities.
— Natty Bumpo
Field Note
We hear that law enforcement agencies have a new method for lifting dust impressions from smooth surfaces. This may mean they can lift complete shoe prints from surfaces where nothing is visible to the naked eye. Such an ability makes the discarding of footwear worn during nightwork even more imperative than formerly.
Car Camping
Car camping while cruising the backroads is a good way to explore new country, and also affords unexpected opportunities for monkey business. A little forethought and planning makes possible all sorts of mayhem.
Among your most likely targets of opportunity are survey markers, claim markers, and heavy equipment. If you spot these while driving, do not stop, or even slow down. Someone may be nearby but not visible to you yet. Park at a considerable distance and take an innocent hike to scout the area thoroughly. While looking for possible problems and planning your activity, give serious consideration to whether the action warrants the risk. A decrepit dozer used to blade the road after gully-washing storms is hardly a worthy target. On the other hand, a machine being used to punch in some land-scam subdivision roads, or to “open” an untouched area to logging or mining, deserves your attention.
While scouting the area, stop frequently to “rest” and observe. Listen intently and use binoculars, if available. Plan your approach and withdrawal routes, as well as an emergency escape route that will lead pursuers away from your parked vehicle. Consider the best time for the hit. A pinpoint target like a bulldozer is usually best hit at last light or in the dark of night. Scattered targets like survey stakes and mining claim makers can be worked under good moonlight if you scout the area beforehand in daylight. If the moonlight is unfavorable (even a half-moon may not be enough light to locate stakes in the dark), you should next consider daytime. Sites may be less active on week-ends, but there may be more hikers, picnickers, and ORVers around then. Observe road and trail traffic closely. Do they look like workers, local residents, or tourists? The pattern may change as the weekend begins or ends.
Seek sign of recent activity in the area. Study footprints and tireprints closely. Claim markers may be years old, or may have been put in last week.
Usually the best time of day for monkey business is early evening. The coming nightfall can provide concealment for your withdrawal. Most important: in unfamiliar terrain, do not work at night unless you are sure you can find your way back to your parked vehicle! If in doubt, change your timing.
Always determine where danger may come from. Can someone drive up on you without warning? Can you be seen from a nearby hill or road? A hasty roadblock, with a rock or large branch, may slow an approaching vehicle long enough to warn you. Working with the sun at your back may conceal you from the view of passersby.
After considering all the possibilities, make a simple plan of action. Use your plan at the earliest opportunity. If you must remain in the area for a few hours .or more before your hit, keep yourself and your vehicle well hidden, but behave as though you are simply camping in the area. If someone stops to talk to you, or even regards you suspiciously, cancel your mission and enjoy your stay. There will always be other opportunities.
Most of what you’ll need should already be with you — primarily sturdy and unobtrusive clothing. Special gear includes cheap canvas shoes and cotton gloves. Both are carried only for monkey business and should not be worn otherwise. Keep them separate from your other clothing. Both items can be purchased for not more than $10–12 at a large discount store. If you have a partner to assist as lookout, binoculars and headset-type walkie-talkies are valuable. A pair of these walkie-talkies (with a headset for hands-free use) can be purchased from Radio Shack for $50–90, depending on the model. Always pay cash and be prepared to give the nosy clerk a phony name and address (they ask for that to put you on their mailing list).
An empty plastic soda bottle is just a piece of trash in your car, but a convenient carrier of sand for working on heavy equipment (wiped free of fingerprints, of course).
Because you are operating on unfamiliar terrain, be especially cautious. If you sense trouble, leave immediately.
If your targets are spread out widely, plan an efficient pattern of movement. Survey markers typically follow the projected paths of roads. Mining claim markers may mark the corners of one or more large squares of land several hundred yards on a side. Your scouting pays off here.
When you leave your vehicle, wear your normal shoes or boots and carry your special gear in a small day pack or similar bag. Enter an area where you’ll leave no footprints (like a rocky or pine needle covered area). Switch to your monkey business shoes and put your others in your pack. Do not stash them — carry them with you.
Remember to pause frequently to look and listen, on your approach, during the action, and while withdrawing. Your nervousness may make you want to make a beeline back to your car after your work is finished. Fight this urge. Be absolutely sure you’re not being followed.
Once you’re back at your car, it is usually best to drive away. Your escape route must not take you past your target. Position your vehicle accordingly.
In most cases, you will want to leave the area by the same route you took in. You know this road is open and passable and you are less likely to get stuck or lost — considerations especially important at night. On the map it may look like a short hop to a nearby paved highway, but if you haven’t driven the road you may find yourself stopped by a washout or other obstacle. Play it safe and backtrack.
Before driving away at night, disconnect your license plate light or smear your plate and adjacent bumper area with mud (make it look natural). This can save you a lot of grief if you pass a nosy or curious person. Stay calm, drive at a normal cautious speed, and be prepared with an explanation as to why you’re in the area, and why you’re leaving at night.
In a worst case, your work might be interrupted and you would need to flee to safety. Run in a direction that will lead pursuers away from your parked vehicle and circle back when you are sure you’re not being followed. Teams must not separate in the dark.
Before you get back to your parked car, stop again in an area where you won’t leave tracks. Switch back to your regular shoes or boots and bury your gloves and monkey business shoes in separate holes. Conceal sign of your digging (a quick way to do this at night is to place some branches over the disturbed soil). Approach your car normally. If someone is there waiting, tell them where you were (you may have dozed off after dinner and just awoken under a nearby tree). Ask what all the commotion is about. Be curious, or helpful. This can disguise the fear you feel. If all is quiet at your car, set up camp normally and go to sleep if you can. If you attempt to drive out when the enemy is alerted, they can easily stop you (unless there’s a fair amount of traffic on the road). Weather out any possible storm as an innocent camper. They’ll ask questions, and look around your campsite for footprints like the ones found at the target site. Knowing you’re totally clean will make it easier to play the role of innocent. After other car traffic has come and gone, you can drive away casually. Remember that the first vehicles seen moving in the area after an interrupted hit will be regarded with most suspicion.
A final note: Because you don’t want to have an untimely breakdown in the area after a hit, carry a good spare tire and whatever tools and parts your mechanical skills allow for.
— Laura Bullion
Field Notes
-
Bird watching is a good cover and a good way to check around an area. Carry a bird book and binoculars. Be able to identify a few birds.
-
Maps of the National Forest in which you operate are vital for planning approach and escape routes. Standard road maps from AAA or gas stations are usually far from adequate for back roads. You can pick up National Forest maps at ranger stations and other information sites. Often a National Forest headquarters will have maps of other, nearby National Forests, too. Hiking and backpacking stores often sell maps of National Forests in their region. Display maps are often posted in campgrounds. As a last resort, you can make a sketch map of backcountry roads from such a display. Maps are also available by mail from Forest Service offices, but this may leave a paper trail. Numerous people stop and buy maps from Forest Service offices. Be sure you do not stand out as a memorable character. Look and act like a typical camping tourist. Maps of National Park areas and BLM lands are available from their offices. A very good set of maps is the USGS 1:100,000 scale series. Back road and trail information is quite accurate, and topography and/or land ownership status is shown on the different editions. A national index is available from the U.S. Geological Survey, Box 25286, Federal Center, Bldg. 41, Denver, CO 80225.
Daily Routine
Because surveillance is likely to be employed against any suspected monkeywrencher, make the counter-surveillance security check a part of your daily routine. Think of it as simply paying attention to detail. It enhances your appreciation of life and events around you.
Following are a few simple rules:
-
Don’t look around in an obvious manner. The trick is to spot the surveillance without the bad guys knowing it. If it’s obvious that you look up and down the street every time you walk out the front door, or if someone following you sees your head twitch every time you look in the rearview mirror, you’ve blown it. Be patient — be cool.
-
Know your neighbors. If they like you they may tip you off to suspicious men asking questions or parked in the neighborhood. This also helps you spot strangers in your area.
-
Know your neighbors’ cars. This makes it harder for a surveillance vehicle to be parked in view of your home. Be suspicious of any new vehicles (especially vans and other vehicles that can conceal a surveillance person in back). Surveillance vehicles are usually rotated, different vehicles in different locations. Be alert and participate in a Neighborhood Watch program if available. See State-of-the-art Video Surveillance elsewhere in this chapter.
-
Be wary of any newcomers in your area, especially if they’re in a house or apartment with a good view of your comings and goings. Empty houses and rentals may also be used as fixed surveillance posts.
-
Surveillance may only be active when you are, like after dark, or when an informer reports you’re going camping. Heighten your awareness at these times, even if you’re not up to anything.
-
Most cautious people only check for surveillance shortly after leaving home, work, or school. Most professional surveillance picks up after this to avoid being “made.” Make your checks random.
-
Pay attention to cars and faces. A feeling that you’ve seen them before is usually your first warning. Don’t stare in an obvious manner.
-
If you live in a remote area, concealed video cameras may monitor your home. Take walks in the area and be alert to new boxes on power poles, unexplained cables, or monitoring vehicles parked at some distance. Here especially, your good neighbor policy may provide you with a tip-off that authorities have asked your neighbors to use their home for surveillance.
-
Bumper beeper transmitters are used to give surveillance teams a good standoff distance to avoid detection, especially in rural areas where light traffic makes it difficult to maintain visual contact without being obvious. Keep your vehicle locked at all times, preferably inside a garage. Learn what the underside of your vehicle and the engine compartment look like so that you can occasionally check for suspicious additions. Use your routine night trips or trips to the country to check for surveillance. Stop in a remote area and wait to see what vehicles overtake you. If you pull off the road into a concealed spot, the following vehicle may drive by slowly or repeatedly trying to figure out where you’ve gone. Walk back to the main road quickly and watch from concealment for any such activity.
-
Run repeated surveillance checks before any mission.
-
Be suspicious of night-flying aircraft when you’re out driving. They’ll usually maintain a healthy distance to avoid tipping you off. When out on a job, stop your vehicle in quiet areas, shut off the engine, and look and listen for air-craft. Repeat this check several times.
-
Using the drop and pick-up technique earlier described in Ecodefense makes even sophisticated surveillance very difficult.
-
The FBI will commonly use six vehicles when tailing a suspect. One vehicle will follow within sight for awhile, and then drop out as another takes over. The tailing vehicles will be in radio contact so all know where the suspect vehicle is at all times.
Routine checks for surveillance will enhance your powers of observation and greatly improve your monkeywrenching work. Be observant. Pay attention to detail.
— Smiley
Mental Conditioning
As a pastime, monkeywrenching is considerably more stressful than softball or good books. Stress reduction and improved work habits are routinely used to improve the performance of people in high stress jobs (such as police work). Mental conditioning can also increase your capabilities and heighten your security.
Stress is unpredictable. Armed forces the world over have spent millions of research dollars trying to develop ways of predicting which recruits will hold up best under extreme stress. These efforts have been largely unsuccessful due to the variety of mental processes involved and the wide range of circumstances that may trigger stress. Stated simply, you do not know how you or your partners will respond to that ultimate moment of stress when the beam of a powerful spotlight catches you at night or the men at the door whip out their FBI credentials. The dangers of this uncertainty can be significantly reduced by simple exercises.
The following is not just empty theory. This writer has had extensive field experience and has felt or witnessed everything described below.
Stress is always present. Even the most mundane tasks are stressful for the monkeywrencher. Though you may not be conscious of a minor level of stress, it is still there and still a danger. Example: You enter a furrier’s shop on a scouting mission. Though you’ve done nothing illegal and you’re not carrying anything incriminating, your eyes wander about nervously, you startle when a salesperson comes up behind you unexpectedly, or you simply do not behave like an interested shopper. Because your behavior is a little unusual, the sales clerks remember you and describe you to police a couple of weeks later when the store is splashed in red paint.
Low stress levels make you vulnerable to high stress. The nervousness present every time you go on a mission makes it easier for a sudden problem to overwhelm you. Example: You make your final approach to a bulldozer parked alongside a quiet road. You’ve been very cautious, stopping time and again to look and listen for signs of trouble. Your throat is dry and you’re sweating just a little. Suddenly a voice booms out, “Hold it right there! You’re under arrest!” You freeze in your tracks, rather than running, confused and uncertain where the voice came from. Then you are arrested.
Because stress is always present and dangerous, you must be willing to deal with it at all times instead of waiting until you’re in a bind before trying to reduce your stress level.
While there are many kinds of stress reactions, the following are the most dangerous to the monkeywrencher:
Tunnel vision. This is a common form of high stress sensory distortion that causes you to focus intently on the most obvious danger to the exclusion of your surroundings. Example: You are watching a security guard’s truck drive past on a nearby dirt road. You don’t even notice the second guard walking up on your left in plain view.
Blocking out sounds. Similar to tunnel vision, here you are concentrating your attention on anticipated sounds while ignoring others. Example: Convinced you heard the sound of footsteps, you fail to notice the sound of distant highway traffic getting louder as a patrol car rolls up to your hiding spot.
Time distortion. Time may seem to slow down or speed up, either way giving you inaccurate information with which to deal with your problems. Example: You drop flat on your stomach in the tall grass after seeing a moving silhouette in the nearby trees. Waiting perfectly still for what seems like a couple of minutes, you slowly rise up to leave. In reality, only fifteen seconds have passed and you’re staring into the face of an unfriendly Freddie. Or...you duck out of sight from an approaching car that stops a short distance away. Time seems to stand still. Your fear mounts rapidly while you wait for the car to leave. Seconds later you jump up and dash off recklessly into the night. The driver at the stop sign sees you run off and notifies police.
Loss of fine motor skills. Stress automatically prepares your body for large brute responses like running or fighting. Fine coordination suffers as a result. Example: Convinced you’ve been spotted, you hurry back to your parked car where you fumble with your keys and drop them in the darkness.
Loss of descision-making ability. Even if you’ve successfully controlled the sensory manifestations of stress cited above, high levels of anxiety may override your normal ability to make correct choices. Example: While out spiking trees you narrowly escape an ambush by Freddies. After fleeing the area, you pause momentarily to catch your breath. Then you dash off once again, but instead of heading deeper into the woods, you inadvertently run directly to the trailhead where more Freddies are waiting by their parked trucks.
The market is flooded with books, tapes, and seminars teaching stress reduction. But closing your eyes or systematically relaxing muscle by muscle is impractical when the law is breathing down your neck and you must be totally alert to your surroundings. For this reason, a simple stress reducing breathing exercise may be most suitable for all stressful situations. In addition, it’s something you can do in public without drawing undue attention.
A breathing exercise counters the rapid and shallow breathing that normally accompanies stress. By calming the body, it sends signals to your brain that things are okay, thus reducing mental stress. The key is to breath deeply and slowly.
Inhale deeply while counting “one-two-three-four-five.” Hold that breath while again counting one to five. Now exhale completely while again counting to five. When your lungs are completely emptied, count one through five again and begin your next five-count breath. Repeat this process over and over; inhale, hold it, exhale, pause...
Practice this breathing exercise at home or in your favorite place in the woods. A calm and peaceful setting will help you feel the relaxation it affords you. Once you have learned this simple exercise, pause before your next scouting mission, or after your driver has dropped you off, or before the final approach to the target, and take a few moments to reduce your stress before facing trouble. Later, if you’ve just ducked out of sight of a passing guard, do this breathing exercise while observing your surroundings closely and waiting for an “all clear.” Or, if you’ve just escaped a near capture, pause to control your breathing and consider your options carefully.
Another means of improving your stress response is visualization. Because you will react as you have been trained to react, drill yourself repeatedly on what you would do if...
...you are suddenly caught in the glare of a spotlight from the left ... or the right...
... a car engine starts up nearby just as you climb down off the bulldozer.
...you return to your pickup point to find the flashing lights of a police car.
...you look out the window after hearing a knock at the front door and see two men in business suits standing outside.
Visualize your complete response to the danger scenario. Imagine in detail — will you run or walk? Will you stop to pick up your keys before answering the door? Will you hide nearby, or run as far as you can?
Make these mental drills a routine part of your monkeywrenching, adapting them to every changing circumstance. If trouble suddenly appears, you will have already taken the first step in proper decision making, thereby eliminating those first few precious seconds of indecision.
Finally, take a little comfort in knowing that successfully surviving one stressful situation will tend to make the next one a little easier to cope with. Stress reduction can give you the winning edge before, during, and after a dangerous mission. And don’t stop just because the job is over. What if you’re pulled over by a cop while driving home?
— Cool Hand Luke
Surveillance
Anti-Bugging Devices
A wide variety of devices for detecting room bugs, telephone taps, tape recorders or transmitters on people, and the like are commercially available. Because these instruments are sold largely for corporate security they are very expensive and likely beyond the reach of monkeywrenchers. The best way to guard against electronic surveillance or bugs is two-fold: 1) Do not draw suspicion to yourself; and 2) never discuss illegal activities over the telephone, in your home or office, or with anyone you do not completely trust.
The following may give you an idea of the remarkable devices available. International Logistics System, Inc., POB 25 (72 Ralph St), Belleville, NJ 07109 (201)759–0007, sells, among many items, a portable bug detector for $995, a counter-surveillance probe monitor for $2,995, various telephone bug detectors ranging from $995 to over $5,000, night vision goggles for $7,000–9,000, and so forth. TRD, Inc., 177 Main St, Fort Lee, NJ 07024, 1-800-USA-SWEEP, also sells room, telephone, and on-person bug detectors.
Phoenix Systems, Inc., POB 3339, Evergreen, CO 80439 (303)277–0305, also has a mail-order catalog offering bug detectors and other security devices. Their bug detector for transmitters in home, office, or car is only $129.95 and their telephone bug detectors range from $129.95 to $249.95. They also offer a variety of lock picking tools, tear gas and pepper sprays and grenades, smoke grenades, caltrops (about $2 apiece), and books and videos on lock picking and surveillance. Some of their other devices indicate what a monkeywrencher may come up against: a $60 booby trap tear gas dispenser (this might be on the big yellow machine parked temptingly on the timber road construction project), theft detection powder (about fifteen bucks), surveillance microphones and transmitters ($45 to $145), motion detectors ($40 to $50), and a $12.95 spray that makes envelopes briefly transparent but leaves no lingering markings or residue. Some of these surveillance tools might have value in certain ecotage operations.
Even if you cannot afford such devices, simply studying these catalogs can give a monkeywrencher a good sense of how electronic surveillance works and how pervasive it is. Keep in mind that ordering any of these devices or merely asking for a catalog could put you on a “usual suspects” list. (It is entirely possible that one of these outfits is an FBI front designed to identify the usual suspects.) Practice standard security as outlined elsewhere in this chapter. These catalogs also help you realize that bugs are not placed just by law enforcement agencies. Much bugging and surveillance of suspected ecodefenders is probably done by industry, private security outfits, and the “wise use” thugs.
Law enforcement experts tell us that electronic counter-measures (ECM) is a job for trained and experienced professionals. Inexperienced amateurs doing “sweeps” for bugs will almost always miss a professional installation such as employed by the FBI. Do not, therefore, rely on any of the above equipment to successfully carry out a “do it yourself” de-bugging operation. This section is included only to give you an idea of the availability and variety of surveillance tools on the open market and how rife the practice is.
Electronic Surveillance
In addition to phone taps, microphone surveillance is also a law enforcement favorite. Microphones connected to tape recorders or transmitters are hidden in homes, offices, cars, and are worn by undercover officers and informers. Your first line of defense against these efforts is coded and vague conversation. Avoid using obvious or incriminating words and say no more than necessary. For example:
“Can you go out tonight?” (got a hit planned)
“Sure, you got something in mind?” (you got a target/plan?)
“Yeah, kinda like last month.” (another heavy equipment job)
“Okay, meet ya at seven.” (at the usual rendezvous)
Also, avoid conducting incriminating conversations in the same place time and again. Step outside the house into the backyard, walk down the street, or stroll off into the park. Microphones will only be hidden in the places where you are most likely to talk. Avoid the obvious.
Microphone surveillance of automobiles is more difficult due to noise, although it is often successfully practiced. Make it tougher by turning on the radio and rolling down the window before discussing business.
If you must discuss a job in your house or apartment, turn on a radio or TV or both and sit close together so you can keep your voice low and still be understood.
Get in the habit of hugging your close acquaintances when you see them. This makes it much more difficult for an informer or undercover cop to “carry” or “wear” a “wire” (hidden transmitter or recorder). These are usually hidden in the small of the back where a hug might reveal a strange shape. This forces them to find other places to carry the equipment, such as in a woman’s purse or in the top of a boot. Michael Fain, the undercover FBI agent in the Arizona Five case, always wore cowboy boots because they provided an effective hiding place for his tape recorder. Women in our society can get away with more touching, and hence more discreet checks for surveillance gear.
A sure way to avoid tipping off a microphone surveillance is to avoid talk altogether. One person can be responsible for the target selection and plan, the others simply show up suitably attired and equipped for work but not knowing in advance what is to be done. Once briefed on the mission, no one is allowed to leave the group (when they might make a phone call warning).
Be wary of even a close friend who talks too much. Even someone totally trustworthy can be indiscreet enough to cause you serious trouble.
FBI Updates Eavesdropping Methods
According to an AP wire story in February 1992, the FBI is spending $82 million on a research effort to improve their capability to bug digital phone systems (such as cellular telephones). The Pentagon is spending even more money on similar research. Evidently the FBI was caught with its pants down when drug dealers, Mafioso, and white-collar criminals began using cellular phones and over-the-phone transmission of computer data. Having fallen behind the times, the FBI has found it difficult to locate and unscramble such digital transmissions when they are part of a steady stream of thousands of simultaneous transmissions over the wires.
Wiretaps on digital transmissions need to be placed near the cellular phone or computer being used instead of at a telephone switching center, which is adequate for intercepting normal calls. This makes it more difficult to hide such wiretapping.
Therefore, a key element in the FBI plan is to improve their breaking and entering techniques (“Surreptitious Entry Program”) to place bugging devices inside homes and offices of people they are investigating. Such gadgets and techniques will be designed to thwart security devices like burglar alarms and bug detectors.
F-Men
It is well-known that the National Park Service has gone overboard on hiring people with law-enforcement training to be rangers. Not so well known is that the U.S. Forest Service and, to a lesser degree, the BLM, have also begun hiring more cops — F-men, we’ll call them. Regular Forest Service and BLM employees are receiving considerable law enforcement training at special federal centers. Even many old-time Forest Service and BLM employees are disgusted with this emphasis on law enforcement-particularly since many of these new agents are thugs who believe that everyone is an outlaw.
The Forest Service has a super-cache of law enforcement equipment in Bozeman, Montana. Some of this stuff is out of James Bond movies: automatic weapons, location transmitters to attach under private automobiles, motion sensors to place on trails or around logging sites, and night-vision equipment.
Forest Service law enforcement also has a “special task force” to be sent where needed. Unlike FBI SWAT Team agents who are uncomfortable in wild country, these Freddie hoods are probably good in the woods.
Under current practices, if a Forest Service or BLM law enforcement agent approaches someone to talk, it’s very likely that they have a hidden mike and tape recorder on their person or nearby and are recording the conversation. This is perfectly legal and such recorded conversions are admissible as evidence in court.
In some National Forests prone to arsonists (many forest fires are deliberately set by loggers because “salvage” timber sales in burned areas have fewer restrictions than regular timber sales), surveillance cameras have been established. Monkeywrenchers should expect such surveillance in areas that have been hit hard by ecotage or where there are particularly controversial timber sales, road construction projects, and the like.
Approaching A Forest Site
Recent reports that the Forest Service has diverted substantial numbers of its narco cops to investigations of monkeywrenching calls for renewed security procedures. These officers have backwoods experience prowling around for marijuana patches and setting up surveillance to apprehend the cultivators. They are often dressed to look like people you might normally encounter in the woods. Be suspicious of everyone you observe in the area in which you operate. Many of these “F-Men” are women, so don’t relax your security when you encounter a female hiker while you are on a mission. Most such efforts, however, are conducted by pairs or small groups of men. Their vehicles look like private cars and trucks.
Essential to avoiding the surveillance net is unpredictability. After working an area a time or two, stay clear of it for many months. Surveillance is expensive to maintain — too expensive for months of fruitless waiting in a potential target area. Where feasible, avoid using roads and trails to approach the target as these are more likely to be watched.
Every time you’re out hiking or camping, practice reading “sign,” particularly footprints. Fresh footprints may be your first warning that someone else is prowling your target area. Keep abreast of the weather to enhance your ability to understand tracks. Feel tracks with your hand, as well as studying them with your eyes. A recent heavy rain may have washed out all but the newest tracks, while a hard track in dried mud may date back to a period following the most recent rain.
You can prepare roads and foot trails on a scouting run to warn you of movement later. Gently brush a small area clear of tracks, leaving it looking normal. When you come back later on a mission, check these clean spots for signs of recent activity. A two to three foot stretch on a footpath will be sufficient, while a mere six to twelve inches in the soft dirt of a road will reveal new tire tracks. Locate these clear spots near landmarks that will enable you to find them readily. In the dark, a small flashlight held close to the ground and shined across the dirt will produce shadows in new tracks.
Before engaging in an action, such as tree spiking, stash any incriminating items and scout the area for signs of surveillance (ranging from parked vehicles to funny looking men in camouflage). Move slowly and use your senses fully. A sound or the smell of a cigarette may tip you off before you see anything. You can either move openly, with props (like your tree identification guide book, camera, or binoculars), or secretively, staying in concealment, moving only short distances (quietly!) before stopping to listen and look. Circle your target area at least twice, once close in, and again at a distance just within earshot of where you’ll be working. Approach anything suspicious for a close look, since you’re carrying nothing incriminating.
Automobile Trailing
Forest Service law enforcement officers (F-men) are attaching inconspicuous devices to “suspicious” vehicles in order to follow their movements. These gizmos come in two varieties:
-
A flashing light on a wave-length that can only be seen with special goggles. They are worn by F-men in a following vehicle.
-
A radio transmitter. The following vehicle with F-men stays out of sight. Transmissions indicate general location and movement of the suspicious vehicle.
Drug Searches
The “War on Drugs” makes any association between drug possession and monkeywrenching more dangerous than ever. An increasingly popular law enforcement tactic is the roadblock, which has been employed everywhere from interstate highways to small roads in rural Utah. Similar to this is the so-called “drug courier profile” which is a catch-all used to stop anyone who looks suspicious, or out-of-place, or is simply driving a vehicle with out-of-state plates. An alleged traffic violation like “following too close” or “changing lanes without a signal” is used to stop a suspect, run their driver’s license and auto registration through the NCIC computer, and request “consent” to a search.
An attempt to intimidate you into allowing a search may begin with a simple question like “Do you have any firearms or drugs in your vehicle?” Avoid looking startled and always answer “no.” Even if you’re simply carrying an unloaded firearm in the back, if you don’t answer “no” you may find yourself running afoul of a state law or local regulation you didn’t know existed (and sure to ruin your vacation). Never consent to a search, even if you’re completely “clean.” The first hand experience of witnessing a frustrated cop go through the motions to intimidate you is valuable for the monkeywrencher who may risk later encounters with law enforcement.
If you don’t consent to a search, a drug-sniffing dog may be called in to provide “probable cause.” The dog will sniff around the door seals and trunk seeking a whiff of drugs. If the dog signals its handler that the smell of drugs is present, a lawful search ensues. In the absence of “probable cause” to believe a crime has been committed, the fruits of a search will typically be thrown out of court. Know your rights. Read If an Agent Knocks (available free from the Center for Constitutional Rights, 666 Broadway, NY, NY 10012, 212-614-6464).
Other variations on this law enforcement tactic include setting up road-blocks or signs announcing roadblocks up ahead and waiting back to snag anyone who turns around in an attempt to avoid the roadblock.
Suspects who are detained, either for an ID check or a vehicular search, may be placed in the back of a patrol car that contains a hidden microphone and transmitter that is monitored through an earphone worn by an officer standing some distance from the car. The idea is to eavesdrop on incriminating conversations between suspects to obtain information and probable cause for search or arrest. Such bugging may be entirely legal. Whenever you are detained by police, do not say anything incriminating to a friend that you wouldn’t want the police to hear.
— Dick Tracy
Counterintelligence
The best defense is a good offense. A good counterintelligence program is a must!
Everything that goes on in regard to protests, occupations, civil disobedience, and other “out in the open” actions is well documented on film and video tape by government agencies so that the actions can be analyzed by law enforcement agents at a later date. During such actions they fill out forms to answer questions like: who are the speakers? any known radicals present? does the action appear to be a diversion? etc.
They record incidents of ecotage in much the same manner. All the information they gather is entered into a file that is constantly analyzed.
If you do the same — constantly analyze all related events — you are practicing counterintelligence. A good book on this subject is FM 34–60 (Army field manual) and you can probably find a copy in most larger military surplus outlets.
— The Plumbers
Advanced Investigation Methods
DNA “Fingerprinting”
The authors of an article published in February 1992 Science magazine endorsed so-called DNA fingerprinting as a reliable technique for identification of criminals. They said that DNA patterns extracted from blood, semen, hair, or body tissue can only overlap in identical twins. Such scientific confirmation makes it more likely that courts will admit DNA comparisons in criminal cases, thus making it even more important for eco-saboteurs not to leave parts of their bodies or their bodily fluids behind at monkeywrenching sites.
The Department of Defense is creating a registry of DNA patterns. Supposedly, they merely want to have genetic fingerprints on file of all military personnel so that body remains can be more easily identified. However, the FBI and other government agencies could gain access to such records to run computer matches of DNA fingerprints left at crime sites. The FBI already has 7.6 million DNA fingerprints on file in its computer banks. There have been proposals to secure DNA fingerprints from all children so that they can be identified more easily in abduction cases.
Field Note
Do not urinate near where you are monkeywrenching. It is possible that if urine-soaked dirt was discovered near a ecotage site, DNA analysis of it could incriminate you. Pee far away from any site of your nightwork. FBI agents boast, “If you even sneeze in a car that you’ve stolen, we can get a DNA trace from it.” The FBI, of course, is notorious for exaggerating its abilities and competence, but such braggadocio may be true under certain circumstances. The state of California is already building a DNA database like the FBI’s national database of fingerprints. Researchers report that when five DNA loci were used, there were no matches in the entire 7.6 million FBI samples. This indicates that DNA analysis is as effective as fingerprints in identifying someone.
Ultraviolet Tracing
Ultraviolet tracing materials are used to identify individuals who have come into contact with restricted objects or areas. They consist of powders or pastes, which are applied to an object or surface, that will be picked up on the hands or clothing of anyone coming into contact with them. These powders (usually used indoors) and pastes (oil-based for outdoors use) come in a variety of colors to blend with background (the object they are being applied to). Under normal light they are all but invisible or appear to be ordinary dirt or grease. Under ultraviolet light these compounds effloresce, or glow. Thus, a check of the hands or clothing of a suspect will clearly indicate whether they have come into contact with the treated material.
The use of ultraviolet tracing against monkeywrenching is limited by several factors. Weather can wash the tracing compounds off the treated area or object. In addition, it is necessary to have a suspect in order to check the person and her clothing for the presence of the fluorescent material. Finally, it is time consuming and costly to treat a large area.
It has been reported that the Forest Service experimented with these tracing materials on trees marked for a controversial logging cut. The tree spiker can avoid problems by scrupulously avoiding direct contact with the bark of any tree. To set a spike, only a cheap throwaway cloth glove need come in actual physical contact with a tree. Avoid brushing a shirt or jacket sleeve on the bark. When the job is finished, isolate the gloves in a small bag. If they come into contact with your clothing, such as the inside of your pockets, they will spread the material. Dispose of the gloves correctly by burying them in a hole a great distance from the target (ideally on the drive out — stop briefly, step outside to a concealed place, and quickly bury — this will prevent their discovery by a tracking dog), or dropping them in a dumpster or other suitable spot (don’t leave them in a bag that might bear your fingerprints).
Tracing materials are especially well suited to a set-up. Here a piece of heavy equipment or similar target can be treated and left in an open area as bait, especially if it is known that the suspect will visit or routinely pass by and be tempted. Be wary of anything that looks too easy or is located too close to where you live or travel. Be very suspicious of equipment that stays parked and is not regularly in use. Remember, though, this approach is only effective if you are already a suspect and are being baited. Do not fear it is widely employed.
Other precautions include:
-
Purchase an ultraviolet light to check your gloves and other clothing for the presence of tracer chemicals. Most of these materials respond to long wave ultraviolet light, though a shortwave light can enhance your certainty. Check the big city yellow pages for a “Lapidary equipment and supplies” listing. Mail-order suppliers (a last resort) can be found through ads in gem, mineral, and rock-hounding magazines. This includes companies like Ultra-Violet Products Inc., Box 1501, San Gabriel, CA 91778, whose 1990 catalog lists battery powered lamps at about $20 for long wave and around $30 for short-wave. (Don’t bother with the cheap incandescent “Black Light” bulbs sold through novelty stores and catalogs.)
A good cover for owning such a light and for carrying it in the field is that of the prospector or rock hound. A rock hammer, sample bags or bottles, and a copy of any of the good rock and mineral field guides completes the look, though you should read your field guide or any of a number of books specializing in fluorescent minerals (check libraries or lapidary stores) to be at least slightly conversant on the subject. -
Avoid wool outer garments that might come into contact with a treated surface. The UV tracing pastes are very persistent once worked into wool fibers.
-
Wash your work clothes as soon as possible after any hit. This will remove soil and other material that may provide police with forensic evidence. If the clothing has any smudges or grease spots, clean these first with paper towels and gasoline or paint thinner. Exercise caution to protect yourself from vapors and the flammable hazards. Do not throw soaked towels or rags in a pile or trash can as they can ignite through spontaneous combustion. Spread them out to dry and dispose of them by burying or tossing in a dumpster, or by safely burning. The paint thinner or gasoline will remove most of the oil-based stain. Then apply a commercial stain remover before washing the clothes normally. For substantial grease stains (from heavy equipment “repair”) launder again as needed.
-
If you detect fluorescent material with your UV light, remember to check anything else the material came into contact with, such as hiking/camping gear, car seat and floor, etc. Clean these surfaces and check again.
Advanced Fingerprinting Techniques
-
New research has developed techniques that make it possible to lift usable fingerprints even from rough surfaces like paper bags.
-
Law enforcement agencies have a cyanoacrylic vapor deposition technique that can pull fingerprints from almost anything. This includes the insides of cloth gloves and even skin surfaces.
-
There is supposedly an 80 pound backpack laser fingerprinter that can lift old or faint fingerprints from practically anything including tree bark. A private investigator working for lumber companies in North Carolina is reputed to use such a rig.
-
A new fingerprinting technique, similar to a method biologists use to stain proteins, uses gold and silver attracted to latent protein in the fingerprint. Among the items from which it can recover fingerprints are wet paper, cartridges, computer disks, counterfeit money, and adhesive tape. The FBI and Secret Service are both using the new technique. A Secret Service agent said it was the only technique that works on the adhesive side of tape, and claimed it was one of the five most important improvements in fingerprinting during the hundred years that fingerprinting has been used.
State-Of-The-Art Video Surveillance
Due to recent technological breakthroughs, an innocent-looking empty car parked down the street from your house or apartment may be providing police with round-the-clock video camera surveillance of your comings and goings as well as your visitors.
Agencies ranging from local police departments to the FBI are using this innovative approach to conduct surveillances in areas where an officer sitting in a car, or a more conventional surveillance van, would draw unwanted suspicion. A small camera lens is hidden on the vehicle so that it can be aimed at the target. This can be in a side marker or tucked inside a dashboard ornament. A bundle of fiber optics carries the image to a video camera concealed within a couple of feet of the lens (in the trunk or under a seat). Early models of this type then stored the video signal with a video cassette recorder (VCR). Even with a timed shutter recording one image every few seconds, this required routine servicing to pick up and replace the videotape. Usually an agent simply drove the surveillance car away, and it would be replaced by a different vehicle, often parked in a different spot. The vehicles would be shuttled back and forth to provide the required video coverage of the target.
More recent developments allow the video signal to be transmitted via radio waves to a surveillance post. This surveillance post may be in a nearby government office, the residence of a policeman or other government employee, or in a camper or motor home parked in the neighborhood. This allows the video surveillance vehicle to remain stationary for long periods of time, an especially useful feature when strangers coming and going might arouse suspicions, or where suitable parking spaces are hard to come by.
A video surveillance vehicle is carefully chosen to blend in with the neighborhood. An officer or agent will park the car in a predetermined spot, lock it, and leave it sitting empty. The driver may do this at night to avoid observation, or may feign engine trouble, look under the hood, and finally walk away as if to get help.
Your countermeasures include being aware of what vehicles belong on your street. Any new ones should be regarded with suspicion. Make a note of the vehicle’s description, including make, model, color, and distinctive features. License plates are regularly shuffled by law enforcement agencies and are not a sufficient description by themselves. Watch for signs of activity around the car. Ask your neighbors about the car, feigning interest in buying a car like it. If you find the legitimate owner, avoid suspicion by asking how well the car runs and whether they’re satisfied with its performance. (Keep in mind that this book is read by the authorities and may tip them off to your suspicions.)
Consider other avenues to conceal your comings and goings. Many residential houses can be approached from the street or alley side, making effective video surveillance more costly and difficult.
Rural residents can also be placed under similar video surveillance, with cameras and related equipment concealed on telephone poles, or in brush and trees. Of course, timber sale areas, trailheads, heavy equipment, and other sites in remote areas can be similarly watched.
Be sensitive to your surroundings without being paranoid.
Telephone Monitoring
The secretive and little-known National Security Agency (NSA) has the capability to monitor by computer all telephone calls in the United States. NSA shares its information with the CIA, FBI, and other agencies. Assume all pay phone to pay phone calls are monitored and can be traced if the people give out incriminating information. The NSA’s monitoring computers are programmed for certain words, phrases, or telephone numbers. For details, see the article on the NSA in the Summer 1989 issue (Number 32) of Covert Action. There is only one way to be absolutely certain that phone calls concerning monkeywrenching are not being recorded or monitored by the NSA — do not use the telephone to discuss any illegal activities.
According to news reports, the FBI plans to spend $82 million over the next five years to develop equipment capable of intercepting and unscrambling digital signals from over-the-phone transmission of computer data and conversations over cellular telephones. The FBI’s Surreptitious Entry Program (where agents break into someone’s home or office) is developing devices to counter electronic alarms and other security systems that warn of intruders, so they will be able to break in and install the necessary equipment to intercept transmissions from computers and cellular phones.
Surveillance of personal computer emissions, if not already taking place, will arise soon. All PCs (and, of course, larger computers) give off high frequency emissions which are easily intercepted and made readable. There are no laws prohibiting private or government entities from doing this. Even inexpensive equipment can pick up such emissions at a few hundred feet (the apartment or house next door, the van parked down the street). Greater distances require more costly equipment like pre-amplifiers, but are easily within federal budgets. G-men used to do break-ins to get membership lists, now they can get it all legally when a computer prints out address labels! Unfortunately, the shielding necessary for secure PC use is costly (it doubles the cost of the computer). Precautions include moving PCs to interior rooms and being aware of strange vehicles parked in the neighborhood. Apartments and business offices cannot be secure without costly shielding. Sensitive material should be kept off the PC.
— J. Edgar Redress
Field Notes
-
Telephone companies routinely monitor some calls as part of operator training.
-
The police, many bureaucracies, and some media have technology that enables them to know the phone number someone is calling them from. This was just brought to my attention while I was talking to a reporter from a number he didn’t know. He was going to check into something and call me back. I started to give him the number but he’d gotten it when he picked up the phone. Scary.
— Meyer
Police Undercover Operations
Undercover police activity has become a standard feature of the contemporary political terrain. Disclosures in recent years indicate that environmentalist, anti-nuclear, and animal rights groups are likely to be targeted for surreptitious investigation. This can take many forms, from an inconspicuous stranger who turns up to help at a demonstration, to a trained “deep cover” operative who may spend years working inside a target organization. These operations can be launched locally by a police or sheriff’s department, or by any of a number of federal agencies, such as the Forest Service, which now has the third largest law enforcement staff in the federal government.
Another major source of inside information for investigators is the “CI” or “confidential informant.” These informers can be private citizens recruited to infiltrate a group, or fearful members who turn on their friends (usually to save themselves). Without the existence of the CI, or “snitch,” there would in fact be very few arrests made for major crimes. However, CIs do have major shortcomings from a police perspective, including their general unreliability, questionable status as testifying witnesses, and frequent refusal to testify in open court. Therefore, the information garnered from a CI must be backed up by the testimony of undercover police officers or supplemented by an intensive police investigation (which may involve surveillance and the use of search warrants) to build a case without putting the informer on the witness stand. In fact, the use of a CI in an arrest is usually not revealed, so the investigation may appear to be nothing more than competent police work.
Any monkeywrencher who suspects surveillance, should examine associates, study who has access to information now believed to be in the hands of the police, notice anyone who suddenly attempts to distance themselves, and be alert to any other indication that investigators are receiving inside information.
The Undercover Infiltrator
Both government agencies and private companies are routinely involved in running undercover operations. Small police departments and private firms (ranging from the large agencies like Pinkerton and Burns down to the security divisions maintained by large corporations and often staffed by former law enforcement agents) typically rely on the solitary agent to ferret out information which is then passed on to the agent’s supervisors. Larger state and Federal agencies have the resources to mount far more extensive infiltration efforts. Major efforts entail a team approach, with extensive backup equipment and personnel to exploit the information provided by the undercover cop. The team’s job is to protect the undercover agent and assemble a mass of evidence so that a subsequent prosecution doesn’t rely entirely on the testimony of one officer.
The increasing sophistication of undercover operations has made it more difficult to spot these people. Today’s undercover officer can look and sound like anyone. Many years ago, an undercover cop might be exposed when suspicious associates pilfered his phone bill from a mailbox and found that it listed numerous calls to a recognizable police phone number. Those days are gone as the quality and training of undercover operatives has improved. Only the crudest attempts to infiltrate, such as those occurring at demonstrations or other well-publicized events, are likely to be obvious due to the appearance or demeanor of the plainclothes officer.
There are two broad categories of undercover operative: deep cover and light cover.
A deep cover infiltrator “lives” the role. It may be someone with extensive experience in undercover work, or a young person selected from an academy training class. Novices are actually preferred sometimes because they have not acquired the typical authoritarian habits that might give them away as cops, and also because they are less likely to be recognized by regular cops in the field who might unknowingly reveal their identity in a chance encounter.
Deep cover operations are tightly compartmentalized within the investigating agency to prevent breaches of security or leaks by employees sympathetic to the group being infiltrated. These operations may be coordinated from isolated offices at training facilities like the FBI’s Quantico Academy or the Federal law enforcement training academy (western branch at Marana, Arizona).
A deep cover agent is equipped with false ID (usually retaining the real first name so she doesn’t forget to respond to her name), and a skeleton of personal history, such as a business owner who will verify that so-and-so worked for them (and who will later notify the police that someone was inquiring). The agent’s background may be kept close to the truth to prevent slip-ups. Finally, a deep cover agent may work a real job, rent a house or apartment, and live the role 24 hours a day.
An undercover cop working under “light” cover may also have a false ID, but will most likely go home to his family and “real” life (usually in another city). Sometimes narcotics officers and other specially trained agents will be called on for these assignments.
Going Undercover
Most undercover infiltrations begin when the operative presents herself as a willing volunteer and joins the targeted organization. Often a confidential informant is used to introduce the infiltrator into a group so that she will be more readily accepted. The CI may then discreetly drop from the scene.
A high priority target organization may have a number of CIs and undercover operatives working at once, usually unknown to each other. Such multiple infiltration is used to test the veracity of the information provided.
Undercover agents may also assume roles outside the target organization but designed to provide inside access. A favorite is to pass themselves off as “writers” or members of the news media, or even as someone hoping to produce a documentary for public access television. A phony photographer or video camera crew will enhance the look of authenticity and make a record of people and actions for later use in identification and prosecution. This approach, when used at public gatherings, provides better quality information and photos than the old method of concealing surveillance cameras inside nearby buildings or parked vans. These undercover officers may also use this role to seek “confidential” interviews with monkeywrenchers and other underground activists. One of the CIs in the Arizona Five case played this role.
Another widely used undercover role is that of a utility worker or phone company repair person. This approach is valuable for obtaining access to a suspect’s living quarters or workplace. While inside, the officer can plant listening devices, size up the security measures for a later “break-in,” or look for evidence of illegality that can be used to obtain a search warrant. If the suspect is a renter, the landlord’s cooperation may be sought to obtain legal access without a warrant, to provide nearby facilities for surveillance, or to provide cover for an undercover officer who may act as a handyman or building superintendent. If you rent, you should go out of your way to remain on good terms with your landlord. Even if your landlord doesn’t tip you off to police inquiries, a sudden change in her behavior around you could alert you that something has happened to change her opinion of you, and that “something” just might be sudden police interest in you. The same rule applies to neighbors, employers, and co-workers. The people around you every day can provide the first warning of danger.
If utility company employees come to your door seeking access and you didn’t request service, you should request some ID first, and then call their office to verify their identity and their reasons for requesting entry. Look up the phone number yourself, since the number they provide could be as phony as their ID card. However, remember also that acting unduly suspicious might cause a bona fide repair person to wonder just what you might have to hide.
Yet another undercover role is that of the phony “lawyer” who contacts a suspect before the shock of arrest wears off in an effort to elicit information. This person may claim to be a lawyer, or may just use subterfuge to create that impression. You can, of course, ask for some ID such as a state bar membership card. The period immediately after arrest is a dangerous time. Even after you take on an authentic lawyer to represent you, you may want time to think about your situation before deciding how straightforward you want to be with your attorney. Contrary to the old adage, it is not necessarily essential that your lawyer know everything. For instance, your lawyer may not need to know that you’re guilty, just that you intend to plead innocent.
Similar to the phony lawyer approach is that of the fake court official. This person may ask you for a statement or ask you to fill out a form (to be used for handwriting comparison). If someone like this approaches you, verify the person’s identity before doing anything else.
If you are in jail, the prisoner sharing your cell may be an undercover operative, usually a “jail-house snitch” who routinely seeks information for the authorities from talkative prisoners. Finally, the prosecution may attempt to place an informant in your legal defense committee.
Undercover Tactics
The first task of an undercover infiltrator is to gain unquestioning acceptance within the group. Often she will play it cool, do volunteer work, and bide her time, awaiting opportunity.
The goal of undercover cops is to identify suspects and gather evidence for prosecution. They may volunteer for any job, just to widen their access to information. Often they seek clerical or leadership roles to extend their influence and gain access to membership and contribution records. When the FBI was working to suppress the American Indian Movement, they had an undercover agent working as AIM’s head of security.
Sometimes, undercover agents may go beyond the identification of suspects and the gathering of evidence: they may actually encourage someone to participate in an illegal act, and then help the police set up the arrest of that person or persons (the classic “agent provocateur”). Don’t make the mistake of thinking that this sort of thing is only found in spy novels, or went out of style with the demise of the Czarist secret police. There is a good deal of evidence to suggest that the decline of a number of radical groups in the U.S. in the 1960s and early 70s was speeded up by the judicious use of agents provocateurs (as well as simple informants) by both Federal and local police agencies. The undercover FBI agent in the Arizona Five case went so far with being a provocateur in his desperation to make a case, that he warned his supervisor he had “an entrapment problem.”
One way these agents try to spot potential monkeywrenchers they can set up for arrest is to act especially radical and “talk tough” when around other members of the group. If someone responds, the agent will then provide ideas, information, or equipment to the monkeywrencher(s) to encourage specific illegal acts which can later result in arrests. Such agents may brag of having participated in numerous illegal acts, in order to attract recruits. In early 1989, a story unfolded about the infiltration of animal rights and environmental organizations by several undercover operatives. In this case, the agents were apparently employed by a private security company whose clients included corporations under attack by animal rights activists for their abuse of laboratory animals. In one incident, these agents appear to have helped engineer an attempted bombing in which an animal rights activist was arrested. According to Ecomedia Bulletin, a Toronto anarchist publication, one agent (Mary Lou Sapone) was on the mailing lists of numerous animal rights and environmental groups, including Earth First!.
Michael Fain, the FBI undercover agent, and several confidential informants in the infamous Arizona Five set-up, are classic examples of the above types of infiltrators.
The most valuable information an undercover agent can obtain includes admissions of guilt and plans for future raids. The agent will often seek to record this information for later presentation in court. The basic way to do this is to “wear a wire,” either a small transmitter or a recording device concealed on her person. If this is deemed too risky, the agent may try to arrange an incriminating conversation in a car or room that has been bugged in advance. Any such recording is completely legal, requiring no warrant, as long as one party present (the undercover cop) consents to allow the recording. When preselected locations are used to stage an incriminating session, hidden video cameras using tiny “pinhole” lenses which are nearly impossible to spot may be used to make a record of non-verbal, but possibly incriminating evidence, such as the nod of a head, or the passing of a written communication.
Electronic recording has become so common that often police agents questioning suspects openly will wear small recording devices.
If a suspect makes an incriminating statement in the presence of an agent when not under electronic surveillance, the undercover agent may then try to arrange a second incriminating conversation at a time and place when it can be recorded. Note: Contrary to popular myth, an undercover cop does not have to admit being a cop if confronted with the accusation.
Undercover operatives enjoy logistical support that greatly expands their ability to gather evidence. In addition to sophisticated electronics, they often use a wide variety of vehicles (usually confiscated) to allow unobtrusive surveillance.
Measures taken against suspects fingered by an undercover operative include the following:
-
Physical surveillance of a suspect and her residence, which will continue during nighttime and other times when illegal actions are more likely to occur.
-
Video surveillance of a residence by cameras hidden in parked vehicles’ or nearby buildings. Remote video surveillance has become especially popular in rural areas where the physical presence of officers may stand out. Cameras may be hidden in brush and trees, with coaxial cables run to a monitoring post (perhaps in a neighbor’s house).
-
Trash may be searched for incriminating items, names, and addresses of associates, financial records, records of travel, etc. Trash may be either directly retrieved from the suspect’s trash can, or retrieved later from the trash truck after normal pickup.
-
A “pen register” may be installed on the suspect’s phone line. This device makes a record of all phone numbers dialed but does not record conversa-tions. Such a record may be useful in establishing a pattern of calling associated with illegal actions, and in establishing a suspect’s associates. Undercover agents, wanting to frame a leader with whom they have limited contact, will encourage an individual against whom they have incriminating recordings to phone the leader merely to establish evidence of contact in an effort to support conspiracy charges against the leader.
-
Bank records may be scrutinized for signs of travel or incriminating purchases. These records sometimes may be secured unofficially, through the “good-old-boy” network, since many former law enforcement personnel end up in bank security posts.
-
Utility company records may be checked. These might show valuable information, such as a drop in power usage which might indicate a prolonged absence at a key time.
-
Authority to conduct “mail cover” may be secured from postal authorities. This involves the recording of all the information on the outside of letters and packages (without opening them to check the contents).
-
A “bumper beeper” may be secured to the underside of a suspect’s vehicle with wire or magnets. Such a device allows surveillance vehicles to track the suspect’s movements from a safe distance so as not to betray the agents’ presence.
Note that none of the above investigative methods requires a warrant. If the police can develop sufficient information (usually just a “pattern” of suspicious behavior) they can then obtain warrants for more invasive methods, such as phone taps, hidden microphones, and opening of mail. The FBI has very good success at getting permission from federal judges to install phone taps and room bugs based on elaborate and often fanciful conspiracy theories.
Private Undercover Operations
When private investigative agencies infiltrate a radical group, they usually assign operatives with little training, sent out on a “fishing expedition” to pass along any and all information on the activities of the target group. More experienced operatives may have a background in employee investigations and are generally “hired” by an established business to pose as an average employee while actually seeking information about theft, drug use, union activity, or anything else of interest to management.
Private operatives may use their real identities or fabricated ones. They routinely provide written reports to their employers to justify their job. Because they are not law enforcement officers, they are more likely to instigate or provoke others to commit illegal acts (such as the recent case involving animal rights activists alluded to above), conduct illegal searches and surveillance, and generally engage in the kinds of actions whose evidence would not be admissible in court. Private operatives also typically lack the costly support systems of police undercover agents, and can be more readily exposed.
These private undercover operatives have been repeatedly used against the environmental, anti-nuclear, and animal rights movements.
Confidential Informants
The confidential informant, or “CI,” is possibly the single most valuable tool used in law enforcement. CIs are obtained by a number of means:
-
Walk-in. These are disgruntled or disenchanted members of a target organization who volunteer their services, for a variety of reasons. They may have joined a group with good intentions, only to become offended by what they see as overly radical tactics. Or they may be ambitious people who have been passed over for leadership roles and decide to seek revenge against those they think slighted them. Or they may be wackos who seek revenge against someone in the group for personal reasons, including romantic ones.
-
Tip-offs. The future CI is indiscreet in talking of illegal exploits, and is overheard by someone not of the group, who in turn informs police. The police approach the future CI, and are able to persuade her to “roll over.”
-
Deal-makers. Someone who is arrested on a serious charge may try to avoid prosecution, or obtain a lighter sentence by agreeing to infiltrate a group to obtain information about other illegal activities. This often occurs with drug busts.
-
Recruits. Known members of a target group may be targeted for recruitment by the police. The effort usually begins with a background check for signs of vulnerability. An individual who appears “weak” might simply be interviewed repeatedly by a persuasive officer until she agrees to cooperate. A conservative employer, perhaps one with a law enforcement or military background, might be enlisted to help in pressuring the prospective recruit. In the past, for instance, the FBI has used interviews with employers to intimidate members of political groups.
Similarly, a spouse may be approached to aid in the recruitment. Veiled threats to children or to one’s job security have often proved effective. Also, the parents of the would-be informer may be approached to secure their help. This approach may be particularly effective if the subject is, say, a college student receiving financial support from her parents. -
People who have never been arrested, or young people heavily influenced by their families, are often more susceptible to becoming CIs than those with more experience.
Defense Against Undercover Activities
The danger posed by CIs can be lessened by observing the following rules:
-
Always use the basic “need-to-know” rule. This means that each member of a monkeywrenching team needs only the information necessary to carry out her specific task. Ideally, only one member of a monkeywrenching group needs to know the target in advance, and the others are informed en route to the target. In such cases, be suspicious of someone who suddenly has to make a phone call after learning the target or other plans. Obviously, it is not always possible to operate this way. In many operations, it is necessary that participants be widely scattered (lookouts, for instance) and have detailed knowledge of the terrain. Suffice it to say that such operations should only be undertaken by small groups of people who have known each other for years and have previously operated together.
-
Never belittle a fellow activist or excessively criticize their errors. Everyone makes mistakes. People who are unnecessarily embarrassed may become resentful and vengeful.
-
If someone expresses doubt about certain actions, don’t involve her in those types of actions. If she has serious reservations, “ease” her out of the monkeywrenching group, but try to remain friends. Cutting her off completely may destroy bonds of personal loyalty and make it easier for her to inform on you.
-
If you have reason to believe that police pressure has been stepped up, lay low for a while. Your increased vulnerability at such times could provide the authorities with recruitment opportunities.
-
Be wary of someone who suddenly drops out after introducing a new member. The new member may be an undercover cop.
-
If a member of the group is contacted by the police, for whatever reason, that member has an obligation to inform the group leader or organizer. The contact may be the first warning of a recruitment attempt.
-
Be wary of any group member arrested on unrelated criminal charges, such as drugs. Such persons might have incentive to make a deal for their freedom.
-
Have no contact with the so-called “criminal element.” Such circles teem with informers. A radical animal rights activist was once busted after buying explosives from a member of an “outlaw” motorcycle gang.
-
Be wary of “lost souls,” mentally-disturbed individuals (sometimes it takes a while to realize that someone doesn’t have all her oars in the water), or other people you feel sorry for and might therefore try to be friends with. The CIs in the Arizona Five case were all people whom folks in Arizona Earth First! pitied.
Double Agents
Be especially cautious when dealing with people who volunteer inside information from their position in the offending company, agency, or the like. Such people may be sincerely on your side, and if so, their information can be extremely valuable. But it is also possible that such people, particularly if they approach you first, are “double agents.” A double agent will, under the pretext of helping your group, actually give you misleading information that can be harmful. Such a person may even try to set the group up for an arrest.
If you have such a “volunteer” and you think she might be useful to you, reduce the risk to any actual monkeywrenchers by dealing with her through an intermediary, who serves as contact person. The contact should be someone you know well and are sure is on your side, but who has never participated in illegal actions, and who has no intention of ever doing so. The contact serves as a “cut-out,” passing on information from the volunteer informant and providing a protective layer between the informant and the action group.
It is important that information only flow in one direction, from the informant to the action group. The informant, no matter how helpful, should never be told of plans or actions by the action group. This also protects the informant, in case of investigation by police or company officials. For this reason, you never make any written record of the informant’s identity, lest this fall into the authorities’ hands.
Because your contact person is exposed to the threat of arrest (especially if the informant really is a double agent planning a set-up) she must be mature and emotionally stable enough to stand up under interrogation to protect the identity of the action group.
If you have reason to suspect that your informant is a double agent planning a set-up, arrange to secretly tape-record meetings between your contact and the informer, in which the informant can be caught making provocative statements designed to incite illegal action. Such a recording could be quite valuable in the defense of anyone charged with a monkeywrenching offense. However, any such tapes (or other evidence) should never be kept at home where police could use a warrant to seize and destroy them. Remote rural burial is perhaps the most secure option, so long as you encase the tapes in several layers of water-tight plastic bags.
Your contact should have solid alibis at the time of any action. Being in a public place where others will be able to provide later verification is a good way; being verifiably out of town is even better.
The contact should be very careful when passing information on to the action group. A pay phone to pay phone call, arranged at the last minute, is generally secure. Face-to-face meetings in open areas like parks are also usually secure from electronic eavesdropping. Pass information on verbally, making no written notes that can be seized as evidence, and on a strictly one-to-one basis. If confronted, denials will be more convincing if the content of a conversation hinges on one person’s word against another’s. Another precaution is for the contact to pass on information as if it were idle conversation or gossip. If no illegal activity is actually discussed, it will be harder to prove that a crime has been committed.
Because legal, above-ground political organizations are most susceptible to infiltration by undercover officers, serious monkeywrenchers should not be involved in such groups, particularly those with militant reputations or believed to be sympathetic to monkeywrenching.
Exposing Undercover Agents
When dealing with a suspected undercover agent, be patient. Undercover operations can be very costly, and if they don’t produce results, they may be discontinued or moved elsewhere. If an undercover agent fails to elicit any useful information after a considerable time, they may move on. Incidentally, beware of the person who moves constantly from one area to another. She could be an undercover agent fishing for opportunities.
Baiting is one way to expose an undercover agent. The “suspect” is provided (seemingly inadvertently) with a bit of information so enticing that the authorities cannot resist acting on it. This could be the time, date, and place of a future action, or the location of some highly incriminating items. Of course, the action does not take place as planned, or the “incriminating items” are totally innocuous. If the suspected undercover agent is the only one provided with this information, and the police make the appropriate response, you have reasonable proof that the “suspect” is indeed an agent. If you have tipped the suspected informer to the details of a bogus action, you will need to have some method of spotting the resultant police surveillance or ambush without compromising anyone; perhaps you could have someone just walk by as an innocent pedestrian or hiker.
The baiting method can be used with more than one person at a time by providing each one with slightly different information (different locations, times, etc.) The response will indicate which person is passing information. Keep it simple!
Though undercover agents routinely participate in illegal actions to convince group members that they are bona fide, they are not generally allowed to instigate acts by their handlers for legal reasons. They sometimes break this rule, but doing so can weaken a case in court. If you want to “test” someone you suspect of being an undercover cop, you might provide her with the opportunity (and even materials) to commit an illegal act, but no encouragement. Use your imagination. A simple example would be something like this: With the suspected undercover agent in your car, park by a fur store. You have rocks, spray paint, quick drying glue, and the like in plain sight of the suspected agent. You ask her, “What do you think?” Let the person being tested totally instigate the action. If the person does propose to do something illegal, and is an agent, she has entrapped you by instigating the crime. However, in such a situation most agents will try to make an excuse for inaction, perhaps belittling the scale of the action or promising more later. Beware of this person in this future. (Don’t give a suspected agent the opportunity to run to a pay phone before deciding what to do; she might try to contact her supervisor for instructions.) Note: An undercover agent may risk committing entrapment on one action in order to insinuate herself with the group to get the “goods” on them for a later, more serious caper.
Remember that undercover agents usually “wear a wire” to record conversations. If you really suspect someone of being an agent, and there is no way to keep the person out of a key meeting, you might consider “frisking” the people attending the meeting. Another method of detecting recording devices would be to use a small metal detector (such as are used by treasure hunters, and sold by companies like Radio Shack). However, in most situations this option is probably not feasible, since most people would highly resent such an invasive procedure, or consider it an affront to their loyalty. A better option would be to come up with an excuse for postponing the meeting, until you can check out the suspected agent by other means. Often an agent will have her recorder or a backup recorder in a day pack, purse, or briefcase. As long as the conversation takes place nearby (in the same room or vehicle, say) the recording is apt to be intelligible. In situations where undercover agents expect close personal or extended contact, such as a camping trip, exercise, or soaking in a hot tub, they may forego using a recording device lest they be discovered. (If anything incriminating is discussed while they are “unwired,” they will refer back to the conversation later when they are recording, hoping to get the incriminating information on tape.) Or if they suspect they are suspected, they might manufacture a situation which “proves” they are not wired for sound.
Here are a few ways undercover agents may tip their hands:
-
Seeking information they do not need under “need to know” rules.
-
Trying to get people to repeat incriminating statements made at an earlier meeting (so they can be recorded). If you are suspicious, say you were just joking when you made the earlier remark.
-
Repeatedly casting suspicion on others without basis. This may be a smoke screen to keep suspicion off themselves.
-
Showing an extremely shallow understanding of the issues. An undercover cop may know only what she has been briefed on. Some, however, are good talkers and can sound knowledgeable without really knowing an issue in depth.
-
Making boisterous demands for action and belittling more timid members of the group. Because many cops have authoritarian, even violent personalities, they may reveal this inadvertently.
-
Showing extreme nervousness, such as looking around constantly during an action. (They may be looking for the surveillance or backup team.)
-
Slipping away to phone or meet supervisors or control agents. Such meetings may be brief, in a car at a public parking lot, for instance, or in a department store. Longer meetings, such as “debriefings” might be held in motel rooms.
-
Constantly “managing” the conversation to guide it in directions they wish.
-
Mentioning another person’s name when you refer obliquely to that person. (For the record, since the agent is probably recording the conservation; likewise the next two.)
-
Working the time, date, or location into conversations.
-
Explicitly stating incriminating things in response to vague comments from you or others.
-
Manipulating conversations to try to get some kind of affirmation from you in response to their incriminating statements.
-
Regularly asking about other individuals (particularly supposed leaders).
-
Initiating conversations about monkeywrenching.
-
Steering a conversation back to illegal acts or conspiracies when the conversation moves on to legal and unrelated matters.
-
Claiming to be a recovering alcoholic. This gives them excuses not to drink with you and possibly slip up on their covers while under the influence.
-
Playing different roles with different people calculated to appeal specifically to each individual’s vulnerabilities or strengths. An infiltrator may play the role of just the kind of person you need in your current mental state.
-
Setting-up a phony “hit” to enhance their credibility. They may arrange to attack heavy equipment, surveyor stakes, or other targets while witnessed by people they wish to entrap or whose confidence they want.
Remember that a typical way for a professional undercover agent to initially contact a suspect (group or individual) is to be introduced by a non-professional informer already known but not suspected by the suspect(s).
Background Check on Suspected Infiltrators
Background investigation may uncover undercover operatives. Even the deep cover operative typically has only a rudimentary personal “history” to back up the false IDs. A basic background check through government records (a stock-in-trade process for private investigators) will usually expose the fabricated persona of the undercover cop.
Every normal person (including you) leaves a substantial paper trail as they move through life. To check someone, you need to gain access to such records.
Begin by using casual conversation to elicit details about the past of the potential recruit or suspected undercover infiltrator. Be wary of anyone who seems reluctant to discuss her past, her family, or her job history. Most undercover operatives will not want to reveal their real families to persons suspected of criminal activity (for good reason!). The key period in an agent’s personal history may be the most recent years, which might be the years in which she has worked for the police department, Forest Service, Pinkerton Agency, etc. But even the earlier years in her life may provide leads to friends and relatives who know about her true current employment. The “investigator” needs to be subtle in talking with such people (casual conversation), patient (gather a lot of information over time), and thorough (your freedom may be on the line).
Once you have elicited some background on the potential recruit, search public records for confirmation. You will have to violate the basic security axiom of “no written notes,” but be cautious in your handling and concealment of the information you gather. If your background investigation convinces you of the person’s legitimacy, destroy the accumulated notes in the proper method (burning and crumbling the ashes).
As you begin the background check, you will find that laws vary from state to state with regards to what is, or is not, public record. The only uniformity in accessibility (or inaccessibility) is with federal records.
Dealing with bureaucratic records clerks can be frustrating, but be patient and friendly. Don’t volunteer information. Some clerks will demand to know why you want the information. Tell such people that the records are public (if you know they are) and tell them you would prefer to work with their supervisor. This usually changes their attitude. If such clerks insist that the information you want is not public record, verify this by talking to someone else in the office, or call a similar office (county clerk, say) in another county.
Have a cover story. You could say you are doing genealogical research, or that you are working for a Realtor (out-of-town Realtor, of course). Or you might pose as a writer or researcher.
You can find out a great deal at the public library. Become familiar with city directories (such as Cole’s). Libraries may keep files of high school and college yearbooks. The county courthouse is a veritable gold mine, and includes tax and property ownership records. State government offices keep records on businesses, auto registration, driver’s licenses, and driving records. Driver’s licenses are probably the last thing you should check, since if an undercover agent has a phony license, she may have set it up so that if anyone checks on her license, it will trigger a warning to the appropriate police agency.
Remember that a record search entails looking not just at the one person, but at family, friends, and neighbors. Later on, you may find it necessary to approach these people in person or by phone to elicit information about the person whose background you are checking. For this approach you will need to manufacture a cover story. You could be an old school chum (with a name pulled off an old high school annual, say; this is risky in a small town) or a fellow member of some club or service organization, or an old Army buddy. You might pose as a businessperson verifying a job application or a request for credit. Use your imagination, and be friendly, not pushy or demanding. If you’ve verified a former job by talking to the boss, you might pose as a former co-worker when approaching neighbors or family members.
A deep cover undercover agent may have a sketchy history, such as a business owner who’ll tell you the subject worked for them. Because of this, you must take the time to dig deep. Beware of discrepancies and mysterious gaps. Don’t be in a hurry, as a thorough check of someone’s background may take months, and it may be necessary to travel to a distant city or state.
Private undercover operatives may use their real history, in which case you will need to ask around to find out about their current employment. If all else fails, you can ask something like, “Did she ever get that government job she wanted?”
For detailed information on how to conduct a records search, check a large public library for a copy of Where’s What, the bible for such work. Or check for books on the subject in the Loompanics Unlimited catalog (POB 1197, Pt. Townsend, WA 98368).
You can also hire a private investigator to run a background records check, while you pose as a prospective yet suspicious business partner, would-be spouse, or the like. Get a cost for a basic records check first and make it clear to the investigator that you don’t want word of it getting back to the target. Keep in the back of your mind, however, that if law enforcement becomes aware of the PI’s inquiry, they may compel her to join their scheme. This is most likely to occur when a records background check delves into government maintained files like auto registrations and driver’s licenses.
If all this seems like too much trouble, consider this: Undercover operatives are working right now within groups you are associated with. You can’t be too careful. Of course, because of the risk inherent in such background checks, and the time and possible expense involved, it may be best to simply avoid any individual who elicits your suspicion to the extent that you feel a background check is called for.
Finally, the most certain ways to avoid being busted because of an informant or undercover agent is to work only with long-time trusted friends or to work alone and give no one any hint that you are a monkeywrencher.
To better understand undercover operations by the FBI, all monkeywrenchers should read War At Home by Brian Glick, Agents of Repression by Ward Churchill, In the Spirit of Crazy Horse by Peter Matthiessen, and Break-ins, Death Threats and the FBI by Ross Gelbspan.
— Mollie Maguire
Countersecurity
As the incidence and effectiveness of monkeywrenching increases, targets will be “hardened” with the addition of various security measures. A basic knowledge of how to defeat these security additions is therefore important to a successful campaign of ecotage.
Locks
Because of their low cost, various types of padlocks are used to secure gates, equipment sheds, and heavy equipment. Much earth moving equipment is designed to allow the owner to put padlocks on all the standard access points like fuel tank and radiator caps, oil dipstick, and transmission and oil pan filler tubes. In addition, many machines have metal doors that can be locked to block access to the cab or engine compartment. There are two methods for defeating locks. jamming or forcing.
Jamming: Any glue that dries hard within a couple of hours is suitable for jamming locks. The “liquid metal” type is usually good. Whatever glue you use, force it into the keyway by one of two methods as seen in illustration 9.1. The syringe applicator (A) is very handy, but due to higher unit cost, should only be used where few locks are to be jammed. The large tubes can be modified by drilling a small hole in the cap (B) to direct a narrow stream of glue into the lock. These are best when many locks are to be jammed. A single earth mover can have six to ten padlocks securing all vulnerable parts of it. See also the section on Lock Jamming in the Miscellaneous Deviltry chapter.
Forcing: A battery-powered electric drill with a new 1/8 inch high speed drill bit can be used to force open most locks as in illustration 9.1. Most keyed locks are pin-tumbler types whose basic operating principle can be seen in (C). When a key is inserted, it pushes up on spring-loaded pins of various lengths. When the tops of these pins are in perfect alignment with the “shear line,” the entire “plug” in which the key is inserted can be turned and the lock opened. In most locks, all of these parts are made of brass to prevent corrosion, and its relative softness makes drilling easy. As you can see in (D), the drill is used to destroy the pins along the shear line. Be careful not to drill too deeply into the lock since this can damage the locking bar deep inside making it impossible to open. Drill in only to the depth of the keyway (3/4-inch in most padlocks). A “drill stop” found with the power tools in a hardware store can be used to pre-set this depth and prevent drilling too deep.
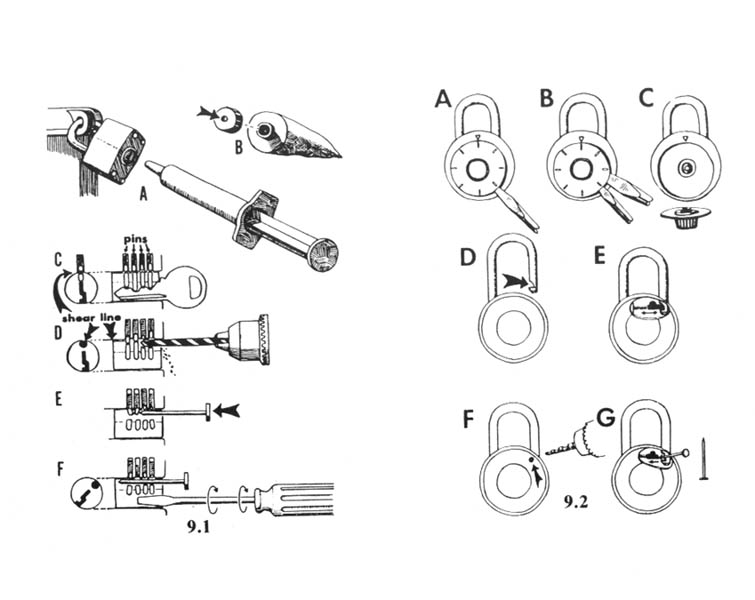
Inserting a pin, like a nail, will keep the damaged remains of the top pins above the shear line. Otherwise they will drop down and prevent the lock from opening. You may need to put the drill bit in a couple of times to chew up any pin fragments that might interfere with opening.
Finally, insert a narrow-bladed screwdriver (F) into the keyway and turn it to open the lock. Before using this method in the field, buy a cheap padlock or two and practice at home.
Field Notes
-
Large bolt cutters can be used to slice open a padlock.
-
Some monkeywrenchers say a much easier way to remove unwanted padlocks is with a crescent wrench. Just slip the jaws, from the side, over the brass body of the lock and twist. The hasp is made of hardened steel which is hard to cut but brittle. You can supposedly break a lock in seconds with an 8 inch crescent wrench (called a shifter in Australia).
-
The use of lock picks can provide access to many outdoor and indoor secured areas and equipment. A basic set consisting of several rake picks, feeler picks, base keys, and torsion wrenches can take care of many pin cylinder type locks. The procedures and practice techniques are described in Lock Picking Simplified (Desert Publications, 1975) available from mail-order outfits like Loompanics. One monkeywrencher reports, “In the year since making my first lock picks, I have opened about 30 locks.”
“The practice should focus on constant but light pressure on the torsion wrench, and judging the correct depth of insertion to insure that the farthest pin will be depressed. The door locks and padlocks used in my practice have usually been opened in less than a minute. Several rusty locks took considerably more time. However, the time used in attempting to pick these locks would appear to be justified before using destructive techniques. A small section of hacksaw blade used similar to a rake pick, can be used to open locks with small keyways.”
Combination Locks
You may also encounter the combination-type padlock as seen in illustration 9.2. To “jam” these, pry off the dial face. Although this can be accomplished with one screwdriver, two make the job easier. First insert a narrow-bladed screwdriver behind the dial face (A). After it is pried up sufficiently, insert a second, heavier screwdriver (B) to finish the job. Without a dial face, the lock owner will be unable to open the lock without forcing it.
These locks can often be opened with the same drill and bit described previously. Note how the notch in the shackle (D) is locked in place by a spring-loaded bolt (E). By drilling a hole in the back of the lock case directly over the bolt (F), you can insert a small nail and push the bolt back out of the notch in the shackle (G) and the lock will open.
Some expensive high security combination padlocks are designed to prevent prying the dial face off, and have two locking bolts, one on each side of the shackle. These can still be jammed by drilling a hole in the back of the casing and forcing glue inside.
Fences
Garages and parking areas for heavy equipment, and offices are often protected by fenced yards or compounds. The most common type of fence is made of chain-link “fabric” with openings of 2 inches or less to make climbing difficult. Seven feet is the minimum effective height. Often a “top guard” is added, consisting of an angled brace (or two) holding either barbed wire or the newer barbed tape. These fences can be climbed with the aid of a ladder. If you plan to climb the fence without a ladder, wear tennis shoes for the best grip.
The top guard wire can either be cut, or covered with a scrap of old carpet and climbed over. If you chose to cut it, use good bolt cutters. The newest type of barbed tape is reinforced with a steel cable core that wire cutters cannot cut, but bolt cutters slice right through.
It is also a simple matter to cut through the chain-link fabric, and a hole sufficiently large to pass through can be made in less than half a minute. Never buy cheap bolt cutters to do this, for they will eventually let you down. Remember that any cutting, unless hidden in a low or concealed spot of a rarely patrolled fence, will reveal your presence the next morning. By cutting only at the bottom (just enough to allow you to crawl under) you can minimize this problem. Also, you can carry a few scraps of wire to tie the fence fabric back to a semblance of its former condition, perhaps delaying discovery.
The gates on these fenced compounds can usually be quickly forced open with a 6-foot pry bar. In an emergency, a car or pickup truck can easily drive through either a gate, or directly through the chain-link fabric itself, sustaining little more than a few paint scratches.
Field Notes
-
It is much faster to cut a hole in chain-link fencing than to try to get three to five people over the fence. When cutting chain-link fence, use small bolt cutters or a fence tool and cut the same vertical strand of wire repeatedly each time it slants to the left or right (not both). You will need to cut the bottom tension wire also. Study how chain-link fences are constructed. Watch for electrified or alarmed fences.
-
If chain-link fences must be climbed, running shoes with knobby soles help. The old Adidas TRX model was great.
Lighting
The presence of security lighting often reveals the location of a sensitive target. The effectiveness of security lighting in bad weather is minimal. Time your hit accordingly.
If necessary, these lights can be knocked out, even if mounted high on a pole or the side of a building. An air rifle firing BBs can break an exposed bulb. It is best to avoid using air rifles firing either .177 or .22 caliber pellets, even though these are more effective, because these soft lead pellets pick up distinctive rifling marks as they pass through the barrel and can often be matched back to a specific gun.
A slingshot is probably best for knocking out lights, but it requires practice to develop the necessary accuracy (see section on Slingshots in the Miscellaneous Deviltry chapter). Also, some security lights are protected by a piece of Plexiglas to deflect low-velocity projectiles.
Closed-Circuit Television
Before penetrating any fence, develop the habit of checking for CCTV surveillance. These cameras are mounted high on poles or the sides of buildings to prevent tampering, and may be concealed by a round or box-like weatherproof covering. The effectiveness of CCTV surveillance is severely limited by bad weather. Also, right-angle corners of fences might create a blind spot through which you can quickly move. Study the layout carefully. To prevent blind spots at corners, some fences avoid the 90-degree turn and use three 30-degree bends at corners.
Alarms
Although many types of alarm sensors are visible from the outside of a structure (like the metal foil on windows), some are not readily detected. The surest way to check for presence of an alarm is to force entry. This may trip lights, bells, or sirens. If it does not, there may still be a silent alarm system in place designed to summon guards or police without alerting the intruder. These can be detected by forcing entry and hiding a safe distance away to see if someone arrives to check out the target. Most responses occur within a half hour, usually substantially less.
Of course if your hit is to be quick, like breaking windows to toss in paint bags, an alarm will not deter you since you’ll be long gone before someone arrives.
Before climbing or cutting fences, check to see that they are not wired to an alarm system. Any heavy wire or conduit attached to the fence from four to five feet above the ground (as seen in illustration 9.3 A) could indicate an alarm system designed to detect both climbing and cutting. If you look farther, you will find sensors attached at intervals (see B, C, & D).
These can be circumvented by digging under the fence, but you must be careful not to bump the fence. Another way to neutralize this type of system is to trigger numerous false alarms by shaking the fence and quickly leaving the area. Enough false alarms might bring about the shutdown of the system. Since high winds can trigger these alarms, windy nights are the best times to do this. In addition, numerous false alarms on a windy night can cause immediate shutdown, allowing you to enter later that same night.
Field Note
In urban areas watch for passive infrared motion and heat detectors. Several different types are currently in use. They can be wired to turn on lights, sound horns, or quietly notify a guard at a security station.
Guards
Most security guards work for only about minimum wage, and bring little enthusiasm to the job with them. A lot of them are pensioners seeking extra income, and retired cops. A surprising number are ex-cons and wackos who want to carry guns but are too unstable to be hired by police agencies. You never know what type you’ll encounter, so always be cautious if you suspect they might be in the area.
Monitoring is boring, and the long hours tend to dull the senses. The guards who manage to stay awake often do so with the aid of television, radio, or magazines, all of which greatly hinder their effectiveness.
Some guards remain relatively stationary, guarding a specific building or heavy equipment parking lot. Others patrol irregularly, often using pickup trucks at remote sites. All have a tendency to hang out near well-lit areas or in the nearby shadows. Sometimes making a complete circuit of a target will reveal the silhouette of a guard’s truck parked with a view of the target.
Always be patient when looking for security guards. The slightest sound or glow of a cigarette will often tip you off to their presence. If you have not been able to locate any guards, but are still unsure, use your flashlight or make some loud noise to see if you can draw them out. Make sure you have a concealed escape route handy.
If a guard is sitting too close to your target, you may want to consider using lights and noise to decoy him away — especially if your hit is to be a smash-and-run type. Remember to close your eyes in those brief moments when using a flashlight as a decoy or bait, to prevent loss of night vision.
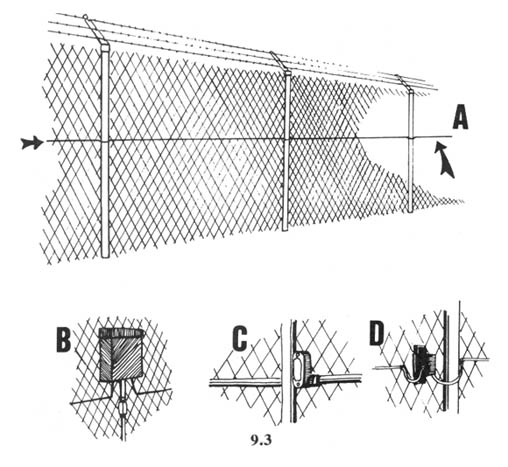
Among the tools useful in your check for guards is a flashlight equipped with a red lens, or covered with electrical tape so that it emits only a pinhole of light. With these you can illuminate small things without alerting a guard. Another useful piece of equipment is a good pair of binoculars. For maximum light-gathering at night, they should have fully coated optics and an objective lens of at least 50 millimeters.
If, despite your precautions, you are surprised by a security guard or other self-appointed guardian of the mindless machine, your best option is immediate flight. When running at night, keep one or both arms fully extended in front of you to prevent being slapped in the face by a tree limb or worse. A heavy jacket provides good protection from unseen obstacles. (This writer once ran full tilt into a barbed wire fence that was invisible on a moonless night. The fence bowed almost to the ground, then sprang back up, leaving me standing a bit surprised, but none the worse for wear thanks to the heavy army-surplus jacket I wore.)
Finally, an inexpensive, battery-powered device, worn on a cord around your neck, can make it difficult for a pursuer to follow you in the night. Pointed at a pursuer on a dark night, a compact strobe light (as is used as a flash attachment for 35 mm cameras) can cause him to lose his night vision. You, of course, should keep your eyes closed when flashing the unit. Many types are available, so shop around. Look for one that is easily operated manually (by a small push button) and can be used while wearing gloves.
Field Notes
-
Tear gas type CS or CN, or electronic stun guns could be used to over-power a guard or watchman. This is illegal but as a last resort it might save you from the greybar hotel. Tear gas does no permanent damage. If you were ultimately arrested and convicted, however, you would probably face additional charges of assault and battery, thereby lengthening your stay in the greybar hotel. Use of such a device would at the least argue against probation, and likely would send you to a medium or maximum instead of a minimum security prison. While minimum security facilities are not country clubs, they seem like Club Med compared to a maximum security prison. Use of such devices, therefore, cannot be recommended.
-
The absolute best approach is to run like hell.
Guard Dogs
In recent years, guard dogs have become a popular way of securing fenced areas in and around urban centers. Because of this, any fenced compound should be checked for the possible presence of these dogs.
Guard dogs are usually males, weighing 70 pounds or more, and of a working breed, German Shepherds and Dobermans being the favorites. Because of the recent boom in the guard dog business, quality has suffered. It is estimated that fewer than one in four German Shepherds is really suitable for this type of work. And since many clients base their choice on cost alone, they often get an inferior guard dog.
Guard dogs are often delivered to the site in the evening, and picked up in the morning. Surveillance can reveal the comings and goings of these vehicles. Also, many times a sign will be posted at a gate warning of the presence of guard dogs. In large fenced areas, guard dogs will work in pairs, the weaker dog taking his cue from the stronger.
Another way to check for guard dogs is to lure them into view. Well-trained dogs will not approach the fence, but will hang back or report to a specific place, or “station,” to wait for the potential intruder to get well inside the fenced area. Despite this, they can usually be lured into view as a way to check for their presence. A “silent” dog whistle, available at all pet stores (illustration 9.4) is one way to check. Simply shaking the fence, or throwing rocks inside the fenced compound, simulating the sounds of an intruder, can bring a guard dog into view.
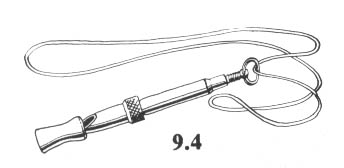
If the target protected by the dog is worth the effort, there are several ways to neutralize them. They are based on luring the dog to a selected area along the fence. Although these dogs are usually trained to stay back from the fence, and are further trained not to pick up food baits (called “poison-proofing”), the boredom of their job often makes them more amenable to luring. Meat baits delivered regularly to a certain area will establish a pattern of visits by the dog. Or, “house-breaking” spray, bought at pet stores, can be sprayed on a section of the fence. This imitation urine can make a dog curious, and cause him to mark his scent posts regularly. And of course, there is the classic bitch in heat which has proven the downfall of many a protection dog.
Following are some methods for neutralizing a dog lured close to the fence:
Noose pole — The noose poles described in the Trapping section of the Animal Defense chapter can be used to snare an unwary guard dog. Since many of these dogs are trained by “agitation,” frequently by waving a rag or burlap sack in their face, you should try to provoke them into grabbing a burlap sack offered on the end of a pole (illustration 9.5a). Once you have begun a tug-of-war with the dog, slip the noose over his neck and tighten (9.5b). Finally, pull the dog up to the fence, and secure him there with a sturdy piece of wire, a carabiner, or a heavy-duty leash clip (9.5c).
Hidden traps — Standard leg-hold traps can be chained to the fence and slid inside. Covered with a cloth, they will not be immediately visible to the dog. Use only the Victor “soft catch” type (illustration 9.6a) or a standard trap with added cloth padding on the jaws (9.6b). Kick the fence and make noise to agitate the dog, then lead him down to the section of the fence with the traps. Once the dog has been caught, leave the area immediately. He will settle down and wait to be released in the morning. The padding on the traps will prevent injury. Penetrate the compound at a different point and remain out of view of the dog when working.
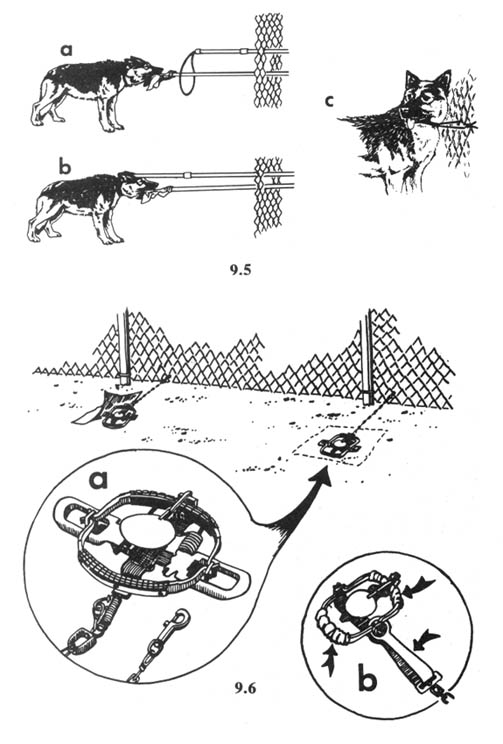
Tranquilizers — Dogs that will accept meat baits can be slipped tranquilizers early in the evening, allowing you time for the drug to take effect. Adding a little garlic to a meat bait can make it even more attractive to most dogs.
The most effective tranquilizers for oral administration are the CNS depressants derived from Phenothiazine or Promazine. These include:
Propiopromazine HCL (Tranvet)
Triflupromazine HCL (Vetame)
Acetylpromazine (Acepromazine)
Chlorpromazine (Thorazine)
Valium
These are all rated “relatively nontoxic.” Clinical dosages for sedative effect would be less than 100 mg for a large dog. Actual field use would require more, up to 600 mg. The effects will be noticed within 15 minutes of ingestion and include ataxia (loss of coordination) in the hindquarters, drooping eyelids, and eventually, lying down. Fullest effect can take from 30 to 60 minutes.
Tranquilized dogs are best snared and then secured by means of a chain and heavy clip. Lightweight snaps and nylon webbing are not sufficient to hold a large dog.
The aforementioned drugs are available by prescription only. You will need to have a sympathetic vet, or try to get tranquilizers from a vet by explaining that you are driving a friend’s large dog cross country and that the dog needs sedatives before he’ll ride in a car. Thorazine and valium are, of course, prescribed for humans, so they may be obtainable from other sources than veterinarians. Many drugs are available without a prescription in Mexico.
Force method — Using this technique, an intruder dresses and arms himself to meet the dog head on, if necessary, and frighten him off. A variety of gear and weapons make this possible. Police use variations of this method in raids where criminal suspects own vicious dogs.
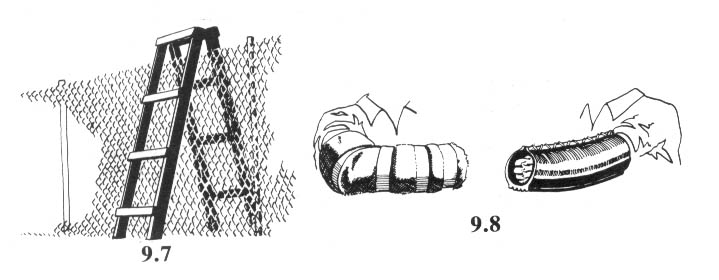
Special Ladder — Illustration 9.7 shows a specially built ladder with widely spaced rungs that a dog cannot climb. This is an aid to escape, should that become necessary.
Protection Sleeve — Homemade protection sleeves are made of a thick inside layer of soft cloth and a durable exterior of heavy canvas or old car tire (see illustration 9.8). The sleeve is held out to the attacking dog, who will grab it and then become more vulnerable to blows or the effects of specialized weapons.
Full Protection Suits — Used to train guard and police dogs, these padded suits cover the body from neck to ankle. They can be purchased for several hundred dollars from veterinary and dog training supply houses (like Animal City, PO Box 1076, La Mesa, CA 92041). These are best worn with heavy boots, and a few trainers recommend a motorcycle helmet. They do provide excellent protection from attacking dogs, especially when combined with a protection sleeve that the dog can pull off.
Stun Guns — Where legal, the electronic stun gun can be purchased over-the-counter at pawn shops and some gun shops. The best models discharge over 40,000 volts at an amperage so low that they can be safely used (or so the manufacturers say) on someone wearing a pacemaker. They have a tremendous immobilizing capacity, and are best applied to a dog’s nose after he has taken hold of the protection sleeve. (At the present time, these “stun guns” are being sold legally in Arkansas, and probably in several other states as well.)
Pepper Sprays — These are far more effective on dogs than tear gas (which is illegal in most states, anyway). The type the postal service uses is available through W.S. Darley & Co., 2000 Anson Drive, Melrose Park, IL 60160. Another brand is available through Bushwhacker Backpack and Supply Co., PO Box 4721, Missoula, MT 59806. These sprays contain the active ingredient of red pepper, and are the subject of research for “bear repellents.” To be effective on a dog, the spray must be directed at the eyes. It does no permanent damage.
If Attacked by a Guard Dog
If attacked by a guard dog, observe the following procedures: Do not run unless you have a short way to go to safety and a good head start. Dogs can run very fast.
Shout “No!!” as loudly as you can as the dog approaches — he may automatically respond to this command by hesitating or stopping. If he stops, command him to “Sit!”
Offer your padded sleeve to the dog. Once he grabs it, use your pepper spray, stun gun, or your booted foot and a club to strike him on the nose, in the throat, or in the abdomen (just below the rib cage).
Retreat to safety when possible. Do so at a half-turn so you can keep the protective sleeve between you and the dog.
Most dogs will cease their attack if the victim stands perfectly still for a time varying from a few seconds to a minute. Some people have escaped by slipping out of the sleeve and letting the dog have it.
As a last resort, remember that a car or truck can be driven through a chain-link fence or gate to rescue someone attacked by a dog.
— Major E.J. Allen
Field Note
A battery-powered shock rod or cattle prod could keep you from being attacked by a dog.
Pursuit and Evasion
Any combination of error and bad luck may find you being pursued by police, security guards, or a suspicious citizen. Even if the pursuers are trappers, dirt bikers, loggers, surveyors, bulldozer jockeys, prospectors, or ranchers, avoid panic. While planning, you should have considered the possibility of pursuit, so you should know a good way to escape. If you must run at night, keep your head down and your arms extended ahead of you to block tree branches and to break a fall. Lift your knees high to step over small obstacles that might otherwise trip you. Stop running as soon as possible and listen for the sounds of pursuit. At night you can sometimes hide and allow pursuers to run past you. (Do not attempt this ploy if your pursuers are using dogs. For this eventuality, see the section on Tracking Dogs.) Do not lead your pursuers directly to where your driver is supposed to pick you up.
Pursuers following your footprints will have a difficult if not impossible task at night. Trackers working cross-country at night will be moving slowly, so you can outdistance them. Generally, if being pursued at night, you will want to stay in open areas to allow quick and quiet movement, and need not worry about leaving footprints.
When moving by day, use roads or hard-packed trails when out of sight of pursuers. Otherwise, step on rocks or clumps of grass to minimize tracks. Walking on the outside edge of your foot will also diminish tracks. Learning to follow tracks yourself will be the best way to learn how to avoid leaving any. (See the earlier section on Tracking).
Vehicular Pursuit
You may find yourself being pursued when in your vehicle. Again, your pursuer may be a police officer, a private security guard, or an irate citizen. Even skilled pursuers can sometimes be safely eluded by the driver who keeps cool and plans ahead. However, it is unlikely that you will be able to outrun law enforcement vehicles. They know what they are doing. They also know they don’t need to catch you — all they have to do is radio ahead and wait for you to screw up. You have a better chance, however slim, of eluding police than out-running them.
Remember that a high-speed chase can endanger innocent people, not to mention yourself. This is morally indefensible. Fortunately, simply outrunning the opposition is rarely as successful as outmaneuvering and outthinking it.
We were once actually pursued by an enraged citizen on some dark country roads. Unfortunately our trusty steed, an ancient automobile, could not go over fifty miles an hour. Our pursuer came howling down on us like a banshee and was fast closing the gap. Since we were unable to outrun him, our survival depended solely on our wits (two halves make a whole). Since our advanced planning had included a study of all the roads within miles of the target, we knew that just over the next rise were several small intersecting side roads. When the opposition was within thirty seconds of us, we topped out on the slight rise in the road and were briefly out of sight. In those precious few seconds, we jammed on the brakes and whipped off onto a side road. We then cut the headlights and coasted along slowly in the dark, finally stopping with the parking brake to avoid signaling our location with a flashy display of brake lights. (See Vehicle Modifications in the Vehicles and Heavy Equipment chapter.)
Our pursuer roared past moments later, in hot pursuit of a car that had been well ahead of us on the same road. Once clear, we turned our lights back on and left the area by the back roads.
This tactic can also be used in urban areas, especially if your pursuer never gets close enough to see what your vehicle looks like. Whip into a parking lot or even into the driveway of a house, shut off the lights and engine, and allow the pursuer to pass. Once it’s safe, quietly leave the area in the opposite direction.
The trick of this and other types of evasion is getting out of sight of your pursuer. This can be accomplished by turning in and out of side streets and alleys. We have used this type of evasive maneuvering more than once to evade police cruisers in downtown business areas.
Those who try to rely on speed alone to escape police find that they can’t outrun the radios used to alert interceptors and set up roadblocks.
In rural areas, forest and range roads may offer avenues of escape. If you have thrown your pursuer off the track, this may be a good time to rid yourself of any incriminating evidence. But don’t just drive to the end of the road and then walk off into the forest or desert to bury the goods. An experienced tracker can detect what you’ve done after a brief examination. Instead, stop at some random point along the road, preferably at a spot where rocks, hard ground, or a thick bed of pine needles allow you to walk without leaving footprints. Make sure that nothing you dispose of could carry your fingerprints. Burn all papers, maps, etc. (Obviously, if you think a pursuer is still somewhere in the vicinity, don’t start a fire.) After disposing of the incriminating material, leave the area and play dumb if questioned.
Carry camping gear in your vehicle. If forced to hide out on a remote back-road, you can set up camp and pretend to be camping should any police inquire. If you are forced to take this approach, pay attention to details of your alibi. For example, don’t say that you’ve been camping for a week if you have only one fire’s worth of ashes in your fire pit.
If you are not discovered, get out your highway or forest map and plot the shortest, safest route out of the county (and possibly the state). Avoid driving through the county seat or other main towns, if possible, as this is where you are most likely to encounter a roving sheriff’s deputy. Under dire circumstances, you may want to arrange for only the driver to leave the area, and have a second vehicle, unknown to the police, come later to pick up the rest of the team at a pre-selected rendezvous site.
Field Note
Because of the danger of high-speed auto chases to yourself and others, the unlikelihood that an amateur can outrun or evade the police, and the additional criminal charges for running, we discourage trying to escape from police in your vehicle. However, if this is something you want to be able to do, shell out the money and go to one of the professional driver schools that teach chauffeurs for executives how to evade kidnappers. See their ads in the backs of magazines like Police Gazette. Most important for vehicular escape is to know the escape routes beforehand. You should know the area and its roads better than your potential pursuer.
Self Defense
One of the most serious dangers faced by monkeywrenchers is the very real possibility of being assaulted by security guards (or more likely, by miners, ranchers, loggers, and other assorted yahoos) if apprehended in the midst of an operation. Should you come unexpectedly face-to-face with a real or self-appointed guardian of the mindless machine, under circumstances in which no amount of talking is likely to persuade the guard of your innocence, the best policy is to turn and run. (Of course, if you’re staring down the barrels of a 12-gauge double at five paces, running might be the last thing you should do. In fact, if you do run under such circumstances, it may be the last thing you ever do.) Most of the people on the other side are dreadfully out of shape, and any good monkeywrencher should count it a matter of professional pride to be in top cardiovascular fitness. Being able to run fast, and for several miles can save your sweet ass.
There is a readily available tool that can greatly deter a pursuer, should you unexpectedly encounter someone at close range, without causing permanent injury. This is a small, hand-held, battery-powered strobe light (normally used for taking flash photos). Select a unit that will flash at a very rapid rate. Buy unobtrusively through a large discount house or catalog showroom.
A short strap or cord will allow you to hang the strobe unit around your neck or secure it to your wrist for quick deployment. If the trigger button of the strobe is exposed and easily depressed, use a thick, hard adhesive to build up, layer by layer, a protective ring around it. The ring should allow your gloved finger to reach the button, yet should protect the button from accidental discharge (as, for example, might happen should you be forced to lie down on top of the unit).
The strobe unit can be used on daring daylight raids to distract and temporarily blind prospective witnesses, but is most effective at night. Practice with the unit before taking it on operations, lest you trip it accidentally and reveal your presence.
When using the strobe at night, flash it several times at the guard or other individual who steps around the corner or pops up from behind a bulldozer. Remember, close your own eyes when activating the flash, or you will lose your night vision. Hold the light at arm’s length out to the side. After a few flashes, turn away and run like hell.
If your flash unit can be set to repeatedly flash automatically, it can be left behind to distract pursuers. Lay the unit on the ground or roll it to the side before running. Don’t do this unless you’re sure that there are no fingerprints on the unit or on the batteries inside.
Do not attempt to use the flash unit if you are looking down the business end of a gun barrel. A sudden move on your part might cause a nervous guard to pull the trigger in panic.
Other devices may be of benefit in deterring pursuit. Tear gas sprays may be effective under certain circumstances, and will not cause permanent injury, but their mere possession is a felony in many states, and their use by a monkeywrencher would probably be construed as an assault. The large spray units designed for use by law enforcement personnel are the only reliable ones; the small purse and key chain size devices may be ineffective. Some have suggested tear gas sprays be carried only for use against dogs, but even in this case you would be violating the statutes against possession, and pepper sprays are more effective.
All in all, the best self defense is to be prepared, and to avoid sudden surprises. A carefully prepared escape plan (including alternate times and locations for meeting with other team members or drivers), and a pair of good, strong legs will do more for insuring your continued freedom than any other factor.
If you must restrain a guard or watchman, do not use his own handcuffs. Police and security guards frequently carry hidden cuff keys. Restrain the guard with heavy duty cable ties and duct tape. Call police anonymously to free the guard as soon as you are clear of the area. Of course, if you are later arrested, you may be also charged with kidnapping or assault and battery if you physically restrain a guard.
Cross-Country Evasion
Occasionally, problems of transportation or terrain may necessitate long cross-country travel in the course of a mission. As with a short-range mission (where foot travel is limited to a mile or two), spend the minimum amount of time necessary on the ground. To speed up your travel, consider using cross-country skis in winter, and mountain bikes in other seasons. Hiking can be hastened by using back roads or foot trails. All of these methods carry an increased danger, since you may come onto searchers too suddenly to take evasive action. Because of this, it is often best to stash your tools in a spot where you can easily locate and recover them at a later date. Also, it is important to change your footwear, since searchers may have photos or diagrams of footprints to match up to the footgear of suspects. In the event you are stopped for questioning and searched, your “mission” shoes should be concealed inside a bag inside your pack. This may prevent a searching officer from being able to claim he was searching you for a weapon (as they can legally do) and just stumbled upon the shoes. In a real pinch, you can claim to have found the shoes discarded alongside the trail. You tried them on for a fit, and decided to keep them.
The legal latitude given police to search backpacks is not clearly defined, but court rulings have made it clear that a tent is not considered a dwelling, and no warrant is required to search it. The same probably applies to backpacks. Regardless, state clearly that you do not consent to a search, but never attempt to physically interfere with one.
Search
There are two types of search a monkeywrencher might experience:
Conventional search — Here the officer responding to a call or complaint searches the area quickly to see if any suspects are present. The police canine unit consisting of an officer and a trained police dog are highly effective at this. The responding officer and others may also cruise adjacent roads looking for suspicious activity, parked cars, or cars driving slowly through the area.
To avoid this type of search, leave the target area immediately after the mission. At the time of the pick-up or shortly thereafter, store all tools and incriminating items in the trunk, camper shell, or similar location where they cannot be readily discovered by an unscrupulous officer inventing “probable cause” to search your vehicle. As always, have a good story for being in the area (even if it’s something simple like “just out partying”). The story must be short and simple. All members of the team must know it. Even on a roadside stop, officers sometimes split up the suspects and question them separately to look for differences in their stories. Be brief and you won’t slip up. If pressed, repeat the same answers.
Intensive search — An intensive search may be mounted if the authorities believe that the crime is serious, and that the suspects might still be in the area. A number of search methods which might be employed:
Aerial search — Both helicopters and light planes can be used in conjunction with the search methods described below. Search aircraft are easy to escape if you observe basic precautions. If you hear or see an aircraft, conceal yourself immediately until you can determine its purpose by observation. Do not look directly at the aircraft if it is close. An upturned face is often very visible, especially against a dark background. Since movement also increases detectability, remain still.
The best way to hide from aircraft is to remain in shadows. On bright, sunlit days, the harsh contrast between light and shadow make it extremely difficult for searchers to see into shadowed areas. The airborne searcher is considerably more effective on cloudy or overcast days, and during the brief daylight time before sunrise and after sunset.
Lying down can expose more surface to the eyes of an observer flying overhead, so it’s usually better to crouch or sit down. Don’t panic if a search aircraft passes directly overhead. Most aircraft have a blind spot directly beneath them.
Lying under a camouflage tarp (or white sheet on snow-covered ground) can render you essentially invisible to spotters in an aircraft. Beware of your visible tracks leading such airborne searchers to you under such camouflaged cover.
If a local police department does not have a helicopter, they can usually obtain the services of one from a nearby agency through a mutual assistance agreement. Learn which agencies in your area have helicopters, the frequencies they use (monitor the scanner for Air Ten, Copter 3, or Skywatch). Helicopters seldom fly in high winds, heavy rain or snow, or in heavy fog. Use this weather to your advantage.
Cordon — Authorities may set up roadblocks to check cars leaving an area (this method is usually employed when the suspects are thought to be armed). Authorities might cordon a backcountry area where suspects are thought to be by posting officers or rangers at trailheads leading out of the area. The way to deal with this problem is to avoid major trails, especially when within a mile or so of a road or trailhead. If you are “clean,” you might try to bluff your way through, although you should recognize that even if the authorities let you pass, they will probably make a record of your presence.
Scratch search — In this method, small teams of searchers check only the most likely spots. Major trails, cabins, and the like are obvious choices. Search planning is usually based on the principle that the suspect will move downhill. Avoid this type of search by staying away from obvious landmarks, campgrounds, major springs, old cabins, mines, and caves.
Survey search — This type of search is designed to cover large areas quickly with aircraft, jeep patrols, and horseback patrols. Officers may be in plainclothes, attempting to look like ranchers, hunters, fishermen, and the like. Staying off major trails and roads will help you avoid this type of search. Be careful that you are not observed from a road. If you must cross a road, do so at a low spot or at a bend where you cannot be observed from any great distance. While crossing the road, move slowly, erasing your tracks carefully behind you (see Tracking Search below). Remember that searchers might stop on a high point and use binoculars to scan the surrounding terrain.
Saturation search — This is a highly intensive search method which usually involves moving a line of searchers back and forth through an area. This method is not commonly used because it requires a lot of people. It is sometimes used to search the immediate crime scene for physical evidence. Keeping your tools in pouches and on lanyards prevents accidental loss and possible recovery by police during such a search.
Tracking search — This method uses both human and dog trackers. Capable human trackers are rare. Still, some sheriff’s departments and search-and-rescue outfits do have semi-experienced trackers on call. The best way to avoid a tracker is through speed and changes in direction. It’s difficult enough for a tracker to keep up with, much less overtake, someone walking at a normal pace. The tracker usually hopes to catch up with the poorly-conditioned subject taking a break or camping overnight. Also, trackers may attempt to determine the general direction of movement and radio ahead for other teams to intercept the suspect along the trail or at road crossings.
Practice walking in ways that leave minimal tracks. You will learn that stepping on rocks, gravelly areas, and small clumps of grass makes tracks difficult to spot. On soft soils, walk slowly, putting your entire sole down at once and lifting it in the same way. Most tracks leave distinct impressions when the weight is concentrated on the small surface area of toes or heel. Forget about walking backwards to deceive a tracker, as this only fools a rank amateur.
In areas where you cannot avoid leaving tracks, like the soft dirt in a road, erase your tracks as you go. Do not erase them with wide, sweeping actions, since this makes your trail all the more obvious. Carefully use your hand to brush out your tracks one at a time. This is practical only for very small areas where you can’t avoid leaving tracks between areas where you don’t leave tracks, such as a sandy area between slickrock.
If you will be moving cross-country for some length of time (say, eight hours or more) be careful not to leave a clear trail near the target. The beginning of your trail will be used to indicate the direction in which searchers will concentrate their efforts. If possible, leave the target at right angles, or in the direction opposite to which you eventually intend to travel. Circle back later, avoiding major trails that might be checked in the immediate area.
Field Notes
-
If you can afford the risk of exposure, moving 100 or 200 yards along a paved road will often throw off a human tracker. This is especially true if your first steps back off the pavement are in a place where you can avoid leaving tracks.
-
Among the Australian Kooris (indigenous people of Australia) were people who worked in the spirit world. These people were called “Kadachi.” One of the tools of their trade was special footwear traditionally made from Emu feathers (a very fine, soft feather) held together with blood; the equivalent can be made with sheepskin from old car seat covers. With these shoes it was possible to enter and exit a camp without leaving tracks to be found even though the Kooris were and are renowned for their tracking.
Tracking dogs — Tracking dogs are probably more likely to be used in an intensive search than are human trackers. While a well-trained tracking dog can be a difficult adversary, they too have limits. As with human trackers, the best principle with dogs is to move fast and outdistance the pursuit. Tracking dogs can follow scent on the ground, both fresh human scent (in the first few hours, usually) and the scent of crushed vegetation and disturbed soil (which lingers much longer). They can follow scent trails in the air. Airborne scent lingers on calm days, and settles in low spots like ditches. They can distinguish the scent left by different individuals. For example, a tool dropped at the scene can be matched to a specific individual in a line-up. For this reason (and others) never leave tools at the scene.
Most dogs can follow a trail that is less than 24 hours old (the record is over 100 hours). Here are a few methods which will make things difficult for a tracking dog:
-
Leave the target area by moving through a spot that is likely to be “contaminated” by the first people to arrive at work in the morning. When other scent trails are laid on top of yours, the dog often doesn’t know which scent trail to follow.
-
Do not drop any articles like clothing or tools. If you must get rid of incriminating items, toss them far off your trail, preferably into thick brush, deep water, or off the top of a cliff.
-
Walk on roads (if safe) where the smells left by passing cars will both disperse and mask your scent trail.
-
Travel in exposed, windy areas (if safe), where the scent will be dispersed by the wind.
-
Walk in areas that get direct sunlight. Direct sun kills the bacteria that produce scent. Tracking dogs have been known to track people by skipping from one shady area to another, the sunlight having destroyed the scent in between.
-
Walk on dry sand and gravel, which have less bacteria to enhance the scent trail, than rich humus and thick vegetation, which provide ideal conditions for the tracking dog.
-
Contaminate your back trail with red pepper and pepper sprays (such as the postal service uses), and gasoline. Dust is also bad for the dog’s nose, causing fatigue. The French Resistance reportedly scattered cocaine to foil tracking dogs (presumably it deadened their sense of smell) but this method is probably too expensive for anyone except movie stars and rock musicians.
-
Walk on the upwind side of cactus and rough ground that can injure the dog’s feet and slow it down. In summer, walk through fields of seed-bearing grass (like foxtail) that will cling to your clothing. They will work into a dog’s paws and possibly force the handler to abandon the trail.
-
Change directions at a sharp angle, ideally an acute angle back in the direction from which you came. Change directions on sections of easy trail or downhill stretches where the dog’s speed and momentum will cause it to over-shoot the turn. Though the dog will likely find the turn, the handler may lose some confidence in the dog. If possible, change directions by walking with the wind. In this way, the wind will not carry your airborne scent back to your old trail.
-
Before changing directions, walk about in a small area, crossing and criss-crossing your trail. Imagine the confused look on the dog handler’s face as the dog dashes to and fro. The dog may be following your trail, but the handler may think the dog has lost the trail and is casting about for a fresh scent. Repeat this procedure each time, you change direction. Eventually, the average handler will assume the dog has lost the trail and may terminate the search.
— Victorio
Arrest
If You Are Arrested
If, despite all of your precautions, you fall into the hands of the police, remain calm and collected. What you say at this point may well make the difference between being freed and imprisoned.
When dealing with police, be polite. An angry cop will go out of his way to make life difficult for you. However, being polite does not mean you have to acquiesce in everything the cop wants. Don’t be intimidated by the uniform and gun. Never (if you still have any say about it) consent to a search of your person or vehicle. When asked, politely but firmly say “no.”
Most police are well aware of their power to intimidate. They know that putting someone in handcuffs or driving them “downtown” is sometimes all it takes to make a suspect cooperate fully in incriminating herself. The shock of arrest, isolation from friends and family, and well practiced questioning are all designed to force the suspect’s cooperation, confession, and the implication of others.
If you are arrested, do not talk to police until you have talked with your lawyer. You will be read your “Miranda” rights only if police officers wish’ to question you. Do not be lulled into casual conversation; this is a standard method for lowering a suspect’s defenses and causing a slip of the tongue. Your only safe answer to questioning is to politely tell the police that you have nothing to say until you have talked to a lawyer. Then say nothing, not even small talk. This measure alone may spare you from later conviction.
Don’t believe the cops if they say it’s too late at night to get a lawyer. You can call one any time (or else have one appointed when the courts open in the morning).
Watch out for the “nice” cop who wishes you would cooperate for your own good. His partner will often come on with the “tough guy” approach to make the “nice” cop seem friendlier still. Another classic ploy is to tell you that “we know everything, anyway.” If the police really knew everything, they wouldn’t waste time asking you questions. Sometimes the police will reveal a few bits of information and tell you that they are only trying to fill in “a few minor details.”
Perhaps the most common ploy is to tell you that it will all go easier for you if you cooperate. In reality, your cooperation will only make it easier for them to convict you. Never forget that the interrogating officer is a trained professional, in his own element, and that you are out of yours. If you try to talk your way out of trouble, you will probably only make it worse. Say nothing until you’ve seen a lawyer.
Even should you slip up and reveal something damaging to the police, you are under no obligation to continue talking or answering questions. In such an instance, when you come to your senses, stop talking immediately.
Before undertaking serious monkeywrenching, read up on a few pertinent points of law. Most important, read If An Agent Knocks, available free from the Center for Constitutional Rights, 666 Broadway, NY, NY 10012. This booklet gives the best and most accurate advice available on your rights to refuse to talk.
A book well worth reading is The Outlaw’s Bible, by E. X. Boozhie. (In the second edition of Ecodefense, we reported it was available from Circle A Publishers in Arizona for $12.95 postpaid. They seem to no longer be in business. But some folks have ordered it through bookstores like Walden’s for $11.95.) It tells you how a few extra precautions may maximize the protection of your “constitutional rights,” something most people take for granted until it is too late.
— Clarence Darrow
Field Note
Never talk to the FBI. They usually come calling in pairs, and one is carry-ing a concealed recorder to catch everything you say. Don’t try to outwit them. Ask them what they want, then tell them you have nothing to say. Warn your friends immediately after the agents leave, as they may be visited next. But be cautious when warning your friends! You may be under electronic or physical surveillance and the FBI visit may have been designed only to spook you into leading them to your associates. They’re crafty devils. Have a planned, innocent-sounding code phrase which you can insert into a pay phone or face-to-face conversation to warn others that law enforcement is snooping around.
Media Relations
Although the secrecy so essential to monkeywrenching generally dictates against contacting outsiders about clandestine activities, it may on occasion be necessary to communicate with governmental bodies, target industries, or the media. Keep in mind that all of these contacts will be reported to the police, who will run down every lead in their efforts to identify and arrest you. At any face-to-face meeting with media representatives, there may be plainclothes police officers masquerading as reporters. Any written messages, even the envelopes they come in, will be chemically treated in the crime lab to reveal fingerprints. Any handwriting samples will be carefully filed and compared with samples of every suspect’s handwriting. (In the Arizona Five case over a dozen individuals were served with subpoenas requiring them to not only provide fingerprints to the FBI but detailed handwriting samples. A trained agent sat in a room with the person giving the handwriting sample and dictated many things to write, then print, and then all over again several times. The repeats were designed to ferret out any deliberate attempt to disguise an individual’s handwriting. The feds were trying to match various postcards, notes, signatures, and other writing found in their investigation.) Telephone calls may be tape-recorded, and valuable voiceprint evidence may be obtained this way. All telephone calls to police agencies are routinely tape-recorded. (All phone calls made from jail cells are monitored and many are recorded.)
When dealing with the press or other media, never assume that they are interested in impartially presenting the facts to the reading or viewing public. Some news people will gladly turn you in to the police. Others, whose code of professional conduct will not allow active cooperation with the police, will nevertheless not hesitate to fabricate lies, distort truths, and seek out anyone who will provide a derogatory quote about your actions, if that will make a more sensational story. The truly impartial reporter/newscaster is unfortunately rather rare, and must be treated with care. (Nonetheless, there certainly are friendly, supportive, and professionally ethical reporters.) Never lie to the press. Never give information to the press that might reveal your identity, numbers, or intended actions. If asked revealing questions, politely say you cannot answer that question. When in doubt, leave it out.
The four basic forms of contact with the press and others, in descending order of security, are communiqués, telephone contacts, photographs, and personal interviews.
Communiqués
Never write a communiqué by hand. Anything you may do to disguise your handwriting can be nullified by an experienced handwriting analyst. It is much safer to use a typewriter (preferably a rented one), or better still, the classic method of cutting words out of the newspaper and pasting them up on a sheet of paper to make your message. Don’t make the mistake of leaving the chopped-up newspaper in plain view or throwing it in the trash where police can easily (and legally) retrieve it. Take it out somewhere and burn it. An argument against this method is the classic criminal aura it carries.
Rental typewriters are available in a number of places. Libraries may be the best place, as you may be able to work in a carrel which provides a bit of privacy. Some of the more sophisticated printing/photocopying establishments may also have rental typewriters. If you have to type in a public place, be sure to “bury” your message inside an innocent-looking text, in case someone looks over your shoulder. You can later cut out the text, paste it together, and photocopy it under more secure conditions.
Do not deliver the original. You may have accidentally touched the paper and left fingerprints that can be revealed through chemical fuming in the laboratory. Another drawback is that a typewritten original (and possibly even a clear copy) can be linked to the exact typewriter that produced it. (It is particularly important not to deliver the original if you use the classic method of cutting words out of a newspaper and pasting them on a sheet to make your message.)
Photocopy the original communiqué and deliver only the copies. Use only a photocopy machine whose location or amount of use makes it unlikely that someone will accidentally observe what you’re doing. If you are copying something incriminating and someone walks up before you are through, calmly stand so as to block their view, or else gather up your materials and leave. You can always come back later. Copying machines are common, and are now found in libraries, post offices, and supermarkets, so finding a suitable one should be no problem.
Note: Don’t use a copying machine where you are known, or near your residence or place of employment. Don’t repeatedly use the same copying machine. Investigators may be able to trace a copy to the exact machine that produced it, due to irregularities in the glass, etc. We have heard that copy machines may leave some other kind of identifying characteristic on photocopies which can be traced to the specific machine.
Run off several copies of your communiqué. When finished, pick up the copies by handling only the outside sheets. Slip them in a folder or large envelope, and later (with gloves on) destroy the outside copies you touched. Never handle with bare hands the copies you intend to send. Do not forget to pick up your original before leaving the copy machine. If you fail to do this, somebody is likely to get quite a surprise!
The importance of taking precautions to avoid leaving fingerprints on both message and envelope cannot be overstressed. Recently a gang of arsonists in Boston was caught because part of a single fingerprint was uncovered by the crime lab on the inside (gummed portion) of a postage stamp on an envelope used to send a bragging message to the authorities.
If the copy machine you are using has an adjustment for lightness and darkness, set it as light as possible while still allowing the message to be readable. This is especially helpful in disguising the origin of a typewritten original. It also may help to make a copy, photocopy that copy, and then photocopy that copy to make a poorly reproduced copy that will mask the identifying marks of the typewriter used.
Delivering a communiqué can be dangerous, and should be well planned in advance. If your message could be construed as threatening in any way, you should avoid using the U.S. Mail, as this may needlessly violate Federal law. However, if you are simply sending a matter-of-fact statement of some action that has already occurred, you are probably not incurring any additional legal penalty. Certainly, using the mail simplifies delivery.
If you choose not to use the mail, there are a number of ways of delivering your message. You might tape your message to a door or bulldozer. Of course, wear gloves and leave no prints on paper or tape. For delivery to the press, you might leave your communiqué in a remote location, such as in a phone book in a phone booth, taped to the bottom of a garbage can, or in any number of locations. Once away from the area, call the newsroom at the newspaper or TV station and briefly tell the person who answers where your message can be found. Ask them to repeat your directions. Don’t forget that any communiqué that you deliver to the press will be photocopied by them before being passed on to the police.
If you choose to mail your communiqué, make sure the envelope, as well as its contents, have no fingerprints or other distinctive identifying characteristics. You might type the address ahead of time on a sheet of paper with a rented typewriter, then Xerox the address sheet as described above. When you are ready to send your communiqué, you can cut out the address and glue or tape it on an envelope you have pulled from the middle of a package of envelopes, wearing gloves during this process. (Wearing gloves while using the rental typewriter would eliminate the necessity of using glue, but if someone were to see you so attired they might be suspicious.) Once you have your envelope addressed and sealed, ready for mailing (be careful with the postage stamps — fingerprints!), place it inside another envelope for carrying until you are able to mail it. Always use a sponge to moisten stamps or envelope flaps, saliva can be identified as to blood type and for DNA. When you are ready for mailing, take the inner envelope out (wearing gloves, of course) and drop it unobtrusively in a mail box far from your usual haunts. If you are operating in a rural area or small town, mail communiqués from some nearby large city, so as not to tip off your location.
Field Notes
-
To make it even more difficult to trace your photocopied communiqué, type through five sheets of paper and a carbon sheet to get the final result on a bottom sheet. Photocopy the bottom carbon copy. By using a cloth ribbon on the typewriter, this method makes unreadable the thread count which is part of typewriter identification.
-
Another way to get rid of the individual characteristics of the typewriter is to run it through a copy machine on a reduction cycle and then enlarge the reduced copy back to normal size. Use a common typewriter with a common typeface or an electric typewriter with interchangeable type heads or daisy wheels. If you use a rental machine, use one with a cartridge ribbon and bring your own. Take it with you when you are finished.
-
Burn your cartridge ribbon after you type your communiqué. Do not keep it around for future use. Your freedom is worth the cost of a new cartridge. One of the defendants in the Arizona Five case kept his cartridge ribbon and the FBI picked up his communiqué message on it. It was considered major evidence when introduced in the trial.
-
To prevent people from reading your letter without opening the envelope, wrap aluminum foil around it inside the envelope. This stops x-ray and chemicals used to look inside of your letter.
-
To grab paper without leaving fingerprints when wearing gloves would appear suspicious (such as making photocopies of a communiqué about monkeywrenching at a self-service copy shop), simply grasp the paper with a binder clip.
-
Don’t leave an unfinished communiqué in your typewriter when you go out to do the job! Amazingly, one of the “Arizona Five” did just that. He is serving several years in a federal prison. The prosecution gleefully waved the unfinished communiqué before the jury during the trial.
Advanced Communiqué Sending
With the new generation of typewriters, it is now safe to use your own typewriter for communiqués, and you may even send the original safely (use only common stock paper). Modern typewriters no longer use keys, and it was these keys that made letters typed on “old-fashioned” typewriters traceable. Modern typewriters use either typing elements (e.g., the “ball”) or cartridge printwheels. The former sell for about $13 and the latter for about $25 apiece. (A brand new typewriter now costs under $300, and there is an abundant supply of used ones.)
One can either (a) purchase an element or printwheel for each communiqué and then dispose of it or (b) use an element or printwheel specially reserved for communiqués, switching back to one’s “normal” element or printwheel for everyday correspondence. Obviously, (b) is cheaper, provided the reserved element or printwheel is kept in a secure, secret place. Most elements and printwheels have no metal in them, and so can not be found with a metal detector. These are the ones to buy. Of course, if you come under any kind of investigation, you should thoroughly and securely destroy your reserved element or printwheel at the earliest safe opportunity. Typed letters can be positively matched to a particular printwheel or element just as they can to an old-fashioned typewriter with keys.
Cutting out words from a newspaper is even more time-consuming than it is boring. A simple alternative, which has the advantages of being quick, cheap, and untraceable (newspaper print can at least be traced back to the newspaper from which it came) is to use a stencil, such as those often found across the middle of a high-school-type plastic ruler, or a plastic template that contains the letters of the alphabet (some computer templates have this latter feature). Again, the stencil can either be disposed of after use or can be reserved only for communiqués. The advantage of the stencil over the typing element or cartridge printwheel is that the stencil is cheaper and you don’t have to buy a typewriter to use it. The best writing instrument for a stencil is a felt-tip pen. If you use a ballpoint, do not write on a hard surface that will retain a permanent secondary impression of your message.
As long as you have used common stock paper and surgical rubber gloves to avoid leaving fingerprints, this is a safe communiqué to send. Also, it spares you of the need to visit a photocopy shop to make a copy to send. Use envelopes of the standard variety, and seal them with (and moisten stamps with) a damp sponge or a piece of damp tissue paper.
If you use any typewriter, destroy the ribbon after typing your communiqué, especially if it is a carbon, rather than an ink, ribbon. This is necessary because your ribbon records a perfect copy of what you have typed.
If you must use a typewriter with keys, keep the following points in mind: If the typewriter is a manual or a cheap electric, type with only one finger and hit each key with the same amount of pressure. With these typewriters, it is very easy to determine your typing ability; e.g., whether you touch-type or hunt-and-peck and how well you do either. If you use a typewriter with keys, you must photocopy the communiqué and send only the photocopy. In addition to the extra security precaution of sending a third or fourth generation photocopy, you might want to make your first photocopy by placing a piece of thick Mylar or Saran Wrap between the original and the photocopy platen. Anything to help obscure the typewriter’s unique impressions will make it all the more difficult for your communiqué to be traced.
All in all, however, the element or printwheel typewriter or the stencil is safer. With the accompanying, related precautions, untraceability is virtually guaranteed.
Equally important is to obscure your writing style. Write communiqués as if you were sending an expensive telegram. Do not attempt literary excellence. Terse phrases rather than complete sentences are best. Punctuate as little as possible, using only commas and periods, and these only when necessary to make your communiqué intelligible. Spell phonetically. In short, do nothing that will disclose any of your stylistic or spelling idiosyncrasies — and everyone has them. On the other hand, do not overcompensate by being positively cryptic. Be smart rather than “clever.” The whole point is to provide information about what you did, and not about who you are. No clues are better than false ones, because the latter can give you away inadvertently. And, of course, real clues can be fatal. Just get your message across as simply as possible. Reporters aren’t imbeciles. A simple, clueless communiqué will make perfect sense to them, yet leave the authorities with no leads to follow.
Editor’s Note: There remain dangers of using your own typewriter even with a removable printwheel. There will always be the temptation for the impecunious monkeywrencher to retain a ribbon for future communiqués. No matter how well you hide it, a police search may find it. But let’s suppose you promptly destroy your ribbon after each use and hide your printwheel. If it is discovered during a police search it may well be directly linked to a particular communiqué, despite whatever precautions you might take to render the printing less legible. And even if you discard a printwheel, the authorities may be able to determine from your communiqué the make of typewriter used, and if you happen to own one of those, that’s a bit of circumstantial evidence. More than one person has spent their life in the slammer on the basis of a few pieces of “circumstantial” evidence.
Field Note
Evidence obtained from an Electrostatic Detection Apparatus (ESDA) is admissible in court. An ESDA detects and visualizes invisible indentations on paper. For example, if you sign a check on top of a piece of paper that is later used in a communiqué, the indentation of your signature could be made visible by an ESDA.
BLM Procedure for Ecotage Letters
It is always good to know one’s opponent. A disadvantage of publishing Ecodefense is that it gives the destroyers of wilderness a window into the strategy and tactics of ecodefenders. Similarly, ecodefenders should study the tactics used against them. Monkeywrenchers should find interesting the following text of an August 28, 1990 memo on “Tree Spiking and Ecotage Evidence” from the Oregon State Bureau of Land Management Director to his district managers. It explains very well how agencies treat ecotage communiqués.
Recently the Eugene and Medford Districts have received letters from Ecotage groups claiming that timber sales have been spiked. Letters are of a threatening nature and generally outline the unsigned writers [sic] beliefs that timber is being managed improperly. At least one timber area in the Medford district has, in fact, been spiked. The letters which the district offices receive are, in fact, evidence which can help us find and prosecute those responsible for damaging Public Timber. We request that the mail service unit on each district or the first reader or receiver of threatening document [sic] do the following immediately on receipt of document or letter.
Do not handle.
Place in 9” by 12” zip lock plastic bag.
Make copy of letter for your office needs through plastic bag.
Notify State Law Enforcement Office, Agent Kevin Freeman.
Send letter in blue envelope to Agent Freeman.
Place envelope in which letter came into plastic bag.
Send envelope to Agent Freeman.
Each person who receives or touches the original letter should write a statement outlining how they handled letter and whom they passed the original letter onto before it was placed in zip lock bag. Each person who touches the original letter may have to be fingerprinted in order to eliminate their prints from suspects for identification purposes. The fewer the persons who handle the letter, the more valuable the letter will be as evidence.
Your assistance is appreciated in this matter of investigative importance.
Telephone Contacts
Telephone contacts must be kept to a minimum, whether with press or others. Phone calls may be tape-recorded (even though you may request press not to do so, you can never be sure that they will honor your request). Phone calls can also be traced, should the authorities be listening. In the past, calls had to be at least several minutes long to be traced, but the technology for this is improving. Some big-city police departments are installing computerized systems which have the potential to trace calls almost instantaneously (911 systems, for example). In some big cities, phone companies provide customers with instantaneous tracing of “harassing” or obscene phone calls. Also, a “Caller ID” service is now available in some locations. With this service the number of all incoming calls is displayed on a special monitor attached to one’s phone. Many reporters have this feature on their phones. Given that this kind of tracing technology is now available for normal telephone customers, it should be assumed that law enforcement agencies, other government agencies, corporations, and media can identify the telephone number for incoming calls.
For your own security when using the telephone, only use pay phones, and even then make your call as brief as possible. For added security, call the reporter/newscaster and instruct her to go to a specified pay phone, where you will call her within a specified time. Then call her from yet another pay phone. Get to the point right away and get off the phone.
Advanced Telephone Contacts
Because of the ease with which telephone communications can be monitored, telephones are dangerous for monkeywrenchers to use. Even coded conversations must be kept brief, and the code words routinely changed to avoid a pattern of suspicion.
Occasionally you may have to use a phone to engage in computer “games” or to notify the press where to find your latest communiqué. Here the phone trace becomes a danger. Never use a phone to threaten people — this is risky and cowardly. As discussed above, phone traces are much quicker with today’s electronic switching. If you must use a phone, select a pay phone where you are not likely to be observed, either because it is secluded, or in a busy area where people (including potential witnesses) are in a hurry and not likely to linger long enough to be questioned by police (such as outside convenience markets). When using the phone, appear normal and average. Don’t give potential witnesses anything distinctive to remember. Don’t make eye contact with others (eye contact helps them remember you). Try not to park your car within sight of the phone. This would give more information for possible witnesses.
Computer hackers can make traces more difficult and time consuming by routing calls through different electronic bulletin boards. You can also use an old bookmaker’s trick called “backstrapping.” Here you run your own phone wire from a terminal (the large multiunits at apartments and commercial centers) or house protector (the simple two-wire block mounted on the outside of a house) to a remote and secure location. A successful trace will send police to the point of origin where your counter-surveillance will warn you in time to disconnect and flee before your extra wire is discovered. Don’t expect police to arrive in uniform with lights flashing — learn to spot unmarked police cars and suspicious looking loiterers.
An empty home, apartment, or business can be a good place to hook up. Don’t worry about the owners being billed for long-distance calls — they’ll contest the billing when it arrives and the phone company will consider it an error. Don’t draw undue attention when you run your backstrap wire. If you run it to a laptop computer in a car or van, use a long wire, park out of the direct line of sight, and be prepared to drop the wire and drive away casually. Carry a large magnet to quickly erase any computer disk on the chance you are stopped and your equipment seized.
For details on phone systems, consult the do-it-yourself telephone books. Many of them have illustrations of the systems you’ll encounter.
As discussed elsewhere in this chapter, all telephone communications have the possibility of being monitored or instantly traced. The only absolutely certain way to avoid this danger is to not use the telephone for any illegal activities or to discuss any illegal activities.
Personal Interviews
A direct meeting with reporters is one of the most dangerous contacts a monkeywrencher can make. However, such an interview can help get your message across. The notorious ecoteur “The Fox” was once interviewed by Chicago’s popular columnist Mike Royko with considerable advantageous publicity resulting.
If you do decide to take the risk of a direct meeting with a media person, exercise precautions. First, direct the reporter to a phone booth to await further instructions. Then have her go to yet another phone for more directions. In the meantime, have someone observe the reporter to make sure that she is not being followed, knowingly or unknowingly, by undercover police. Do not attempt to follow the reporter in your car, because if the police do have her under surveillance, their trained eyes will probably pick you out. If you think it is safe, finally direct the reporter to a remote rural location which gives you multiple avenues of escape. Hold the interview at sunset since the oncoming night will conceal your withdrawal from the area. Always wear mask and gloves to protect your identity. Don’t even let your hair show, as this will tell an observant reporter more about you than is necessary. Have someone concealed nearby to provide you with backup security. Never allow more than one newsperson at an interview.
Sometimes it is possible to arrange a spur of the moment interview at night. Do this only in familiar terrain so that if something goes wrong you can escape into the darkness. If TV lights or camera flash are to be used, save them until the end of the interview as they will likely draw unwanted attention.
Photographs
Photographs of actions, delivered to the press, can be an excellent method of gaining media attention. Since photos can also convey information to the police, make sure there is nothing in the picture that can be traced to you. It is probably wiser not to have people in such a photo, but if you do, everyone must be well-disguised and lack distinctive clothing. Anything else in the photo must be of common manufacture and widely available.
If you do not have your own secure darkroom facilities for processing and printing, use Polaroid-type film only. Never entrust film from illegal actions to commercial labs. Many people have been busted for offenses after being turned in by a photo lab’s quality control inspector or some “friendly” drugstore clerk. Destroy extra photos and negatives, and resist the temptation to start a scrapbook. Photos constitute highly incriminating evidence. In England, saboteurs who attacked the grave/shrine of fox hunter John Peel were undone by a random license plate check which led to a search warrant which turned up a mere one-half of a negative that the photographer was unable to destroy in time. This scrap of evidence led to further investigation which ultimately put the saboteurs in prison.
— Corona Smith
Field Note
A number of monkeywrenchers and other activists believe that while it was necessary to inform the media about ecotage in the past, it is no longer necessary or wise to do so. Early publicity about monkeywrenching helped to raise the urgency of the debate about conservation issues like ancient forests, and to underscore the adamant opposition of many people to the destruction of wild places. That has been accomplished. In most cases, publicity about monkeywrenching in the 1990s is counterproductive and no effort should be made to contact the media. For tree spiking, it is still absolutely necessary to inform land managers using the above safe techniques; otherwise it is probably best not to publicize your work. There are, of course, exceptions. Use your best strategic judgment.
General Security Field Notes
The following tips come from experienced monkeywrenchers. Benefit from their on-the-job learning.
-
Medicine for monkeywrenchers: Ecoteurs have fallen into ditches, scraped knuckles on heavy equipment, cut themselves on glass, and otherwise suffered numerous minor injuries. There is likely to be so much adrenaline pumping through your system that you scarcely notice the injury, but you should examine the wound at the first safe opportunity. A penlight flashlight can be carefully used for the examination. Each member of the team should carry a dark, clean bandanna to use as a bandage.
-
Water: Monkeywrenching can be hot, dry work. Keep a water jug in your vehicle. If you carry a canteen on your person, remember that a partially full canteen can make a loud sloshing noise. If silence is needed, drink all of the water in your canteen or pour out the remainder when you first drink in order to keep it from sloshing and revealing your position.
-
Psychology: Learn to play your hunches and be aware of subtle feelings. Life in the underground sharpens the senses to the point where you can develop a protective “sixth sense” that defies rational explanation. Dreams and “feelings” with no apparent basis in fact or observation have saved many an outlaw or monkeywrencher from arrest. Nevertheless, under no circumstances should you allow “feelings” to become a substitute for proper planning. On the other extreme, make sure that neither you nor your associates slip into paranoia. If fears and pressures seem to be mounting, take a vacation.
Another type of behavior for which to be on alert, particularly among experienced operatives, is euphoria. This energetic, go-getting, “nothing-can-stop-me-now” attitude often follows periods of depression. The pattern will be acted out by even the most highly motivated individuals after prolonged exposure to danger. First comes a slow, creeping depression when the individual begins to question his or her basic motivation. It begins to seem as though nothing will ever change for the better, regardless of what one may do. After a few days or weeks, the mind snaps out of this way of thinking but then overcompensates by making the individual feel invincible. This is euphoria. Locked in its heady grip, experienced monkeywrenchers have been known to charge forward without taking even elementary security precautions. This is a dangerous state of mind, and team leaders, in their coordinating role, must remain on the alert for it (even in themselves!). The solitary Earth defender must carefully evaluate her own moods. A break or vacation will help to restore proper balance. -
Keep in mind that police, Forest Service and other government agencies, and industrial security specialists will study this book in the hope of developing countermeasures. Be thoughtful and inventive. Do not leave this book in plain view in your home or car.
-
Remember that your abilities are acquired through experience. Re-read pertinent sections of this volume before attempting an actual operation. Start with simple tasks and easy targets, and only gradually work up to major monkeywrenching.
-
Experiment, improvise, and practice your techniques. Monkeywrenching is a highly creative field in the fight to preserve wild country. Use your imagination!
-
When driving in rough country or on jeep trails, try to avoid scraping bottom. If you scrape a rock, the paint chips you leave can be compared to the FBI’s National Automotive Paint File to determine the year and make of your vehicle. Also, grease smears rubbed off on the high-centers of such roads can sometimes be linked to the remaining crud on the undercarriage of your vehicle. Whenever you leave such a sign, stop to brush it away.
-
Get a black, dark green, or camouflage fanny pack and fill it with basic survival gear (space blanket, matches, candle, candy, pocket knife, first aid kit, small flashlight, etc.). Strap it around your waist as soon as you leave your vehicle for operations such as tree spiking in the woods. Do not remove it. In case you are confronted by Forest Service law enforcement agents or deputies, you can escape through the woods and know that you have all you need to get back to safety even if you have to spend several days in the back-country.
-
If you need a backpack for an extended monkeywrenching mission, use a frame pack with the sides of the frame extending vertically above the top of the pack. Camouflage the frame with camo bow tape (sold in bow hunting stores) or paint. Use camo straps if possible. Jansport also makes a good belly band in an inconspicuous tan. The pack itself should be camo. (Some experienced monkeywrenchers argue that dull green or brown are better than camo for packs, straps, and frame.) Use it to carry anything incriminating. Next, get a camouflage day pack. Mount it over the frame pack with the day pack straps looped over the vertical uprights on the frame. This day pack is used for emergency gear in case you get into a bad situation. If that happens, dump the backpack into a bush or over a cliff. Take the day pack and take off. Try to retrieve your backpack later.
-
Anyone who engages in ecotage should avoid becoming a suspect in the first place. This means not drawing attention to yourself by leading conservation protests or becoming a public pain in the ass to government agencies or powerful corporations. Even if there is no evidence linking you with an act of monkeywrenching, if you are suspected and are enough of an irritant, some police, government agents, or corporate thugs are not beyond planting evidence on you or in your home (such as illegal drugs) in order to make your life miserable or to take you out of commission for a while.
-
In 1989, the Mountain States Legal Foundation established a hot-line for gathering information on alleged monkeywrenching. That number in Denver, Colorado, is (303)837–8439. Calls are no doubt taped and traced.
-
Some experienced monkeywrenchers believe deer hunting season is a good time to work. One writes: While it’s true that there are more people in the forests, that large influx can provide a good cover for many activities. First, no amount of noise is suspicious if it’s coming from a deer hunter’s camp. Second, as long as you’re carrying a rifle and have a license, you can go any place and not be unusual. At the worst, somebody will just call you an idiot and tell you to get the hell off their land. This is especially so if you pretend to be an idiot or just plain lost. It’s probably best not to carry bolt cutters, but there are lots of things you can do. Spike the trees around your camp, shoot power line insulators, spike dirt roads. Cutting fence is probably too dangerous at this time of year unless you do it in an area where you can’t be seen and you can get away promptly. Some deer hunters carry hand-axes on their belts; we all know what can be done with a couple of strategic blows from a hand-ax.
-
Carry a rock hammer and a brunton compass when you’re out in the boonies. Then if some rancher or 4-wheeler asks you what you are doing, tell them you’re a geologist on a field traverse. If they ask you any more questions, say the company doesn’t allow you to discuss the project with anybody. Have some phony business cards made up with a phony PO Box.
-
During the summer of 1989, when the Burr Trail in southern Utah was being widened and paved, bait equipment was left out on the side of the road to lure monkeywrenchers. Armed men were hidden in the equipment, and one of the most expert and notorious trappers in the Southwest was hired to trap a monkeywrencher. It was widely believed that this thug would have killed in cold blood anyone he caught.
-
Beware of the carelessness that comes with success. Don’t get lax. Law enforcement people may bide their time and wait for you to make a careless slip. Be unpredictable. After hitting a particular target for a while, drop it and move to something else. Engage in counter-surveiIlance.
-
Loggers in northwest Montana have started a forest watch program to look out for monkeywrenchers. They may be using fire lookout towers to monitor timber sales. There has been talk of levying $1 for every thousand board feet of timber cut on the Kootenai National Forest to hire private security guards. Loggers claim they could raise $190,000 a year by that method.
-
The September 1990 issue of Timber Harvesting magazine offers tips on protecting logging equipment from monkeywrenching or theft. They suggest:
-
Hire retired or handicapped persons to guard equipment at night.
-
Park equipment near a rural home on weekends and pay the residents to check your equipment.
-
Lock fuel tanks, battery compartments, dash & side panels, filter housings, and oil and hydraulic fluid filler caps.
-
If you can’t lock up these parts of your equipment, have workers inspect their rigs before starting them up, especially on Monday mornings. Look for anything that might indicate tampering.
-
Stick signs on equipment warning that booby traps of tear gas or sirens have been installed. The article states, “You may have a more creative solution.” Be forewarned, then, of potentially lethal booby traps.
-
Park equipment 50 feet apart to prevent a fire in one from catching others.
-
Insure equipment.
-
This, of course, indicates that monkeywrenching is taking its toll. All of these measures cost the operator money and/or time. Note particularly the suggestion of booby-trapping heavy equipment by potentially dangerous means.
-
Because law enforcement investigations target specific groups or individuals known to operate in certain areas, change your MO (method of operation or modus operandi) regularly. Consider the physical evidence left at a scene and generally used to determine patterns. If shoe prints are left at the scene, buy different shoes at a different discount outlet, in different sizes, and consciously lengthen or shorten your stride when leaving obvious footprints. If you use spray paint, switch brands and colors. If you spray warnings or slogans, have a different member of your group do it, switch from upper to lower case letters, use your weak hand to vary the appearance. If you identify your actions with a group name, change the name. If you send written communiqués, have a different group member write them (forensic analysts study the style of writing looking for similarities in tone, grammar, and word usage to determine if two documents might have been written by the same person). If you’ve been sabotaging heavy equipment in a certain way, switch to a different method.
Most importantly, changes designed to throw off investigators must be thorough. Change everything on a specific date and be careful not to lapse back into old methods or materials. Pay attention to detail, as you can be sure investigators will. If you change everything but your shoes, leaving the same old footprints, all your efforts will be wasted. The illusion of more than one group working in an area will dilute the effectiveness of the law enforcement response. -
Injuries caused by carelessness, fatigue, lack of proficiency, or any other reason can endanger the whole group. If the injury is serious enough to require the care of a doctor or hospital, you might have to explain to the doctor and maybe to police. All team members must understand and agree on a course of action to be followed should an injury occur during a field operation. Preparation prevents confusion.
-
Ecodefenders who wear glasses should use a head strap or keeper to prevent loss or breakage of glasses. Beware of light reflected from glasses and goggles.
-
Monkeywrenchers should not smoke prior to or during work. Use of alcohol and/or illegal drugs before, during, or after work is very hazardous. Avoid contact with known drug users or dealers. Do not carry even minute traces of drugs. Current federal law is very harsh and the combination of monkey-wrenching and drug possession would send you up the river for a very long time.
-
Some of the people who plant crops of marijuana on public lands are cautious, suspicious, and dangerous. They use trip wires, explosives, booby traps, guns, guard dogs, punji sticks, and other surprises to protect their crop and themselves from thieves and law enforcement officers. So that you do not mistakenly “trespass” on their plantations, do a careful daylight recon of the area. Pot growers sometimes put up “No Trespassing” signs near their farms. Watch out for strike forces of law enforcement and Forest Service officers as they conduct observations and raids on marijuana growers. Helicopters are often used to locate pot farms and to transport these strike forces. You may be sure these officers are more than happy to go after any ecodefenders they chance upon.
-
If you notice more (or less) law enforcement activity in an area, postpone your job. Do not blunder into a search and rescue operation, or a police, military, or national guard operation or training exercise.
-
When moving as a group, have one or more persons out front On Point as far forward as you can see. A point with a VOX radio may be the ideal entry and exit formation.
-
Drivers must not give police any probable cause to stop them. In some cases, however, just being in an area may constitute enough probable cause.
-
Avoid the appearance that your team is more than just casual friends. Avoid looking like a standing group of friends or an exclusive club.
-
Do not conduct planning, practice, or training sessions where you could be noticed or observed.
-
After an operation, debrief and evaluate. Discuss what worked well, what needs improvement and how this improvement should be initiated, group and individual errors and corrections, how to improve the planning for the next job. This meeting should be private and secure but should not draw the suspicion of neighbors, casual observers, or even family.
Epilogue: Marine Monkeywrenching
By Gray Wolf & Hummingbird
Over 70 percent of the surface of this planet is covered by oceans. Some biologists estimate that 90 percent of Earth’s living biomass is in the oceans, and that 90 percent of photosynthesis occurs in the oceans. The tropical forests may be the reservoirs of land-based biodiversity, but the oceans are the lungs, or air filters, of this planet.
The assault on the biological integrity of the seas is being waged on many fronts, by many financial buccaneers. Prominent among these ecological corsairs of the high seas are whalers, drift-netters, and toxic-dumping ships. This final section of Ecodefense offers clear directions for sending these outlaw ships to Davy Jones’ locker.
The oceans of the world are a frontier beyond the reach of the laws of most nation states. Within the realm of this non-territorial zone there is no legal jurisdiction other than a confusing and conflicting quagmire of international treaties and regulations. Into this lawless territory it is possible for the intrepid defender of marine ecosystems to move and operate in a guarded but overt manner. However, it must be remembered that although the laws over this Neptunian realm are vague, one law still reigns supreme, it is the law of force, where might makes right.
The first group to grasp the full import of this situation was a unique organization called the Sea Shepherd Conservation Society, which has been involved in numerous confrontations on the high seas since the 1970s. Sea Shepherd has gone up against pirate whalers, outlaw fishing operations, polluters, and the armed might of navies. These battles have from time to time found their way into the courts of some nations but, in every case, the Shepherds have managed to utilize strategies that have prevailed both on the high seas and in the courts. Most of the following advice and instruction is derived from their expertise in the field.
Sea Shepherd’s rationale for its actions has been that, as individuals, its members are legally empowered to intervene in protecting marine environments. This empowerment is codified in Appendix E of The World Charter for Nature, Section III, Implementation Clause 21 #C & E.
States and, to the extent they are able, other public authorities, international organizations, individuals, groups and corporations shall:
(c) Implement the applicable legal provisions for the conservation of nature and the protection of the environment;
(e) Safeguard and conserve nature In areas beyond national jurisdiction.
In September 1993, Sea Shepherd founder Paul Watson used the World Charter as a legal justification in the Newfoundland Provincial Court to defend himself against felony charges of ordering and forcing Cuban trawlers off the Tail of the Grand Banks in international waters. He admitted that he had indeed done so but that he was legally justified according to the Charter. The jury agreed and Watson was acquitted.
Sea Shepherd operates not as a protest group but as a self-appointed law enforcement organization operating in accordance with the Charter. They enforce laws in situations where traditional law enforcement refuses to operate or chooses to discriminate in the application of regulations, laws, and treaties protecting marine wildlife. Sea Shepherd has also directly attacked operations within the boundaries of nation states when the activities were in violation of international treaties. The global moratorium on commercial whaling that was passed in 1986 by the International Whaling Commission led to Sea Shepherd sinking two illegal whaling ships in Iceland in 1986 and two again, in Norway between 1992 and 1994.
Sinking Whaling Ship
Sea Shepherd takes the position that sinking a whaler is a surefire way of stopping whaling. Even if the ship is refloated, the immersion in salt water will have destroyed most electrical and mechanical systems. Of the seven ships Sea Shepherd has sunk worldwide, only two have been refloated and returned to sea at great expense. In some cases, insurance may cover the whaler’s cost, but only if they have paid war insurance premiums. Since the scuttling at dock of the two Norwegian whalers in 1992 and 1994, the entire Norwegian fleet of 48 whaling vessels must now pay exorbitant premiums and some even post twenty-four hour security guards. Whaling has become a very expensive enterprise. Scuttling ships is not a college prank. It can be deadly serious.
The Marine Eco-Mechanic
If you take a page from Sea Shepherd’s logbook, you will note there are some basics in common to both land and sea ecodefense maneuvers. You must not look conspicuous. Dress in a style that does not attract attention. Pretend to be a tourist if you do not speak the language. A good way to make subtle inquiries is to pose as a tourist returning to the town of his/her ancestors and looking for family roots. Another approach is to work with someone you trust who is from the region. This allows you to remain quiet and not arouse suspicion. When staying at hotels, eating at restaurants, or purchasing tools, do not ask questions about the menu, about room conditions, or do anything other than be a non-memorable faceless person. Always pay with the local currency, don’t use credit cards.
A good marine eco-mechanic should know the way around a ship’s engine room and be able to locate the Achilles’ heel of any ship, the saltwater intake valves. To find them it is most important to have a knowledge of engine room color codes.
International Engine Room Colorcode
| Green | Saltwater pipes and pumps |
| Blue | Fresh water pipes and pumps |
| Brown | Fuel oil pipes and tanks |
| Yellow | Fuel |
| Red | Fire fighting system (salt water) |
The system you will be looking for is the salt water intake system, which supplies salt water for cooling and to the fire systems. The valve you are looking for is the salt water intake valve. The valve is painted green and usually located beneath the deck plates. It can be found by following the green pipes back and down to a large valve that connects the intake pipe to the pipe which supplies the system. It should be easy to find a pipe (or three) going straight into and through the hull, below the water level. There will also be a valve somewhere close to where this pipe meets the hull.
Tools
No guns, limpet mines, or explosives. Using explosives could only risk life and would definitely be very counterproductive with the media. If you get caught with explosives you can expect to do long time. Any eco-warrior of passion and courage can kill whaling ships, driftnetters, and toxic dumping ships with a few easily acquired tools. Before undertaking monkeywrenching of this magnitude, study all of the techniques in Ecodefense.
Buy or secure your tools in the country where your target is moored. Use cash and buy one tool at one store in one town, the next at another store in another town. If you have the time to look, some of the tools will be found on the target vessel itself. A fire ax will always be found on board any ship.
Tool List
-
Spare clothes, money, ID, shoes, in waterproof bag
-
Large pipe wrench (place a rag between the jaws and close, to silence!)
-
Large crescent wrench (2 of these! Silenced, as above)
-
Large pry bar or folding ax or shovel
-
Flashlight (Headset Lamp is best; with blue — not red light filter, and small backup light that you can hold in your mouth if necessary)
-
Leather Gloves — not rubber, or thin diving, batting, or golf gloves
-
Duct Tape
-
Ax — use onboard ship’s ax
-
Wire cutters — insulated
-
10–20 ft. light, strong rope
-
Compass — and knowledge of using one
-
Extra Batteries for Everything — do it, or Mr. Murphy will fall upon you.
It is always a good idea to wrap your tools with electrical tape prior to boarding. This way they won’t reflect light, and if dropped, they are a lot more quiet. In a pinch you can always just spray paint them black or dark gray.
Keep additional/extra rags in tool bag to silence any clanking along the way.
Optional Equipment
-
Wet Suit, flippers, mask, and snorkel
-
Rebreather or scuba tanks
-
Rope with small grapple — silence with electrical tape
-
Small Float Bag — waterproof
-
Two-way radios — preferably with headset, ear piece, signal/transmission light
-
Small basic First-Aid kit
-
Small set of bolt cutters
Step One: Recon. You must know your target. Where does it moor? Who owns the ship? How far is the nearest occupied structure? Is there a premise alarm? Many questions can be answered by referring to international shipping registers. A recon team of local or native speaking individuals is best, however. This team should make subtle inquiries and observations from a week to a month before the ship is boarded. The recon team should not include the eco-mechanic unless the operation involves a solitary operator. Observation should determine if the ship is manned or unmanned, is being watched by security, or has a surveillance or alarm system installed.
Step Two: The approach. It is best to approach from the water as a diver or swimmer or by a small boat. Carry your tools suspended from a float bag. Board at the stern end between the ship and the berth. Use a small grapple to attach a rope on which you can climb up onto the deck. A water retreat is also the most secure way of leaving the boat and offers the most options. If an approach must be taken from land, make it fast and try not to leave footprints in the snow or mud.
It is best to have a member of the team on shore in a position to observe the ship. Equipped with a radio, this person would be able to notify the eco-mechanic of any approach by unwelcome people.
Step Three: If there is time, open any air vents on deck. (And once inside the engine room, be careful of shining unfiltered light up or near vent openings.) Opening these vents will facilitate the exit of air from the engine room in the same way that venting a water jug (or a beer!) at one end will allow free outflow of the liquid contents.
Step Four: Locate and gain access to the engine room. If the door is locked, use your prybar to break in. Access can be made through a bridge window by duct-taping the window and then smashing it with your pry bar or wrench. The duct tape should diminish the sound of breaking glass. Use the blue filter on the flashlight to avoid lights flickering through the port holes. Check the ship to ensure that there is no one sleeping on board. You do not want to scuttle a ship with people on board. Once inside the engine room, descend to the bottom of the engine space, remove the filter from your flashlight, and trace the green salt water cooling pipes.
Step Five: Locate the intake valve. You should be able to trace the green pipes to the salt water intake valve. A few ships, especially in very cold northern waters, will have keel cooling systems. They still must have access to salt water for the fire system. In this case, trace the red pipes to the intake valve.
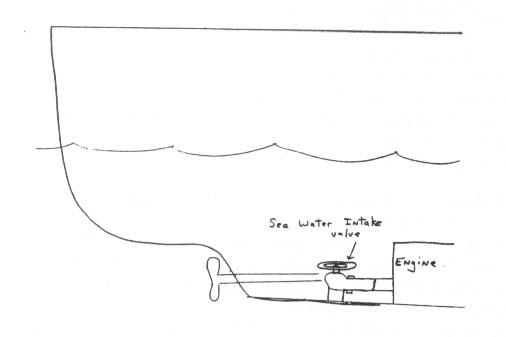
Third edition, third printing 2002: All large ocean-going ships have salt water intake valves and piping. These ships need salt water for deck cleansing, fire fighting, and for cooling their massive diesel engines. There are no air-cooled diesel engines out at sea. Usually, the coolant radiator from the diesel engine is bathed in a steady stream of cool sea water. The best way to find the sea water intake valve is to follow the piping. Ocean-going ships typically have four or five different types of plumbing -- for fresh water, salt water, fuel oil, engine oil, and hydraulic fluid. The salt water pipes are generally the thickest. The sea water intake valve is almost always located in the engine room. Keep following the pipes to the thickest one that appears to be attached to the side or the bottom of the ship. Here is where the sea water enters the ship.
Ships with keel-cooling systems are exceptions. Keel-cooling ships pump their engine coolant directly into cooling pipes attached to the keel (outside) of the ship. They do not use internal heat exchange with salt water. These ships typically stay in colder waters. Norwegian whalers use keel-cooling systems. They still need sea water for deck cleaning and fire fighting, however, so they do have salt water intake systems. Their sea water intakes are not as large, but they are plenty big for scuttling. The Norwegian pirate whaling ship, the Nybrena. which we sank on December 27, 1992, had a keel-cooling system.
Step Six: Close the sea water intake valve. If the intake valve is open and you are in a real hurry, strike the green cooling pipes with an ax to flood the engine room. This creates a lot of noise and is less efficient but, in a pinch, will get the job done. Saltwater pipes tend to be more brittle than fresh water pipes. If you can breach the pipe and the sea valve is open, you will bring in the briny sea.
A more efficient way is to take the time to close the valve to remove the pressure to the pipes. Turn the wheel clockwise to close the valve. Give it a little extra pull shut with your wrench or a valve wrench if one is available.
Third edition, third printing 2002: You need to close this so that you can cut off the pressure to the piping. If the ship is in dock for any amount of time, they should have closed the valve already. But we have boarded ships and found the valve left open. We have had to shut the valve, do our work, and then reopen the valve to sink the ship.
Step Seven: Remove the retaining nut on the valve wheel. You still need to reopen the valve but you need to remove the valve wheel quickly once you do so. You can remove it completely using your wrench, but the wheel is more efficient so leave it on for now. Check and make sure that it can be easily removed.
To further damage engine room and other wiring, cut the wiring to the engine, bridge, and generators (in ceiling and behind panels) discretely, in case scuttling is discovered. Small bolt cutters will cut larger wires very efficiently. Open oil filler caps & radiators for salt water access to the engine’s “guts”.
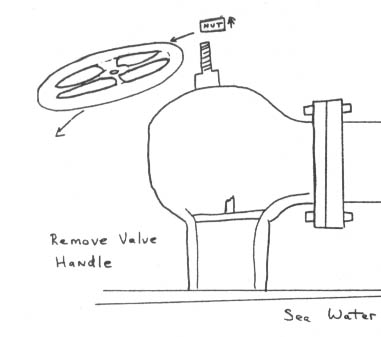
Third edition, third printing 2002: We take the handle off so that if they find the ship in the process of sinking, they cannot easily shut off the valve. The valve handle may look either like a steering wheel or a lever type handle. Remove the retaining nut holding the handle on, then pull the handle off. Hide the handle somewhere away from the valve stem. That leaves just the valve stem protruding outward from the valve.
Step Eight: Disconnect the piping from the valve. Remove nuts and bolts connecting the pipe from the intake valve. You may need to use both wrenches, one to hold the nut and the other to turn the bolt. It is best to remove a section of pipe if you can, which means removing nuts and bolts where the pipe connects to the next section. If the pipe section is heavy, you may not be able to support the loose end while you disconnect the other end. Rope can be used to hold it in place while you are working on it, so it won’t fall crashing to the floor. You don’t want a loud noise attracting uninvited attention to your little party.
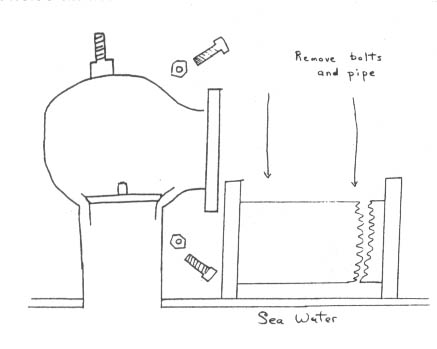
Third edition, third printing 2002: Now that you have closed the valve, you have removed the water pressure from the system and you can work more easily. Use your pipe wrench, crescent wrench, and vise grips to remove the pipe or plating near the intake valve. The larger the pipe you remove, the better. You will have to improvise here. Study the pipe and find one that you can take off. Be prepared for spraying water when you are taking the bolts off. This is water already in the system which you are now bleeding out. It will stop draining shortly.
Do not just loosen the pipe. Take all the bolts off and remove it. Carry the pipe away from where you disconnected it. You are getting close.
Step Nine: If there is time, look in the bilge for the bilge pump. It will probably have a float of some kind, not unlike the float in your toilet. However, this float will activate the ship’s bilge pump when it reaches a certain level and not shut off until it is much lower. It has been verified firsthand that some Norwegian whale-killers have these automatic pumps on board. If you are in a time-sensitive situation, at least disconnect the engine room batteries and cut off leads.
Third edition, third printing 2002: Gather everything that you brought aboard. Everything. You want to be ready to make a quick exit.
Step Ten: Open the valve. Stand behind the intake opening and open the valve. Immediately water will begin spraying into the engine room under great pressure. You will get wet. Open the valve wide. After the valve is fully open, remove the wheel and toss it as far away as possible. The water will now be roaring into the engine room. The noise will last until the area is submerged, which should take from five to ten minutes.
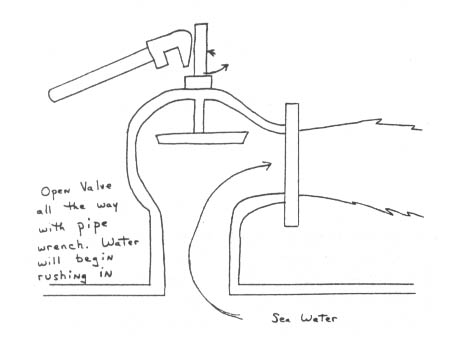
With your wrench, bash and bend the valve stem so that it will not be possible to close the valve.
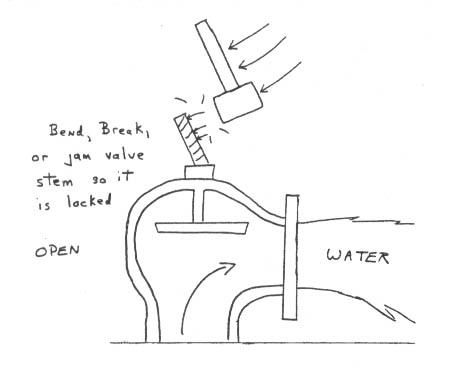
Third edition, third printing 2002: This is the moment you have been waiting for. Put your pipe wrench on the valve stem and open the valve.
Salt water should begin spraying all over the place. Keep turning the valve stem until the valve is wide open. (The ship has now hit the fan!) Then lean on the pipe wrench and push it as hard as you can. Try to break the valve while it is locked wide open, so that no one will be able to close it before the boat sinks.
(This is the "high pucker factor" part of the action. Don't be surprised at this point if your arse, of its own volition, bites five kilos of metal right out of the scaffolding you are sitting on.)
Hit it hard with the pipe wrench to try to bend it out of "true" and further lock the valve wide open. While you are doing this, the engine room will be flooding all around you. Stay calm and just do it.
Step Eleven: Spraying fire extinguishers. While onboard , locate two or three of the small “ABC” fire extinguishers. ABC’s are very corrosive to electrical equipment, especially electronics, wiring, instruments, and gauges. Take the ABC’s to the bridge and engine room. Shake them first, then spray on radios and gyros, into electrical outlets, junction boxes, power panels, etc. Now, even if the ship is saved prior to a complete scuttling, you can sleep soundly knowing that you have cost the whalers a lot of money and firmly glued Murphy (and his Law) to the ship for a long time.
Step Twelve: Retreat. Take your time. Don’t rush and risk falling and hurting yourself. Leave your tools behind. If possible, padlock the engine room door shut after you leave. This will buy the sea more time to sink the ship if the sabotage is discovered right away. To save the ship, high-volume pumps must be deployed into the engine room before it sinks. Every minute of delay is crucial to prevent the saving of the ship. For good measure, to deter any ship savers who might show up, you can empty a tear gas or CS/pepper spray canister into the engine room as you exit. (Save a last blast to coat the door knob.) It is a serious crime to take tear gas on a commercial airplane. Don’t do it. [Editors’ Note: See the objections to the use of tear gas elsewhere in Ecodefense (pages 314 and 322, for example). Many ecodefenders believe that pepper sprays are just as effective and much safer (see page 318).]
Third edition, third printing 2002: Take Everything You Brought With You Out Of The Engine Room. Leave no material evidence.
If you have a tear gas canister, just before you step out of the engine room door, open the canister and set it up high someplace. Do not throw the tear gas into the incoming salt water - it will considerably reduce its effectiveness. Just trigger the canister and set it near the door. Needless to say, you should shut your eyes and hold your breath while you do this. Or put on a gas mask. Then quickly shut the engine room door.
Put A Heavy-Duty, Long-Handled Lock On Both The Engine Room And The Main Entrance Doors. We may have broken their locks while entering their ship, so we feel it is only proper that we should replace their damaged property. We're not scoundrels. We also feel it to be rather improbable that their keys would fit our locks.
If they discover their ship is sinking, they will try to board and pump it out. We use the locks and tear gas to buy time. When a ship gets full enough of water, it hits a critical mass and cannot be rescued. The tear gas and locks help get the ship to that point.
Locks must have a long locking loop on them. These doors are made of thick metal and the locking arm of the lock will have to travel through thick metal before it can catch.
Ditch The Tools Overboard. Ease them into the water with a rope on the bag. Do not throw them in; someone could hear the splash of a thirty-kilo bag hitting the water.
Step Thirteen: Leave the Country: It will take hours to determine if sabotage was responsible and further hours to organize a search for a suspect. Do not speed away. Travel at normal speeds. Do not attract attention to yourself. Put on clean clothes. Dress like a tourist or a businessman. It is helpful if you know train, bus, or airplane schedules in advance of your retreat. You should take ground transportation which leaves no trail, away from the area, out of the country and far away. If you simply grab the first plane out, your name can be easily pulled up later from passenger lists. Consider a short (three to four day) well-deserved vacation before flying back or using other traceable transport.
Third edition, third printing 2002: You have two basic choices: Either go underground at a safe house, or immediately leave the country. Our experience is that it is best to leave. It may take them twelve hours to figure out that someone has sabotaged them. By then, you can be long gone.
As soon as you are safely away from the ship, take off and dispose of everything that you have worn onto the ship, including your shoes. Remember that your rubber gloves will have a perfect set of your fingerprints inside. If possible, melt them; otherwise, dispose of them securely. Then wash yourself. Remove all of the diesel fuel and salt water. Put on clean clothes. Look like a tourist or businessperson - don't look like an anarchist.
Assuming you have not used explosives or violence against people, it will be difficult for the site country to extradite you, but they may try. Each case is different. In the past, countries have not even tried because of the potential embarrassment of a media trial. They want to keep their eco-crimes quiet. It is your personal choice whether you want to further embarrass the country where you did your scuttling by participating in such a trial. Some scuttlers have turned themselves in after the fact. Others have not. Some dream of becoming the “serial scuttler.”
Secondary Sabotage Techniques
If you have not had an opportunity to scout out your target, you can still damage a whaling ship. Perhaps you stumbled on an illegal whaler or other ecologically destructive ship in the course of your vacation. You don’t have the tools to do the big thing. Well, not to worry. With a good sharp knife, you can cause a bit of aggravation. Make sure no one is looking and it’s late at night, then return to the ship, and cut all the mooring lines. This is best done on a stormy or windy night when the wind is blowing away from the mooring. You won’t sink the ship but will cause some serious problems and, if you are lucky, the ship will go aground.
You can destroy or disconnect shore power to the ship. This will cause the ship batteries to drain and cold storage cargo to thaw. You can also contaminate fuel or oil by adding glycerin, salt, water, sand, beer, etc. through filter pipes or fuel tank vents. Pour fluids, sand, small rocks, (quick setting concrete?), down exhaust piping of main engines or generators. If it is raining or snowing, you can prop open or remove the “caps” on the top of these pipes. This will allow Mother Nature the opportunity to piss down inside the engines and thus avenge herself.
Infiltration
Get a job on a fishing vessel, whaler, sealer, oil tanker, etc. (Don’t use your real name and address. Revenge is a bitch.) As a crew member, you will have plenty of opportunities to practice subtle sabotage. Subtle sabotage includes cutting electrical wires, pouring destructive chemicals or materials into engines, pumping sea water into fuel or lube oil pipes, cutting lube oil systems, directing salt-water into fresh water cooling systems... the possibilities are endless. Or perhaps you might want to simply bring on board a small concealable video or still camera to collect documentation on illegal and unethical activity by your employers.
Sea Shepherd’s Captain Watson relates that when he served as a seaman with the Norwegian and Swedish merchant marine in the late sixties and early seventies, he was responsible for informing the U.S. Coast Guard about the dumping of trash and oil in U.S. waters. This led to significant fines against his unsuspecting employers.
Ramming Ships
The physics of ramming a ship are simple. Seven hundred tons of ship colliding with seven hundred tons of ship creates incredible force, most of which is absorbed by the great volume of metal involved. It’s not like a car accident. You must simply ensure that there is no person standing on deck at the point of impact and that you do not strike the ship in an accommodation or work space. The storage hold is the point to aim for unless you are just giving the ship an intimidating blow to the stern. The blow should not be enough to breach the hull but enough of a nudge to be noticed. When ramming outlaw drift-netters, the objective is to destroy the net-retrieving power blocks. This is done by coming from behind at a slight angle, and then striking the ship where the power block is situated on the side of the hull, thus making the power block inoperable.
If your objective is maximum damage or sinking, then strike with your bow with as much force as possible at the midship area. The bow is the strongest part of a ship’s hull and the midship area is the weakest. Sea Shepherd likes to reinforce the bow with twenty or thirty tons of concrete and gravel. Watson relates that when he rammed the pirate whaler Sierra in 1979, he “hit her midship section at full speed at just a slight angle. The angle prevented me from becoming stuck in the whaler and allowed me to disentangle myself.”
Destruction of Drift Nets
Drift nets are panels of monofilament fish netting laid down by a drift-netter. One drift net can range from three miles to over sixty miles in length. To confiscate nets, you have to have a very expensive power block. A simple alternative is to attach a weight of a few hundred pounds to a section of the net. If you can sink part of the net, you will sink the whole net.
A forty-mile-long net can be sunk completely in two miles of ocean. The reason for this is that the styrofoam floats on the nets compress at sixty fathoms, losing their buoyancy and increasing the weight of the sinking net. A physicist has determined that as the net descends into the depths, it spirals and tangles along its length. Upon reaching the bottom, the destructive web of monofilament is pulled into a tight monofilament rope. It will not biodegrade but it will be quickly buried in the muck and debris on the ocean floor.
One great advantage of sinking a drift net is that you can attach the weight to the net miles away from the vessel deploying it. Long lines can be sunk in a similar manner.
Engaging Naval Forces on the High Seas
“Over the course of my organization’s history,” Watson recounts, “I have had occasion to confront the naval forces of Norway, Canada, Portugal, Mexico, and the Soviet Union. We have been rammed ourselves twice, fired at, and depth charged. On every occasion we have survived the encounter by refusing to comply. This is not a game of poker. Before you leave port, every crew member understands the risk and that if there is a confrontation we will not back down. It is very difficult to board a moving vessel and as long as the ship is moving, it is possible to escape. One important point is to never carry firearms, legal or otherwise when confronting governments. Possession of firearms can instigate a “justifiable’ attack.”
Anti-Boarding Deterrents
Sea Shepherd favors several techniques in this area. Boarding a moving ship is difficult enough, but the difficulty can be greatly increased by utilizing a pie-filling gun. This is a water monitor or water cannon hooked up to a hose, which, when dropped into a barrel of pie filling (obtainable as surplus from the U.S. Department of Agriculture), can send 45 gallons of chocolate or Boston Cream with moderate force, thus “sliming” your attackers and causing an embarrassed retreat.
The deck of a ship can be cleared with a glass vial of butyric acid, the foulest smelling substance known with the possible exception of Pseudocorpse, which is used to train police dogs to find dead human bodies.
Delivery of butyric acid can be made from remote-controlled small model airplanes by the intrepid eco-defender who wishes to command an eco-defense aircraft carrier. Model airplanes are also very useful for crashing into ship’s radar and radio equipment.
The Eco-Navy
Sea Shepherd is a believer in the necessity for ecodefense tactics and a good sense of humor in international law enforcement. Since 1977, they have commanded six ships. In 1994, they acquired a submarine. A spokesperson for the Canadian Navy told the media that he thought it was ridiculous that a conservation group had a submarine and that, in his opinion, they did not have the skills to deploy it.
“I was forced to embarrass the Canadian Navy” Watson recalls, “by responding that since World War II, my organization had sunk more ships, boarded more ships, and rammed more ships than the Canadian Navy, and that I didn’t think the Canadian Navy had the expertise or the experience to presume to pass judgment on our abilities.”
Maritime monkeywrenchers as well as terrestrial monkeywrenchers should remember what anthropologist Margaret Mead once said, “never depend on government or institutions to create change. All significant social change in human history was accomplished by individual action.”
The oceans of the world are in desperate times, but hope can be found in those who can, and dare, to act.